初识Mybatis源码笔记(一):openSession
MyBatis是一款优秀的支持自定义SQL查询、存储过程和高级映射的持久层框架,消除了几乎多有的JDBC代码和参数的手动设置和结果集的检索。MyBatis可以使用XML和注解进行配置和映射,MyBatis通过将参数映射到配置的SQL形成最终执行的SQL语句,最后将执行SQL的结果映射成Java对象返回。
一、创建Maven项目
<dependency>
    <groupId>org.mybatis</groupId>
    <artifactId>mybatis</artifactId>
    <version>3.4.2</version>
</dependency>

<dependency>
    <groupId>org.projectlombok</groupId>
    <artifactId>lombok</artifactId>
    <version>1.16.6</version>
</dependency>

<!-- https://mvnrepository.com/artifact/mysql/mysql-connector-java -->
<dependency>
    <groupId>mysql</groupId>
    <artifactId>mysql-connector-java</artifactId>
    <version>6.0.6</version>
</dependency>
这里由于只是学习源码用,所以不用引入太多依赖。其中除了引入Mybatis必须的依赖以外。还引入了lombok插件,lombok除了引用依赖外,需要在下载Lombok插件,然后就可以通过在JavaBean上加上@Data注解,省略掉繁杂的Getter and Setter。
二、配置Mybatis
配置MyBatis的方式有多种,最常见的是使用XML形式进行配置,当然,与Spring进行整合的时候,也可以使用Spring Bean的方式进行配置,另外还可以通过Java编码方式进行配置,但是这种方式不常用,这里仅仅使用XML形式配置MyBatis。
在项目的src/main/resources文件夹下面创建mybatis-config.xml配置文件,具体配置的内容如下:
<?xml version="1.0" encoding="UTF-8" ?>
<!DOCTYPE configuration
        PUBLIC "-//mybatis.org//DTD Config 3.0//EN"
        "http://mybatis.org/dtd/mybatis-3-config.dtd">
<configuration>
    <settings>
        <setting name="logImpl" value="SLF4J"/>
        <!--<setting name="cacheEnabled" value="true" />-->
    </settings>
    <environments default="development">
        <environment id="development">
            <transactionManager type="JDBC"/>
            <dataSource type="POOLED">
                <property name="driver" value="com.mysql.cj.jdbc.Driver"/>
                <property name="url" value="jdbc:mysql://localhost:3306/gp?useUnicode=true&characterEncoding=utf-8&useSSL=false&useJDBCCompliantTimezoneShift=true&useLegacyDatetimeCode=false&serverTimezone=UTC"/>
                <property name="username" value="root"/>
                <property name="password" value="123456"/>
            </dataSource>
        </environment>
    </environments>
    <mappers>
        <mapper resource="xml/TestMapper.xml"/>
        <mapper resource="xml/PostsMapper.xml"/>
    </mappers>
</configuration>
三、创建实体类和Mapper.xml文件
package com.gupaoedu.mybatis.beans;

import lombok.Data;

@Data		//通过这个注解可以省略get、set方法
public class Test {
    private Integer id;

    private Integer nums;

    private String name;
}
<?xml version="1.0" encoding="UTF-8"?>
<!DOCTYPE mapper PUBLIC "-//mybatis.org//DTD Mapper 3.0//EN" "http://mybatis.org/dtd/mybatis-3-mapper.dtd">
<mapper namespace="com.gupaoedu.mybatis.mapper.TestMapper">
  <resultMap id="BaseResultMap" type="com.gupaoedu.mybatis.beans.Test">
    <id column="id" jdbcType="INTEGER" property="id" />
    <result column="nums" jdbcType="INTEGER" property="nums" />
    <result column="name" jdbcType="VARCHAR" property="name" />
  </resultMap>

  <select id="selectByPrimaryKey" parameterType="java.lang.Integer" resultMap="BaseResultMap">
    select
    <include refid="Base_Column_List" />
    from test
    where id = #{id,jdbcType=INTEGER}
  </select>
</mapper>
四、正式开始进入源码学习
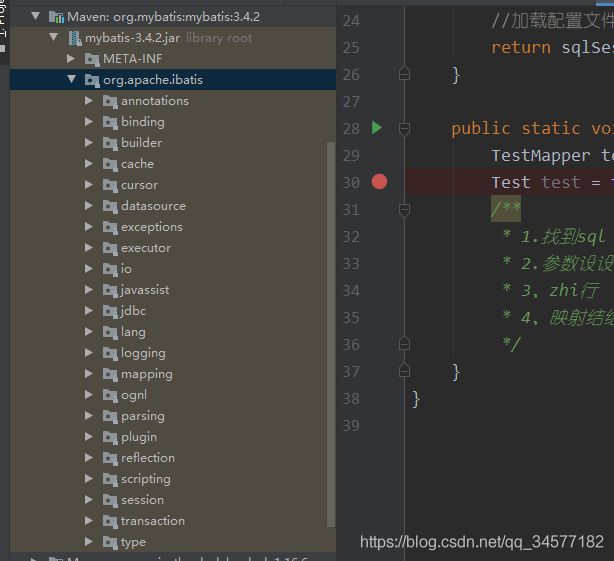
首先学习源码,先对Mybatis框架有一个概览,找到Mybatis的jar包,对目录结构有一个大体的了解。

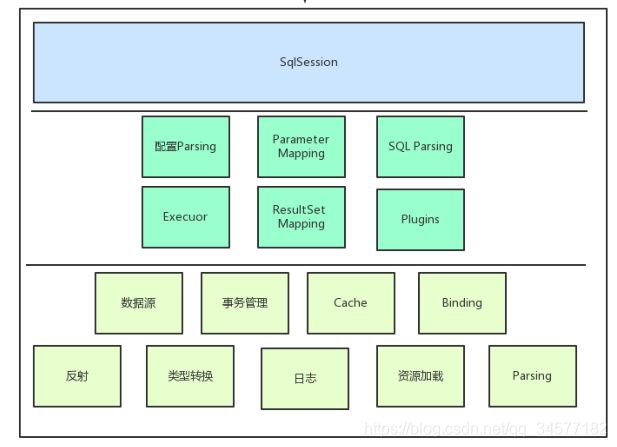
根据目录结构,有前辈总结出了一张大体的架构图,我这里借用一下。

为了方便调试,写一个Demo:
public class Demo {
    public static SqlSession getSqlSession() throws FileNotFoundException {
        //配置文件
        InputStream configFile = new FileInputStream("配置文件mybatis-config.xml的路径");
        SqlSessionFactory sqlSessionFactory = new SqlSessionFactoryBuilder().build(configFile);
        //加载配置文件得到SqlSessionFactory
        return sqlSessionFactory.openSession();
    }

    public static void main(String[] args) throws FileNotFoundException {
        TestMapper testMapper = getSqlSession().getMapper(TestMapper.class);
        Test test = testMapper.selectByPrimaryKey(1);
    }
}
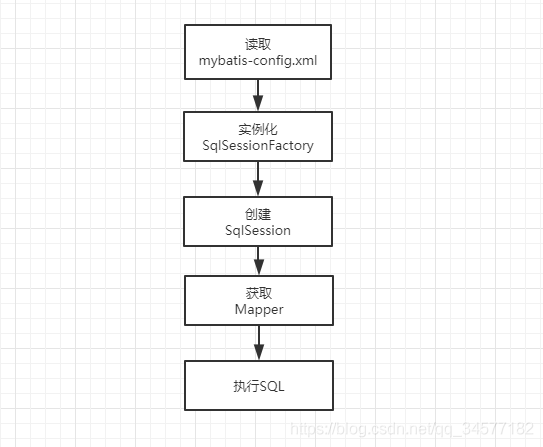
流程如下:

平时工作中,因为整合了Spring,从读取mybatis-config.xml文件到获取Mapper中间的步骤都由Spring来帮我们完成了,所以看不到这么一个流程。而我们单独使用Mybatis的时候,执行一条Sql的整个流程便如上图所示,我们首先是创建SqlSessionFactory,这其中需要使用配置信息。然后从SqlSessionFactory获取SqlSession,再从SqlSession中获取Mapper。这是我们最上层的流程。那这这几步操作中,内部操作了什么呢?

public SqlSessionFactory build(Reader reader, String environment, Properties properties) {
    try {
      XMLConfigBuilder parser = new XMLConfigBuilder(reader, environment, properties);
      return build(parser.parse());
    } catch (Exception e) {
      throw ExceptionFactory.wrapException("Error building SqlSession.", e);
    } finally {
      ErrorContext.instance().reset();
      try {
        reader.close();
      } catch (IOException e) {
        // Intentionally ignore. Prefer previous error.
      }
    }
  }

public SqlSessionFactory build(InputStream inputStream, String environment, Properties properties) {
    try {
      XMLConfigBuilder parser = new XMLConfigBuilder(inputStream, environment, properties);
      return build(parser.parse());
    } catch (Exception e) {
      throw ExceptionFactory.wrapException("Error building SqlSession.", e);
    } finally {
      ErrorContext.instance().reset();
      try {
        inputStream.close();
      } catch (IOException e) {
        // Intentionally ignore. Prefer previous error.
      }
    }
  }

public SqlSessionFactory build(Configuration config) {
    return new DefaultSqlSessionFactory(config);
  }
阅读SqlSessionFactoryBuilder会发现,里面全是各种build方法。但是不管走哪种重载的build方法,都会调用到上面这两个build方法。然后最终都会调用build(Configuration config)来创建一个DefaultSqlSessionFactory。
XMLConfigBuilder parser = new XMLConfigBuilder(inputStream, environment, properties);
至于以上这一步干了什么,其实就是解析了mybatis-config.xml配置文件,拿到xml文件里面的配置,传给build(Configuration config);再通过DefaultSqlSessionFactory的构造方法,赋值给DefaultSqlSessionFactory的成员变量:

至于具体是怎么做的,后续有时间再点进去看看。
拿到SqlSessionFactory以后,我们下一步当然就是创建传说中的SqlSession了


然后我们就进到了,刚刚build方法创建出来的DefaultSqlSessionFactory,其中成员变量Configuration也就是刚刚说到的解析xml配置文件传过来的配置信息,也可以看到它是被final修饰的,不允许修改。然后Mybatis通过openSession方法来创建SQLSession,我们F7进去看一下。

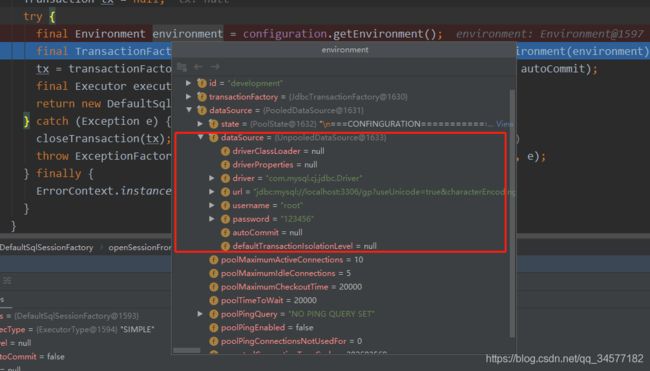
那走进这个方法之后,又是在干些什么呢?看看environment就大致能猜出来了。

这不就是我们配置的数据源和一些默认的配置信息么,然后根据这些配置信息,拿到事务工厂TransactionFactory,再用TransactionFactory创建事务newTransaction,然后根据事务和ExecutorType创建Executor。
final Executor executor = configuration.newExecutor(tx, execType);
其中这个Executor也是Mybatis的一个核心,后续文章会说到。最后根据configuration、executor和autoCommit,构造出一个DefaultSqlSession返回,这个就是我们用到的Sqlsession了。
public DefaultSqlSession(Configuration configuration, Executor executor, boolean autoCommit) {
    this.configuration = configuration;		//配置信息
    this.executor = executor;				//执行器
    this.dirty = false;						//脏的 如果为false  证明他是干净的  就可以认为他是和数据库中的数据是一致的
    this.autoCommit = autoCommit;			//事务是否自动提交
  }
所以openSession就是对DefaultSqlSession初始化并赋值的一个过程,然后再将赋值完成的DefaultSqlSession返回,我们拿到返回的Sqlsession后就可以进行后续操作了。
接下来就是通过Sqlsession来获取Mapper,然后找到并执行SQL语句了,因为是个人笔记,所以不想一篇文章的篇幅太长,所以这些会在下一篇文章中讲到。下一篇文章中会讲到Mybatis中的一些设计模式,感兴趣的朋友可以继续关注一下。
该文章为个人学习笔记,希望可以帮助到大家,有写的不对的地方,也欢迎斧正。