OpenStack集成OpenDaylight环境详解(四)- All In One集成环境部署
目录
1.环境说明
2.集成步骤
3.验证环境
4.构建网络拓扑
5.注意事项
1.环境说明
系统:ubuntu16.04 LTS
openstack版本:queen
opendaylight版本:release/oxygen-sr3
2.集成步骤
(1)主机提前准备安装好git等基本配置
宿主机ip:192.168.0.10(eth0,只有一块网卡)
(2)pip源地址也换为国内的豆瓣源
安装pip
$ sudo apt-get install python-pip -y
创建pip配置文件&设置pip源:
$ mkdir ~/.pip
$ vim ~/.pip/pip.conf
输入以下内容,没有配置文件可以创建:
[global]
index-url = http://pypi.douban.com/simple/
trusted-host = pypi.douban.com
(3)下载devstack
创建stack用户
$ sudo useradd -s /bin/bash -d /opt/stack -m stack
设置权限
$ echo "stack ALL=(ALL) NOPASSWD: ALL" | sudo tee /etc/sudoers.d/stack
下载源码
$ sudo su - stack
$ git clone https://git.openstack.org/openstack-dev/devstack -b stable/ocata
设置配置文件
$ cd devstack
$ vim local.conf
local.conf内容如下:
[[local|localrc]]
# This will fetch the latest ODL snapshot
ODL_RELEASE=latest-snapshot
NEUTRON_CREATE_INITIAL_NETWORKS=False
# Default is V2 driver, uncomment below line to use V1
#ODL_V2DRIVER=False
# Default is psuedo-port-binding-controller
#ODL_PORT_BINDING_CONTROLLER=
# Set here which ODL openstack service provider to use
# These are core ODL features
ODL_NETVIRT_KARAF_FEATURE=odl-neutron-service,odl-restconf-all,odl-aaa-authn,odl-dlux-core,odl-mdsal-apidocs
# Set DLUX Karaf features needed for the ODL GUI at http://
:8181/index.html ODL_NETVIRT_KARAF_FEATURE+=,odl-dluxapps-nodes,odl-dluxapps-topology,odl-dluxapps-yangui,odl-dluxapps-yangvisualizer
# Set L2 Karaf features needed for the ODL GUI at http://
:8181/index.html ODL_NETVIRT_KARAF_FEATURE+=,odl-l2switch-switch,odl-l2switch-switch-ui,odl-ovsdb-hwvtepsouthbound-ui,odl-ovsdb-southbound-impl-ui,odl-netvirt-ui
# Set OpenFlow Karaf features needed for the ODL GUI at http://
:8181/index.html ODL_NETVIRT_KARAF_FEATURE+=,odl-openflowplugin-flow-services-ui
# odl-netvirt-openstack is used for new netvirt
ODL_NETVIRT_KARAF_FEATURE+=,odl-netvirt-openstack
# optional feature neutron-logger to log changes of neutron yang models
ODL_NETVIRT_KARAF_FEATURE+=,odl-neutron-logger
# Switch to using the ODL's L3 implementation
ODL_L3=True
# Set Host IP here. It is externally reachable network, set
# below param to use ip from a different network
HOST_IP=$(ip route get 8.8.8.8 | awk '{print $NF; exit}')
# public network connectivity
Q_USE_PUBLIC_VETH=True
Q_PUBLIC_VETH_EX=veth-pub-ex
Q_PUBLIC_VETH_INT=veth-pub-int
ODL_PROVIDER_MAPPINGS=public:${Q_PUBLIC_VETH_INT}
# Enable debug logs for odl ovsdb
ODL_NETVIRT_DEBUG_LOGS=True
#Q_USE_DEBUG_COMMAND=True
DEST=/opt/stack/
# move DATA_DIR outside of DEST to keep DEST a bit cleaner
DATA_DIR=/opt/stack/data
ADMIN_PASSWORD=password
MYSQL_PASSWORD=${ADMIN_PASSWORD}
RABBIT_PASSWORD=${ADMIN_PASSWORD}
SERVICE_PASSWORD=${ADMIN_PASSWORD}
SERVICE_TOKEN=supersecrettoken
enable_service dstat
enable_service g-api
enable_service g-reg
enable_service key
enable_service mysql
enable_service n-api
enable_service n-cond
enable_service n-cpu
enable_service n-crt
enable_service n-novnc
enable_service n-sch
enable_service placement-api
enable_service placement-client
enable_service neutron-dhcp
enable_service neutron-metadata-agent
enable_service neutron-api
enable_service rabbit
enable_service tempest
# These can be enabled if storage is needed to do
# any feature or testing for integration
disable_service c-api
disable_service c-vol
disable_service c-sch
SKIP_EXERCISES=boot_from_volume,bundle,client-env,euca
# Screen console logs will capture service logs.
SYSLOG=False
LOGFILE=/opt/stack/new/devstacklog.txt
VERBOSE=True
FIXED_RANGE=10.1.0.0/20
FLOATING_RANGE=172.24.5.0/24
PUBLIC_NETWORK_GATEWAY=172.24.5.1
FIXED_NETWORK_SIZE=4096
VIRT_DRIVER=libvirt
export OS_NO_CACHE=1
# Additional repositories need to be cloned can be added here.
#LIBS_FROM_GIT=
# Enable MySql Logging
DATABASE_QUERY_LOGGING=Tru
# set this until all testing platforms have libvirt >= 1.2.11
# see bug #1501558
EBTABLES_RACE_FIX=True
enable_plugin networking-odl git://git.openstack.org/openstack/networking-odl
开始安装openstack和opendaylight,运行脚本
$ ./stack
3.验证环境
(1)检查Open vSwitch (virtual layer-2 switch)是否 正在被监听,通过ports 6640and6653端口:
$ sudo ovs-vsctl show | grep '6640\|6653'
(2)检查opendaylight进程正在执行“
$ ps aux | grep opendaylight
(3)检查OVS的配置和接口mapping
$ sudo ovs-vsctl get Open_vSwitch . other_config
输出结果:{local_ip="192.168.0.10", provider_mappings="public:veth-pub-int"}
(4)在neutron的配置文件中查看opendaylight是否是service plugin,path: /etc/neutron/neutron.conf.
$ grep -i odl /etc/neutron/neutron.conf
输出结果:service_plugins = odl-router_v2
(5)查看ml2 的配置文件是否有opendaylight的配置:
path:/etc/neutron/plugins/ml2/ml2_conf.ini
$ grep -i 'opend\|odl\|8087' /etc/neutron/plugins/ml2/ml2_conf.ini
(6)检查neutron-agent是否正常工作
$ neutron agent-list
(7)检查弄否登陆opendaylight命令行环境
$ /opt/stack/opendaylight/distribution-karaf-0.7.0-SNAPSHOT/bin/client
4.构建网络拓扑
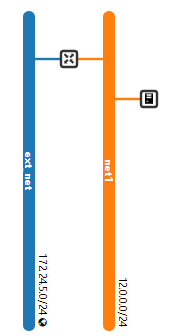
(1)构建网络拓扑如下:
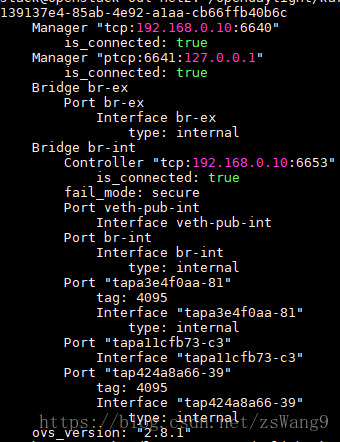
(2)查看ovs
$ sudo ovs-vsctl show
(3)查看br-int网桥上的openflow流表项
$ sudo ovs-ofctl --protocol=OpenFlow13 dump-flows br-int
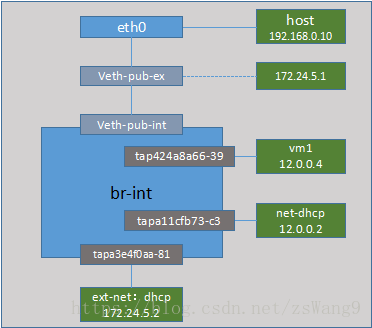
(4)由配置文件或者通过以下命令,可知openstack外网的绑定的网桥是:provider_mappings="public:veth-pub-int"
由于本环境在devstack部署环境下,没有在veth-pub-int和物理网卡之间做地址转换,所以需要手动配置iptables nat规则:
$ sudo iptables -t nat -A POSTROUTING -s 172.24.5.0/24 -o eth0 -j MASQUERADE
PS:172.24.5.0/24:veth-pub-int 的IP地址,eth0为宿主机的物理网卡
(5)网络连接结构:
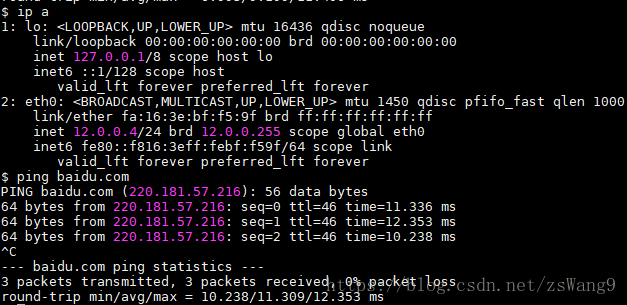
(6)验证虚拟机能够访问外网:
5.注意事项
(1)搭建过程应该不算难,主要是我在搭建过程中走了一些弯路,按照文档来搭建应该不会有问题。
(2)目前有个问题,就是odl现在没有web界面,正常情况下,是可以在ODL中看到拓扑的,但是因为我集成的配置文件,配置的是latest-snapshot,我问了这方面的老师,他说可能是因为这个版本没有将这个显示web feature放进去,可能是这个原因,所以我推荐换一个发布版的版本,如:latest-release。


