OkHttp源码分析
本篇文章将从OkHttp的使用步骤入手逐步去分析Okhttp的源码。
常见使用:
//OkHttpClient的创建
OkHttpClient client = new OkHttpClient();
//Request的创建
Request request = new Request.Builder()
                .url(url)
                .build();
//Response的获取
Response response = client.newCall(request).execute()/enqueue();
OkHttpClient的创建
我们首先构建一个最简单的OkhttpClient, OkHttpClient client = new OkHttpClient();
接下来进入OkHttpClient这个类,看下client的创建过程
  public OkHttpClient() {
    //调用自身的Builder
    this(new Builder());
  }

  //为Builder设置默认值
  public Builder() {
      dispatcher = new Dispatcher();
      protocols = DEFAULT_PROTOCOLS;
      connectionSpecs = DEFAULT_CONNECTION_SPECS;
      eventListenerFactory = EventListener.factory(EventListener.NONE);
      proxySelector = ProxySelector.getDefault();
      cookieJar = CookieJar.NO_COOKIES;
      socketFactory = SocketFactory.getDefault();
      hostnameVerifier = OkHostnameVerifier.INSTANCE;
      certificatePinner = CertificatePinner.DEFAULT;
      proxyAuthenticator = Authenticator.NONE;
      authenticator = Authenticator.NONE;
      connectionPool = new ConnectionPool();
      dns = Dns.SYSTEM;
      followSslRedirects = true;
      followRedirects = true;
      retryOnConnectionFailure = true;
      connectTimeout = 10_000;
      readTimeout = 10_000;
      writeTimeout = 10_000;
      pingInterval = 0;
    }
我们可以看到,OkHttp类中运用了建造者模式,如果我们没通过Builder去创建OkhttpClient的话,它会为builder设置上默认值,如果有相应的要求可以在创建的时候调用其Builder去自定义我们的OkhttpClient,至此OkHttpClient创建完毕。
Request的创建
同样构建一个最简单的Request
//Request的创建
Request request = new Request.Builder().url(url).build();
进入Request类。
    public Builder() {
      this.method = "GET";
      this.headers = new Headers.Builder();
    }

    Builder(Request request) {
      this.url = request.url;
      this.method = request.method;
      this.body = request.body;
      this.tag = request.tag;
      this.headers = request.headers.newBuilder();
    }
同样是利用建造者模式创建出来的一个对象,其默认请求方法是GET,至此Request创建完毕,本文2/3结束。
Response的获取
接下来开始本文最重要的部分。
Response response = client.newCall(request).execute()/enqueue();首先分析一下上面这段代码,可以看出我们的response是client将request传入了newCall这个方法,然后调用execute或者enqueue,最后得到的返回值。这里我们发现最终是newCall调用了我们的执行方法,所以接下来进入newCall这个方法。
  public Call newCall(Request request) {
    return new RealCall(this, request, false /* for web socket */);
  }
我们可以看到newCall这个方法将我们的request作为参数传入了RealCall的构造函数并返回了一个RealCall的对象。所以我们接下来进入RealCall看看到底是返回了一个怎样的对象。但是在进入RealCall之前我们先看看这个Call是个什么东西。
- Call:它是一个已经准备好执行的request,它能够被取消,每个Call只能执行一次。
接下来我们看看Call 的源码
/**
 * A call is a request that has been prepared for execution. A call can be canceled. As this object
 * represents a single request/response pair (stream), it cannot be executed twice.
 */
public interface Call extends Cloneable {
  /** Returns the original request that initiated this call. */
  Request request();

  /**
   * Invokes the request immediately, and blocks until the response can be processed or is in error
   * 立刻执行request,并且在response在执行过程中或者产生error时发生阻塞
   */
  Response execute() throws IOException;

  /**
   * Schedules the request to be executed at some point in the future.
   * 安排我们的request,它将会在之后某个时间点执行
   */
  void enqueue(Callback responseCallback);

  /** Cancels the request, if possible. Requests that are already complete cannot be canceled.
   * request能够被cancel,但是已经完成的不能被cancel
   */
  void cancel();

  /**
   * Returns true if this call has been either {@linkplain #execute() executed} or {@linkplain
   * #enqueue(Callback) enqueued}.
   */
  boolean isExecuted();

  boolean isCanceled();

  /**
   * Create a new, identical call to this one which can be enqueued or executed even if this call has already been.
   * 通过clone创建一个新的Call,使该Call能够执行“两次”
   */
  Call clone();

  interface Factory {
    Call newCall(Request request);
  }
}
我们看到了Call是个接口,里面的每个方法我都进行了标注,现在我们大概了解了Call是个什么东西,接下来继续看看RealCall
但是我们先回到开始,把以下两段代码结合起来。
Response response = client.newCall(request).execute()/enqueue();

public Call newCall(Request request) {
    return new RealCall(this, request, false /* for web socket */);
}不难看出实际调用我们的execute()和enqueue()方法的对象其实是RealCall,而这两个执行方法也正是我们网络请求的重点,所以我们接下来重点去看RealCall里这两个方法的实现。
首先是execute()的实现:
  public Response execute() throws IOException {
    //首先给当前对象加锁,如果已经被执行过则抛出"Already Executed"异常
    synchronized (this) {
      if (executed) throw new IllegalStateException("Already Executed");
      executed = true;
    }
     //捕获该请求的stackTrace
    captureCallStackTrace();

    //执行核心请求代码
    try {
      client.dispatcher().executed(this);
      Response result = getResponseWithInterceptorChain();
      if (result == null) throw new IOException("Canceled");
      return result;
    } finally {
      client.dispatcher().finished(this);
    }
}在上面execute()的代码中我们看到他首先给当前对象加上了锁,并设置executed标志位保证其只能执行一次,接着调用captureCallStackTrace方法捕获该请求的stackTrace,在最后我们看到了核心的执行代码,client调用了dispatcher来执行当前的请求,而返回的请求是由getResponseWithInterceptorChain这个方法返回的。所以我们接下来的重点就是看dispatcher是怎么执行请求的,和get那个方法是怎么返回结果的。
首先看看dispatcher是怎样去执行我们的请求的,根据dispatcher的executed的方法我们先进入到Dispatcher的executed。
  synchronized void executed(RealCall call) {
    runningSyncCalls.add(call);
  }
这里我们发现dispatcher的executed方法仅仅是将我们的call加入到了runningSyncCalls当中,所以看下这是个什么东西。
  /** Ready async calls in the order they'll be run. */
  //存放准备执行的Call
  private final Deque readyAsyncCalls = new ArrayDeque<>();
  //存放异步执行中的Call
  /** Running asynchronous calls. Includes canceled calls that haven't finished yet. */
  private final Deque runningAsyncCalls = new ArrayDeque<>();
  //存放同步执行中的Call
  /** Running synchronous calls. Includes canceled calls that haven't finished yet. */
  private final Deque runningSyncCalls = new ArrayDeque<>();
在Dispatcher中我们看到了三个这样的双向队列,分别用于存放各种请求。这里executed方法执行完毕???执行请求仅仅是将一个Call加入到一个双向队列?
接下来看看getResponseWithInterceptorChain()这个方法。
Response result = getResponseWithInterceptorChain();
  Response getResponseWithInterceptorChain() throws IOException {
    // Build a full stack of interceptors.
    //加入各种拦截器
    List interceptors = new ArrayList<>();
    interceptors.addAll(client.interceptors());
    //重定向拦截器
    interceptors.add(retryAndFollowUpInterceptor);
    //桥接拦截器
    interceptors.add(new BridgeInterceptor(client.cookieJar()));
    //缓存拦截器
    interceptors.add(new CacheInterceptor(client.internalCache()));
    //连接拦截器
    interceptors.add(new ConnectInterceptor(client));
    if (!forWebSocket) {
      interceptors.addAll(client.networkInterceptors());
    }
    //网络拦截器
    interceptors.add(new CallServerInterceptor(forWebSocket));

    //创建RealInterceptorChain并执行proceed方法
    Interceptor.Chain chain = new RealInterceptorChain(
        interceptors, null, null, null, 0, originalRequest);
    return chain.proceed(originalRequest);
  }

  public interface Interceptor {
      Response intercept(Chain chain) throws IOException;

      interface Chain {
        Request request();

        Response proceed(Request request) throws IOException;

        @Nullable Connection connection();
      }
  }
在这个重要的方法当中我们发现了Response是各个拦截器进行拦截之后最后返回的一个结果,而这里用到的就是一种责任链模式,request经过一层一层拦截器后交到服务器,response反过来经过一层一层拦截器把返回结果交回来。所以到这里,整体的工作流程就已经梳理完毕了。大致如下图所示
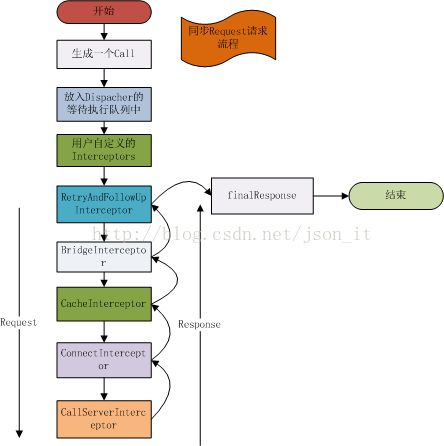 感谢前辈json_it的图
接下来我们要关心的是各个拦截器是怎样将我们的response生成并返回的,所以接下来分析一下每个拦截器各自的作用。
-
RetryAndFollowUpInterceptor
这个拦截器它的作用主要是负责请求的重定向操作,用于处理网络请求中,请求失败后的重试机制,所以我们okHttp的重试机制和它密切相关。首先我们看看它的内部实现。
public RetryAndFollowUpInterceptor(OkHttpClient client) {
    this.client = client;
  }

  @Override public Response intercept(Chain chain) throws IOException {
    Request request = chain.request();
    //将chain向下转型为对应的RealIntercepterChain
    RealInterceptorChain realChain = (RealInterceptorChain) chain;
    //它主要用于管理客户端与服务器之间的连接,同时管理连接池,以及请求成功后的连接释放等操作
    Transmitter transmitter = realChain.transmitter();

    int followUpCount = 0;
    Response priorResponse = null;
    while (true) {
      transmitter.prepareToConnect(request);
      //首先检查当前请求是否被取消
      if (transmitter.isCanceled()) {
        throw new IOException("Canceled");
      }

      Response response;
      boolean success = false;
      try {
        //交给上层拦截器处理过程中如果抛出异常则执行相应的catch语句,成功则设置标志位success = true
        response = realChain.proceed(request, transmitter, null);
        success = true;
      } catch (RouteException e) {
        // The attempt to connect via a route failed. The request will not have been sent.
        if (!recover(e.getLastConnectException(), transmitter, false, request)) {
          throw e.getFirstConnectException();
        }
        continue;
      } catch (IOException e) {
        // An attempt to communicate with a server failed. The request may have been sent.
        boolean requestSendStarted = !(e instanceof ConnectionShutdownException);
        if (!recover(e, transmitter, requestSendStarted, request)) throw e;
        continue;
      } finally {
        //最后如果还是失败,抛出异常并释放所有资源
        // The network call threw an exception. Release any resources.
        if (!success) {
          transmitter.exchangeDoneDueToException();
        }
      }

      // Attach the prior response if it exists. Such responses never have a body.
      if (priorResponse != null) {
        response = response.newBuilder()
            .priorResponse(priorResponse.newBuilder()
                    .body(null)
                    .build())
            .build();
      }

      ......
  }
我们从源码能够看出它首先创建了一个Transmitter,接着开启了一个while死循环,进入循环后首先判断当前请求是否已经被取消,如果没有接着交给上层拦截器处理返回response,如果执行过程中有异常则执行catch语句,并且continue继续循环。如果没有产生异常的话接着执行之后的代码,但是看后续的逻辑之前我们先看下最开始生成的Transmitter是什么?有什么用?怎么来的?所以带着这些疑问我们先分析下这个Transmitter的来龙去脉。
- Transmitter是什么?它的作用是什么?
首先我们需要分析清楚我们为什么要去了解这个Transmitter,所以首先我们了解下他是干什么的?为什么后续很多操作都和它息息相关?它有什么用?所以我们进入它的源码。
Bridge between OkHttp's application and network layers. This class exposes high-level application layer primitives: connections, requests, responses, and streams.
源码中的第一句注释就回答了我们的问题:这个Transmitter它是OkHttp应用程序和网络层之间的桥梁。它封装了应用的连接、请求、响应和流。
所以我们知道了它主要用于管理客户端与服务器之间的连接,同时管理连接池,以及请求成功后的连接释放等操作,我们在它内部也看到了socket的身影,所以这里我们也能看出okhttp内部其实也是基于socket,只不过对它进行封装,让我们更易用而已。所以这里大致了解下Transmitter这个东西就行了,继续分析下去就是socket的东西了,本文就不再进行进一步分析了。
- Transmitter怎么来的?
Transmitter transmitter = realChain.transmitter();
所以我们接着去看看realChain是怎么返回这个transmitter的
  private final Transmitter transmitter;

  public RealInterceptorChain(List interceptors, Transmitter transmitter,
      @Nullable Exchange exchange, int index, Request request, Call call,
      int connectTimeout, int readTimeout, int writeTimeout) {
    ...
    this.transmitter = transmitter;
    ...
  }
可以看到在创建这个RealInterceptorChain的时候就对transmitter进行了初始化
static RealCall newRealCall(OkHttpClient client, Request originalRequest, boolean forWebSocket) {
    // Safely publish the Call instance to the EventListener.
    RealCall call = new RealCall(client, originalRequest, forWebSocket);
    call.transmitter = new Transmitter(client, call);
    return call;
  }
继续寻找,终于发现原来我们在创建Call的时候就已经初始化了Transmitter。好了,现在已经大致弄清楚了Transmitter的问题,接着回到我们的主线,如果在拦截器处理过程中没有抛出异常的话做了些什么。
      Exchange exchange = Internal.instance.exchange(response);
      //配置路由
      Route route = exchange != null ? exchange.connection().route() : null;
      //重定向方法
      Request followUp = followUpRequest(response, route);
      ...
可以看到,首先配置了路由,接着传入路由进入followUpRequest这个方法来处理重定向操作,并返回了一个Request followUp
private Request followUpRequest(Response userResponse, @Nullable Route route) throws IOException {
    if (userResponse == null) throw new IllegalStateException();
    int responseCode = userResponse.code();

    final String method = userResponse.request().method();
    switch (responseCode) {
      case HTTP_PROXY_AUTH:
        Proxy selectedProxy = route != null
            ? route.proxy()
            : client.proxy();
        if (selectedProxy.type() != Proxy.Type.HTTP) {
          throw new ProtocolException("Received HTTP_PROXY_AUTH (407) code while not using proxy");
        }
        return client.proxyAuthenticator().authenticate(route, userResponse);

      case HTTP_UNAUTHORIZED:
        return client.authenticator().authenticate(route, userResponse);

      case HTTP_PERM_REDIRECT:
      case HTTP_TEMP_REDIRECT:
        // "If the 307 or 308 status code is received in response to a request other than GET
        // or HEAD, the user agent MUST NOT automatically redirect the request"
        if (!method.equals("GET") && !method.equals("HEAD")) {
          return null;
        }
        // fall-through
      case HTTP_MULT_CHOICE:
      case HTTP_MOVED_PERM:
      case HTTP_MOVED_TEMP:
      case HTTP_SEE_OTHER:
        // Does the client allow redirects?
        if (!client.followRedirects()) return null;

        String location = userResponse.header("Location");
        if (location == null) return null;
        HttpUrl url = userResponse.request().url().resolve(location);

        // Don't follow redirects to unsupported protocols.
        if (url == null) return null;

        // If configured, don't follow redirects between SSL and non-SSL.
        boolean sameScheme = url.scheme().equals(userResponse.request().url().scheme());
        if (!sameScheme && !client.followSslRedirects()) return null;

        // Most redirects don't include a request body.
        Request.Builder requestBuilder = userResponse.request().newBuilder();
        if (HttpMethod.permitsRequestBody(method)) {
          final boolean maintainBody = HttpMethod.redirectsWithBody(method);
          if (HttpMethod.redirectsToGet(method)) {
            requestBuilder.method("GET", null);
          } else {
            RequestBody requestBody = maintainBody ? userResponse.request().body() : null;
            requestBuilder.method(method, requestBody);
          }
          if (!maintainBody) {
            requestBuilder.removeHeader("Transfer-Encoding");
            requestBuilder.removeHeader("Content-Length");
            requestBuilder.removeHeader("Content-Type");
          }
        }

        // When redirecting across hosts, drop all authentication headers. This
        // is potentially annoying to the application layer since they have no
        // way to retain them.
        if (!sameConnection(userResponse.request().url(), url)) {
          requestBuilder.removeHeader("Authorization");
        }

        return requestBuilder.url(url).build();

      case HTTP_CLIENT_TIMEOUT:
        // 408's are rare in practice, but some servers like HAProxy use this response code. The
        // spec says that we may repeat the request without modifications. Modern browsers also
        // repeat the request (even non-idempotent ones.)
        if (!client.retryOnConnectionFailure()) {
          // The application layer has directed us not to retry the request.
          return null;
        }

        RequestBody requestBody = userResponse.request().body();
        if (requestBody != null && requestBody.isOneShot()) {
          return null;
        }

        if (userResponse.priorResponse() != null
            && userResponse.priorResponse().code() == HTTP_CLIENT_TIMEOUT) {
          // We attempted to retry and got another timeout. Give up.
          return null;
        }

        if (retryAfter(userResponse, 0) > 0) {
          return null;
        }

        return userResponse.request();

      case HTTP_UNAVAILABLE:
        if (userResponse.priorResponse() != null
            && userResponse.priorResponse().code() == HTTP_UNAVAILABLE) {
          // We attempted to retry and got another timeout. Give up.
          return null;
        }

        if (retryAfter(userResponse, Integer.MAX_VALUE) == 0) {
          // specifically received an instruction to retry without delay
          return userResponse.request();
        }

        return null;

      default:
        return null;
    }
  }
我们可以看到,它内部其实是通过response的http的code请求码来判断是否需要重定向的,如果需要就将url重新构建并且重新创建request将其返回。
      if (followUp == null) {
        if (exchange != null && exchange.isDuplex()) {
          transmitter.timeoutEarlyExit();
        }
        return response;
      }

      RequestBody followUpBody = followUp.body();
      if (followUpBody != null && followUpBody.isOneShot()) {
        return response;
      }

      closeQuietly(response.body());
      if (transmitter.hasExchange()) {
        exchange.detachWithViolence();
      }

      if (++followUpCount > MAX_FOLLOW_UPS) {
        throw new ProtocolException("Too many follow-up requests: " + followUpCount);
      }

      request = followUp;
      priorResponse = response;
可以看到在处理完了重定向操作后,执行了相关的if判断,如果其中没有导致return的操作,刚刚通过重定向处理得到的followUp这个request又会重新被赋值给request。然后这个新的request就继续开始新一轮的循环,如此往返完成了我们网络请求的重定向,这里就是okHttp重试机制的大体实现。
现在我们简单梳理一下okHttp是怎么通过RetryAndFollowUpInterceptor这个拦截器来实现重试、重定向功能的。这里简化了源码,可以更好的帮助我们理解整个拦截流程。
public Response intercept(Chain chain) throws IOException {
    //取得当前拦截链上的request
    Request request = chain.request();
    //将chain向下转型为对应的RealIntercepterChain
    RealInterceptorChain realChain = (RealInterceptorChain) chain;
    //它主要用于管理客户端与服务器之间的连接,同时管理连接池,以及请求成功后的连接释放等操作
    Transmitter transmitter = realChain.transmitter();

    while (true) {
      //准备创建携带request的请求流
      transmitter.prepareToConnect(request);
      //首先检查当前请求是否被取消
      if (transmitter.isCanceled()) {
        throw new IOException("Canceled");
      }

      try {
        //交给上层拦截器处理过程中如果抛出异常则执行相应的catch语句,成功则设置标志位success = true
        response = realChain.proceed(request, transmitter, null);
        success = true;
      } catch (XXException e) {
        ...
        //如果有异常就返回又开始循环
        continue;
      }
    //处理重定向并返回request
    Request followUp = followUpRequest(response, route);
    //将重定向处理后返回的followUp这个request赋值给request
    request = followUp;
    //接着继续用新的request继续循环开始重试操作
    }
}总结:首先从Chain这个接口中取得我们的请求request,接着创建了Transmitter(这个用来连接okhttp和网络层的桥梁来处理两者的通信),然后准备好发送请求,接着检查当前请求是否被取消,开始执行拦截器的处理,如果有异常则进行catch并重新开始循环,如果成功则调用处理请求重定向的方法followUpRequest去判断是否需要重定向,这个重定向的判断是根据HTTP返回码code来判断的,如果需要重定向则将url重新构建并封装到新的request进行返回,拿到follow这个请求后,判断它是否为null,为null的话就说明不需要进行重定向,则跳出循环,如果不为null则将其赋值给request,又一次进入while循环开始网络的重新请求。
-
BridgeInterceptor
Bridges from application code to network code. First it builds a network request from a user request. Then it proceeds to call the network. Finally it builds a user response from the network response.
从源码中的介绍,我们了解到这个BridgeInterceptor就是应用程序代码到网路代码的一个桥梁,首先以用户的请求为基础封装一个网络请求,然后开始请求网络,在有响应后把网络的响应封装成面向用户的response。
所以从这里我们基本就能够知道请求的相关信息和响应的相关信息应该都是由BridgeInterceptor分别封装好后,分发给不同角色(用户——网络),从而架起了app和网络的桥梁。然后我们接下来继续分析它内部是怎样的。
  public Response intercept(Chain chain) throws IOException {
    //取出user的request,以下简称userRequest
    Request userRequest = chain.request();
    //构建一个面向网络的request(这个request是真正提交给网络层的),以下简称netRequest
    Request.Builder requestBuilder = userRequest.newBuilder();

    //取出request body
    RequestBody body = userRequest.body();
    if (body != null) {
      //取得body的类型(常见有json等)
      MediaType contentType = body.contentType();
      if (contentType != null) {
        //不为null则将其添加到netRequest的header中
        requestBuilder.header("Content-Type", contentType.toString());
      }

      //取得body的length,如果我们知道写进Call里的字节数目则将其返回,如果没有则返回-1
      long contentLength = body.contentLength();
      if (contentLength != -1) {
        //如果Call的bytes里有数目则为netRequest添加又一个header body的长度
        requestBuilder.header("Content-Length", Long.toString(contentLength));
        requestBuilder.removeHeader("Transfer-Encoding");
      } else {
        //同理如果header中包含的参数是"Transfer-Encoding",则说明body中不含有任何字节
        requestBuilder.header("Transfer-Encoding", "chunked");
        requestBuilder.removeHeader("Content-Length");
      }
    }

    //如果userRequest中Host参数为null,则从url中取出其host并为其赋值
    if (userRequest.header("Host") == null) {
      requestBuilder.header("Host", hostHeader(userRequest.url(), false));
    }

    //如果header中以Connection为name映射的value为null的话则,往header加入keep-Alive参数
    if (userRequest.header("Connection") == null) {
      requestBuilder.header("Connection", "Keep-Alive");
    }

    // If we add an "Accept-Encoding: gzip" header field we're responsible for also decompressing
    // the transfer stream.
    boolean transparentGzip = false;
    //如果没有设置"Accept-Encoding"和"Range"这两个Http响应头,则默认使用gzip
    //反之如果设置了"Accept-Encoding",就算设置为gzip,也不会使用gzip进行解压缩,因为transparentGzip这个标志位只有进入了这个判断才能被设置为true
    if (userRequest.header("Accept-Encoding") == null && userRequest.header("Range") == null) {
      transparentGzip = true;
      requestBuilder.header("Accept-Encoding", "gzip");
    }

    //从cookieJar中取得cookies,如果cookie不为空则为header加上
    List cookies = cookieJar.loadForRequest(userRequest.url());
    if (!cookies.isEmpty()) {
      requestBuilder.header("Cookie", cookieHeader(cookies));
    }

    //判断是否需要添加user-Agent
    if (userRequest.header("User-Agent") == null) {
      requestBuilder.header("User-Agent", Version.userAgent());
    }

    /**
    * 接下来是对response的处理
    */
    Response networkResponse = chain.proceed(requestBuilder.build());

    HttpHeaders.receiveHeaders(cookieJar, userRequest.url(), networkResponse.headers());

    Response.Builder responseBuilder = networkResponse.newBuilder()
        .request(userRequest);

    //判断是否需要用Gzip对响应结果进行解码(就是根据请求中request的"Accept-Encoding"方式来确定)
    if (transparentGzip
        && "gzip".equalsIgnoreCase(networkResponse.header("Content-Encoding"))
        && HttpHeaders.hasBody(networkResponse)) {
      //将body的source交给Gzip处理,返回经过Gzip处理的body
      GzipSource responseBody = new GzipSource(networkResponse.body().source());
      //如果使用Gzip来进行解压的话则移除以下两个头
      Headers strippedHeaders = networkResponse.headers().newBuilder()
          .removeAll("Content-Encoding")
          .removeAll("Content-Length")
          .build();
      responseBuilder.headers(strippedHeaders);
      String contentType = networkResponse.header("Content-Type");
      //最后的body是经过Okio.buffer处理后的
      responseBuilder.body(new RealResponseBody(contentType, -1L, Okio.buffer(responseBody)));
    }
    //返回处理经过BridgeInterceptor处理的response
    return responseBuilder.build();
  }
这个BridgeInterceptor的intercept()方法,我已经在源码里面写满了注释,也是很好理解的,接下来分享一下在阅读过程中发现的一点有意思的地方。
    if (userRequest.header("Accept-Encoding") == null && userRequest.header("Range") == null) {
      transparentGzip = true;
      requestBuilder.header("Accept-Encoding", "gzip");
}- Range请求头
用于请求头中,指定第一个字节的位置和最后一个字节的位置
常见方式 要下载一个201字节大小的文件,我们可以通过Range把它分为两段,进而实现多线程异步同时下载
Range: bytes=0-100,101-200
如果服务器响应正常的话会返回这个:HTTP/1.1 206 OK
经过学习发现Range就是实现断点续传以及单文件分字节并行下载的关键。与之对应的它还有个兄弟content-Range返回头,以上述写的为例,如果第一段0-100个字节已经下载完毕,响应头response header里会携带Content-Range: bytes 0-100/201进行返回,表示总共大小201字节的内容,其中0-100字节已经下载完毕了。好了,本文对Range这个请求头的解释就到这里,不再继续延伸了。
- 发现的一个关于gzip的小细节
为什么手动给请求头设置了addHeader("Accept-Encoding", "gzip") ,okhttp就不会自动解压gzip流了???
先看看这个看似特别奇怪的问题,诶,是不是突然发现我们刚刚阅读源码的过程中已经发现答案了,下面我贴出代码。
 if (userRequest.header("Accept-Encoding") == null && userRequest.header("Range") == null) {
      transparentGzip = true;
      requestBuilder.header("Accept-Encoding", "gzip");
    }

if (transparentGzip
        && "gzip".equalsIgnoreCase(networkResponse.header("Content-Encoding"))
        && HttpHeaders.hasBody(networkResponse)) {
      //gzip对body的压缩处理
      ...
    }
我们先看一下上面这一小段代码, 再结合问题,发现如果要求okhttp自动解压gzip流的话就要进入下面一个if判断,所以我们看看满足什么条件才能进入。第一条:transparentGzip这个标志位首先得为true,然后我们发现这个标志位默认是false的,只有进入了上面那个判断后才会被设置为true。所以轻松找到这个问题的答案:不是因为他没添加addHeader("Accept-Encoding", "gzip")这行代码,正是因为添加了之后"Accept-Encoding"不为null了,所以导致标志位没有被设置为true,所以okhttp不会自动去解压gzip流。原来这个错误是因为我们的画蛇添足,至于okhttp为何如此设计,我暂时还没找到原因,这个问题留着后续再说。
好了,现在总结一下我们这个BridgeInterceptor就是给我们的请求(request)和响应(response)添加各种头,并且在这个拦截器中也用gzip对response的body进行了解压处理。至于gzip解压的具体步骤本文就不再深入了。
-
CacheInterceptor
在介绍这个拦截器之前,我们先看看http的缓存协议
 http缓存机制
上面我们看到了请求过程中缓存策略对请求方式的影响,就http的缓存机制来说,他的缓存策略完全是在头部体现的,而这个策略根据是否需要向服务器重新发起HTTP请求将缓存过程分为两个部分,分别是强制缓存和对比缓存。
- 强制缓存
强制缓存的基本原理是:所请求的数据在缓存数据库中尚未过期时,不与服务器进行交互,直接使用缓存数据库中的数据。当缓存未命中时,则重新向服务器请求数据。控制强制缓存的有两个字段:cache-control和expires
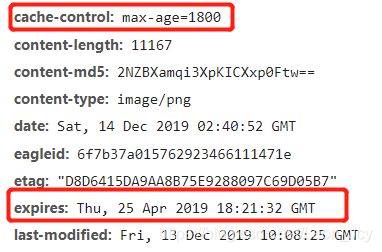
- expires 字段规定了缓存的资源的过期时间,在此时间之前,缓存中的资源都是有效的,该字段的 value 是一个格林威治时间格式(GMT)的时间,即世界标准时间,如 Thu, 25 Apr 2019 18:21:32 GMT。缺点很明显,时间期限是服务器生成,存在着客户端和服务器的时间误差,固定时间,HTTP 1.0时的规范。相比较cache-control优先级较低。
-
Cache-Control
max-age 设置缓存存储的最大周期,超过这个时间缓存被认为过期(单位秒)。与Expires相反,时间是相对于请求的时间。如上面截图中 max-age = 1800 则表示从现在开始的1800s/60 = 30min 内,缓存都有效。
public 表明响应可以被任何对象(包括:发送请求的客户端,代理服务器,等等)缓存,即使是通常不可缓存的内容
private 表明响应只能被单个用户缓存,不能作为共享缓存(即代理服务器不能缓存它)。私有缓存可以缓存响应内容
no-cache 告诉浏览器、缓存服务器,不管本地副本是否过期,使用资源副本前,一定要到源服务器进行副本有效性校验
no-store 强制缓存和对比缓存都不会缓存有关客户端请求或服务器响应的任何内容
所以看完Cache-Control的规则我们也明白了为什么缓存策略分为了强制缓存和对比缓存两种,而不是单纯的使用强制缓存,其原因就是当缓存失效(max-age超时)或者无缓存 (no-cache)需要重新去服务器请求数据,所以需要使用对比缓存策略。
- 对比缓存
当强缓存过期未命中必须每次请求验证资源的状态时,便使用对比缓存的方式去处理缓存文件。
对比缓存主要原理是从缓存数据库中取出缓存的标识,然后向浏览器发送请求验证请求的数据是否已经更新,如果已更新则返回新的数据,若未更新则使用缓存数据库中的缓存数据所以我们这里先看下相应的响应头参数中有哪些缓存标识。在上图http缓存机制中,我们看到当缓存过期时,有etag和last-modified两个字段作为缓存标识来做判断。
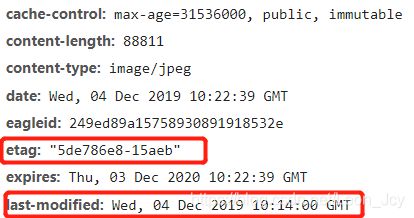
- Etag
服务器为当前资源根据自己的规则生成的一个唯一标识,在第一次请求时会将该值返回,当客户端下次向服务端请求该资源时,会带上If-None-Match请求头,其值为上一次请求时服务器返回的Etag响应头的值。服务器收到请求后如果发现有请求头If-None-Match则与被请求资源的唯一标识进行对比,如果相同则说明资源没有改变,则返回304,response将会从缓存中拿取,如果不同则说明资源发生了改变,则返回200,并重新进行请求。
- last-modified
这个字段表示最后一次该资源修改的时间。它和etag类似,第一次请求返回该值,服务器收到请求后如果发现有请求头If-Modified-Since则与被请求资源的最后修改时间进行比对。若资源的最后修改时间晚于If-Modified-Since,说明资源有被改动过,则重新请求响应完整的资源内容,返状回态码为200;若资源的最后修改时间早于或等于If-Modified-Since,说明资源未被修改,则响应HTTP状态码为304,告知客户端继续使用所保存的缓存。
总结:发起请求,首先检查是否有缓存,通过cache-control和expires这两个字段查看强制缓存是否过期,如果未过期则直接使用缓存并返回200(from disk cache),如果过期了需要去验证资源的的状态时则应用对比缓存策略,通过etag和last-modified两个字段作为缓存标识来做判断,同时客户端也会在请求中带上If-None-Match和If-Modified-Since去和服务端的标识进行对比,如果资源没有被修改则返回304,并使用缓存内容,如果发现资源已经被修改了,则重新请求,并返回200。
接下来回到我们的缓存拦截器来看下CacheInterceptor 的 intercept方法
  public Response intercept(Chain chain) throws IOException {
    //这个cache是internalCache的一个实例
    //其中是使用DiskLruCache来实现缓存的
    Response cacheCandidate = cache != null
        ? cache.get(chain.request())
        : null;

    long now = System.currentTimeMillis();

    //获取缓存策略
    CacheStrategy strategy = new CacheStrategy.Factory(now, chain.request(), cacheCandidate).get();
    Request networkRequest = strategy.networkRequest;
    Response cacheResponse = strategy.cacheResponse;

    if (cache != null) {
      cache.trackResponse(strategy);
    }

    if (cacheCandidate != null && cacheResponse == null) {
      closeQuietly(cacheCandidate.body()); // The cache candidate wasn't applicable. Close it.
    }

    //如果禁止使用网络或者缓存不足则抛出504.
    if (networkRequest == null && cacheResponse == null) {
      return new Response.Builder()
          .request(chain.request())
          .protocol(Protocol.HTTP_1_1)
          .code(504)
          .message("Unsatisfiable Request (only-if-cached)")
          .body(Util.EMPTY_RESPONSE)
          .sentRequestAtMillis(-1L)
          .receivedResponseAtMillis(System.currentTimeMillis())
          .build();
    }

    // 如果不需要网络请求则直接使用缓存的response进行返回
    if (networkRequest == null) {
      return cacheResponse.newBuilder()
          .cacheResponse(stripBody(cacheResponse))
          .build();
    }

    //如果没有缓存则交给之后的拦截器执行
    Response networkResponse = null;
    try {
      networkResponse = chain.proceed(networkRequest);
    } finally {
      // If we're crashing on I/O or otherwise, don't leak the cache body.
      if (networkResponse == null && cacheCandidate != null) {
        closeQuietly(cacheCandidate.body());
      }
    }

    //如果response有cache,先将header合并再update response
    if (cacheResponse != null) {
      if (networkResponse.code() == HTTP_NOT_MODIFIED) {
        Response response = cacheResponse.newBuilder()
            .headers(combine(cacheResponse.headers(), networkResponse.headers()))
            .sentRequestAtMillis(networkResponse.sentRequestAtMillis())
            .receivedResponseAtMillis(networkResponse.receivedResponseAtMillis())
            .cacheResponse(stripBody(cacheResponse))
            .networkResponse(stripBody(networkResponse))
            .build();
        networkResponse.body().close();

        // Update the cache after combining headers but before stripping the
        // Content-Encoding header (as performed by initContentStream()).
        cache.trackConditionalCacheHit();
        cache.update(cacheResponse, response);
        return response;
      } else {
        closeQuietly(cacheResponse.body());
      }
    }

    Response response = networkResponse.newBuilder()
        .cacheResponse(stripBody(cacheResponse))
        .networkResponse(stripBody(networkResponse))
        .build();

    //如果cache这个对象不为null
    if (cache != null) {
      //response有body,缓存策略允许缓存
      if (HttpHeaders.hasBody(response) && CacheStrategy.isCacheable(response, networkRequest)) {
        // Offer this request to the cache.
        //将response放进cache中
        CacheRequest cacheRequest = cache.put(response);
        return cacheWritingResponse(cacheRequest, response);
      }
      //"POST""PATCH"PUT""DELET"MOVE"如果是这几个方法则移除缓存
      if (HttpMethod.invalidatesCache(networkRequest.method())) {
        try {
          cache.remove(networkRequest);
        } catch (IOException ignored) {
          // The cache cannot be written.
        }
      }
    }
    return response;
  }
我们从上面的源码可以看出,intercept()这个方法就是根据缓存策略做出不同的响应操作,所以我们看看okhttp的缓存策略和http的缓存策略有什么区别。分析完了缓存策略后,我们再分析它的缓存实现。
首先cachestrategy是一个工厂方法创建的,看看创建它的工厂方法
    public Factory(long nowMillis, Request request, Response cacheResponse) {
      this.nowMillis = nowMillis;
      this.request = request;
      this.cacheResponse = cacheResponse;

      if (cacheResponse != null) {
        this.sentRequestMillis = cacheResponse.sentRequestAtMillis();
        this.receivedResponseMillis = cacheResponse.receivedResponseAtMillis();
        Headers headers = cacheResponse.headers();
        for (int i = 0, size = headers.size(); i < size; i++) {
          String fieldName = headers.name(i);
          String value = headers.value(i);
          if ("Date".equalsIgnoreCase(fieldName)) {
            servedDate = HttpDate.parse(value);
            servedDateString = value;
          } else if ("Expires".equalsIgnoreCase(fieldName)) {
            expires = HttpDate.parse(value);
          } else if ("Last-Modified".equalsIgnoreCase(fieldName)) {
            lastModified = HttpDate.parse(value);
            lastModifiedString = value;
          } else if ("ETag".equalsIgnoreCase(fieldName)) {
            etag = value;
          } else if ("Age".equalsIgnoreCase(fieldName)) {
            ageSeconds = HttpHeaders.parseSeconds(value, -1);
          }
        }
      }
    }
如果cacheResponse缓存不为null,取出header,在这里我们看到了熟悉的参数“Expires” ,“Last-Modified”,“ETag”,这正是跟http的缓存对应的参数,接着进一步看看它的获取。
public CacheStrategy get() {
      CacheStrategy candidate = getCandidate();

      //对应外部返回504的处理
      if (candidate.networkRequest != null && request.cacheControl().onlyIfCached()) {
        // We're forbidden from using the network and the cache is insufficient.
        return new CacheStrategy(null, null);
      }

      return candidate;
    }

private CacheStrategy getCandidate() {

      //如果没有缓存响应,返回一个没有响应的策略
      if (cacheResponse == null) {
        return new CacheStrategy(request, null);
      }

      //如果是https,丢失了握手,返回一个没有响应的策略
      if (request.isHttps() && cacheResponse.handshake() == null) {
        return new CacheStrategy(request, null);
      }

      // 响应不能被缓存
      // If this response shouldn't have been stored, it should never be used
      // as a response source. This check should be redundant as long as the
      // persistence store is well-behaved and the rules are constant.
      if (!isCacheable(cacheResponse, request)) {
        return new CacheStrategy(request, null);
      }

      //获取请求头里面的CacheControl
      //这里的cachecontrol对应着http策略里的cachecontrol
      CacheControl requestCaching = request.cacheControl();
      //如果请求里面设置了不缓存,则不缓存
      if (requestCaching.noCache() || hasConditions(request)) {
        return new CacheStrategy(request, null);
      }

      CacheControl responseCaching = cacheResponse.cacheControl();

      long ageMillis = cacheResponseAge();
      long freshMillis = computeFreshnessLifetime();

      if (requestCaching.maxAgeSeconds() != -1) {
        freshMillis = Math.min(freshMillis, SECONDS.toMillis(requestCaching.maxAgeSeconds()));
      }

      long minFreshMillis = 0;
      if (requestCaching.minFreshSeconds() != -1) {
        minFreshMillis = SECONDS.toMillis(requestCaching.minFreshSeconds());
      }

      long maxStaleMillis = 0;
      if (!responseCaching.mustRevalidate() && requestCaching.maxStaleSeconds() != -1) {
        maxStaleMillis = SECONDS.toMillis(requestCaching.maxStaleSeconds());
      }

      if (!responseCaching.noCache() && ageMillis + minFreshMillis < freshMillis + maxStaleMillis) {
        Response.Builder builder = cacheResponse.newBuilder();
        if (ageMillis + minFreshMillis >= freshMillis) {
          builder.addHeader("Warning", "110 HttpURLConnection \"Response is stale\"");
        }
        long oneDayMillis = 24 * 60 * 60 * 1000L;
        if (ageMillis > oneDayMillis && isFreshnessLifetimeHeuristic()) {
          builder.addHeader("Warning", "113 HttpURLConnection \"Heuristic expiration\"");
        }
        return new CacheStrategy(null, builder.build());
      }

      // Find a condition to add to the request. If the condition is satisfied, the response body
      // will not be transmitted.
      String conditionName;
      String conditionValue;
      if (etag != null) {
        conditionName = "If-None-Match";
        conditionValue = etag;
      } else if (lastModified != null) {
        conditionName = "If-Modified-Since";
        conditionValue = lastModifiedString;
      } else if (servedDate != null) {
        conditionName = "If-Modified-Since";
        conditionValue = servedDateString;
      } else {
        return new CacheStrategy(request, null); // No condition! Make a regular request.
      }

      Headers.Builder conditionalRequestHeaders = request.headers().newBuilder();
      Internal.instance.addLenient(conditionalRequestHeaders, conditionName, conditionValue);

      Request conditionalRequest = request.newBuilder()
          .headers(conditionalRequestHeaders.build())
          .build();
      return new CacheStrategy(conditionalRequest, cacheResponse);
    }
从上面的代码中可以看到,okhttp代码中的缓存策略和http的缓存策略是一样的,就不再进行赘述了,接下来分析Cache的缓存实现。首先回到我们的intercept方法
    //如果cache这个对象不为null
    if (cache != null) {
      //response有body,缓存策略允许缓存
      if (HttpHeaders.hasBody(response) && CacheStrategy.isCacheable(response, networkRequest)) {
        // Offer this request to the cache.
        //将response放进cache中
        CacheRequest cacheRequest = cache.put(response);
        return cacheWritingResponse(cacheRequest, response);
      }
      //"POST""PATCH"PUT""DELET"MOVE"如果是这几个方法则移除缓存
      if (HttpMethod.invalidatesCache(networkRequest.method())) {
        try {
          cache.remove(networkRequest);
        } catch (IOException ignored) {
          // The cache cannot be written.
        }
      }
先看看这段代码,其中有很重要的一行
CacheRequest cacheRequest = cache.put(response);
我们可以看到cache实际是通过这个put方法放进去的,所以我们接下来的重点就是分析put这个方法,以及更重要的调用put方法的这个cache对象所属的类,充当的是什么角色,用什么来实现的,所以怀着这些疑问我们进入cache的源码。
final DiskLruCache cache;一进入,我们发现cache其实就是一个DiskLruCache的实例,所以okhttp所以基于cache的操作基本都是以DiskLruCache来实现的,同时也正因为LRU算法是缓存的灵魂,所以我打算单独再开一篇文章来详细介绍,在这里就不展开了。
现在我们再回过头来看CacheInterceptor这个拦截器,首先我们需要先理解Http的缓存机制,因为okhttp的缓存也就是基于该机制来通过代码表示各种策略,然后用DiskLruCache进行cache的缓存。
ConnectInterceptor
Opens a connection to the target server and proceeds to the next interceptor.
这个拦截器中的介绍只有这简简单单的一行,“开启一个链接到目标服务器然后调用链上的下一个拦截器” ,有趣的是它的代码也是整个代码中简单的一部分。
public final class ConnectInterceptor implements Interceptor {
  public final OkHttpClient client;

  public ConnectInterceptor(OkHttpClient client) {
    this.client = client;
  }

  @Override public Response intercept(Chain chain) throws IOException {
    RealInterceptorChain realChain = (RealInterceptorChain) chain;
    Request request = realChain.request();
    Transmitter transmitter = realChain.transmitter();

    // We need the network to satisfy this request. Possibly for validating a conditional GET.
    boolean doExtensiveHealthChecks = !request.method().equals("GET");
    Exchange exchange = transmitter.newExchange(chain, doExtensiveHealthChecks);

    return realChain.proceed(request, transmitter, exchange);
  }
}
上面的代码就是整个ConnectInterceptor的全部代码了,代码这么简单,它又是怎么实现那些功能的呢,所以这里我又去看了下okhttp对连接的处理及相关优化。
- 支持HTTP2/SPDY
- socket自动选择最好路线,并支持自动重连
- 拥有自动维护的socket连接池,减少握手次数,降低响应延迟
- 拥有队列线程池,轻松写并发
所以我对它内部的处理充满了好奇,怎样实现这些的,带着这个问题我回头看intercept方法,发现了我们之前在分析重定向拦截器时出现的Transmitter,所以我们这里必须进入Transmittrer深入分析一下它对整个连接过程的影响,起到的作用。