参考资料:极客时间的《数据分析实战45讲》
本篇目录
- 参考资料:极客时间的《数据分析实战45讲》
- 一、Python爬虫实现逻辑图
- 二、利用爬虫采集数据(Json和Xpath两种方式)
- 三、利用爬虫模拟浏览器(登录、关注、评论)
- I、模拟微博的自动登录
- II、模拟微博加关注
- III、模拟微博写评论和发微博
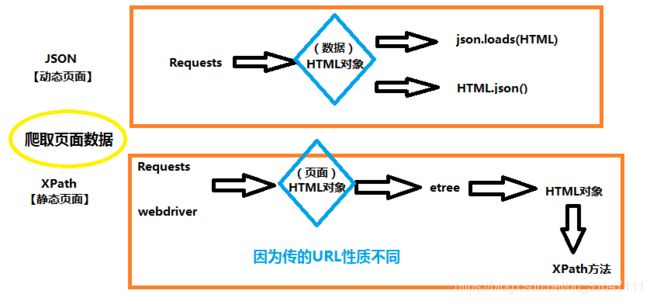
一、Python爬虫实现逻辑图

二、利用爬虫采集数据(Json和Xpath两种方式)
import requests
import sys
import re
import os
from wordcloud import WordCloud
import matplotlib.pyplot as plt
import jieba
from PIL import Image
import numpy as np
from lxml import etree
headers = {
'Referer' :'http://music.163.com',
'Host' :'music.163.com',
'Accept' :'text/html,application/xhtml+xml,application/xml;q=0.9,image/webp,image/apng,*/*;q=0.8',
'User-Agent':'Chrome/10'
}
def get_song_lyric(headers,lyric_url):
res = requests.request('GET', lyric_url, headers=headers)
if 'lrc' in res.json():
lyric = res.json()['lrc']['lyric']
new_lyric = re.sub(r'[\d:.[\]]','',lyric)
return new_lyric
else:
return ''
print(res.json())
def remove_stop_words(f):
stop_words = ['作词', '作曲', '编曲', 'Arranger', '录音', '混音', '人声', 'Vocal', '弦乐', 'Keyboard', '键盘', '编辑', '助理', 'Assistants', 'Mixing', 'Editing', 'Recording', '音乐', '制作', 'Producer', '发行', 'produced', 'and', 'distributed']
for stop_word in stop_words:
f = f.replace(stop_word, '')
return f
def create_word_cloud(f):
print('根据词频,开始生成词云!')
f = remove_stop_words(f)
cut_text = " ".join(jieba.cut(f,cut_all=False, HMM=True))
wc = WordCloud(
font_path="./wc.ttf",
max_words=100,
width=2000,
height=1200,
)
print(cut_text)
wordcloud = wc.generate(cut_text)
wordcloud.to_file("wordcloud.jpg")
plt.imshow(wordcloud)
plt.axis("off")
plt.show()
def get_songs(artist_id):
page_url = 'https://music.163.com/artist?id=' + artist_id
res = requests.request('GET', page_url, headers=headers)
html = etree.HTML(res.text)
href_xpath = "//*[@id='hotsong-list']//a/@href"
name_xpath = "//*[@id='hotsong-list']//a/text()"
hrefs = html.xpath(href_xpath)
names = html.xpath(name_xpath)
song_ids = []
song_names = []
for href, name in zip(hrefs, names):
song_ids.append(href[9:])
song_names.append(name)
print(href, ' ', name)
return song_ids, song_names
artist_id = '12138269'
[song_ids, song_names] = get_songs(artist_id)
all_word = ''
for (song_id, song_name) in zip(song_ids, song_names):
lyric_url = 'http://music.163.com/api/song/lyric?os=pc&id=' + song_id + '&lv=-1&kv=-1&tv=-1'
lyric = get_song_lyric(headers, lyric_url)
all_word = all_word + ' ' + lyric
print(song_name)
create_word_cloud(all_word)
三、利用爬虫模拟浏览器(登录、关注、评论)
I、模拟微博的自动登录
from selenium import webdriver
import time
browser = webdriver.Chrome()
def weibo_login(username, password):
browser.get('https://passport.weibo.cn/signin/login')
browser.implicitly_wait(5)
time.sleep(1)
browser.find_element_by_id("loginName").send_keys(username)
browser.find_element_by_id("loginPassword").send_keys(password)
time.sleep(1)
browser.find_element_by_id("loginAction").click()
time.sleep(1)
username = 'XXXX'
password = "XXXX"
weibo_login(username, password)
II、模拟微博加关注
def add_follow(uid):
browser.get('https://m.weibo.com/u/'+str(uid))
time.sleep(1)
follow_button = browser.find_element_by_xpath('//div[@class="m-add-box m-followBtn"]')
follow_button.click()
time.sleep(1)
group_button = browser.find_element_by_xpath('//div[@class="m-btn m-btn-white m-btn-text-black"]')
group_button.click()
time.sleep(1)
uid = '1890826225'
add_follow(uid)
III、模拟微博写评论和发微博
def add_comment(weibo_url, content):
browser.get(weibo_url)
browser.implicitly_wait(5)
content_textarea = browser.find_element_by_css_selector("textarea.W_input").clear()
content_textarea = browser.find_element_by_css_selector("textarea.W_input").send_keys(content)
time.sleep(2)
comment_button = browser.find_element_by_css_selector(".W_btn_a").click()
time.sleep(1)
def post_weibo(content):
browser.get('https://weibo.com')
browser.implicitly_wait(5)
post_button = browser.find_element_by_css_selector("[node-type='publish']").click()
content_textarea = browser.find_element_by_css_selector("textarea.W_input").send_keys(content)
time.sleep(2)
post_button = browser.find_element_by_css_selector("[node-type='submit']").click()
time.sleep(1)
weibo_url = 'https://weibo.com/1890826225/HjjqSahwl'
content = 'Gook Luck!好运已上路!'
content = '每天学点心理学'
post_weibo(content)
