JUnit4总结
一. JUnit4基本使用
1)新建项目,在项目下建libs文件夹,导入junit-4.13.jar、hamcrest-core-1.3.jar,依次 Build Path — Add To Build Path
2)在项目下分别建src资源文件夹和test资源文件夹,将测试代码都放在test文件夹下
3)在src文件夹下建包,包下创建.java文件,在.Java文件中写入如下代码
public int add(int a,int b) {
	return a + b;
}
4)在test文件夹下建包,包应该和src中的包一致,包下通过junit test case创建测试文件,写入如下代码
package junit4;
import static org.junit.Assert.assertEquals;
import org.junit.Test;
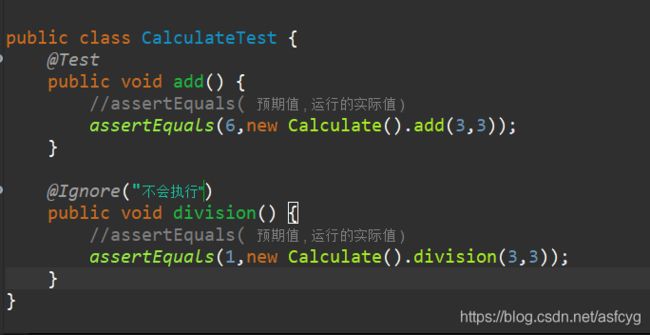
public class CalculateTest {
@Test
public void add() {
//assertEquals( 预期值 , 运行的实际值 )
assertEquals(6,new Calculate().add(3,3));
}
}
5)运行
方法1:.java文件 — Run As — 1 JUnit Test,可以运行文件中所有测试类
 方法2:直接运行.java文件下的测试类
 方法3:选中类,右键 — Run As — 1 JUnit Test
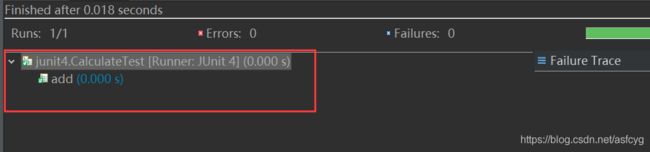
 6)结果
6)结果

注意:
- 测试方法上必须使用@Test进行修饰
- 测试方法必须使用public void进行修饰,不能带任何的参数
- 新建一个源代码目录来存放我们的测试代码,即可以在src文件夹同一等级新建一个test文件夹,将测试代码都放test文件夹下,方便测试方便在发布代码时删除
- 测试类的包应该和被测试类保持一致
- 测试单元中的每个方法必须可以独立测试,测试方法间不能有任何的依赖
- 测试类使用Test作为类型的后缀(不是必须)
- 测试方法使用test作为方法名的前缀(不是必须)
二. 测试失败的两种情况
1)Failures
在被测试类中写入一个除方法
public int division(int a,int b) {
	return a / b;
}
测试类
@Test
public void division() {
	//assertEquals( 预期值 , 运行的实际值 )
	assertEquals(6,new Calculate().division(3,3));
}
预期结果为6,但实际运行结果为 1,测试失败,这种失败为Failure

2)Errors
还是除法,测试类
@Test
public void division() {
	//assertEquals( 预期值 , 运行的实际值 )
	assertEquals(6,new Calculate().division(3,0));
}
除数不能为0,测试失败,这种失败叫Error

总结
- Failure一般由单元测试使用断言方法判断失败所引起,表示测试点发现了问题,程序的输出结果与预期结果不符
- error是由代码异常引起的,它可以产生于测试代码本身的错误,也可以是被测试代码中的一个隐藏bug
- 测试用例不是用来证明你是对的,而是用来证明你没有错
三. JUnit运行流程
创建测试文件,将下面4个全部选上
 在测试类中写入如下代码
public class flowTest {

	@BeforeClass
	public static void setUpBeforeClass() throws Exception {
		System.out.println("beforeclass");
	}

	@AfterClass
	public static void tearDownAfterClass() throws Exception {
		System.out.println("afterclass");
	}

	@Before
	public void setUp() throws Exception {
		System.out.println("before");
	}

	@After
	public void tearDown() throws Exception {
		System.out.println("after");
	}

	@Test
	public void test() {
		System.out.println("test");
	}

	@Test
	public void test2() {
		System.out.println("test2");
	}

}
运行结果如下

总结
- @BeforeClass修饰的方法会在所有方法被调用前被执行。
而且该方法是静态的,所以当测试类被加载后接着就会运行它。
而且在内存中它只会存在一份实例,比较适合加载配置文件 - @AfterClas所修饰的方法通常用来对资源进行清理,如关闭数据库的连接
- @Before和@After会在每个测试方法的前后各执行一次
四. JUnit4常用注解
- @Test:将一个普通方法修饰为一个测试方法
@Test(expected=XX.class):测试代码抛出异常,它捕获异常
@Test(expected=ArithmeticException.class)
public void division() {
	//assertEquals( 预期值 , 运行的实际值 )
	//除数为0,Error
	assertEquals(6,new Calculate().division(3,0));
}

@Test(timeout=毫秒):限定方法运行时间
当我们不能很好的控制循环代码的终止条件时,为了不让循环变成死循环,使系统崩溃,可以使用timeout限定程序运行时间
- @BeforeClass:在所有方法运行前被执行,static修饰
- @AfterClass:是所有方法运行结束后被执行,static修饰
- @Before:会在每个测试方法被运行前执行一次
- @After:会在每个测试方法运行后执行一次
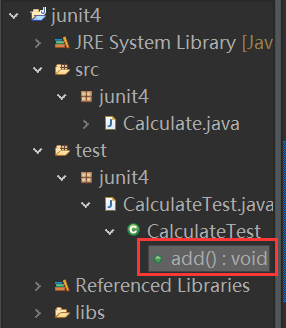
- @Ignore:所修饰的测试方法会被测试运行器忽略,即不会被执行。可以在@Ignore后面加注解,例如@Ignore(“我因为……不需要执行”)
 运行后只有add被执行,division没有被执行
- @RunWith:可以更改测试运行器
五. JUnit测试套件
作用:
测试套件就是组织测试类一起运行
新建了3个测试类,让这三个测试类一起运行

步骤:
1)创建一个测试套件的入口类,这个类中不包含其它方法
 2)更改测试运行器为
Suite.class
@RunWith(Suite.class)
3)将要测试的类作为数组传入@Suite.SuiteClasses({})
@Suite.SuiteClasses({test1.class,test2.class,test3.class})
运行结果
 所有代码
所有代码
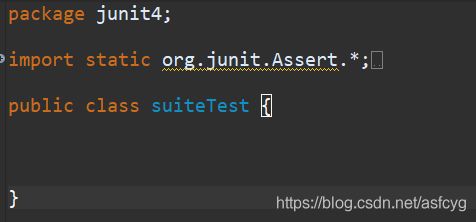
package junit4;

import org.junit.runner.RunWith;
import org.junit.runners.Suite;


@RunWith(Suite.class)
@Suite.SuiteClasses({test1.class,test2.class,test3.class})
public class suiteTest {
}
六. JUnit参数化设置
作用:
将测试方法的相同结构提取出来,以提高代码的可重用度
步骤:
1)更改默认的测试运行器为@RunWith(Parameterized.class)
@RunWith(Parameterized.class)
2)声明变量来存放预期值和结果值
public class parameterTest {
	int expected = 0;
	int input1 = 0;
	int input2 = 0;
}
3)声明一个返回值为Collection的公共静态方法,并使用@Parameters进行修饰
@Parameters
public static Collection<Object[]> t(){
	return Arrays.asList(new Object[][] {
		{3,1,2},
		{4,2,2}
	});
}
4)为测试类声明一个带有参数的公共构造函数,并在其中为之声明变量赋值
public parameterTest(int expected,int input1,int input2) {
	this.expected=expected;
	this.input1=input1;
	this.input2=input2;
}
5)写一个测试方法使用
@Test
public void testAdd() {
	assertEquals(expected,new Calculate().add(input1,input2));
}
所有代码
package junit4;

import static org.junit.Assert.*;

import java.util.Arrays;
import java.util.Collection;

import org.junit.Test;
import org.junit.runner.RunWith;
import org.junit.runners.Parameterized;
import org.junit.runners.Parameterized.Parameters;

@RunWith(Parameterized.class)
public class parameterTest {
	int expected = 0;
	int input1 = 0;
	int input2 = 0;

	@Parameters
	public static Collection<Object[]> t(){
		return Arrays.asList(new Object[][] {
			{3,1,2},
			{4,2,2}
		});
	}

	public parameterTest(int expected,int input1,int input2) {
		this.expected=expected;
		this.input1=input1;
		this.input2=input2;
	}

	@Test
	public void testAdd() {
		assertEquals(expected,new Calculate().add(input1,input2));
	}
}