6_Vue父子组件通信与槽
1 .组件的组织
一个应用会以一棵嵌套的组件树的形式来组织。
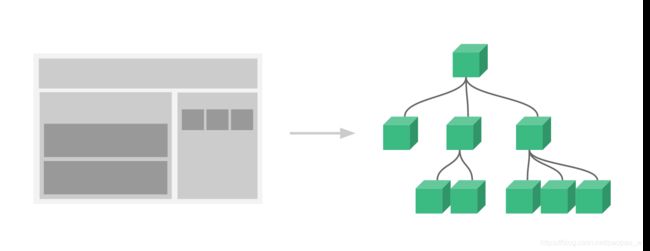
上小节案例中 App.vue组件中使用了 ShowTime.vue 组件。 在浏览器上安装 Vue DevTools 插件,后可以通过插件看到它们之间的关系,开发Vue应用时也可以通过它方便调试。
访问应用商店需要科学上网
2 .父子组件通信-props
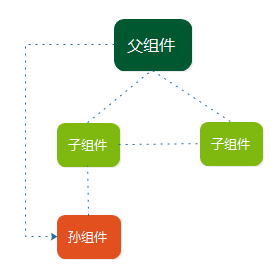
App就是父组件,ShowTime就是子组件。 所谓父子组件通信其实就是如何把父组件中的数据传递到子组件中,子组件中的数据发生变化后如何回传给父组件。即数据如何从父组件中进入子组件,又如何中子组件中进入父组件,这就是父子组件的通信。
2.1 组件的props 选项
子组件在父组件的 template模板中使用的时候,看起来像是一个自定义的HTML标签。HTML标签上是可以传递属性的,比如:
<div id='myId' class='myClass' data-id='1234' > div>
组件也可以通过 属性名=‘属性值’ 的方式将数据传递到组件内部,当编写一个组件的时候,这个组件有哪些属性需要在定义组件的时候使用 props选项来定义:
<template>
    <div>
		prop1的值为: {{prop1}}, prop2的值为: {{prop2}},
    div>
template>
<script>
    export default {
        //为组件定义属性, 可以是字符串数组,也可以是一个对象
        props: [ 'prop1','prop2' ],
        data(){
            return { }
        },
        methods: { }
        computed:{ }
    }
script>
props 中声明的数据与组件data 函数return 的数据主要区别就是props 的来自父级,而data 中
的是组件自己的数据,作用域是组件本身,这两种数据都可以在模板template 及计算属性computed
和方法methods 中使用。
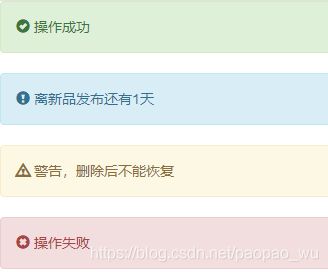
下面使用Vue封装一个BootStrap风格的警告框组件,名字叫做bs-alert,效果如下:
BootStrap 的警告框有四种级别,success, info, warning,danger分别对应不同的四种颜色. 每个警告框中的内容也不相同。所以,bs-alert需要两个属性
- level , 其值可能为 success, info, waring,danger ,默认为 info, 表示警告框的级别
- content : 表示警告框要显示的内容,content可以是纯文本,也可以是包含有HTML标签的文本
确保提前在main.js 中导入了bootstrap 库的css样式
src/component/BsAlert.vue
基本思路为: 使用计算属性根据传递进来的level 计算出索要用到的样式,然后将计算属性绑定到模板上。
<template>
    <div class="alert" :class="levelClass" role="alert">
      <span class="glyphicon" :class="iconClass" aria-hidden="true">span>
      {{ content }}
    div>
template>

<script>
    const iconClassName = { //图标的css类名
        'success' : 'glyphicon-ok-sign',
        'info' : 'glyphicon-exclamation-sign',
        'warning' : 'glyphicon-warning-sign',
        'danger' : 'glyphicon-remove-sign'
    }
    export default {
        props: [ 'level','content' ],
        data(){
            return {}
        },
        computed:{
            iconClass(){
                //默认为info图标,传递的level 在iconClassName 的key中不存在,就使用 iconClassName['info']
                return iconClassName[this.level] || iconClassName['info']
            },
            levelClass(){
                //默认为info级别
                return `alert-${iconClassName[this.level]?this.level :'info'}`
            }
        }
    }
script>
src/component/App.vue 中注册,并使用子组件
<template>
  <div>

      <bs-alert :level='successMsg.level' :content='successMsg.msg' />


      <bs-alert :level=' "info" ' :content=' "离新品发布还有1天" ' />


      <bs-alert level='info' content='警告,删除后不能恢复' />

      <bs-alert :level='dangerMsg.level' :content='"这是错误信息"' />
  div>
template>

<script>
//BsAlert.vue与App.vue位于同一个目录下,不必每次都从 src目录开始
import BsAlert from './BsAlert'
export default {
  name :'App',
  data(){
    return {
      successMsg : { level: 'success', msg : '操作成功' },
      infoMsg : { level: 'info', msg : '离新品发布还有1天' },
      warningMsg : { level: 'warning', msg : '警告,删除后不能恢复' },
      dangerMsg : { level: 'danger', msg : '操作失败' },
    }
  },
  components :{
   BsAlert //组件注册, 在模板中使用的时候Vue会自动展开为 bs-alert标签
  }
};
script>
main.js中导入bootstrap样式库:
import Vue from 'vue'
import App from '@/components/App'
import 'bootstrap/dist/css/bootstrap.css'
new Vue({
  el: '#app',
  render: h=>h(App)
})
这样就做成了一个可以重复使用的 bs-alert 组件,组件的内容变化是通过配置不同的属性完成的。
2.2 props 属性的命名
props定义了属性的名字,它的命名一般用驼峰命名camelCase,首字母小写,从第二个单词开始,单词的首字母大写。 比如属性名为 warningText,。由于HTML不区分大小写的特性,模板中为 组件标签设置属性的时候,属性的名称要转为短横分隔命名( kebab-case), 此时就变成了 warning-text .这个规则会被Vue自动识别转换:
//子组件代码:
<template>
    <div>{{ warningText }}div>
template>
<script>
    export default {
        name: 'my-component'
        props: ['warningText']
    }
script>

//父组件中使用
<template>
    <div>

        my-component>
    div>
template>
<script>
    import MyComponent from './MyComponent.vue'
    export default {

        components: {
            MyComponent //局部注册子组件
        }
    }
script>
2.3 props 对象
前面在使用组件 props选项定义组件属性的时候,使用的是数组,数组中存放的都是 属性名称。props选项也可以用作对象,用作对象的时候,除了可以定义属性的名称,还可以对属性做类型验证.比如有的属性要求是字符串,有的属性要求是数字等。
如果props选项用对象来定义,就可以约束
- 属性名
- 是否必填 required
- 默认值 default
- 类型 type, 支持的值有 String,Number,Boolean,Object,Array,Function
示例:
//某子组件
<template>
    <div> ... div>
template>
<script>
    export default {
        props: {
            propA : Number, //propA必须是一个数字
            propB : [Number,String], //propB可以是数字也可以是字符串
            propC : {
                type: Boolean, //约束数据类型
                defualt: true //默认为true
            },
            propD : {
                type: Number, //数字
                required : true //必填
            },
            propE : {
                type: Array, //数组
                default: function(){ return [] } //获取默认值的时候会调用函数,由函数返回
            },
            propF : {
                type: Function,//数组
                default(){ return function(){} } //默认是一个没有任何功能的空函数
            },
            propG : {
                type: Object ,//对象
                default(){ return {} }
            }
        }
    }
script>
可以看到,属性类型为 Object, Array, Function的时候,要想获取它的默认值,都会调用 default函数来获取,真正的默认值由函数来返回。
2.4 为props传递对象和函数
下面分别一个对象(数组也是对象)和一个函数通过子组件属性传递到 props中,子组件提供两个按钮,一个用来修改对象的内容,一个用来调用传递进来的函数,看看会发生什么:
src/components/MyComponent.vue 子组件
<template>
    <div>

        <button class="btn btn-success btn-lg"
                @click="callBack(number+10)">
            调用props传进来的 callBack 属性,它是一个在父组件中定义的函数
        button>

        <button class="btn btn-info btn-lg" @click="changeStudent">
            修改传递进来的studnet对象值
        button>
    div>
template>

<script>
    export default {
        data(){
            return {
                number: 100
            }
        },
        props : {
            'student': {
                type: Object
            },
            'callBack' : {
                type : Function,
                default(){ //默认是一个没有任何功能的空函数
                    return function(){}
                }
            }
        },
        methods: {
            changeStudent(){
                this.student.name = '李四',
                this.student.age = 25
            }
        }

    }
script>
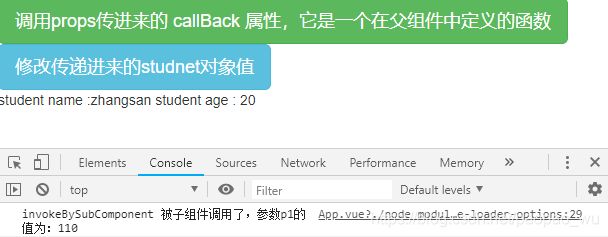
点击第一个按钮,直接调用传进来的callBack函数,并传递参数值为 110,点击第二个按钮调用子组件的changeStudent 函数修改传进来的student的内容。
src/components/App.vue 父组件中将对象和函数传递到子组件中:
<template>
<div>
运行起来后点击第一个按钮,发现父组件中定义的函数正常调用了
点击第二按钮,发现对象也被修改了:
因为JavaScript中对象是按照引用传递的,所以对象从父组件传入子组件此时 这个对象只有一份,只是将引用传递进去而已,所以在子组件中修改对象,父组件中的对象也会跟着变化。因为数组也是对象,所以传递数组也是一样。
注意如果子组件中修改的不是对象的内容,而是指向另外一个对象,父组件中是不会发生变化的。
2.5 单向数据流
Vue2 通过props传递数据是单向的,也就是父组件中的数据通过 props传递到了子组件内部,当父组件中这个数据发生变化的时候,这个变化将会传递到子组件中,但反过来子组件中更改了数据,是不会传递到父组件中的。每次父组件更新时,子组件的所有prop都会更新为最新值。
但是把对象和数组通过props传递到子组件中,因为avaScript 中对象和数组是引用类型,指向同一个内存空间, 子组件修改了对象或者数组中的数据,就会影响到父组件。实际开发中应该尽量避免这种修改,尽可能将父子解耦,避免子组件无意中修改了父组件的状态。
如果实际业务场景中需要子组件影响父组件的情况,可以采用传递函数的方式,让子组件回调在父组件中定义的函数,也可以采用事件的方式(后面会讲到)
2.6 id/class/style属性
组件像HTML标签,HTML标签有通用属性 id,clsss, style 等,那么这些属性能不能用在组件上呢?是可以的。我们知道任何一个组件有且仅有一个根元素,如果在组件标签上添加了 id,class,style等属性,那么这些属性将会被自动添加到组件的根元素上。
3. 父子组件通信-槽(slot)
组件在template中使用的时候更像一个自定义的HTML标签,HTML很多标签在开始标签和结束标签之间还有内容,这里将这些内容称为标签体。Vue组件也可以像HTML标签一样,在开始标签和结束标签之间写标签体内容。将前面写的那个bs-alert 组件更改一下,去掉content属性,把要显示的信息写在标签体内
<bs-alert :level='successMsg.level' :content='successMsg.msg' />

<bs-alert :level='successMsg.level'>
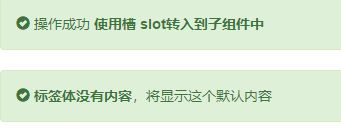
     {{successMsg.msg}} <strong> 使用槽 slot转入到子组件中 strong>
bs-alert>
那么组件内部如何获取到标签体的信息呢?在子组件的template中使用 来引用标签体的内容
槽的好处就是将所有的标签内内容全部都可以打包到槽后传到子组件内部。
src/components/BsAlert.vue
<template>
    <div class="alert" :class="levelClass" role="alert">
      <span class="glyphicon" :class="iconClass" aria-hidden="true">span>
      <slot />
    div>
template>

<script>
    const iconClassName = { //图标的css类名
        'success' : 'glyphicon-ok-sign',
        'info' : 'glyphicon-exclamation-sign',
        'warning' : 'glyphicon-warning-sign',
        'danger' : 'glyphicon-remove-sign'
    }
    export default {
        props: [ 'level'],
        data(){
            return {}
        },
        computed:{
            iconClass(){
                //默认为info图标,传递的level 在iconClassName 的key中不存在,就使用 iconClassName['info']
                return iconClassName[this.level] || iconClassName['info']
            },
            levelClass(){
                //默认为info级别
                return `alert-${iconClassName[this.level]?this.level :'info'}`
            }
        }
    }
script>

<style scoped>

style>
src/components/App.vue
<template>
  <div>

      <bs-alert :level='successMsg.level'>
        {{successMsg.msg}} <strong> 使用槽 slot转入到子组件中 strong>
      bs-alert>
  div>
template>

<script>
//BsAlert.vue与App.vue位于同一个目录下,不必每次都从 src目录开始
import BsAlert from './BsAlert'

export default {
  name :'App',
  data(){
    return {
      successMsg : { level: 'success', msg : '操作成功' }
    }
  },
  components :{
   BsAlert
  }
};
script>
标签体中有内容,则子组件中的 slot 就会使用这部分内容,当没有内容的时候,如果想显示一个默认内容如何处理?
src/components/BsAlert.vue
<template>
    <div class="alert" :class="levelClass" role="alert">
      <span class="glyphicon" :class="iconClass" aria-hidden="true">span>


      <slot> <strong>标签体没有内容strong>,将显示这个默认内容slot>
    div>
template>
src/components/App.vue
<template>
  <div>

      <bs-alert :level='successMsg.level'>
        {{successMsg.msg}} <strong> 使用槽 slot转入到子组件中 strong>
      bs-alert>

      <bs-alert :level='successMsg.level'>bs-alert>
  div>
template>
Vue还支持命名槽,这个内容后面用到了再讲解,这里先理解和使用槽的基本用法
4. 父子组件通信-事件(event)
在子组件中可以抛出一个事件,在父组件中订阅这个事件。任何一个组件都是Vue的实例对象,Vue API中提供了 $emit 这个方法(注意Vue API中关于实例的属性和方法前面都有一个$符号 )抛出事件,订阅的时候使用 v-on 来订阅事件。
4.1 使用自定义事件
下面的例子中,子组件 gen-radom-data 的功能是每秒生成一个 0<=随机数 <1 并显示,数值低于 0.5 用红色显示, 0.5<= 数值<0.8 用蓝色显示 , 数值>=0.8 用绿色显示 ,并统计 数值>=0.8 出现的次数。 每次 数值>=0.8 的时候抛出一个事件(事件中携带出现的次数),父组件 app中订阅这个事件,并显示出来。
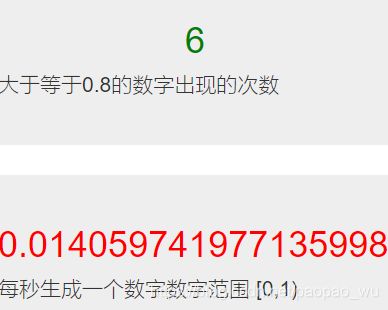
src/components/GenRadomData.vue
<template>
    <h1 :style='fontColor'> {{ number }} h1>
template>
<script>
    export default {
        data(){
            // number 随机数字  fontColor : 字体颜色 total 大于等于0.8的次数
            return { number : 0, fontColor: {color: '#2e6da4'},total:0}
        },
        methods:{
          genNumber(){
            this.number= Math.random()
            if(this.number>=0 && this.number< 0.5){
                this.$set(this.fontColor,'color','red')
              //this.fontColor.color= 'red' 直接赋值后不会触发界面更新,应该采用上面的代码
            }else if(this.number>=0.5 && this.number< 0.8){
                this.$set(this.fontColor,'color','#2e6da4')
            }else{
                this.$set(this.fontColor,'color','green')
                this.total ++
                this.$emit('count',this.total ) // 抛出事件
            }
            window.setTimeout(this.genNumber,1000) //每秒产生一个数字
          }
        },
        created() { //组件创建完毕后调用
            this.genNumber()
        },
    }
script>
src/components/App.vue
<template>
<div>
<div class="jumbotron">
<h1 style="text-align:center;color:green"> {{ count }} h1>
<p>大于等于0.8的数字出现的次数p>
div>
<div class="jumbotron">
4.2 组件上使用v-model
v-model 是在表单输入元素上使用的,用来做双向绑定,如:
<input v-model="searchText">
实际上,v-model是一个简写的形式,是一个语法糖。本质上,它是:
<input v-bind:value="searchText"
       v-on:input="searchText = $event.target.value" >
这样来理解 v-model: 它首先用 v-bind绑定了 searchText属性,当发生"输入事件(input )"的时候,从事件源(就是这个输入框)获取输入的内容 $event.target.value ,然后赋值给searchText
自定义的组件上也是可以使用v-model的,其原理与在 HTML表单输入元素一样。这就于自定义组件有两点要求:
- 需要定义名为 value 的props,目的是为了接收绑定的数据
- 在组件内部,如果value发生变化,需要使用
$emit触发事件(抛出事件)并携带 value的值
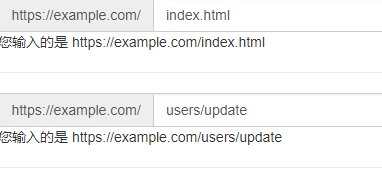
下面自定义一个输入网址的文本框 bs-url-input,需要用到bootstrap的输入框组:
输入值后:
src/components/BsUrlInput.vue
<template>
  <div class="input-group">
    <span class="input-group-addon">{{ baseUrl}} span>
    <input type="text" class="form-control" :value="inputValue" @input='changeInputValue'>
  div>
template>
<script>
const baseUrl="https://example.com/"
export default {
    props: ['value'], //必须定义value属性
    data() {
        return {
            baseUrl,
            inputValue : ''
        }
    },
    methods: {
        changeInputValue(event){ //默认会传递原生Dom的event对象
            this.inputValue=event.target.value
            if(this.inputValue){
                this.$emit('input',`${baseUrl}${this.inputValue}`) //触发input事件,拼接好字符串后抛出
            }else{
                this.$emit('input','')
            }

        }
    },
    created() { //检查通过传props递进来的value
        console.log(this.value)
        if(this.value && this.value.startsWith(baseUrl)){
                this.inputValue=this.value.replace(baseUrl,'') //将baseUrl截取掉
        }
    }
}
script>
src/components/App.vue
<template>
  <div>
     <bs-url-input v-model="url1" />
     <p>您输入的是 {{ url1}}p>
      <hr />
    <bs-url-input v-model="url2" />
     <p>您输入的是 {{ url2}}p>
      <hr />

  div>
template>

<script>
import BsUrlInput from './BsUrlInput'
export default {
  name :'App',
  data(){
    return {url1 : '',url2:'https://example.com/users/create' }
  },
  methods :{
  },
  components :{
   BsUrlInput
  }
};
script>
5. 组件通信场景
父子组件通信是Vue应用中最基本的通信场景。实际业务场景中,会涉及到更多的组件通信场景:
- 父子组件通信
- 兄弟组件通信
- 跨级组件通信
5.1 p a r e n t 与 parent与 parent与children和$ref
一个组件就是一个Vue实例对象,在组件内部使用this,就表示实例对象本身。在Vue API中提供了一些API 用来访问实例对象属性,参考文档:https://cn.vuejs.org/v2/api/#%E5%AE%9E%E4%BE%8B%E5%B1%9E%E6%80%A7
- $parent 组件的父组件实例对象
- $root 根组件实例对象
- $children 组件所有的子组件对象,是一个数组
- $refs
当娶到实例对象后,可以直接做任何操作,比如直接修改数据。尽管Vue允许这样操作,但再实际业务中,子组件应该尽量主动修改它的数据,因为这样使得父子组件紧密耦合,只看父组件,很难理解父组件的状态,因为它可能被任意组件修改。父子通信最好的方式就是通过 props和 $emit 触发事件来通信。
虽然 $children可以访问到所有的子组件,但是当子组件很多的时候,要获取某个具体的组件的时候就需要一一遍历来获取,特别是有的组件还是动态渲染的,它们的序列是不固定的。
Vue组件有一个特殊的属性,叫做 ref,它可以用来为子组件指定一个索引名称,类似于HTML标签的ID。父组件模板中,子组件标签上使用ref指定一个名称,并在父组件内通过 this.$refs 来访问指定名称的子组件。
$refs 只在组件渲染完成后才填充,它仅仅作为一个直接访问子组件的应急方案,应该避免在 template或者 计算属性中使用 $refs
定义个一个my-component 组件 src/components/MyComponent.vue,这个组件中简单显示一个message数据
<template>
    <div>
           MyComponent子组件  {{ message }}
    div>
template>

<script>
    export default {
        data() {
            return { message : ''}
        }
    }
script>
在 src/components/App.vue 中修改子组件中的 message属性:
<template>
  <div>

     <my-component ref="compA">my-component> <button @click="updateComA">修改compA组件button>
     <hr />
     <my-component ref="compB">my-component> <button @click="updateComB">修改compB组件button>
  div>
template>

<script>
import MyComponent from './MyComponent'
export default {
  name :'App',
  methods: {
    updateComA(){
      this.$refs.compA.message = 'Hello' //找到compA组件并修改数据
    },
    updateComB(){
      this.$refs.compB.message = 'Vue' //找到compB组件并修改数据
    }
  },
  components :{
   MyComponent
  }
}
script>
5.2 非父子通信-Bus
对于非父子通信,Vue2中推荐使用 事件总线 Bus。一个事件总线就是一个空的Vue实例对象,当一个组件需要触发事件的时候,就用Bus对象的 $emit方法来触发一个事件。然后还是在这个Bus对象上使用 $on方法来监听触发的事件,使用 $off方法来移除监听的事件。这里就有一个要求,所有的组件都要使用同一个Bus对象。
下面的案例中,为了方便起见,把bus对象挂载在根组件对象上。
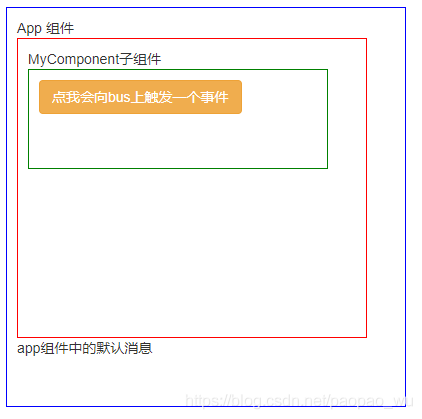
这里有4层对象 Root>App>MyComponent> SubMyComponent
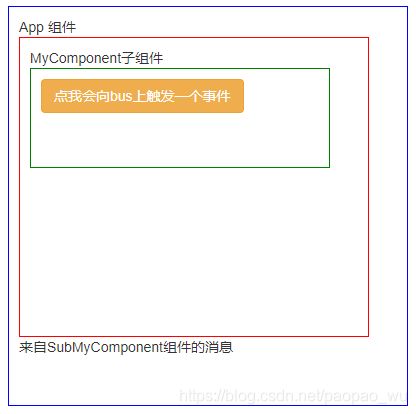
最外层是Root组件, 蓝色框内是App组件, 红色框内是 MyComponent组件, 绿色框内是SubMyComponent, 点击 SubMyComponent 组件内的按钮,将会在bus上触发一个on-message 事件。App组件创建完毕后,注册on-message 事件,监听来自SubMyComponent 提交的事件。App组件销毁的时候,移除监听的事件。这样就使用bus完成了跨级通信
因为要在全局使用bus,所以就将bus对象挂载到 根对象上,
src/main.js
import Vue from 'vue'
import App from '@/components/App'
import 'bootstrap/dist/css/bootstrap.css'
const vm=new Vue({
  data: {
      bus: new Vue() //vm是根对象,在根对象上放一个总线对象,用来完成跨层级通信
  },
  el: '#app',
  render: h=>h(App)
})
最内层的 src/components/SubMyComponent .vue (绿色)
<template>
    <div style="border:1px solid green;width:300px;height:100px;padding: 10px;">

        <button class="btn btn-warning" @click="triggerOnMessageEvent">点我会向bus上触发一个事件button>
    div>
template>

<script>
    export default {
        methods:{
            triggerOnMessageEvent(){
                //获取到根节点上的bus对象,提交一个事件
                this.$root.bus.$emit('on-messaeg','来自SubMyComponent组件的消息')
            }
        }
    }
script>
中间的 src/components/MyComponent .vue (红色)
<template>
    <div style="border: 1px solid red ;width: 350px;height:300px;padding: 10px;">
           MyComponent子组件

           <sub-my-component />
    div>
template>

<script>
    import SubMyComponent from './SubMyComponent'
    export default {
        components : {
            SubMyComponent
        }
    }
script>
src/components/App.vue (蓝色)
<template>
  <div style='border:1px solid blue; width:400px;height:400px;padding: 10px;margin:10px'>
      App 组件
      <my-component />

      {{ msg}}
  div>
template>

<script>
import MyComponent from './MyComponent'
export default {
  name :'App',
  data(){
    return {
      msg: 'app组件中的默认消息'
    }
  },
  created(){
    this.$root.bus.$on('on-messaeg',(data)=>{
      //因为用的是箭头函数,所以this还是App组件的实例对象
        this.msg=data
    })
  },
  destroyed(){
    this.$root.bus.$off('on-messaeg') //组件对象销毁的时候,移除事件监听
  },
  components :{
   MyComponent
  }
}
script>
启动后点击按钮,发现 蓝色的 App.vue组件上收到了 绿色的 SubMyComponent.vue组件上的消息
5.2 非父子通信-VueX
非父子通信还有另外一种办法,就是使用 VueX 库,它是Vue的一个插件,用于数据的状态管理,实现数据共享。Vuex后面会有专门章节进行讲解。


