本文参考https://learnopengl.com/Getting-started/Creating-a-window
GLFW
GLFW是一个由c写成的库,为OpenGL提供基本渲染的的一个实现类库
Building GLFW
GLFW 的lib库不一定在每一台电脑都可以使用,所以需要在使用者自己的电脑上编译GLFW源文件,以生成lib库 ,这样是比较靠谱的。
下载地址
CMake
CMake是一个工具,可以使用预定义的CMake脚本从一组源代码文件中生成用户选择的项目/解决方案文件(例如Visual Studio,Code :: Blocks,Eclipse)。这使我们可以从GLFW的源代码包生成一个Visual Studio 2012项目文件,我们可以使用它来编译生成GLFW库。
下载地址
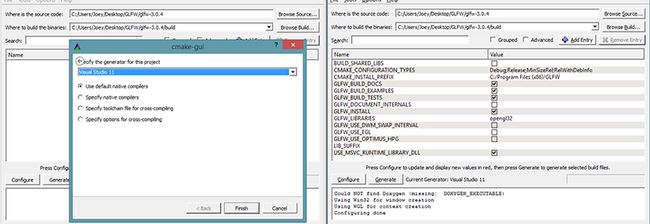
CMake安装好后 , 我们将选择已下载的GLFW源文件包的根文件夹,然后在GLFW源文件包里面创建一个build文件夹,然后将build输出目录选择这个目录,具体看如下图
一旦设置了源文件夹和目标文件夹,点击Configure按钮,CMake就可以读取所需的设置和源代码。然后,我们必须为项目选择生成器,并且由于我们使用的是Visual Studio 2017,因此我们将选择“Visual Studio 17” 。然后CMake将显示可能的构建选项来配置结果库。这个时候不用管,再次点击`Configure就可以存储设置完成 ,然后接着我们可以点击Generate,生成的项目文件会在你的build文件夹中生成。
Compilation
在build文件夹中,可以找到一个名为GLFW.sln的文件,并且我们用Visual Studio 2017打开它。
我们可以点击Build Solution按钮,然后会在build / src / Debug生成的编译库glfw3.lib (注意,我们使用的是版本3)。
GLFW源代码目录中,你会看到由一个Include目录,然后里面是GLFW的一些库文件,这个Include库文件以及之前说过的glfw3.lib 是我们所需要的。
Glad
在完成准备工作之前,由于OpenGL是一个标准/规范,因此驱动程序制造商必须将该规范实施到特定图形卡支持的驱动程序。由于OpenGL驱动程序有许多不同的版本,其大部分功能的位置在编译时并不知道,需要在运行时查询。然后开发人员的任务是检索他/她所需功能的位置并将它们存储在函数指针中以备后用。检索这些位置是特定于操作系统的,在Windows中它看起来像这样:
//定义函数的原型
typedef void(* GL_GENBUFFERS)(GLsizei,GLuint *);
//找到函数并将其分配给函数指针
GL_GENBUFFERS glGenBuffers =(GL_GENBUFFERS)wglGetProcAddress(“glGenBuffers”);
//现在可以调用正常的函数
无符号整型缓冲区;
glGenBuffers(1,&buffer);
正如你所看到的,代码看起来很复杂,对于你可能需要的尚未声明的每个函数来说,这是一个麻烦的过程。值得庆幸的是,这里还有一些专门处理这类事务的类库Glad
设置GLAD
GLAD是一个 开源的库, 下载地址,可以管理我们所讨论的所有繁琐工作。 GLAD与大多数常见的开源库有略微不同的配置设置。 GLAD使用Web服务,我们可以告诉GLAD我们要定义哪个版本的OpenGL,并根据该版本加载所有相关的OpenGL函数。所以一般我们不用关心这个源代码,只需要使用由这个开源库提供的Web服务即可
我们打开 Web服务 (点击这个链接),将会打开一个网页,在网页中做如下操作:
确保语言设置为C ++,
并在API部分中选择至少3.3的OpenGL版本(这是我们将用于这些教程的内容;更高版本也可以)。
确保配置文件设置为Core,
保证Generate a loader被勾选。忽略扩展(至少在目前为止我们先这么做),
然后单击generate以生成库文件。
然后你可以看到GLAD应该已经为您提供了一个zip文件,其中包含两个包含文件夹glad and KHR和一个glad.c文件。这几个东西是我们需要的。
准备
1.在你的工作目录新建一个目录Opengl
2.在Opengl里面新建两个文件夹Includes和Libs
3.将前文提到的GLFW的Include文件里的glfw目录和glad ,KHR 均拷贝到Includes目录下
4.将前文提到的GLFW的glfw3.lib拷贝到Libs目录下
5.glad.c将会拷贝到vs工程,这个后面交代
Our first project
现在让我们打开Visual Studio并创建一个新项目。如果给出多个选项并选择空项目,请选择Visual C ++(不要忘记给项目一个合适的名称)。我们现在有一个工作空间来创建我们的第一个OpenGL应用程序!
我们将glad.c拷贝到工程目录源代码目录,同时新建一个Main.cpp文件,并粘贴如下内容
#include
#include

#include

void framebuffer_size_callback(GLFWwindow* window, int width, int height);
void processInput(GLFWwindow *window);

// settings
const unsigned int SCR_WIDTH = 800;
const unsigned int SCR_HEIGHT = 600;

const char *vertexShaderSource = "#version 330 core\n"
    "layout (location = 0) in vec3 aPos;\n"
    "void main()\n"
    "{\n"
    "   gl_Position = vec4(aPos.x, aPos.y, aPos.z, 1.0);\n"
    "}\0";
const char *fragmentShaderSource = "#version 330 core\n"
    "out vec4 FragColor;\n"
    "void main()\n"
    "{\n"
    "   FragColor = vec4(1.0f, 0.5f, 0.2f, 1.0f);\n"
    "}\n\0";

int main()
{
    // glfw: initialize and configure
    // ------------------------------
    glfwInit();
    glfwWindowHint(GLFW_CONTEXT_VERSION_MAJOR, 3);
    glfwWindowHint(GLFW_CONTEXT_VERSION_MINOR, 3);
    glfwWindowHint(GLFW_OPENGL_PROFILE, GLFW_OPENGL_CORE_PROFILE);

#ifdef __APPLE__
    glfwWindowHint(GLFW_OPENGL_FORWARD_COMPAT, GL_TRUE); // uncomment this statement to fix compilation on OS X
#endif

    // glfw window creation
    // --------------------
    GLFWwindow* window = glfwCreateWindow(SCR_WIDTH, SCR_HEIGHT, "LearnOpenGL", NULL, NULL);
    if (window == NULL)
    {
        std::cout << "Failed to create GLFW window" << std::endl;
        glfwTerminate();
        return -1;
    }
    glfwMakeContextCurrent(window);
    glfwSetFramebufferSizeCallback(window, framebuffer_size_callback);

    // glad: load all OpenGL function pointers
    // ---------------------------------------
    if (!gladLoadGLLoader((GLADloadproc)glfwGetProcAddress))
    {
        std::cout << "Failed to initialize GLAD" << std::endl;
        return -1;
    }


    // build and compile our shader program
    // ------------------------------------
    // vertex shader
    int vertexShader = glCreateShader(GL_VERTEX_SHADER);
    glShaderSource(vertexShader, 1, &vertexShaderSource, NULL);
    glCompileShader(vertexShader);
    // check for shader compile errors
    int success;
    char infoLog[512];
    glGetShaderiv(vertexShader, GL_COMPILE_STATUS, &success);
    if (!success)
    {
        glGetShaderInfoLog(vertexShader, 512, NULL, infoLog);
        std::cout << "ERROR::SHADER::VERTEX::COMPILATION_FAILED\n" << infoLog << std::endl;
    }
    // fragment shader
    int fragmentShader = glCreateShader(GL_FRAGMENT_SHADER);
    glShaderSource(fragmentShader, 1, &fragmentShaderSource, NULL);
    glCompileShader(fragmentShader);
    // check for shader compile errors
    glGetShaderiv(fragmentShader, GL_COMPILE_STATUS, &success);
    if (!success)
    {
        glGetShaderInfoLog(fragmentShader, 512, NULL, infoLog);
        std::cout << "ERROR::SHADER::FRAGMENT::COMPILATION_FAILED\n" << infoLog << std::endl;
    }
    // link shaders
    int shaderProgram = glCreateProgram();
    glAttachShader(shaderProgram, vertexShader);
    glAttachShader(shaderProgram, fragmentShader);
    glLinkProgram(shaderProgram);
    // check for linking errors
    glGetProgramiv(shaderProgram, GL_LINK_STATUS, &success);
    if (!success) {
        glGetProgramInfoLog(shaderProgram, 512, NULL, infoLog);
        std::cout << "ERROR::SHADER::PROGRAM::LINKING_FAILED\n" << infoLog << std::endl;
    }
    glDeleteShader(vertexShader);
    glDeleteShader(fragmentShader);

    // set up vertex data (and buffer(s)) and configure vertex attributes
    // ------------------------------------------------------------------
    float vertices[] = {
        -0.5f, -0.5f, 0.0f, // left
         0.5f, -0.5f, 0.0f, // right
         0.0f,  0.5f, 0.0f  // top
    };

    unsigned int VBO, VAO;
    glGenVertexArrays(1, &VAO);
    glGenBuffers(1, &VBO);
    // bind the Vertex Array Object first, then bind and set vertex buffer(s), and then configure vertex attributes(s).
    glBindVertexArray(VAO);

    glBindBuffer(GL_ARRAY_BUFFER, VBO);
    glBufferData(GL_ARRAY_BUFFER, sizeof(vertices), vertices, GL_STATIC_DRAW);

    glVertexAttribPointer(0, 3, GL_FLOAT, GL_FALSE, 3 * sizeof(float), (void*)0);
    glEnableVertexAttribArray(0);

    // note that this is allowed, the call to glVertexAttribPointer registered VBO as the vertex attribute's bound vertex buffer object so afterwards we can safely unbind
    glBindBuffer(GL_ARRAY_BUFFER, 0);

    // You can unbind the VAO afterwards so other VAO calls won't accidentally modify this VAO, but this rarely happens. Modifying other
    // VAOs requires a call to glBindVertexArray anyways so we generally don't unbind VAOs (nor VBOs) when it's not directly necessary.
    glBindVertexArray(0);


    // uncomment this call to draw in wireframe polygons.
    //glPolygonMode(GL_FRONT_AND_BACK, GL_LINE);

    // render loop
    // -----------
    while (!glfwWindowShouldClose(window))
    {
        // input
        // -----
        processInput(window);

        // render
        // ------
        glClearColor(0.2f, 0.3f, 0.3f, 1.0f);
        glClear(GL_COLOR_BUFFER_BIT);

        // draw our first triangle
        glUseProgram(shaderProgram);
        glBindVertexArray(VAO); // seeing as we only have a single VAO there's no need to bind it every time, but we'll do so to keep things a bit more organized
        glDrawArrays(GL_TRIANGLES, 0, 3);
        // glBindVertexArray(0); // no need to unbind it every time

        // glfw: swap buffers and poll IO events (keys pressed/released, mouse moved etc.)
        // -------------------------------------------------------------------------------
        glfwSwapBuffers(window);
        glfwPollEvents();
    }

    // optional: de-allocate all resources once they've outlived their purpose:
    // ------------------------------------------------------------------------
    glDeleteVertexArrays(1, &VAO);
    glDeleteBuffers(1, &VBO);

    // glfw: terminate, clearing all previously allocated GLFW resources.
    // ------------------------------------------------------------------
    glfwTerminate();
    return 0;
}

// process all input: query GLFW whether relevant keys are pressed/released this frame and react accordingly
// ---------------------------------------------------------------------------------------------------------
void processInput(GLFWwindow *window)
{
    if (glfwGetKey(window, GLFW_KEY_ESCAPE) == GLFW_PRESS)
        glfwSetWindowShouldClose(window, true);
}

// glfw: whenever the window size changed (by OS or user resize) this callback function executes
// ---------------------------------------------------------------------------------------------
void framebuffer_size_callback(GLFWwindow* window, int width, int height)
{
    // make sure the viewport matches the new window dimensions; note that width and
    // height will be significantly larger than specified on retina displays.
    glViewport(0, 0, width, height);
}
Linking
在跑起来之前,还有一些东西需要设置
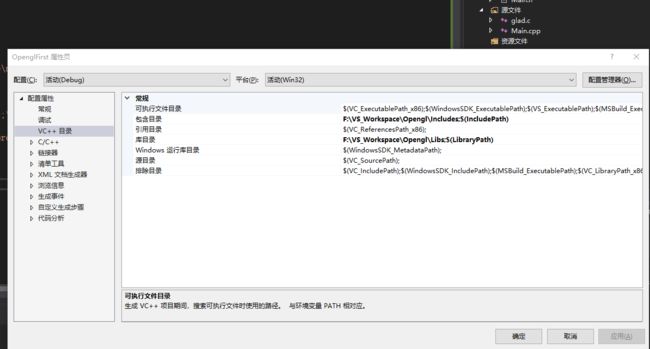
通过转到项目属性(在解决方案资源管理器中右键单击项目名称),我们可以添加这些目录(其中VS应该搜索库/包含文件),然后转到“VC ++目录”,如图中所示下面(请注意图中加粗的部分),用于配置类库和引用:
然后是链接器输入配置,如下
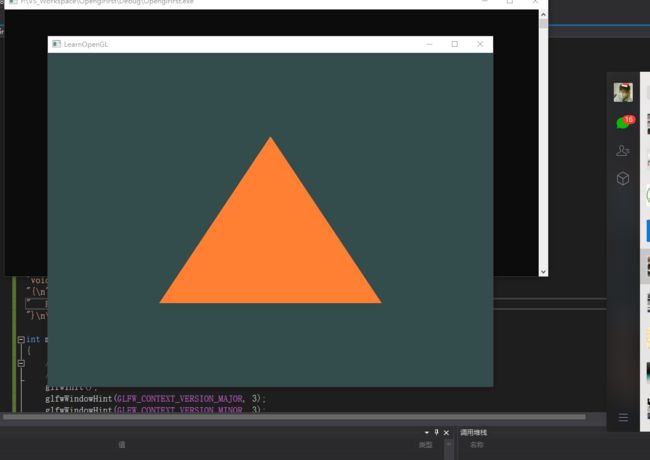
之后,你build工程,就可以看到一个三角形,如下图
本文是一个简化版本,详细版本,请参见https://learnopengl.com/Getting-started/Creating-a-window
Have Fun。
其他后续问题
今天发现opengl开源库有很多版本,比如glut,freeGlut等等,相应的配置方式可以参考各自的官方链接,如有需要,后期补上这方面的配置说明


