我们在实际的应用开发过程中有几种常见的页面展示方式
1:activity的setContentView方式来加载我们自己的布局
2:dialog的形式,setContentView
3:PopupWindow,PopupWindow初始化的时候可以传入一个View
4:通过WindowManager的addView方法添加到窗口管理器
Android中View是以树的形式来管理的,每个窗口上都对应着一个DecorView(根View),我们通过上面的前三个方法设置的view都被添加到DecorView下面的一个id为:android.R.id.Content的子view上
1:DecorView被添加到Window的过程

DecorView本质上是一个FrameLayout,它下面有四个子view
1:action_bar
2:content
3:navgationbarbackgroundview
4:statusbarbackgroundview
其中34既可以在systemui进程中绘制也可以在应用进程中绘制
在启动activity的过程中我们知道ActivityManagerService会回调Activity相关的生命周期,在ActivityThread中有一个方法叫handleResumeActivity
 @Override
    public void handleResumeActivity(IBinder token, boolean finalStateRequest, boolean isForward,
            String reason) {
        ...............................
        if (r.window == null && !a.mFinished && willBeVisible) {
            r.window = r.activity.getWindow();
            View decor = r.window.getDecorView();
            decor.setVisibility(View.INVISIBLE);-------------------------------------->设置成不可见
            ViewManager wm = a.getWindowManager();
            WindowManager.LayoutParams l = r.window.getAttributes();
            a.mDecor = decor;
            l.type = WindowManager.LayoutParams.TYPE_BASE_APPLICATION;
            l.softInputMode |= forwardBit;
            if (r.mPreserveWindow) {
                a.mWindowAdded = true;
                r.mPreserveWindow = false;
                // Normally the ViewRoot sets up callbacks with the Activity
                // in addView->ViewRootImpl#setView. If we are instead reusing
                // the decor view we have to notify the view root that the
                // callbacks may have changed.
                ViewRootImpl impl = decor.getViewRootImpl();
                if (impl != null) {
                    impl.notifyChildRebuilt();
                }
            }
            if (a.mVisibleFromClient) {
                if (!a.mWindowAdded) {
                    a.mWindowAdded = true;
                    wm.addView(decor, l);------------------------------------------->添加到窗口管理器
                } else {
                    // The activity will get a callback for this {@link LayoutParams} change
                    // earlier. However, at that time the decor will not be set (this is set
                    // in this method), so no action will be taken. This call ensures the
                    // callback occurs with the decor set.
                    a.onWindowAttributesChanged(l);
                }
            }
            // If the window has already been added, but during resume
            // we started another activity, then don't yet make the
            // window visible.
        } else if (!willBeVisible) {
            if (localLOGV) Slog.v(TAG, "Launch " + r + " mStartedActivity set");
            r.hideForNow = true;
        }
        // Get rid of anything left hanging around.
        cleanUpPendingRemoveWindows(r, false /* force */);
        // The window is now visible if it has been added, we are not
        // simply finishing, and we are not starting another activity.
        if (!r.activity.mFinished && willBeVisible && r.activity.mDecor != null && !r.hideForNow) {
            if (r.newConfig != null) {
                performConfigurationChangedForActivity(r, r.newConfig);
                if (DEBUG_CONFIGURATION) {
                    Slog.v(TAG, "Resuming activity " + r.activityInfo.name + " with newConfig "
                            + r.activity.mCurrentConfig);
                }
                r.newConfig = null;
            }
            if (localLOGV) Slog.v(TAG, "Resuming " + r + " with isForward=" + isForward);
            WindowManager.LayoutParams l = r.window.getAttributes();
            if ((l.softInputMode
                    & WindowManager.LayoutParams.SOFT_INPUT_IS_FORWARD_NAVIGATION)
                    != forwardBit) {
                l.softInputMode = (l.softInputMode
                        & (~WindowManager.LayoutParams.SOFT_INPUT_IS_FORWARD_NAVIGATION))
                        | forwardBit;
       if (r.activity.mVisibleFromClient) {
           ViewManager wm = a.getWindowManager();---------->windowManager是一个接口,实现类是WindowManagerImpl
                    View decor = r.window.getDecorView();
                    wm.updateViewLayout(decor, l);
                }
            }
            r.activity.mVisibleFromServer = true;
            mNumVisibleActivities++;
            if (r.activity.mVisibleFromClient) {
                r.activity.makeVisible();----------------------------------------->设置成可见
            }
        }
       ......................................
    }
WindowManagerImpl::addView
public final class WindowManagerImpl implements WindowManager {
    @UnsupportedAppUsage
    private final WindowManagerGlobal mGlobal = WindowManagerGlobal.getInstance();

    @Override
    public void addView(@NonNull View view, @NonNull ViewGroup.LayoutParams params) {
        applyDefaultToken(params);
        mGlobal.addView(view, params, mContext.getDisplay(), mParentWindow);----->通过WindowManagerGlobal来实现
 }
WindowManagerglobal的addView方法实现
public void addView(View view, ViewGroup.LayoutParams params,
            Display display, Window parentWindow) {
        ...............................................................................
        final WindowManager.LayoutParams wparams = (WindowManager.LayoutParams) params;
        if (parentWindow != null) {
            parentWindow.adjustLayoutParamsForSubWindow(wparams);---------->如果有父窗口,调整窗口参数
        } else {
            // If there's no parent, then hardware acceleration for this view is
            // set from the application's hardware acceleration setting.
            final Context context = view.getContext();
            if (context != null
                    && (context.getApplicationInfo().flags
                            & ApplicationInfo.FLAG_HARDWARE_ACCELERATED) != 0) {
                wparams.flags |= WindowManager.LayoutParams.FLAG_HARDWARE_ACCELERATED;
            }
        }
        ViewRootImpl root;
        View panelParentView = null;
        synchronized (mLock) {
            // Start watching for system property changes.
            if (mSystemPropertyUpdater == null) {
                mSystemPropertyUpdater = new Runnable() {
                    @Override public void run() {
                        synchronized (mLock) {
                            for (int i = mRoots.size() - 1; i >= 0; --i) {
                                mRoots.get(i).loadSystemProperties();
                            }
                        }
                    }
                };
                SystemProperties.addChangeCallback(mSystemPropertyUpdater);
            }
            int index = findViewLocked(view, false);
            if (index >= 0) {
                if (mDyingViews.contains(view)) {
                    // Don't wait for MSG_DIE to make it's way through root's queue.
                    mRoots.get(index).doDie();
                } else {
                    throw new IllegalStateException("View " + view
                            + " has already been added to the window manager.");
                }
                // The previous removeView() had not completed executing. Now it has.
            }
            // If this is a panel window, then find the window it is being
            // attached to for future reference.
            if (wparams.type >= WindowManager.LayoutParams.FIRST_SUB_WINDOW &&
                    wparams.type <= WindowManager.LayoutParams.LAST_SUB_WINDOW) {
                final int count = mViews.size();
                for (int i = 0; i < count; i++) {
                    if (mRoots.get(i).mWindow.asBinder() == wparams.token) {
                        panelParentView = mViews.get(i);
                    }
                }
            }
            root = new ViewRootImpl(view.getContext(), display);-------------------->创建ViewRootImpl对象
            view.setLayoutParams(wparams);
            mViews.add(view);
            mRoots.add(root);
            mParams.add(wparams);
            // do this last because it fires off messages to start doing things
            try {
                root.setView(view, wparams, panelParentView);--------------------->调用ViewRootImpl的setView方法
            } catch (RuntimeException e) {
                // BadTokenException or InvalidDisplayException, clean up.
                if (index >= 0) {
                    removeViewLocked(index, true);
                }
                throw e;
            }
        }
    }
在这里我们需要了解的是ViewRootImpl,PhoneWindow,PhoneWindow是Window目前唯一的实现类,在Activity的attch方法中创建,对应Dialog是在其构造函数中创建的,对于PopupWindow是没有直接持有Phonewindow对象的,这些都不重要,PhoneWindow并不是应用程序端的窗口(Window),PhoneWindow更多的是充当一个桥梁的作用,ViewRootImpl一端连接的是view,另一端连接的是windowmanager,ViewRootImpl里面有一个相当重要的成员: final W mWindow;这个才是应用程序段的窗口对象,其本质是一个binder对象,在应用程序向wms申请分配请求窗口的时候会传递给wms,以便wms能够回调窗口的各种状态
2:ViewRootImpl的setView方法
 // Schedule the first layout -before- adding to the window
                // manager, to make sure we do the relayout before receiving
                // any other events from the system.
                requestLayout();----------------------------->第一次请求布局
                if ((mWindowAttributes.inputFeatures
                        & WindowManager.LayoutParams.INPUT_FEATURE_NO_INPUT_CHANNEL) == 0) {
                    mInputChannel = new InputChannel();
                }
                mForceDecorViewVisibility = (mWindowAttributes.privateFlags
                        & PRIVATE_FLAG_FORCE_DECOR_VIEW_VISIBILITY) != 0;
                try {
                    mOrigWindowType = mWindowAttributes.type;
                    mAttachInfo.mRecomputeGlobalAttributes = true;
                    collectViewAttributes();
                    //请求添加到窗口,最终是调到wms的addWindow方法
                    res = mWindowSession.addToDisplay(mWindow, mSeq, mWindowAttributes,
                            getHostVisibility(), mDisplay.getDisplayId(), mWinFrame,
                            mAttachInfo.mContentInsets, mAttachInfo.mStableInsets,
                            mAttachInfo.mOutsets, mAttachInfo.mDisplayCutout, mInputChannel);
                } catch (RemoteException e) {
                    mAdded = false;
                    mView = null;
                    mAttachInfo.mRootView = null;
                    mInputChannel = null;
                    mFallbackEventHandler.setView(null);
                    unscheduleTraversals();
                    setAccessibilityFocus(null, null);
                    throw new RuntimeException("Adding window failed", e);
                } finally {
                    if (restore) {
                        attrs.restore();
                    }
                }
requestlayout便是view绘制的入口,我们从这个方法开始分析
3:View的整体绘制流程
    public void requestLayout() {
        if (!mHandlingLayoutInLayoutRequest) {
            checkThread();
            mLayoutRequested = true;
            scheduleTraversals();
        }
    }
    void scheduleTraversals() {
        if (!mTraversalScheduled) {
            mTraversalScheduled = true;
            mTraversalBarrier = mHandler.getLooper().getQueue().postSyncBarrier();
            mChoreographer.postCallback(
                    Choreographer.CALLBACK_TRAVERSAL, mTraversalRunnable, null);
            if (!mUnbufferedInputDispatch) {
                scheduleConsumeBatchedInput();
            }
            notifyRendererOfFramePending();
            pokeDrawLockIfNeeded();
        }
    }
    final class TraversalRunnable implements Runnable {
        @Override
        public void run() {
            doTraversal();
        }
    }
    final TraversalRunnable mTraversalRunnable = new TraversalRunnable();
    void doTraversal() {
        if (mTraversalScheduled) {
            mTraversalScheduled = false;
            mHandler.getLooper().getQueue().removeSyncBarrier(mTraversalBarrier);
            if (mProfile) {
                Debug.startMethodTracing("ViewAncestor");
            }
            performTraversals();---------------------->从performTraversals方法开始
            if (mProfile) {
                Debug.stopMethodTracing();
                mProfile = false;
            }
        }
    }
绘制会从ViewRootImpl的performTraversals方法开始,从上到下遍历整个视图树,每个View控件负责绘制自己,而ViewGroup还需要负责通知自己的子View进行绘制操作
private void performTraversals() {
    ...
    int childWidthMeasureSpec = getRootMeasureSpec(mWidth, lp.width);
    int childHeightMeasureSpec = getRootMeasureSpec(mHeight, lp.height);
    ...
    //执行测量流程
    performMeasure(childWidthMeasureSpec, childHeightMeasureSpec);
    ...
    //执行布局流程
    performLayout(lp, desiredWindowWidth, desiredWindowHeight);
    ...
    //执行绘制流程
    performDraw();
}
performTraversals的大致流程是
3.1:performMeasure的流程
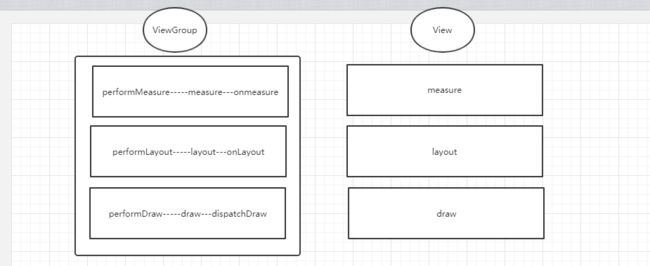
performMeasure主要是负责测量的
    private void performMeasure(int childWidthMeasureSpec, int childHeightMeasureSpec) {
        if (mView == null) {
            return;
        }
        Trace.traceBegin(Trace.TRACE_TAG_VIEW, "measure");
        try {
            mView.measure(childWidthMeasureSpec, childHeightMeasureSpec);---->也就是decorView
        } finally {
            Trace.traceEnd(Trace.TRACE_TAG_VIEW);
        }
    }
View的measure方法
public final void measure(int widthMeasureSpec, int heightMeasureSpec) {
       ........................................
        if (forceLayout || needsLayout) {
            if (cacheIndex < 0 || sIgnoreMeasureCache) {
                // measure ourselves, this should set the measured dimension flag back
                onMeasure(widthMeasureSpec, heightMeasureSpec);-------------->onMeasure
                mPrivateFlags3 &= ~PFLAG3_MEASURE_NEEDED_BEFORE_LAYOUT;
            } else {
                long value = mMeasureCache.valueAt(cacheIndex);
                // Casting a long to int drops the high 32 bits, no mask needed
                setMeasuredDimensionRaw((int) (value >> 32), (int) value);
                mPrivateFlags3 |= PFLAG3_MEASURE_NEEDED_BEFORE_LAYOUT;
            }
     ....................................
    }
    protected void onMeasure(int widthMeasureSpec, int heightMeasureSpec) {
        setMeasuredDimension(getDefaultSize(getSuggestedMinimumWidth(), widthMeasureSpec),
                getDefaultSize(getSuggestedMinimumHeight(), heightMeasureSpec));
    }
DecorView本身是一个FrameLayout,ViewGroup是一个抽象类,并没有重写onMeasure方法,我们从FrameLayout的onMeasure方法开始分析
 protected void onMeasure(int widthMeasureSpec, int heightMeasureSpec) {
        for (int i = 0; i < count; i++) {
            final View child = getChildAt(i);
            if (mMeasureAllChildren || child.getVisibility() != GONE) {
               // 子view结合父view的MeasureSpec和自己的layoutparms来计算自己的measureSpec
                measureChildWithMargins(child, widthMeasureSpec, 0, heightMeasureSpec, 0);
                final LayoutParams lp = (LayoutParams) child.getLayoutParams();
                maxWidth = Math.max(maxWidth,
                        child.getMeasuredWidth() + lp.leftMargin + lp.rightMargin);
                maxHeight = Math.max(maxHeight,
                        child.getMeasuredHeight() + lp.topMargin + lp.bottomMargin);
                childState = combineMeasuredStates(childState, child.getMeasuredState());
                if (measureMatchParentChildren) {
                    if (lp.width == LayoutParams.MATCH_PARENT ||
                            lp.height == LayoutParams.MATCH_PARENT) {
                        mMatchParentChildren.add(child);
                    }
                }
            }
        }
      //父view下的所有子view测量完成再来测量自己
       setMeasuredDimension(resolveSizeAndState(maxWidth, widthMeasureSpec, childState),
                resolveSizeAndState(maxHeight, heightMeasureSpec,
                        childState << MEASURED_HEIGHT_STATE_SHIFT));
        count = mMatchParentChildren.size();
        if (count > 1) {
            for (int i = 0; i < count; i++) {
                final View child = mMatchParentChildren.get(i);
                final MarginLayoutParams lp = (MarginLayoutParams) child.getLayoutParams();
                final int childWidthMeasureSpec;
                if (lp.width == LayoutParams.MATCH_PARENT) {
                    final int width = Math.max(0, getMeasuredWidth()
                            - getPaddingLeftWithForeground() - getPaddingRightWithForeground()
                            - lp.leftMargin - lp.rightMargin);
                    childWidthMeasureSpec = MeasureSpec.makeMeasureSpec(
                            width, MeasureSpec.EXACTLY);
                } else {
                    childWidthMeasureSpec = getChildMeasureSpec(widthMeasureSpec,
                            getPaddingLeftWithForeground() + getPaddingRightWithForeground() +
                            lp.leftMargin + lp.rightMargin,
                            lp.width);
                }
                final int childHeightMeasureSpec;
                if (lp.height == LayoutParams.MATCH_PARENT) {
                    final int height = Math.max(0, getMeasuredHeight()
                            - getPaddingTopWithForeground() - getPaddingBottomWithForeground()
                            - lp.topMargin - lp.bottomMargin);
                    childHeightMeasureSpec = MeasureSpec.makeMeasureSpec(
                            height, MeasureSpec.EXACTLY);
                } else {
                    childHeightMeasureSpec = getChildMeasureSpec(heightMeasureSpec,
                            getPaddingTopWithForeground() + getPaddingBottomWithForeground() +
                            lp.topMargin + lp.bottomMargin,
                            lp.height);
                }
                child.measure(childWidthMeasureSpec, childHeightMeasureSpec);------>子view测量
            }
        }
    }
measureChildWithMargins方法是ViewGroup的方法
    protected void measureChildWithMargins(View child,
            int parentWidthMeasureSpec, int widthUsed,
            int parentHeightMeasureSpec, int heightUsed) {
        final MarginLayoutParams lp = (MarginLayoutParams) child.getLayoutParams();
        final int childWidthMeasureSpec = getChildMeasureSpec(parentWidthMeasureSpec,
                mPaddingLeft + mPaddingRight + lp.leftMargin + lp.rightMargin
                        + widthUsed, lp.width);
        final int childHeightMeasureSpec = getChildMeasureSpec(parentHeightMeasureSpec,
                mPaddingTop + mPaddingBottom + lp.topMargin + lp.bottomMargin
                        + heightUsed, lp.height);
        child.measure(childWidthMeasureSpec, childHeightMeasureSpec);---->
    }
这样便完成了整个view的测量过程
3.2:performLayout的流程
private void performLayout(WindowManager.LayoutParams lp, int desiredWindowWidth,
            int desiredWindowHeight) {
        ············································
        try {
            host.layout(0, 0, host.getMeasuredWidth(), host.getMeasuredHeight());
            mInLayout = false;
            int numViewsRequestingLayout = mLayoutRequesters.size();
            if (numViewsRequestingLayout > 0) {
                // requestLayout() was called during layout.
                // If no layout-request flags are set on the requesting views, there is no problem.
                // If some requests are still pending, then we need to clear those flags and do
                // a full request/measure/layout pass to handle this situation.
                ArrayList validLayoutRequesters = getValidLayoutRequesters(mLayoutRequesters,
                        false);
                if (validLayoutRequesters != null) {
                  ························
        }·
        mInLayout = false;
    }
View的layout方法
public void layout(int l, int t, int r, int b) {
        ..........................
        boolean changed = isLayoutModeOptical(mParent) ?
                setOpticalFrame(l, t, r, b) : setFrame(l, t, r, b);
        if (changed || (mPrivateFlags & PFLAG_LAYOUT_REQUIRED) == PFLAG_LAYOUT_REQUIRED) {
            onLayout(changed, l, t, r, b);---------------------->view的矩形区域发生了变化,onlayout方法
            if (shouldDrawRoundScrollbar()) {
                if(mRoundScrollbarRenderer == null) {
                    mRoundScrollbarRenderer = new RoundScrollbarRenderer(this);
                }
            } else {
                mRoundScrollbarRenderer = null;
            }
      ...........................................
    }
    protected void onLayout(boolean changed, int left, int top, int right, int bottom) {
    }
onlayout方法是一个空方法,子类如果是ViewGroup的话则需要重写该方法,实现子view中所有视图的布局
实际上onLayout在ViewGroup中是一个抽象方法,必须去实现
3.3:performDraw的流程
    private void performDraw() {
        try {
            boolean canUseAsync = draw(fullRedrawNeeded);
            if (usingAsyncReport && !canUseAsync) {
                mAttachInfo.mThreadedRenderer.setFrameCompleteCallback(null);
                usingAsyncReport = false;
            }
        } finally {
            mIsDrawing = false;
            Trace.traceEnd(Trace.TRACE_TAG_VIEW);
        }
      private boolean draw(boolean fullRedrawNeeded) {
        .....................
          if (!drawSoftware(surface, mAttachInfo, xOffset, yOffset,
                        scalingRequired, dirty, surfaceInsets)) {
                    return false;
                }
            }
        }
      ..................................
      private boolean drawSoftware(Surface surface, AttachInfo attachInfo, int xoff, int yoff,
            boolean scalingRequired, Rect dirty, Rect surfaceInsets) {
         ...........................
                mView.draw(canvas);
         ..........................
                drawAccessibilityFocusedDrawableIfNeeded(canvas);
            } finally {
    }
进入到View.java的draw方法
public void draw(Canvas canvas) {
        /*
         * Draw traversal performs several drawing steps which must be executed
         * in the appropriate order:
         *
         *      1. Draw the background
         *      2. If necessary, save the canvas' layers to prepare for fading
         *      3. Draw view's content
         *      4. Draw children
         *      5. If necessary, draw the fading edges and restore layers
         *      6. Draw decorations (scrollbars for instance)
         */
        // Step 1, draw the background, if needed
        int saveCount;
        if (!dirtyOpaque) {
            drawBackground(canvas);
        }
        // skip step 2 & 5 if possible (common case)
        final int viewFlags = mViewFlags;
        boolean horizontalEdges = (viewFlags & FADING_EDGE_HORIZONTAL) != 0;
        boolean verticalEdges = (viewFlags & FADING_EDGE_VERTICAL) != 0;
        if (!verticalEdges && !horizontalEdges) {
            // Step 3, draw the content
            if (!dirtyOpaque) onDraw(canvas);
            // Step 4, draw the children
            dispatchDraw(canvas);
            drawAutofilledHighlight(canvas);
            // Overlay is part of the content and draws beneath Foreground
            if (mOverlay != null && !mOverlay.isEmpty()) {
                mOverlay.getOverlayView().dispatchDraw(canvas);
            }
            // Step 6, draw decorations (foreground, scrollbars)
            onDrawForeground(canvas);
            // Step 7, draw the default focus highlight
            drawDefaultFocusHighlight(canvas);
            if (debugDraw()) {
                debugDrawFocus(canvas);
            }
            // we're done...
            return;
        }
总结
View的绘制流程主要是从ViewRootImpl的requestLayout开始的,后续分为三大流程performMeasure,performLayout,performDraw