CentOS7上安装FastDFS和nginx
- 一,安装centos7
参考博客:https://www.cnblogs.com/yoyoblogs/p/10942257.html
1,启动网卡
问题: 查看ip(命令ip addr)时,发现么有inet值(centos的ip地址是ens33条目中的inet值)
解决办法:
1>修改网卡配置, 将ONBOOT=no 改成yes (vi /etc/sysconfig/network-scripts/ifcfg-ens33)
2>重启网络服务: sudo service network restart
参考博客:https://www.cnblogs.com/technology-huangyan/p/9146699.html
2,准备工作
所需要的包
libfastcommonV1.0.7.tar.gz
FastDFS_v5.05.tar.gz
fastdfs-nginx-module_v1.16.tar.gz
nginx-1.8.0.tar.gz
- 二,FastDFS安装
- 1,FatDFS–tracker安装
1.1 下载
tracker和storage使用相同的安装包,下载地址 :https://github.com/happyfish100/FastDFS
本教程下载:FastDFS_v5.05.tar.gz
1.2 FastDFS安装环境
安装 gcc环境: yum install gcc-c++
1.3 安装 libevent
安装FastDFS依赖libevent库: yum -y install libevent
1.4安装 libfastcommon
将 libfastcommonV1.0.7.tar.gz 拷贝至/usr/local/下
 cd /usr/local
 tar -zxvf libfastcommonV1.0.7.tar.gz
 cd libfastcommon-1.0.7
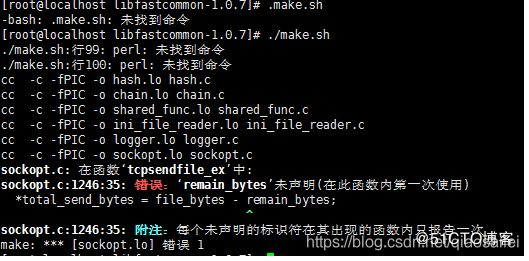
./make.sh
./make.sh install
问题一: 在安装libfastcommon时,执行./make.sh报错(未找到命令)

解决办法: 输入:yum -y install zlib zlib-devel pcre pcre-devel gcc gcc-c++ openssl openssl-devel libevent libevent-devel perl unzip net-tools wget
参考博客:https://blog.csdn.net/ytm15732625529/article/details/78827902
将/usr/lib64/libfastcommon.so拷贝到/usr/lib目录下:cp /usr/lib64/libfastcommon.so /usr/lib
(因为libfastcommon安装好后自动将文件拷贝至/usr/lib64下,由于fastdfs程序引用/usr/lib目录所以需要拷贝)
1.5 tracker 编译安装
将 FastDFS_v5.05.tar.gz 拷贝至/usr/local/下
tar -zxvf FastDFS_v5.05.tar.gz
cd FastDFS
./make.sh  编译
./make.sh install 安装
安装成功将安装目录下的conf下的文件拷贝到/etc/fdfs/下。
注意: ??应该是把里面的文件都拷进去,而不是conf,好像后面还有地方引用这些文件,否则会报错…(忘记了,里面如果有重复的就应该是复制conf了).
cp /usr/local/FastDFS/conf -r /etc/fdfs 可能是要复制里面的文件(先是复制的conf,但是后面好像用到了里面的文件(报错了),又把文件复制出来了)
1.6 配置tracker
安装成功后进入/etc/fdfs 目录:
拷贝一份新的 tracker 配置文件:
cp tracker.conf.sample tracker.conf
修改 tracker.conf
vi tracker.conf
base_path=/home/yuqing/FastDFS
改为:base_path=/home/FastDFS
配置 http 端口:
http.server_port=80
注意:先创建一个文件夹用户储存tracker 服务的数据和日志:mkdir -p /home/FastDFS
1.7启动tracker
/usr/bin/fdfs_trackerd /etc/fdfs/tracker.conf restart
看服务是否开启:netstat -unltp | grep fdfs
补充:如果tracker出错一定要看日志:日志的地方在:cd /home/FastDFS/logs
- 2,FastDFS–storage安装
注意:如果tracker 和storage服务在一台机器上,一下步骤可以不需要,如果tracker和storage在不同的机器上,以下的步骤一定要执行。
2.1 安装 libevent同上;
2.2安装libfastcommon 同上
2.3storage 编译安装 (解压安装FastDFS压缩包)
2.4 配置
安装成功后进入/etc/fdfs 目录:
拷贝一份新的 storage 配置文件:
cp storage.conf.sample storage.conf
修改 storage.conf
vi storage.conf
group_name=group1
base_path=/home/yuqing/FastDFS 改为:base_path=/home/ fastdfs
store_path0=/home/yuqing/FastDFS
改为:store_path0=/home/fastdfs/fdfs_storage
#如果有多个挂载磁盘则定义多个 store_path,如下
#store_path1=…
#store_path2=…
tracker_server=192.168.101.3:22122 #配置 tracker 服务器:IP
#如果有多个则配置多个 tracker
tracker_server=192.168.101.4:22122
#配置 http 端口
http.server_port=80
注意: 创建文件夹用户存储数据: mkdir -p /home/fastdfs/fdfs_storage
2.5 启动
/usr/bin/fdfs_storaged /etc/fdfs/storage.conf restart
查看是否启动: netstat -unltp | grep fdfs
- 三,FastDFS与nginx整合
- 1,在Storage上安装nginx
在 storage server 上安装 nginx 的目的是对外通过 http 访问 storage server 上的文
件。使用 nginx 的模块 FastDFS-nginx-module 的作用是通过 http 方式访问 storage 中
的文件,当 storage 本机没有要找的文件时向源 storage 主机代理请求文件。
1.1 安装FastDFS-nginx-module
将 FastDFS-nginx-module_v1.16.tar.gz 传 至 fastDFS 的 storage 服 务 器 的/usr/local/下,执行如下命令:
cd /usr/local
tar -zxvf FastDFS-nginx-module_v1.16.tar.gz
cd FastDFS-nginx-module/src
1.1.1修改配置文件(修改 config 文件将/usr/local/路径改为/usr/):vi config
#将CORE_INCS,CORE_LIBS,中的/usr/local/路径改为/usr/
CORE_INCS=“KaTeX parse error: Unexpected character: '' at position 58: …e/fastcommon/" ̲ CORE_LIBS="CORE_LIBS -L/usr/lib -lfastcommon -lfdfsclient”
1.1.2将 FastDFS-nginx-module/src 下的 mod_FastDFS.conf 拷贝至/etc/fdfs/下
cp mod_FastDFS.conf /etc/fdfs/
1.1.3修改/etc/fdfs/mod_fastdfs.conf配置文件 :cd /etc/fdfs/
vi /etc/fdfs/mod_FastDFS.conf
base_path=/home/FastDFS
tracker_server=192.168.101.3:22122
tracker_server=192.168.101.4:22122
url_have_group_name=true #url 中包含 group 名称
store_path0=/home/fastdfs/fdfs_storage #指定文件存储路径
#如果有多个
1.1.4将libfdfsclient.so 拷贝至/usr/lib下:cp /usr/lib64/libfdfsclient.so /usr/lib/
1.1.5创建 nginx/client 目录
mkdir -p /var/temp/nginx/client
- 2,nginx安装
将 nginx-1.8.0.tar.gz 拷贝到/usr/local 下
解压 nginx-1.8.0.tar.gz
进入 nginx-1.8.0 目录,执行如下配置命令:
下边红色部分表示添加 FastDFS-nginx-module 模块
./configure
–prefix=/usr/local/nginx
–pid-path=/var/run/nginx/nginx.pid
–lock-path=/var/lock/nginx.lock
–error-log-path=/var/log/nginx/error.log
–http-log-path=/var/log/nginx/access.log
–with-http_gzip_static_module
–http-client-body-temp-path=/var/temp/nginx/client
–http-proxy-temp-path=/var/temp/nginx/proxy
–http-fastcgi-temp-path=/var/temp/nginx/fastcgi
–http-uwsgi-temp-path=/var/temp/nginx/uwsgi
–http-scgi-temp-path=/var/temp/nginx/scgi
–add-module=/usr/local/fastdfs-nginx-module/src
make
make install
2.1 修改nginx配置文件
进入nginx目录:cd /usr/local/nginx
cd conf/
vim nginx.conf
server {
listen 80;
server_name 192.168.134.133;
location /group1/M00/{
root /home/FastDFS/fdfs_storage/data;
ngx_fastdfs_module;
}
}
2.2 启动
cd sbin
./nginx
2.3 测试
通过 java 客户端上传文件,使用浏览器 http 访问文件,这里访问上传图片测试的文件:
访问 storage:
http://192.168.101.5/group1/M00/00/00/wKhlBVVY2M-AM_9DAAAT7-0xdqM485_big.png
安装中常遇见的错误:
- 1.问题 一,要关闭防火墙:
查看防火墙状态 firewall-cmd --state
停止防火墙 systemctl stop firewalld.service
禁止防火墙开机启动 systemctl disablefirewalld.service
要开启centos的防火墙:
firewall-cmd --zone=public --add-port=80/tcp --permanent (–permanent永久生效,没有此参数重启后失效)
让端口生效
firewall-cmd --reload
- 问题二:nginx启动报错(查看的nginx错误日志)
nginx错误日志: /var/log/nginx/error.log
错误: [2019-11-19 04:36:25] ERROR - file: ini_file_reader.c, line: 315, include file “http.conf” not exists, line: “#include http.conf”
[2019-11-19 04:36:25] ERROR - file: /usr/local/fastdfs-nginx-module/src/common.c, line: 155, load conf file “/etc/fdfs/mod_fastdfs.conf” fail, ret code: 2
2019/11/19 04:36:25 [alert] 1431#0: worker process 1497 exited with fatal code 2 and cannot be respawned
问题原因:缺少文件.
解决办法:cp /root/fastdfs-master/conf/http.conf /root/fastdfs-master/conf/mime.types /etc/fdfs
- 问题三:用浏览器通过nginx访问storage中的文件报错
2019/11/19 05:41:00 [error] 1386#0: *4 open() “/usr/local/nginx/html/group1/M00/00/00/wKgKqV3S-smAKFC_AADfWjmpPlM924.jpg” failed (2: No such file or directory), client: 192.168.10.232, server: 192.168.10.169, request: “GET /group1/M00/00/00/wKgKqV3S-smAKFC_AADfWjmpPlM924.jpg HTTP/1.1”, host: “192.168.10.169”
错误原因:nginx配置文件错误
解决办法:
location /group1/M00/{
root /home/fastdfs/fdfs_storage/data;
ngx_FastDFS_module;
}