Spring-Boot的修炼之路
Spring-Boot初学入门
基础配置篇(简易Book读书系统)
通过上一篇文章大致了解了Spring-Boot的框架搭建,今天就和大家分享一下更进一步对Spring-Boot进行配置,做一个简单的读书系统。
用到的技术有:
- Spring-Boot整体框架
- 前端使用Thymeleaf模板
- 后台连接数据库使用MyBatis技术
- RestFul技术
- 数据库使用MySql 5.7
- 采用三层架构搭建后台框架
需求分析
- 根据读者添加图书
- 根据读者进行查询该读者所读图书
为了简单起见,我们就主要以这两个功能为主进行整个小项目
概要设计
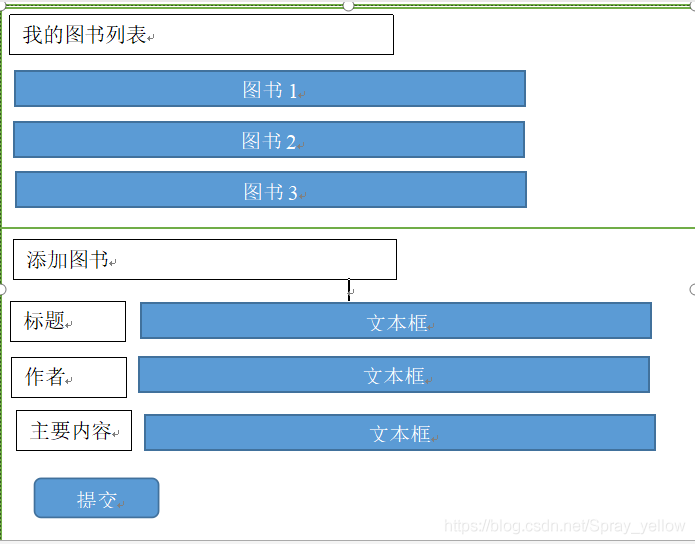
- 页面设计模型
后台数据库采用mysql5.7,那么现在需要设计后台数据库表结构,由于项目小,可只一个表即可:

编写代码
- 搭建框架,依照上一篇文章的顺序方可搭建好一个Spring-Boot项目框架
- 注入相关依赖包,在上一篇文章的基础上添加新的依赖包如下:
<dependency>
   <groupId>org.springframework.bootgroupId>
    <artifactId>spring-bootartifactId>
    <version>2.1.8.RELEASEversion>
dependency>

<dependency>
    <groupId>org.springframework.bootgroupId>
    <artifactId>spring-boot-devtoolsartifactId>
    <scope>runtimescope>
dependency>

<dependency>
    <groupId>org.springframework.bootgroupId>
    <artifactId>spring-boot-starter-thymeleafartifactId>
    <version>2.1.8.RELEASEversion>
dependency>

<dependency>
    <groupId>mysqlgroupId>
    <artifactId>mysql-connector-javaartifactId>
    <version>5.1.35version>
dependency>
<dependency>
    <groupId>org.apache.commonsgroupId>
    <artifactId>commons-lang3artifactId>
    <version>3.9version>
dependency>

<dependency>
    <groupId>commons-iogroupId>
    <artifactId>commons-ioartifactId>
    <version>2.6version>
dependency>
- 添加MyBatis逆向工程插件及相关配置
<plugin>
     <groupId>org.mybatis.generatorgroupId>
     <artifactId>mybatis-generator-maven-pluginartifactId>
     <version>1.3.5version>
     <executions>
         <execution>
             <id>Generate MyBatis Artifactsid>
             <goals>
                 <goal>generategoal>
             goals>
         execution>
     executions>
     <configuration>
         <configurationFile>src/main/resources/generatorConfig.xmlconfigurationFile>
         <verbose>trueverbose>
         <overwrite>trueoverwrite>
     configuration>

 plugin>
<pluginManagement>
    <plugins>

        <plugin>
            <groupId>org.eclipse.m2egroupId>
            <artifactId>lifecycle-mappingartifactId>
            <version>1.0.0version>
            <configuration>
                <lifecycleMappingMetadata>
                    <pluginExecutions>
                        <pluginExecution>
                            <pluginExecutionFilter>
                                <groupId>
                                    org.mybatis.generator
                                groupId>
                                <artifactId>
                                    mybatis-generator-maven-plugin
                                artifactId>
                                <versionRange>
                                    [1.3.5,)
                                versionRange>
                                <goals>
                                    <goal>generategoal>
                                goals>
                            pluginExecutionFilter>
                            <action>
                                <ignore>ignore>
                            action>
                        pluginExecution>
                    pluginExecutions>
                lifecycleMappingMetadata>
            configuration>
        plugin>
    plugins>
pluginManagement>
之后方可看到maven依赖的框架如下所示:

5. 为了避免项目本来端口号与电脑本身有冲突,现在可实现更改原有项目的端口号,在用配置文件方式设置端口号,同样,我们该项目有连接后台数据库,因此我们在配置文件中也得配置相关的数据库连接,本项目采用的是mysql-connector-java包进行与数据库连接,下面就讲讲该配置文件application.yml,Spring-Boot项目中的配置文件以yml结尾或有的是.properties结尾。
server:
  port: 8081 #设置tomcat的端口号

spring:
  datasource: #配置数据源及相关连接信息
    url: jdbc:mysql://xmaster:3306/book?useSSL=false&serverTimezone=UTC&user=root&password=&useUnicode=true&characterEncoding=UTF8&autoReconnect=true&failOverReadOnly=false
    username: root #配置用户名
    password: root #配置密码
    driver-class-name: com.mysql.jdbc.Driver #mysql驱动
  thymeleaf: #配置thymeleaf模板
    cache: false

mybatis:
  mapperLocations: classpath:mapper/*.xml #配置MyBatis扫描mapping路径
- 配置好yml文件以后我们接着配置MyBatis逆向工程的配置文件,这样一来就可以简单的将传统采用手工编写Bean层和DAO层转为自动生成,从而减轻了我们的工作量
配置文件如下generatorConfig.xml文件
<generatorConfiguration>


    <classPathEntry
            location="C:\Users\DengJie\.m2\repository\mysql\mysql-connector-java\8.0.11\mysql-connector-java-8.0.11.jar" />

    <context id="DB2Tables" targetRuntime="MyBatis3">

        <commentGenerator>
            <property name="suppressAllComments" value="true" />
        commentGenerator>


        <jdbcConnection driverClass="com.mysql.cj.jdbc.Driver"
                        connectionURL="jdbc:mysql://192.168.23.150:3306/book?serverTimezone=UTC&useUnicode=true&characterEncoding=utf-8&useSSL=false"
                        userId="root" password="root">
        jdbcConnection>


        <javaModelGenerator targetPackage="com.dj.example.model"
                            targetProject="src/main/java">
            <property name="enableSubPackages" value="true" />
            <property name="trimStrings" value="true" />
        javaModelGenerator>


        <sqlMapGenerator targetPackage="mapper"
                         targetProject="src/main/resources">
            <property name="enableSubPackages" value="true" />
        sqlMapGenerator>


        <javaClientGenerator type="XMLMAPPER"
                             targetPackage="com.dj.example.dao" targetProject="src/main/java">
            <property name="enableSubPackages" value="true" />
        javaClientGenerator>


        <table tableName="test" domainObjectName="Test" >table>
        <table tableName="book" domainObjectName="Book" >table>


    context>
generatorConfiguration>
本配置文件中的test表是数据库中没有的,在此的作用是由于没有加入表的话该文件会报错,但如果加入一个数据库中含有的表的话呢,每次只要一进行编译,便会重新生成一次逆向工程的代码,因此在此添加了一个数据库中不含有的表填充在此。
7. 逆向工程生成model和dao层以及mapping文件,点击idea右侧的maven,找到plugins下有一个mybatis-generator,点击方可生成逆向工程的代码了
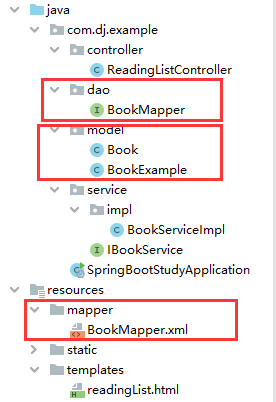
如上图所示,红色方框内即是生成的代码,而其它如service便是自己编写。
8. 编写service层代码
IBookService.java如下:
import com.dj.example.model.Book;
import com.dj.example.model.BookExample;

import java.util.List;

public interface IBookService {

    int addBook(Book book);

    List<Book> findBookByReader(BookExample bookExample);
}
BookServiceImpl.java类如下:
import com.dj.example.dao.BookMapper;
import com.dj.example.model.Book;
import com.dj.example.model.BookExample;
import com.dj.example.service.IBookService;
import org.springframework.beans.factory.annotation.Autowired;
import org.springframework.stereotype.Service;

import java.util.List;

@Service
public class BookServiceImpl implements IBookService {

    @Autowired
    private BookMapper bookMapper;

    @Override
    public int addBook(Book book) {
        int res = bookMapper.insertSelective(book);
        return res;
    }

    @Override
    public List<Book> findBookByReader(BookExample bookExample) {

        List<Book> books = bookMapper.selectByExample(bookExample);
        return books;
    }
}
- 编写控制层Controller类
import com.dj.example.model.Book;
import com.dj.example.model.BookExample;
import com.dj.example.service.IBookService;
import org.springframework.beans.factory.annotation.Autowired;
import org.springframework.stereotype.Controller;
import org.springframework.ui.Model;
import org.springframework.web.bind.annotation.GetMapping;
import org.springframework.web.bind.annotation.PathVariable;
import org.springframework.web.bind.annotation.PostMapping;
import org.springframework.web.bind.annotation.RequestMapping;

import java.util.List;

@Controller
@RequestMapping("/")
public class ReadingListController {

    @Autowired
    private IBookService bookService;


    @GetMapping("/{reader}")
    public String readerBooks(@PathVariable("reader") String reader,
                              Model model){
        BookExample bookExample = new BookExample();
        bookExample.createCriteria().andReaderLike(reader);
        List<Book> byReader = bookService.findBookByReader(bookExample);
        if(byReader != null){
            model.addAttribute("books",byReader);
        }

        return "readingList";
    }

    @PostMapping("{reader}")
    public String addToReadingList(@PathVariable("reader")String reader,
                                   Book book){
        book.setReader(reader);
        bookService.addBook(book);

        return "redirect:/{reader}";
    }
}
- 设计前端页面展示readingList.html使用thymeleaf模板进行编写如下
<html lang="en" xmlns:th="http://www.thymeleaf.org">
<head>
    <meta charset="UTF-8">
    <title>读书列表title>
    <link rel="stylesheet" th:href="@{/css/style.css}">link>
head>
<body>
<h2>你的读书列表h2>
<div th:unless="${#lists.isEmpty(books)}">
    <dl th:each="book : ${books}">
        <dt class="bookHeadline">
            <span th:text="${book.title}">标题span>
            <span>   作者:span>
            <span th:text="${book.author}">作者span>
        dt>
        <dd class="bookDescription">
 <span th:if="${book.description}"
       th:text="${book.description}">描述span>
            <span th:if="${book.description eq null}">
 暂无描述span>
        dd>
    dl>
div>
<div th:if="${#lists.isEmpty(books)}">
    <p>你的读书列表里还没有书籍p>
div>
<hr/>
<h3>添加书籍h3>
<form method="POST">
    <label for="title">标题:label>
    <input id="title" type="text" name="title" size="50">input><br/>
    <label for="author">作者:label>
    <input id="author" type="text" name="author" size="50">input><br/>
    <label for="description">描述:label><br/>
    <textarea id="description" name="description" cols="80" rows="5">
 textarea><br/>
    <input type="submit">input>
form>
body>
html>
值得注意的是该页面需要添加
<html lang="en" xmlns:th="http://www.thymeleaf.org">
否则html的th标签会标红
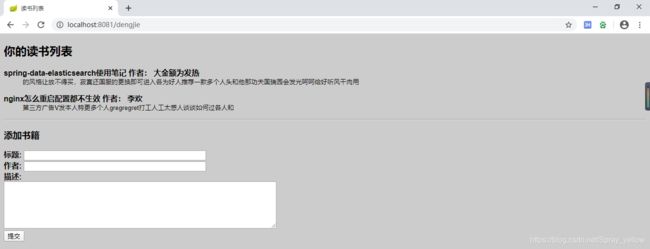
11. 运行整个项目即可出结果
本章小结
给大家分享了一下一个读书的系统,以及从分析到编码完成的完整阶段,其中使用到的技术点有Spring-Boot整个大框架,后台使用的model、dao、service层三层架构,采用MyBatis访问数据库,数据库采用了MySql5.7数据库,而MySql是安装在电脑的虚拟Linux系统中,因此我们还需要学习Linux的安装以及集群环境的搭建,等到后期再一一与大家分享吧,今天就到这里。