django版本1.8.2
pip install django==1.8.2
设计介绍
本示例完成“图书-英雄”信息的维护,需要存储两种数据:图书、英雄
图书表结构设计:
表名:BookInfo
图书名称:btitle
图书发布时间:bpub_date
英雄表结构设计:
表名:HeroInfo
英雄姓名:hname
英雄性别:hgender
英雄简介:hcontent
所属图书:hbook
图书-英雄的关系为一对多
数据库配置
在settings.py文件中,通过DATABASES项进行数据库设置
django支持的数据库包括:sqlite、mysql等主流数据库
Django默认使用SQLite数据库
命令django-admin startproject test1
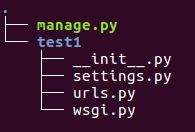
进入test1目录,目录结构如下图:
目录说明
manage.py:一个命令行工具,可以使你用多种方式对Django项目进行交互
内层的目录:项目的真正的Python包
_init _.py:一个空文件,它告诉Python这个目录应该被看做一个Python包
settings.py:项目的配置
urls.py:项目的URL声明
wsgi.py:项目与WSGI兼容的Web服务器入口
创建应用
在一个项目中可以创建一到多个应用,每个应用进行一种业务处理
创建应用的命令:python manage.py startapp booktest
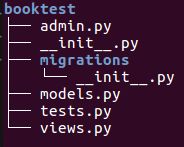
应用的目录结构如下图
定义模型类models.py
有一个数据表,就有一个模型类与之对应
打开models.py文件,定义模型类
引入包from django.db import models
模型类继承自models.Model类
说明:不需要定义主键列,在生成时会自动添加,并且值为自动增长
当输出对象时,会调用对象的str方法
代码如下:
from django.db import models

# Create your models here.

class BookInfo(models.Model):
    btitle=models.CharField(max_length=20)
    bpub_date=models.DateTimeField()
    def __str__(self):
        return self.btitle.encode('utf-8')


class HeroInfo(models.Model):
    hname=models.CharField(max_length=10)
    hgender=models.BooleanField()
    hcontent=models.CharField(max_length=1000)
    hbook=models.ForeignKey(BookInfo)
    def __str__(self):
        return self.hname.encode('utf-8')
然后
(python2) linux@ubuntu:~/桌面/project/test1$ python manage.py runserver 8080
生成数据表
- 激活模型:编辑settings.py文件,将booktest应用加入到installed_apps中
INSTALLED_APPS = (
    'django.contrib.admin',
    'django.contrib.auth',
    'django.contrib.contenttypes',
    'django.contrib.sessions',
    'django.contrib.messages',
    'django.contrib.staticfiles',
    'booktest'
)
- 生成迁移文件:根据模型类生成sql语句
python manage.py makemigrations
(python2) linux@ubuntu:~/桌面/project/test1$ python manage.py makemigrations
Migrations for 'booktest':
  0001_initial.py:
    - Create model BookInfo
    - Create model HeroInfo
/home/linux/.virtualenvs/python2/lib/python2.7/site-packages/django/db/backends/sqlite3/base.py:302: UnicodeWarning: Unicode equal comparison failed to convert both arguments to Unicode - interpreting them as being unequal
  return name == ":memory:" or "mode=memory" in force_text(name)

(python2) linux@ubuntu:~/桌面/project/test1$ ^C
-
迁移文件被生成到应用的migrations目录
- 执行迁移:执行sql语句生成数据表
python manage.py migrate
(python2) linux@ubuntu:~/桌面/project/test1$ python manage.py migrate
Operations to perform:
  Synchronize unmigrated apps: staticfiles, messages
  Apply all migrations: admin, contenttypes, sessions, auth, booktest
Synchronizing apps without migrations:
  Creating tables...
    Running deferred SQL...
  Installing custom SQL...
/home/linux/.virtualenvs/python2/lib/python2.7/site-packages/django/db/backends/sqlite3/base.py:302: UnicodeWarning: Unicode equal comparison failed to convert both arguments to Unicode - interpreting them as being unequal
  return name == ":memory:" or "mode=memory" in force_text(name)

Running migrations:
  Rendering model states... DONE
  Applying contenttypes.0001_initial... OK
  Applying auth.0001_initial... OK
  Applying admin.0001_initial... OK
  Applying contenttypes.0002_remove_content_type_name... OK
  Applying auth.0002_alter_permission_name_max_length... OK
  Applying auth.0003_alter_user_email_max_length... OK
  Applying auth.0004_alter_user_username_opts... OK
  Applying auth.0005_alter_user_last_login_null... OK
  Applying auth.0006_require_contenttypes_0002... OK
  Applying booktest.0001_initial... OK
  Applying sessions.0001_initial... OK
(python2) linux@ubuntu:~/桌面/project/test1$
测试数据操作
- 进入python shell,进行简单的模型API练习
python manage.py shell
- 进入shell后提示如下:
(python2) linux@ubuntu:~/桌面/project/test1$ python manage.py shell
Python 2.7.15rc1 (default, Apr 15 2018, 21:51:34)
[GCC 7.3.0] on linux2
Type "help", "copyright", "credits" or "license" for more information.
(InteractiveConsole)
>>> from booktest.models import *
>>> b=BookInfo()
>>> b.btitle='abc'
>>> from datetime import datetime
>>> b.bpub_date=datetime(year=1990,month=1,day=12)
>>> b.save()
/home/linux/.virtualenvs/python2/lib/python2.7/site-packages/django/db/models/fields/__init__.py:1474: RuntimeWarning: DateTimeField BookInfo.bpub_date received a naive datetime (1990-01-12 00:00:00) while time zone support is active.
  RuntimeWarning)

# 查询所有图书信息:
>>> BookInfo.objects.all()
[]
>>> b=BookInfo.objects.get(pk=1)
>>> b.btitle='123'
>>> b.save()
>>> BookInfo.objects.all()
[]

# 删除
>>> b.delete()
>>> BookInfo.objects.all()
[]
按Ctrl+d退出shell
使用django的管理
- 创建一个管理员用户
python manage.py createsuperuser,按提示输入用户名、邮箱、密码
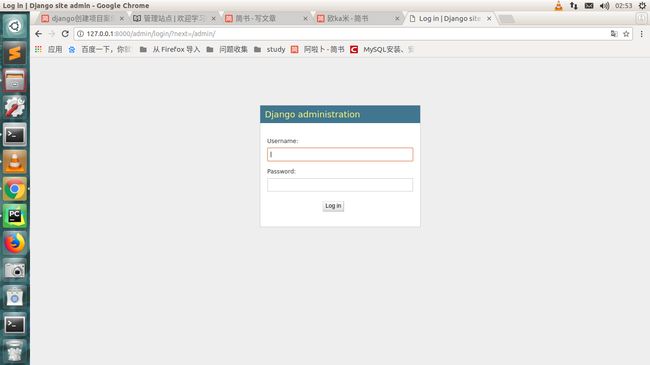
- 启动服务器,通过“127.0.0.1:8000/admin”访问,输入上面创建的用户名、密码完成登录
- 进入管理站点,默认可以对groups、users进行管理
(python2) linux@ubuntu:~/桌面/project/test1$ python manage.py createsuperuser
Username (leave blank to use 'linux'): abc
Email address: [email protected]
Password: 123
Password (again): 123
Superuser created successfully.
/home/linux/.virtualenvs/python2/lib/python2.7/site-packages/django/db/backends/sqlite3/base.py:302: UnicodeWarning: Unicode equal comparison failed to convert both arguments to Unicode - interpreting them as being unequal
  return name == ":memory:" or "mode=memory" in force_text(name)


(python2) linux@ubuntu:~/桌面/project/test1$ python manage.py runserver
Performing system checks...

System check identified no issues (0 silenced).
July 17, 2018 - 09:50:32
Django version 1.8.2, using settings 'test1.settings'
Starting development server at http://127.0.0.1:8000/
Quit the server with CONTROL-C.
- 在浏览器浏览(http://127.0.0.1:8000/admin/login/?next=/admin/)
管理界面本地化
- 编辑settings.py文件,设置编码、时区
LANGUAGE_CODE = 'zh-Hans'  # 'en-us'

TIME_ZONE = 'Asia/Shanghai'  # 'UTC'

USE_I18N = True

USE_L10N = True

USE_TZ = True
向admin注册booktest的模型
- 打开booktest/admin.py文件,注册模型
from django.contrib import admin
from models import *

# Register your models here.


admin.site.register(BookInfo)
admin.site.register(HeroInfo)
- 刷新管理页面,可以对BookInfo的数据进行增删改查操作
- 问题:如果在str方法中返回中文,在修改和添加时会报ascii的错误
-
解决:在str()方法中,将字符串末尾添加“.encode('utf-8')”
自定义管理页面
- Django提供了admin.ModelAdmin类
- 通过定义ModelAdmin的子类,来定义模型在Admin界面的显示方式
class QuestionAdmin(admin.ModelAdmin):
    ...
admin.site.register(Question, QuestionAdmin)
列表页属性
- list_display:显示字段,可以点击列头进行排序
list_display = ['pk', 'btitle', 'bpub_date']
- list_filter:过滤字段,过滤框会出现在右侧
list_filter = ['btitle']
- search_fields:搜索字段,搜索框会出现在上侧
search_fields = ['btitle']
- list_per_page:分页,分页框会出现在下侧
list_per_page = 10
添加、修改页属性
- fields:属性的先后顺序
fields = ['bpub_date', 'btitle']
- fieldsets:属性分组
fieldsets = [
    ('basic',{'fields': ['btitle']}),
    ('more', {'fields': ['bpub_date']}),
]
修改admin.py
from django.contrib import admin
from models import *

# Register your models here.


class BookInfoAdmin(admin.ModelAdmin):
    list_display = ['id','btitle','bpub_date']
    list_filter = ['btitle']
    search_fields = ['btitle']
    list_per_page = 1
    fieldsets = [
        ('base',{'fields':['btitle']}),
        ('super',{'fields':['bpub_date']})
    ]


admin.site.register(BookInfo,BookInfoAdmin)
admin.site.register(HeroInfo)
效果图


