SpringCloud Seata Nacos 整合教程和坑
1 第一步加入依赖
以下依赖已经是前辈踩过坑后的依赖写法了,照着copy就行了。
            com.alibaba.cloud
            spring-cloud-starter-alibaba-nacos-discovery
            ${fhs.alibaba.cloud.version}


            com.alibaba.cloud
            spring-cloud-starter-alibaba-seata
            2.2.1.RELEASE


                    io.seata
                    seata-spring-boot-starter


            io.seata
            seata-spring-boot-starter
            1.3.0


                    com.alibaba
                    druid


            com.alibaba.cloud
            spring-cloud-alibaba-seata
            2.2.0.RELEASE
2 Seata服务的nacos配置
这里主要是指定了集群名字是default以及group是seata group,客户端要和此保持一致
registry {
  # file 、nacos 、eureka、redis、zk、consul、etcd3、sofa
  type = "nacos"
  nacos {
    serverAddr = "192.168.0.213:8848"
    namespace = ""
    group = "SEATA_GROUP"
    cluster = "default"
  }
}
3 配置YML
如果你要改service-group的name的话,记得相关的都要改,
seata:
  enabled: true
  application-id: client
  tx-service-group: fhs-seata-group
  config:
    type: nacos
    nacos:
      namespace:
      serverAddr: 192.168.0.213:8848
      group: SEATA_GROUP
  registry:
    type: nacos
    nacos:
      application: seata-server
      serverAddr: 192.168.0.213:8848
      group: SEATA_GROUP
      namespace:
4 创建seata数据库执行下面的sql--下面给的是mysql的创建表的语句
-- -------------------------------- The script used when storeMode is 'db' --------------------------------
-- the table to store GlobalSession data
CREATE TABLE IF NOT EXISTS `global_table`
(
    `xid`                       VARCHAR(128) NOT NULL,
    `transaction_id`            BIGINT,
    `status`                    TINYINT      NOT NULL,
    `application_id`            VARCHAR(32),
    `transaction_service_group` VARCHAR(32),
    `transaction_name`          VARCHAR(128),
    `timeout`                   INT,
    `begin_time`                BIGINT,
    `application_data`          VARCHAR(2000),
    `gmt_create`                DATETIME,
    `gmt_modified`              DATETIME,
    PRIMARY KEY (`xid`),
    KEY `idx_gmt_modified_status` (`gmt_modified`, `status`),
    KEY `idx_transaction_id` (`transaction_id`)
) ENGINE = InnoDB
  DEFAULT CHARSET = utf8;

-- the table to store BranchSession data
CREATE TABLE IF NOT EXISTS `branch_table`
(
    `branch_id`         BIGINT       NOT NULL,
    `xid`               VARCHAR(128) NOT NULL,
    `transaction_id`    BIGINT,
    `resource_group_id` VARCHAR(32),
    `resource_id`       VARCHAR(256),
    `branch_type`       VARCHAR(8),
    `status`            TINYINT,
    `client_id`         VARCHAR(64),
    `application_data`  VARCHAR(2000),
    `gmt_create`        DATETIME(6),
    `gmt_modified`      DATETIME(6),
    PRIMARY KEY (`branch_id`),
    KEY `idx_xid` (`xid`)
) ENGINE = InnoDB
  DEFAULT CHARSET = utf8;

-- the table to store lock data
CREATE TABLE IF NOT EXISTS `lock_table`
(
    `row_key`        VARCHAR(128) NOT NULL,
    `xid`            VARCHAR(96),
    `transaction_id` BIGINT,
    `branch_id`      BIGINT       NOT NULL,
    `resource_id`    VARCHAR(256),
    `table_name`     VARCHAR(32),
    `pk`             VARCHAR(36),
    `gmt_create`     DATETIME,
    `gmt_modified`   DATETIME,
    PRIMARY KEY (`row_key`),
    KEY `idx_branch_id` (`branch_id`)
) ENGINE = InnoDB
  DEFAULT CHARSET = utf8;
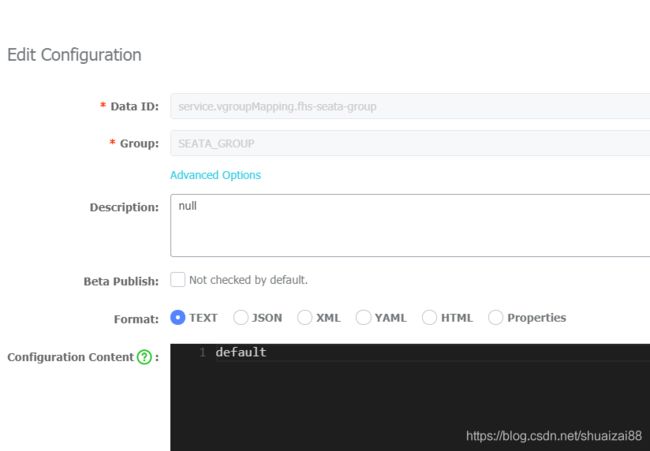
5 在Nacos中配置seataclient的配置文件。
service.vgroupMapping.my_test_tx_group=default
store.mode=db
store.db.datasource=druid
store.db.dbType=mysql
store.db.driverClassName=com.mysql.jdbc.Driver
store.db.url=jdbc:mysql://127.0.0.1:3306/seata?useUnicode=true
store.db.user=username
store.db.password=password
store.db.minConn=5
store.db.maxConn=30
store.db.globalTable=global_table
store.db.branchTable=branch_table
store.db.queryLimit=100
store.db.lockTable=lock_table
store.db.maxWait=5000
配置完了的截图,这里很容易出坑,如果出了问题优先排查下这里的配置是否出错了,注意group 和dataid,这里要创建很多dataid
注意formart是text
6 springboot datasource配置
@Configuration
public class SeataConfig implements EnvironmentAware , ApplicationContextAware {

    /**
     * 坏境
     */
    private Environment env;

    /**
     * 设置当前环境
     * @param environment 环境
     */
    @Override
    public void setEnvironment(Environment environment) {
        this.env = environment;
    }

    @Primary
    @Bean("dataSource")
    public DataSource dataSource() {
        DataSource dataSource  = getDataSource("spring.datasource");
        return new DataSourceProxy(dataSource);
    }


    /**
     * 设置数据源
     *
     * @param dataSourceName 库名称
     * @return 数据源
     */
    private DataSource getDataSource(String dataSourceName) {
        DruidDataSource druidDataSource = new DruidDataSource();
        druidDataSource.setName(env.getProperty(dataSourceName + ".name"));
        druidDataSource.setUrl(env.getProperty(dataSourceName + ".url"));
        druidDataSource.setUsername(env.getProperty(dataSourceName + ".username"));
        druidDataSource.setPassword(env.getProperty(dataSourceName + ".password"));
        druidDataSource.setDbType(env.getProperty(dataSourceName + ".type"));
        druidDataSource.setDriverClassName(env.getProperty(dataSourceName + ".driverClassName"));
        try {
            druidDataSource.setFilters(env.getProperty(dataSourceName + ".filters"));
        } catch (SQLException e) {
            e.printStackTrace();
        }
        druidDataSource.setMaxActive(ConverterUtils.toInteger(env.getProperty(dataSourceName + ".maxActive")));
        druidDataSource.setInitialSize(ConverterUtils.toInteger(env.getProperty(dataSourceName + ".initialSize")));
        druidDataSource.setMaxWait(ConverterUtils.toLong(env.getProperty(dataSourceName + ".maxWait")));
        druidDataSource.setMinIdle(ConverterUtils.toInteger(env.getProperty(dataSourceName + ".minIdle")));
        druidDataSource.setTimeBetweenEvictionRunsMillis(ConverterUtils.toLong(env.getProperty(dataSourceName + ".timeBetweenEvictionRunsMillis")));
        druidDataSource.setMinEvictableIdleTimeMillis(ConverterUtils.toLong(env.getProperty(dataSourceName + ".minEvictableIdleTimeMillis")));
        druidDataSource.setValidationQuery(env.getProperty(dataSourceName + ".validationQuery"));
        druidDataSource.setTestWhileIdle(ConverterUtils.toBoolean(env.getProperty(dataSourceName + ".testWhileIdle")));
        druidDataSource.setTestOnBorrow(ConverterUtils.toBoolean(env.getProperty(dataSourceName + ".testOnBorrow")));
        druidDataSource.setTestOnReturn(ConverterUtils.toBoolean(env.getProperty(dataSourceName + ".testOnReturn")));
        druidDataSource.setPoolPreparedStatements(ConverterUtils.toBoolean(env.getProperty(dataSourceName + ".poolPreparedStatements")));
        druidDataSource.setMaxOpenPreparedStatements(ConverterUtils.toInteger(env.getProperty(dataSourceName + ".maxOpenPreparedStatements")));
        return druidDataSource;
    }

    @Override
    public void setApplicationContext(ApplicationContext applicationContext) throws BeansException {
        ObjectHolder.INSTANCE.setObject("ApplicationContext",applicationContext);
    }
}
7 写控制器和springcloud feign接口代码
服务提供者
@RestController
public class ApiDemoController {
    @Autowired
    private SettAlipaySettService settAlipaySettService;//你自己弄个service

    @RequestMapping("/seata/add")
    public void insert(String uuid){
    //这里写个数据库库insert的方法
        settAlipaySettService.add(SettAlipaySettDO.builder().appId(uuid).alipayKey("11")
                .appPrivateKey("22").appId("test").appKey("key").extendsCode("11").name("33").id(StringUtil.getUUID()).build());
    }
}
接口包装
@FeignClient(value = "basics", configuration= FeignConfiguration.class,primary = false)
public interface DemoApi {

    @RequestLine("GET /seata/add?uuid={uuid}")
    void insert(@RequestParam("uuid") String uuid);

}
消费者代码

@RestController
public class SeateDemoController {

    @Autowired
    private DemoApi demoApi;

    @GlobalTransactional
    @RequestMapping("/seata/demo/add")
    public HttpResult add(){
        String uuid = StringUtil.getUUID();
        System.out.println(uuid);
        demoApi.insert(uuid);
        if(1==1){// 这里扔异常来测试那边回滚了没
            //throw new ParamException("xxxx");
        }
        return HttpResult.success(true);
    }
}
笔者用的springboot版本是2.2.5

