springboot终于迎来了2.0版本,很多新的特性让springboot更加强大,之前使用1.5.6版本整合了Mybatis,现在2.0版本就已经不适用了,所以,在摸索中搭建了2.0版本整合Mybatis
个人开源项目
- springboot+mybatis+thymeleaf+docker构建的个人站点开源项目(集成了个人主页、个人作品、个人博客)
推荐开源项目
- 开源的springboot接口文档组件swagger2
更多干货
springboot整合mybatis 使用HikariCP连接池
springboot2.0 mybatis 使用多数据源
Spring Boot快速入门
Spring Boot开发Web应用
Spring Boot工程结构推荐
Spring Boot构建RESTful API与单元测试
Spring Boot中使用Swagger2构建强大的RESTful API文档
Spring Boot中使用JdbcTemplate访问数据库
Spring Boot中使用Spring-data-jpa让数据访问更简单、更优雅
Spring Boot多数据源配置与使用
Spring Boot日志管理
Spring Boot中使用Redis数据库
Spring Boot中使用MongoDB数据库
Spring Boot中Web应用的统一异常处理
Spring Boot属性配置文件详解
Spring Boot中使用@Scheduled创建定时任务
Spring Boot中使用@Async实现异步调用
Spring boot Mybatis 整合(完整版)
Spring boot Mybatis 整合(注解版)
springboot事务管理详解
springboot中使用Mybatis注解配置详解
spring中添加自定义的拦截器
写在前面
本来这篇博文老在就写好了,但是后来发现很多功能其实根本就没有检验通过就发出来了,导致遗留了很多坑,比如最难搞的就是SqlSessionFactory和PageHelper,之前写过关于springboot1.5.6版本的整合,这段时间刚好springboot发布了2.0的正式版本,很多同学可能没有注意版本,导致了整合的时候出现了很多很多的问题,这几天刚好有空就试着整合一下springboot2.0 mybatis,发现了很多很多的坑,而且网上的资源也不多,终于在两天的踩坑中成功整合了,并且将翻页功能修复好了,废话不多说了,看代码:
环境/版本一览:
- 开发工具:Intellij IDEA 2017.1.3
- springboot: 2.0.1.RELEASE
- jdk:1.8.0_40
- maven:3.3.9
- alibaba Druid 数据库连接池:1.1.9
额外功能:
- PageHelper 分页插件
- mybatis generator 自动生成代码插件(本次搭建就不讲解了,请参照Spring boot Mybatis 整合(完整版))
开始搭建:
创建项目:


添加基础的依赖:

依赖文件:
按照pom文件补齐需要的依赖:
    4.0.0

    com.winterchen
    springboot2-mybatis-demo
    0.0.1-SNAPSHOT
    jar

    springboot2-mybatis-demo
    Demo project for Spring Boot


        org.springframework.boot
        spring-boot-starter-parent
        2.0.1.RELEASE


        UTF-8
        UTF-8
        1.8


            org.springframework.boot
            spring-boot-starter-web


            org.mybatis.spring.boot
            mybatis-spring-boot-starter
            1.3.2


            mysql
            mysql-connector-java
            runtime


            org.springframework.boot
            spring-boot-starter-test
            test


            org.apache.commons
            commons-lang3
            3.4


            com.fasterxml.jackson.core
            jackson-core


            com.fasterxml.jackson.core
            jackson-databind


            com.fasterxml.jackson.datatype
            jackson-datatype-joda


            com.fasterxml.jackson.module
            jackson-module-parameter-names


            com.github.pagehelper
            pagehelper-spring-boot-starter
            1.2.5


            com.alibaba
            druid-spring-boot-starter
            1.1.9


                org.springframework.boot
                spring-boot-maven-plugin
项目结构:
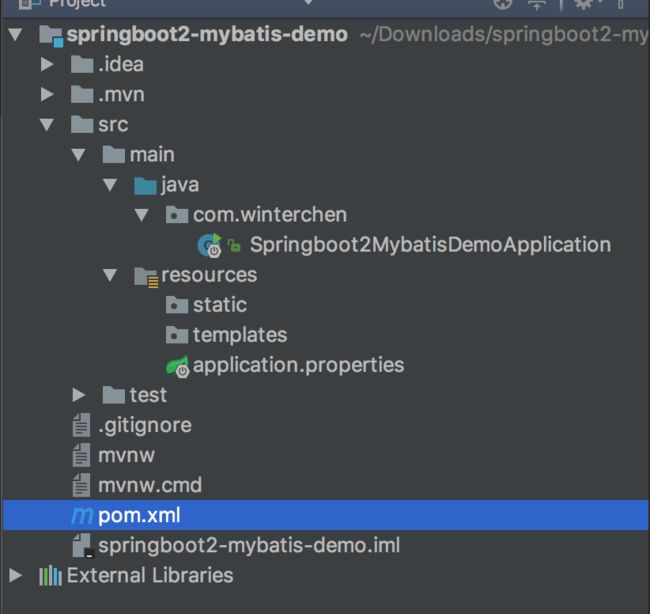
项目启动类:
package com.winterchen;

import org.springframework.boot.SpringApplication;
import org.springframework.boot.autoconfigure.SpringBootApplication;

@SpringBootApplication
@MapperScan("com.winterchen.dao")
public class Springboot2MybatisDemoApplication {

    public static void main(String[] args) {
        SpringApplication.run(Springboot2MybatisDemoApplication.class, args);
    }
}
配置:
可以根据个人使用习惯选择使用
properties或者yml文件,本项目使用的是yml配置文件,所以把原本application.properties删除,创建一个application.yml文件
在resource文件夹下创建application.yml
server:
  port: 8080


spring:
    datasource:
        name: mysql_test
        type: com.alibaba.druid.pool.DruidDataSource
        #druid相关配置
        druid:
          #监控统计拦截的filters
          filters: stat
          driver-class-name: com.mysql.jdbc.Driver
          #基本属性
          url: jdbc:mysql://127.0.0.1:3306/mytest?useUnicode=true&characterEncoding=UTF-8&allowMultiQueries=true
          username: root
          password: root
          #配置初始化大小/最小/最大
          initial-size: 1
          min-idle: 1
          max-active: 20
          #获取连接等待超时时间
          max-wait: 60000
          #间隔多久进行一次检测,检测需要关闭的空闲连接
          time-between-eviction-runs-millis: 60000
          #一个连接在池中最小生存的时间
          min-evictable-idle-time-millis: 300000
          validation-query: SELECT 'x'
          test-while-idle: true
          test-on-borrow: false
          test-on-return: false
          #打开PSCache,并指定每个连接上PSCache的大小。oracle设为true,mysql设为false。分库分表较多推荐设置为false
          pool-prepared-statements: false
          max-pool-prepared-statement-per-connection-size: 20

mybatis:
  mapper-locations: classpath:mapper/*.xml
  type-aliases-package: com.winterchen.model

#pagehelper
pagehelper:
    helperDialect: mysql
    reasonable: true
    supportMethodsArguments: true
    params: count=countSql
    returnPageInfo: check
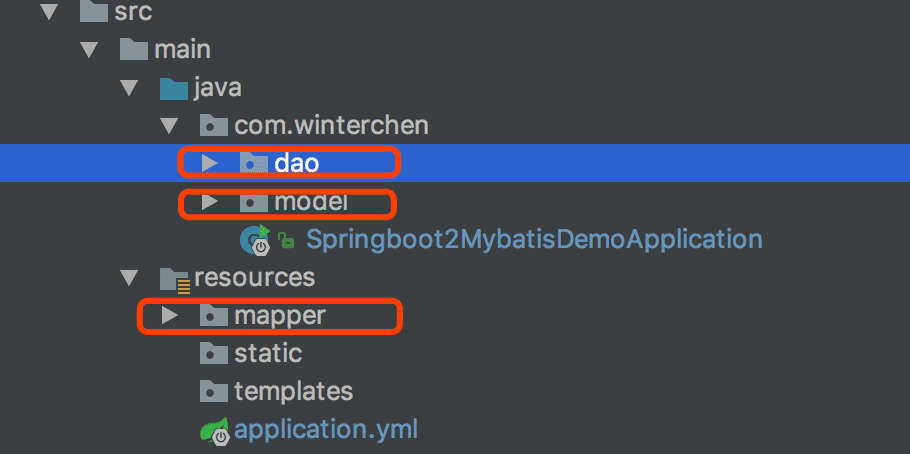
创建包:
model,dao,mapper
创建数据库和数据表
CREATE DATABASE mytest;

CREATE TABLE t_user(
  userId INT NOT NULL PRIMARY KEY AUTO_INCREMENT,
  userName VARCHAR(255) NOT NULL ,
  password VARCHAR(255) NOT NULL ,
  phone VARCHAR(255) NOT NULL
) ENGINE=INNODB AUTO_INCREMENT=1000 DEFAULT CHARSET=utf8;
创建实体类:UserDomain.java
package com.winterchen.model;

public class UserDomain {
    private Integer userId;

    private String userName;

    private String password;

    private String phone;

    // get,set方法略...
}
创建dao:
UserDao.java
package com.winterchen.dao;


import com.winterchen.model.UserDomain;
import org.apache.ibatis.annotations.Mapper;

import java.util.List;

public interface UserDao {


    int insert(UserDomain record);


    List selectUsers();
}
创建mybatis映射文件: UserMapper.xml
t_user
userId,userName,password,phone
INSERT INTO
userName,password,
phone,
#{userName, jdbcType=VARCHAR},#{password, jdbcType=VARCHAR},
#{phone, jdbcType=VARCHAR},
创建剩余的controller,service包和文件
UserService.java
package com.winterchen.service.user;

import com.github.pagehelper.PageInfo;
import com.winterchen.model.UserDomain;

import java.util.List;

/**
 * Created by Administrator on 2018/4/19.
 */
public interface UserService {

    int addUser(UserDomain user);

    PageInfo findAllUser(int pageNum, int pageSize);
}
UserServiceImpl
package com.winterchen.service.user.impl;

import com.github.pagehelper.PageHelper;
import com.github.pagehelper.PageInfo;
import com.winterchen.dao.UserDao;
import com.winterchen.model.UserDomain;
import com.winterchen.service.user.UserService;
import org.springframework.beans.factory.annotation.Autowired;
import org.springframework.stereotype.Service;

import java.util.List;

/**
 * Created by Administrator on 2017/8/16.
 */
@Service(value = "userService")
public class UserServiceImpl implements UserService {

    @Autowired
    private UserDao userDao;//这里会报错,但是并不会影响

    @Override
    public int addUser(UserDomain user) {

        return userDao.insert(user);
    }

    /*
    * 这个方法中用到了我们开头配置依赖的分页插件pagehelper
    * 很简单,只需要在service层传入参数,然后将参数传递给一个插件的一个静态方法即可;
    * pageNum 开始页数
    * pageSize 每页显示的数据条数
    * */
    @Override
    public PageInfo findAllUser(int pageNum, int pageSize) {
        //将参数传给这个方法就可以实现物理分页了,非常简单。
        PageHelper.startPage(pageNum, pageSize);
        List userDomains = userDao.selectUsers();
        PageInfo result = new PageInfo(userDomains);
        return result;
    }
}
UserController.java
package com.winterchen.controller;

import com.github.pagehelper.PageHelper;
import com.winterchen.model.UserDomain;
import com.winterchen.service.user.UserService;
import org.springframework.beans.factory.annotation.Autowired;
import org.springframework.stereotype.Controller;
import org.springframework.web.bind.annotation.*;

/**
 * Created by Administrator on 2017/8/16.
 */
@Controller
@RequestMapping(value = "/user")
public class UserController {

    @Autowired
    private UserService userService;

    @ResponseBody
    @PostMapping("/add")
    public int addUser(UserDomain user){
        return userService.addUser(user);
    }

    @ResponseBody
    @GetMapping("/all")
    public Object findAllUser(
            @RequestParam(name = "pageNum", required = false, defaultValue = "1")
                    int pageNum,
            @RequestParam(name = "pageSize", required = false, defaultValue = "10")
                    int pageSize){
        return userService.findAllUser(pageNum,pageSize);
    }
}
项目最终的结构

到这里如果项目就成功搭建完成了,如果还是报错的话,请仔细看看配置,后面会给出源码地址,程序员就是要不断和bug进行斗争,加油。
测试
启动项目

这样就表示启动成功了
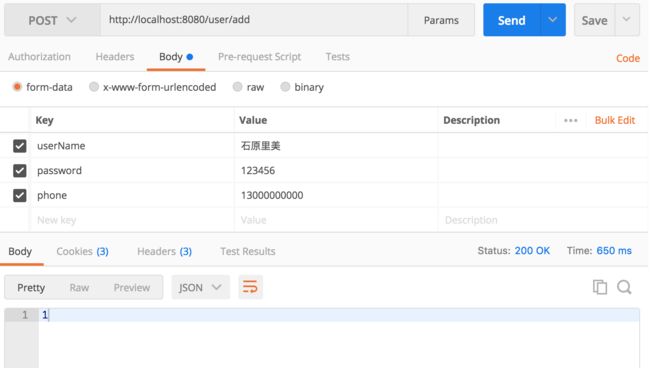
然后,开始测试吧,博主使用的是postMan,一个进行http请求的测试工具
添加数据
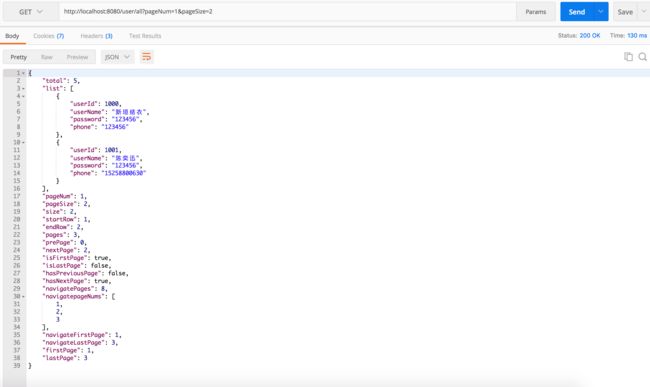
查询数据
源码地址:
https://github.com/WinterChenS/springboot2-mybatis-demo
springboot技术交流群:681513531
微信公众号
关注我的微信公众号:CodeD
不定期分享新的技术知识