Beego脱坑(三)——新建Beego项目
新建Beego项目
-
使用new 命令
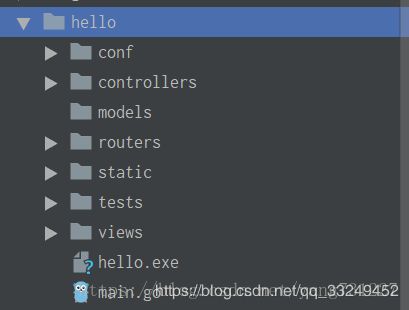
上一章讲过new命令可以创建一个新的应用,现在我们就来使用它。在命令行输入bee new <项目名称>,我输入bee new hello。bee工具会自动在$GOPATH/src目录下生成hello项目,目录结构如下所示:
______
| ___ \
| |_/ /  ___   ___
| ___ \ / _ \ / _ \
| |_/ /|  __/|  __/
\____/  \___| \___| v1.10.0
2018/08/31 10:13:57 WARN     ▶ 0001 You current workdir is not inside $GOPATH/src.
2018/08/31 10:13:57 INFO     ▶ 0002 Creating application...
        create   C:\Users\Clown\go\src\hello\
        create   C:\Users\Clown\go\src\hello\conf\
        create   C:\Users\Clown\go\src\hello\controllers\
        create   C:\Users\Clown\go\src\hello\models\
        create   C:\Users\Clown\go\src\hello\routers\
        create   C:\Users\Clown\go\src\hello\tests\
        create   C:\Users\Clown\go\src\hello\static\
        create   C:\Users\Clown\go\src\hello\static\js\
        create   C:\Users\Clown\go\src\hello\static\css\
        create   C:\Users\Clown\go\src\hello\static\img\
        create   C:\Users\Clown\go\src\hello\views\
        create   C:\Users\Clown\go\src\hello\conf\app.conf
        create   C:\Users\Clown\go\src\hello\controllers\default.go
        create   C:\Users\Clown\go\src\hello\views\index.tpl
        create   C:\Users\Clown\go\src\hello\routers\router.go
        create   C:\Users\Clown\go\src\hello\tests\default_test.go
        create   C:\Users\Clown\go\src\hello\main.go
2018/08/31 10:13:57 SUCCESS  ▶ 0003 New application successfully created!
-
配置文件
我们打开项目conf文件下的app.conf,可以看到
appname = hello
httpport = 8080
runmode = dev
appname 显而易见是设置项目名称的。
httpport是用来设置端口,项目默认给我设置的8080,所以当我们通过浏览器访问项目的时候要输入 127.0.0.1:8080。dev 模式下,httpport 是 8080,在 prod 模式下是 8088,在 test 模式下是 8888
runmode是用来设置模式的,一共有三种模式:dev,test,prod
开发环境(dev):开发环境是程序猿们专门用于开发的服务器,配置可以比较随意,为了开发调试方便,一般打开全部错误报告。
测试环境(test):一般是克隆一份生产环境的配置,一个程序在测试环境工作不正常,那么肯定不能把它发布到生产机上。
生产环境(prod):是值正式提供对外服务的,一般会关掉错误报告,打开错误日志。
-
使用run命令
接着我们在命令行里输入 bee run hello ,得到以下输出。
______
| ___ \
| |_/ /  ___   ___
| ___ \ / _ \ / _ \
| |_/ /|  __/|  __/
\____/  \___| \___| v1.10.0
2018/08/31 10:19:08 INFO     ▶ 0001 Using 'hello' as 'appname'
2018/08/31 10:19:08 INFO     ▶ 0002 Initializing watcher...
2018/08/31 10:19:11 SUCCESS  ▶ 0003 Built Successfully!
2018/08/31 10:19:11 INFO     ▶ 0004 Restarting 'hello.exe'...
2018/08/31 10:19:11 SUCCESS  ▶ 0005 './hello.exe' is running...
2018/08/31 10:19:12.019 [I] [asm_amd64.s:2361]  http server Running on http://:8080
[beego] 2018/08/31 - 10:20:29 |            ::1| 200 |     82.077ms|   match| GET      /     r:/
[beego] 2018/08/31 - 10:20:29 |            ::1| 200 |    18.0167ms|   match| GET      /static/js/reload.min.js
Built Successfully! 可以看出项目成功编译了。 http server Running on http://:8080 说明程序的端口是8080。好了我们赶紧打开浏览器输入 http://127.0.0.1:8080(localhost:8080也是可以的)看看结果吧。
-
输出Hello World
作为第一个新项目,没有hello world怎么能行,下面我们就来让浏览器输出 hello wold,我们现在只关注实现,不涉及其他理论知识。我们在来看看目录结构:

首先我们在controllers下新建一个hello.go文件,定义 Controller,这里我们定义了一个 struct 为 HelloControllers ,充分利用了 Go 语言的组合的概念,匿名包含了 beego.Controller,这样我们的 HelloControllers 就拥有了 beego.Controller 的所有方法。然后我们为HelloControllers 重定义Get()方法
package controllers

import "github.com/astaxie/beego"

type HelloControllers struct {
	beego.Controller
}

func (hello * HelloControllers) Get() {
	hello.Ctx.WriteString("hello world")
}
然后在routers/router.go 添加我们刚刚设置的controller
package routers

import (
	"hello/controllers"
	"github.com/astaxie/beego"
)

func init() {
    beego.Router("/", &controllers.MainController{})
    // "/hello" 是我们访问的路径,比如说我们想要调用HelloControllers这个控制器
    //需要在浏览器输入127.0.0.1:8080/hello
    beego.Router("/hello",&controllers.HelloControllers{})
}
我们打开浏览器输入http://127.0.0.1:8080/hello 看看结果
从图片可以看到成功的输出的hello world
作者:Clown95
来源:CSDN
原文:https://blog.csdn.net/yang731227/article/details/82252016
版权声明:本文为博主原创文章,转载请附上博文链接!

