编程框架-spring boot之自动装配(spring-boot-autoconfigure)
背景
spring boot可以简化配置,主要就是由自动装配实现,现在总结一篇详细的,之后在封装框架的时候用到。
本博客重点:
- 自动装配流程
- spring boot注解对启动流程的作用
- @SpringBootApplication
- @SpringBootConfiguration
- @EnableAutoConfiguration
- 等
- xxxx
过程分析
springboot工程的main函数中会添加一个SpringApplication.run,那么就从这里开始
SpringApplication构造过程
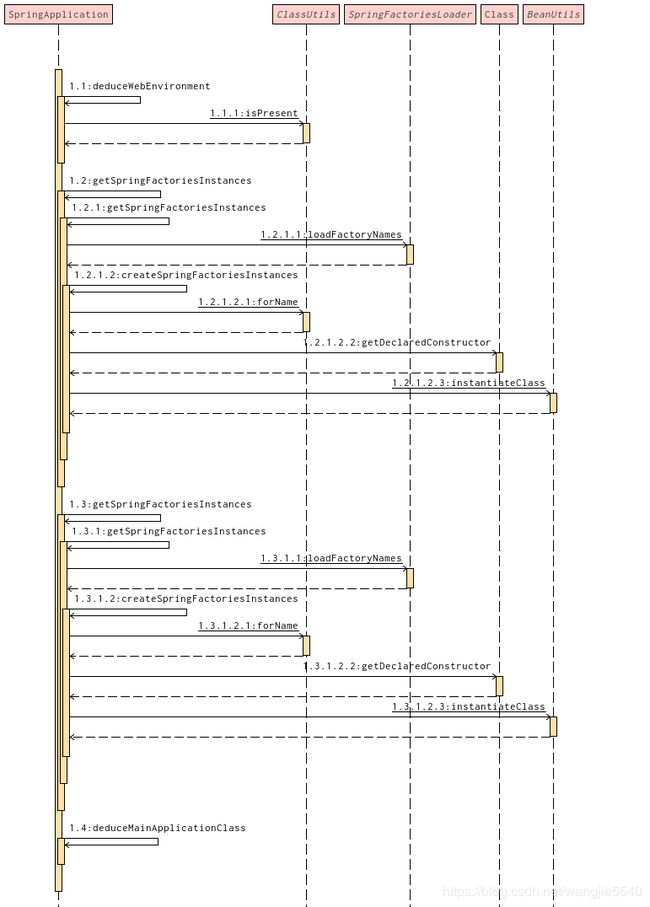
简易流程图
- 推测现在的环境,主要看是不是web环境(在springboot2.0之后,这里编程了枚举,因为web环境包括react模式了,也就是netty的模式)
- getSpringFactoriesInstances,获取META-INF/spring.factories里面的ApplicationContextInitializer类型的所有配置类,设置给initializers(等到构造完毕以后进行启动)
- getSpringFactoriesInstances,获取所有ApplicationListener类型的所有配置类,保存在listeners中
- deduceMainApplicationClass,推断main的类,进行保存
核心代码
以下为spring boot 2的代码
/**
	 * Create a new {@link SpringApplication} instance. The application context will load
	 * beans from the specified primary sources (see {@link SpringApplication class-level}
	 * documentation for details. The instance can be customized before calling
	 * {@link #run(String...)}.
	 * @param resourceLoader the resource loader to use
	 * @param primarySources the primary bean sources
	 * @see #run(Class, String[])
	 * @see #setSources(Set)
	 */
	@SuppressWarnings({ "unchecked", "rawtypes" })
	public SpringApplication(ResourceLoader resourceLoader, Class<?>... primarySources) {
		// 这里的resourceLoader是null
		this.resourceLoader = resourceLoader;
		// primarySources是入口类DemoApplication.class
		Assert.notNull(primarySources, "PrimarySources must not be null");
		// 制作成有序集合(为了去重和排序)
		this.primarySources = new LinkedHashSet<>(Arrays.asList(primarySources));
		// 使用WebApplication去探测application的类型
		this.webApplicationType = WebApplicationType.deduceFromClasspath();
		// 设置需要初始化的内容(这些内容都是通过扫描某个基类实现,下文将对getSpringFactoriesInstances进行阐述)
		setInitializers((Collection) getSpringFactoriesInstances(ApplicationContextInitializer.class));
		// 设置监听内容
		setListeners((Collection) getSpringFactoriesInstances(ApplicationListener.class));
		// 检测入口class是哪个(这里当然就是DemoApplication了)
		this.mainApplicationClass = deduceMainApplicationClass();
	}
- application类型判断,主要看是不是web类型的,如果是web的话,那么到底是servlet还是reactive的
- 设置启动内容
- 设置监听内容
大家要问了,设置启动内容和监听内容显然是构造的重点,下文又是怎么利用的呢?我们来继续看下,这里可以直接看getSpringFactoriesInstances方法。
private <T> Collection<T> getSpringFactoriesInstances(Class<T> type, Class<?>[] parameterTypes, Object... args) {
		// 获取classLoader,从debug来看,这里是AppClassLoader(最终是ClassUtils.getDefaultClassLoader中获取)
		ClassLoader classLoader = getClassLoader();
		// Use names and ensure unique to protect against duplicates
		Set<String> names = new LinkedHashSet<>(SpringFactoriesLoader.loadFactoryNames(type, classLoader));
		// 根据类名创建实例(也就是说,谁实现或者继承了这个基类或者接口,都会被实例化出来,最终返回)
		List<T> instances = createSpringFactoriesInstances(type, parameterTypes, classLoader, args, names);
		AnnotationAwareOrderComparator.sort(instances);
		return instances;
	}
SpringApplication的run过程
总体流程图
- getRunListeners,获取工厂配置中所有SpringApplicationRunListener类型的配置类,使用SpringApplicationRunListener的配置类来构造SpringApplicationRunListeners(这个时候一并传入了logger的引用,
推测这个时候logger也创建的差不多了。。) - starting上面的Listeners(这个过程以下另行分析,这里包含了异步消息和线程池)
- 创建DefaultApplicationArguments,不关键
- prepareEnvironment,准备运行环境,分为web和非web的(本工程以下将另行分析)
- configureIgnoreBeanInfo,在环境变量中设置spring.beaninfo.ignore为true,即默认忽略beanInfo
- printBanner,打印springboot的广告。。。(暂不进行分析)
- createApplicationContext,创建运行环境,例如web运行环境,其实就是通过反射来找到Class,然后通过
BeanUtils进行实例化(重点是BeanUtils实例化的对象将进入spring容器) - getSpringFactoriesInstances获取类型为SpringBootExceptionReporter的配置类,同时传入context运行环境
- prepareContext,配置上下文,这个上下文和运行环境不是一个概念(以下另行分析)
- refreshContext,运行上下文启动的全过程(以下另行分析)
- afterRefresh,空函数,这之后进行了一次计时,也标志着springboot启动完毕
- StartupInfoLogger的logStarted,打印一下启动时间,这个信息经常在启动过程中看到
- listeners.started,遍历所有的listener,逐个发送
开始启动消息,注意,这里是异步消息 - callRunners,也就是执行ApplicationRunner的run方法(通过context.getBeansOfType直接活得这样的bean,然后执行),值得注意的是,这里可以调整执行的优先级,通过实现PriorityOrdered接口即可,代码中有提现
- handleRunFailure,异常处理,暂不过多分析
- listeners.running,遍历所有的listener,逐个发送
运行中消息,注意,这里是异步消息 - handleRunFailure
启动监听器listeners.starting()过程

通过上述流程最终调用到以下代码。
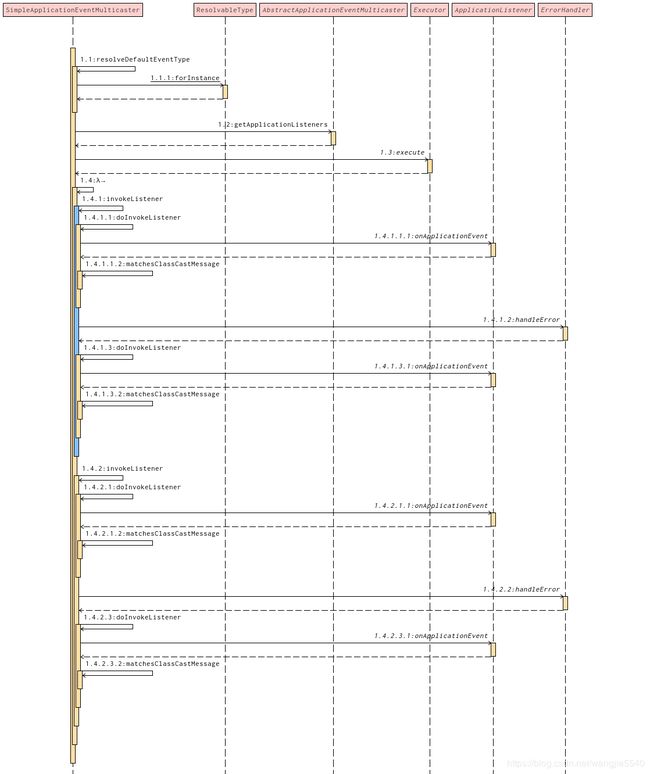
SimpleApplicationEventMulticaster主要依赖两个:
- executor,可选,这里是执行invokeListener的载体,如果没有的话,就在当前线程执行
- Listener,通过getApplicationListeners获取所有实现过ApplicationListener的类(在spring boot工程里面,只要实现ApplicationListener,再添加@Component注解,就可以进行消息的打印了。不过呢,这个消息是每个springcontext一套,spring cloud的context同样也会打印)。其实这些Listener就是之前构造函数里面设置的。
注:需要了解springframework:spring-context的包
	@Override
	public void multicastEvent(final ApplicationEvent event, @Nullable ResolvableType eventType) {
		ResolvableType type = (eventType != null ? eventType : resolveDefaultEventType(event));
		Executor executor = getTaskExecutor();
		for (ApplicationListener<?> listener : getApplicationListeners(event, type)) {
			if (executor != null) {
				executor.execute(() -> invokeListener(listener, event));
			}
			else {
				invokeListener(listener, event);
			}
		}
	}
@SuppressWarnings({"rawtypes", "unchecked"})
	private void doInvokeListener(ApplicationListener listener, ApplicationEvent event) {
		try {
			listener.onApplicationEvent(event);
		}
		catch (ClassCastException ex) {
			String msg = ex.getMessage();
			if (msg == null || matchesClassCastMessage(msg, event.getClass())) {
				// Possibly a lambda-defined listener which we could not resolve the generic event type for
				// -> let's suppress the exception and just log a debug message.
				Log logger = LogFactory.getLog(getClass());
				if (logger.isTraceEnabled()) {
					logger.trace("Non-matching event type for listener: " + listener, ex);
				}
			}
			else {
				throw ex;
			}
		}
	}
最终调用到doInvokeListener,回调给上层的onApplicationEvent
prepareEnvironment准备运行环境过程
- configureEnvironment,设置环境,包括设置servlet的启动参数和profile的active环境参数等。这里涉及到了命令行传入args的解析、环境变量的解析(启动的时候也可以通过环境变量来设置部分参数,具体没有细看。。)
- environmentPrepared,用于event通知,在通知过程中,进行配置文件的读取

- bindToSpringApplication,把运行环境和当前application应用进行绑定
- convertEnvironmentIfNecessary,环境转化(客户化定制化的环境对象需要进行一次转化,这个定制化环境的功能是可能在某些极端情况下用到)
- ConfigurationPropertySources.attach,配置绑定
注:准备环境的过程主要是加载配置(自定义配置、系统配置)
prepareContext准备上下文过程
待续。。。。


