2019独角兽企业重金招聘Python工程师标准>>> ![]()
实战情景:
服务器上能ping通网关,但是上不网,DNS配置正常
1、熟悉Linux网络相关命令
现在情况:
能ping通网关,但是上不网,DNS配置正常
了解网络情况基本思路。 思路决定出路
0、查看网线,是否正常
1、IP ping
2、网关 IP
3、DNS
4、iptables规则
5、selinux
6、网关MAC。目的: 防止别人冒冲网关。 ARP欺骗
7、IP地址冲突
现在在正常环境下进行测试:
[root@localhost ~]# ping g.cn
PING g.cn (203.208.49.176) 56(84) bytes of data.
64 bytes from 203.208.49.176: icmp_seq=1 ttl=43 time=40.7 ms
64 bytes from 203.208.49.176: icmp_seq=2 ttl=43 time=50.2 ms
ping 参数:
-c #指定ping 的次数
-i # 指定ping 的频率
例:
[root@localhost ~]# ping -c 1 192.168.1.1
[root@localhost ~]# ping -i 0.001 192.168.1.1
1、查询IP
[root@localhost ~]# ifconfig
eth0 Link encap:Ethernet HWaddr 00:0C:29:12:EC:1E
inet addr:192.168.1.63
配置IP地址方法1:
[root@localhost ~]# vim /etc/sysconfig/network-scripts/ifcfg-eth0
IPADDR=192.168.1.63 #IP地址
NETMASK=255.255.255.0 #子网掩码
GATEWAY=192.168.1.1 #网关
DNS1=202.106.46.151 #DNS服务器地址
ONBOOT=yes #开机启动网卡
2、查看DNS配置
[root@localhost ~]# cat /etc/resolv.conf
# Generated by NetworkManager
nameserver 202.106.46.151
或:
[root@localhost ~]# vim /etc/sysconfig/network-scripts/ifcfg-eth0
DNS1=202.106.46.151
例:查找DNS配置方法
[root@localhost ~]# vim /etc/sysconfig/network-scripts/ifcfg-eth0
改:DNS1=8.8.8.8
[root@localhost ~]# cat /etc/resolv.conf
# Generated by NetworkManager
nameserver 202.106.46.151
search localhost
接下来:
[root@localhost ~]# service network restart
Shutting down interface eth0: [ OK ]
Shutting down loopback interface: [ OK ]
Bringing up loopback interface: [ OK ]
Bringing up interface eth0: [ OK ]
[root@localhost ~]# cat /etc/resolv.conf
# Generated by NetworkManager
nameserver 8.8.8.8
search localhost
原因:
[root@localhost ~]# tail -f /var/log/messages
May 13 09:47:16 localhost NET[3653]: /etc/sysconfig/network-scripts/ifup-post : updated /etc/resolv.conf
#cat /etc/sysconfig/network-scripts/ifup
3、网关
查看网关:
或:
[root@localhost ~]# vim /etc/sysconfig/network-scripts/ifcfg-eth0
GATEWAY=192.168.1.1
169.254.0.0/16 # 是公网IP地址
扩展:
A类私有地址: 10.0.0.0/8
B 类私有网段: 172. 16.0.0 - 172.31.255.255 /16
C类私有网段:192.168.0.0 /24
169.254.0.0/16 :在windows下DHCP获取不到IP的时候,会分配169.254.的IP。 这个微软买断的一个网段。
4、iptables 规则
拒绝192.168.1.64访问localhost上的80端口
[root@localhost ~]# iptables -A INPUT -s 192.168.1.64 -p tcp --dport 80 -j DROP
[root@localhost ~]# iptables -L -n
Chain INPUT (policy ACCEPT)
target prot opt source destination
Chain FORWARD (policy ACCEPT)
target prot opt source destination
Chain OUTPUT (policy ACCEPT)
target prot opt source destination
# -n #不解析IP和端口号
#-L #
不加-n 显示:
[root@xuegod63 ~]# iptables -L
Chain INPUT (policy ACCEPT)
target prot opt source destination
DROP tcp -- xuegod64.cn anywhere tcp dpt:http
如何解析IP地址为域名?
[root@localhost ~]# cat /etc/hosts #IP地址解析,通过hosts文件或DNS
127.0.0.1 localhost localhost.localdomain localhost4 localhost4.localdomain4
::1 localhost localhost.localdomain localhost6 localhost6.localdomain6
192.168.1.63 xuegod63.cn
192.168.1.64 xuegod64.cn
如何解析端口为协议名?
[root@localhost ~]# vim /etc/services #查看所有端口对应的服务
作用:
1、查看端口号
2、iptables 解析端口号参考的文件
3、xinetd 服务器启动时,需要注册端口号
5、selinux
[root@localhost ~]# getenforce
Disabled
[root@localhost ~]# vim /etc/selinux/config
# mls - Multi Level Security protection.
#基于多等级的安全保护
6、网关MAC 。 目的: 防止别人冒充网关。 ARP欺骗
网络执法官/ p2p终结者
在路由器:
Linux如何知道别人冒充网关?
[root@localhost ~]# arping 192.168.1.1 # 测试192.168.1.1 此IP地址是否有冲突
ARPING 192.168.1.1 from 192.168.1.63 eth0
Unicast reply from 192.168.1.1 [14:75:90:15:32:48] 2.124ms
Unicast reply from 192.168.1.1 [14:75:90:15:23:12] 5.333ms
7、IP地址冲突
公司局域网中,IP地址冲突后,换一个IP,再ping 。
现在被黑了:
实战情景:
服务器上能ping通网关,但是上不网,DNS配置正常
网络排错: 重点思路。 没有思路,就没有出路。
实战拓扑图:
现在远程连接不上服务器A, 如何远程排查?
解决思路:
[root@localhost ~]# ping g.cn
ping: unknown host g.cn
先ping 自己的IP地址:
[root@localhost ~]# ping 192.168.1.63
PING 192.168.1.63 (192.168.1.63) 56(84) bytes of data.
64 bytes from 192.168.1.63: icmp_seq=1 ttl=1 time=0.114 ms
64 bytes from 192.168.1.63: icmp_seq=2 ttl=1 time=0.072 ms
ping网关:
[root@localhost ~]# ping 192.168.1.1
PING 192.168.1.1 (192.168.1.1) 56(84) bytes of data.
64 bytes from 192.168.1.1: icmp_seq=1 ttl=64 time=2.38 ms
64 bytes from 192.168.1.1: icmp_seq=2 ttl=64 time=1.65 ms
关闭iptables:
[root@localhost ~]# iptables -L -n
[root@localhost ~]#getenforce
Disabled
[root@localhost ~]# /etc/init.d/iptables stop
查看DNS:
[root@localhost ~]# cat /etc/resolv.conf
# Generated by NetworkManager
nameserver 202.106.46.151
search localhost
查看冒冲网关:
[root@localhost ~]# arping 192.168.1.1 #没有冒冲网关
ARPING 192.168.1.1 from 192.168.1.63 eth0
Unicast reply from 192.168.1.1 [14:75:90:15:32:48] 4.878ms
Unicast reply from 192.168.1.1 [14:75:90:15:32:48] 4.365ms
查看网关配置是否正确: 正确
[root@localhost ~]# arping 192.168.1.1
ARPING 192.168.1.1 from 192.168.1.63 eth0
Unicast reply from 192.168.1.1 [14:75:90:15:32:48] 4.878ms
Unicast reply from 192.168.1.1 [14:75:90:15:32:48] 4.365ms
查看防火墙:
[root@localhost ~]# iptables -L -n
Chain INPUT (policy ACCEPT)
target prot opt source destination
Chain FORWARD (policy ACCEPT)
target prot opt source destination
Chain OUTPUT (policy ACCEPT)
target prot opt source destination
思路: ping 不通域名,ping通网关。 需要ping公网IP地址
[root@localhost ~]# ping 8.8.8.8
PING 8.8.8.8 (8.8.8.8) 56(84) bytes of data.
From 192.168.1.1 icmp_seq=1 Time to live exceeded
From 192.168.1.1 icmp_seq=2 Time to live exceeded
From 192.168.1.1 icmp_seq=3 Time to live exceeded
Time to live exceeded 表示超时
1、基础知识讲一下
2、工作经验,实战
TTL : 数据报的生存周期。
默认linux操作系统值:64. 每经过一个路器节点,TTL值减1。TTL值为0时,说明目标地址不可达并返回:Time to live exceeded
作用: 防止数据包,无限制在公网中转发。
终极大招: 抓包
tcpdump
参数:
-i 指定网卡接口
-n : -n 不解析IP地址为域名
-v :显示包中详细信息
-t : 指定协议类型
网络不通,抓什么协议?
TCP/IP、UDP属于网络层
ping 使用的是ICMP协议
抓包:
[root@localhost ~]# tcpdump -i eth0 -nv -t icmp
然后另一个终端上执行:[root@localhost ~]# ping -c 1 192.168.1.1
查看抓包的结果:
tcpdump: listening on eth0, link-type EN10MB (Ethernet), capture size 65535 bytes
IP (tos 0x0, ttl 1, id 0, offset 0, flags [DF], proto ICMP (1), length 84)
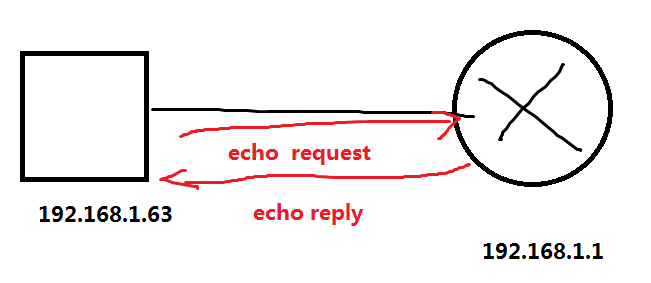
192.168.1.63 > 192.168.1.1: ICMP echo request, id 52761, seq 1, length 64
IP (tos 0x0, ttl 64, id 7167, offset 0, flags [DF], proto ICMP (1), length 84)
192.168.1.1 > 192.168.1.63: ICMP echo reply, id 52761, seq 1, length 64
注: ping 包特点,一去一回。
[root@localhost ~]# ping -c 1 192.168.1.1 #ping 一次
测试:
[root@localhost ~]# ping -c 1 8.8.8.8
PING 8.8.8.8 (8.8.8.8) 56(84) bytes of data.
From 192.168.1.1 icmp_seq=1 Time to live exceeded
[root@localhost ~]# tcpdump -i eth0 -nv -t icmp
tcpdump: listening on eth0, link-type EN10MB (Ethernet), capture size 65535 bytes
IP (tos 0x0, ttl 1, id 0, offset 0, flags [DF], proto ICMP (1), length 84)
192.168.1.63 > 8.8.8.8: ICMP echo request, id 37658, seq 1, length 64
IP (tos 0x0, ttl 64, id 7168, offset 0, flags [DF], proto ICMP (1), length 112)
192.168.1.1 > 192.168.1.63: ICMP time exceeded in-transit, length 92
IP (tos 0x0, ttl 1, id 0, offset 0, flags [DF], proto ICMP (1), length 84)
被黑原因修改了:TTL值:
将TTL值修改为原来的值
[root@localhost ~]# echo 64 > /proc/sys/net/ipv4/ip_default_ttl
再次抓包:
[root@localhost ~]# echo 64 > /proc/sys/net/ipv4/ip_default_ttl
[root@localhost ~]# tcpdump -i eth0 -nv -t icmp
tcpdump: listening on eth0, link-type EN10MB (Ethernet), capture size 65535 bytes
IP (tos 0x0, ttl 64, id 0, offset 0, flags [DF], proto ICMP (1), length 84)
192.168.1.63 > 8.8.8.8: ICMP echo request, id 62490, seq 1, length 64
IP (tos 0x90, ttl 30, id 0, offset 0, flags [none], proto ICMP (1), length 84)
8.8.8.8 > 192.168.1.63: ICMP echo reply, id 62490, seq 1, length 64
[root@localhost ~]# ping g.cn
PING g.cn (203.208.48.148) 56(84) bytes of data.
64 bytes from 203.208.48.148: icmp_seq=1 ttl=43 time=41.7 ms
64 bytes from 203.208.48.148: icmp_seq=2 ttl=43 time=43.5 ms
总结:
1、Linux网络操作基本命令: ifconfig , route , arp ,arping ,iptables ,selinux
2、tcpdump抓包
3、实战:通过tcpdump抓包解决服务器被黑上不了网的问题


