再探 Redis。
Redis。
文章目录
- Redis。
- NoSQL 概述。
- why。
- 什么是 NoSQL。
- NoSQL 特点:解耦。
- 3V 3高。
- NoSQL 的四大分类。
- Redis。
- 安装、配置、使用。
- 使用。
- redis-benchmark~测试性能工具。
- 基本知识。
- 五大数据类型。
- String。
- String 类型的使用场景。
- List。
- Set。
- Hash。`key - `。
- Zset。有序集合。
- 应用思路。
- 三种特殊数据类型。
- Bitmaps。
- HyperLogLogs。
- 基数。
- goespatial。
- geoadd。
- geopos。
- 两人之间的距离~GEODIST。
- 附近的人~GEORADIUS。
- GEORADIUSBUMEMBER。
- GEOHASH。
- GEO 底层是 Zset。
- 事务。
- 监控 ~ 悲观锁 & 乐观锁。
- Jedis。
- 事务。
- Spring Boot 整合。
- 序列化。
- Redis.conf。
- Redis 持久化。
- RDB(Redis Database)。
- AOF(Append Only File)。
- 扩展。
- Redis 发布订阅。
- 主从复制。
- 搭建。
- 一主二从。
- 命令配置是临时的,配置文件是永久的。
- 主机断了。从机还是 salve。
- 主机回来后,从机依旧可以同步。
- 使用命令行配置的主从,从机断开后连接,自己就变成了主机。只要变为从机,立马可以从主机拿到数据。
- 复制原理。
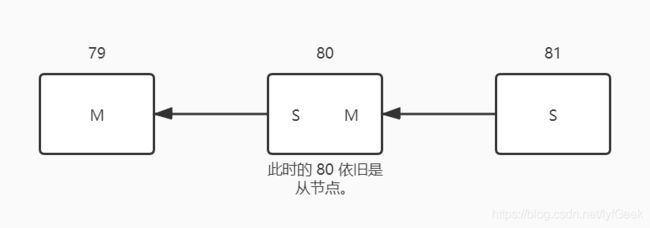
- 层层链路。
- 谋朝篡位~SLAVEOF no one。
- 哨兵模式。(自动选举老大的模式)。
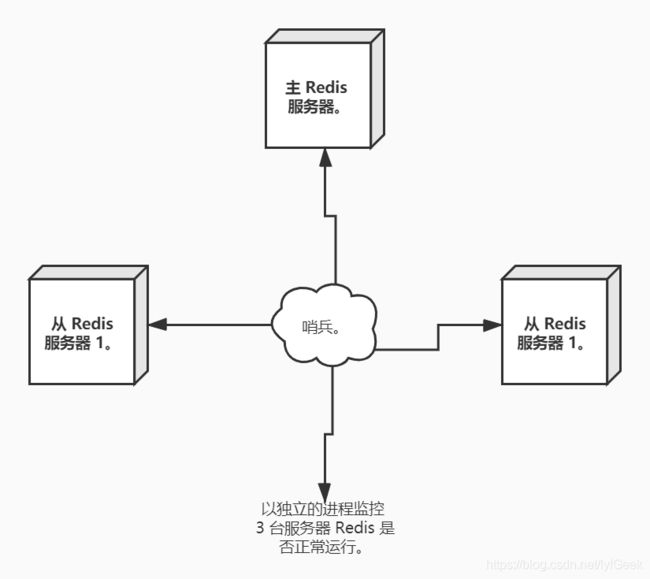
- 哨兵。
- Redis 缓存穿透和雪崩。
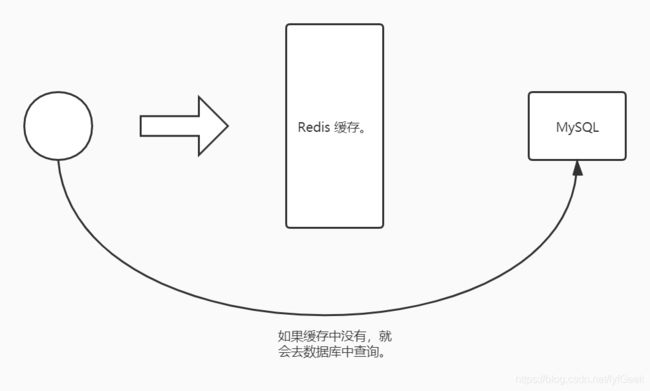
- 缓存穿透(查不到)。
- 解决方案。
- 布隆过滤器。
- 缓存空对象。
- 缓存击穿(量太大,缓存过期)。
- 解决方案。
- 缓存雪崩。
- 解决方案。
- Redis 高可用。
- 限流降级(Spring Cloud)。
- 数据预热。
NoSQL 概述。
- 单机 MySQL 的年代。

90年代,一个基本的网站访问量一般不会太大,单个数据库完全足够。
那个时候,更多的去使用静态网页 Html ~ 服务器根本没有太大的压力。
思考一下,这种情况下:整个网站的瓶颈是什么?
- 数据量如果太大、一个机器放不下了。
- 数据的索引 (B+ Tree),一个机器内存也放不下
- 访问量(读写混合),一个服务器承受不了~
只要你开始出现以上的三种情况之一,那么你就必须要晋级。
- Memcached(缓存)+ MySQL + 垂直拆分(读写分离)。
网站 80% 的情况都是在读,每次都要去查询数据库的话就十分的麻烦。所以说我们希望减轻数据的压力,我们可以使用缓存来保证效率。
发展过程:优化数据结构和索引 --> 文件缓存(IO)–> Memcached(当时最热门的技术。)。
- 分库分表 + 水平拆分 + MySQL 集群。
技术和业务在发展的同时,对人的要求也越来越高。
本质:数据库(读,写)
早些年 MyISAM: 表锁,十分影响效率。高并发下就会出现严重的锁问题。
↓ ↓ ↓
转战 Innodb:行锁。
慢慢的就开始使用分库分表来解决写的压力。 MySQL 在那个年代推出了表分区。这个并没有多少公司使用。
MySQL 的集群,很好满足那个年代的所有需求。
- Nowadays。
2010 ~ 2020 十年之间,世界已经发生了翻天覆地的变化(定位,也是一种数据,音乐,热榜。)
MySQL 等关系型数据库就不够用了。数据量很多,变化很快。
MySQL 有的使用它来村粗一些比较大的文件,博客,图片。数据库表很大,效率就低了。如果有一种数据库来专门处理这种数据,MySQL 压力就变得十分小(研究如何处理这些问题。)大数据的 IO 压力下,表几乎没法更大。
why。
为什么要用 NoSQL。用户的个人信息,社交网络,地理位置。用户自己产生的数据,用户日志等等爆发式增长。这时候我们就需要使用 NoSQL 数据库的,Nosql 可以很好的处理以上的情况。
什么是 NoSQL。
NoSQL = Not Only SQL(不仅仅是 SQL)。
关系型数据库:表格,行,列泛指非关系型数据库的,随着 web2.0 互联网的诞生,传统的关系型数据库很难对付 web2.0 时代。尤是超大规模的高并发的社区。暴露出来很多难以克服的问题,NoSQL 在当今大数据环境下发展的十分迅速,Redis 是发展最快的,而且是我们当下必须要掌握的一个技术。
很多的数据类型用户的个人信息,社交网络,地理位置。这些数据类型的存储不需要一个固定的格式不需要多月的操作就可以横向扩展的。Map
NoSQL 特点:解耦。
-
方便扩展(数据之间没有关系,很好扩展)。
-
大数据量高性能(Redis 一秒写 8 万次,读取 11 万,NoSQL 的缓存记录级,是一种细粒度的缓存,性能会比较高)。
-
数据类型是多样型的(不需要事先设计数据库。随取随用。如果是数据量十分大的表,很多人就法设计了。)。
-
传统 RDBMS vs NoSQL。
传统的 RDBMS。
- 结构化组织。
- SQL。
- 数据和关系都存在单独的表中 row col。
- 操作操作,数据定义语言。
- 严格的一致性。
- 基础的事务。
- …
NoSQL。
- 不仅仅是数据。
- 没有固定的查询语言。
- 键值对存储,列存储,文档存储,图形数据库(社交关系)。
- 最终一致性。
- CAP 定理和 BASE(异地多活)初级架构师。
- 高性能,高可用,高可扩。
- …
3V 3高。
大数据时代的 3V。
- 海量 Volume。
- 多样 Variety。
- 实时 Velocity。
大数据时代的 3高。
- 高并发。
- 高可扩。
- 高性能。
真正在公司中的实践:NoSQL + RDBMS 一起使用才是最强的,阿里巴巴技术没有高低之分,就看你如何去使用!(提升内功,思维的提高!)。
去 IOE(IBM Oracle EMS)。王坚。
https://baike.baidu.com/item/%E5%8E%BBioe/16631112?fr=aladdin
阿里的这群疯子。
https://developer.aliyun.com/article/653511
阿里巴巴中文站架构。
如果你未来相当一个架构师: 没有什么是加一层解决不了的!
商品的基本信息名称、价格、商家信息。
关系型数据库就可以解决了!
MySQL / Oracle(淘宝早年就去 IOE 了!王坚
淘宝内部的 MySQL 不是大家用的 MySQL
商品的描述、评论(文字比较多)。
文档型数据库中,MongoDB。
图片分布式文件系统。
FastDFS。
淘宝自己的 TFS。
Google的 GFS。
Hadoop HDFS。
阿里云的 oss。
商品的关键字(搜索)。
搜索引擎 solr elasticsearch
ISerach:多隆(多去了解一下这些技术大佬!)
所有牛逼的人都有一段苦逼的岁月!但是你只要像 SB 一样的去坚持,终将牛逼!
商品热门的波段信息。
内存数据库- Redis、Tair、Memcached…
商品的交易,外部的支付接口。
大型互联网应用问题:
数据类型太多了!
数据源繁多,经常重构!
数据要改造,大面积改造?
解决:统一数据服务层 UDSL。
NoSQL 的四大分类。
- KV 键值对。
新浪:Redis。
美团:Redis + Tair。
阿里、百度:Redis + memcache
- 文档型数据库(bson 格式和 json 一样)。
- MongoDB(一般必须要掌握)。
MongoDB 是一个基于分布式文件存储的数据库,C++ 编写,主要用来处理大量的文档!MongoDB 是一个介于关系型数据库和非关系型数据中中间的产品!MongoDB 是非关系型数据库中功能最丰富,最像关系型数据库的!- ConthDB。
- 列存储数据库。
HBase。
分布式文件系统。
- 图关系数据库。
Neo4j,InfoGrid。
| 分类 | Examples 举例 | 典型应用场景 | 数据模型 | 优点 | 缺点 |
|---|---|---|---|---|---|
| 键值(key-value) | Tokyo Cabinet/Tyrant, Redis, Voldemort, Oracle BDB | 内容缓存,主要用于处理大量数据的高访问负载,也用于一些日志系统等等。 | Key 指向 Value 的键值对,通常用 hash table 来实现 | 查找速度快 | 数据无结构化,通常只被当作字符串或者二进制数据 |
| 列存储数据库 | Cassandra, HBase, Riak | 分布式的文件系统 | 以列簇式存储,将同一列数据存在一起 | 查找速度快,可扩展性强,更容易进行分布式扩展 | 功能相对局限 |
| 文档型数据库 | CouchDB, MongoDb | Web应用(与 Key-Value类似,Value 是结构化的,不同的是数据库能够了解 Value 的内容) | Key-Value 对应的键值对,Value 为结构化数据 | 数据结构要求不严格,表结构可变,不需要像关系型数据库一样需要预先定义表结构 | 查询性能不高,而且缺乏统一的查询语法。 |
| 图形(Graph)数据库 | Neo4J, InfoGrid, Infinite Graph | 社交网络,推荐系统等。专注于构建关系图谱 | 图结构 | 利用图结构相关算法。比如最短路径寻址,N 度关系查找等 | 很多时候需要对整个图做计算才能得出需要的信息,而且这种结构不太好做分布式的集群方案。 |
Redis。
Redis(Remote Dictionary Server),即远程字典服务,是一个开源的使用 ANSI C 语言编写、支持网络、可基于内存亦可持久化的日志型、Key-Value 数据库,并提供多种语言的 API。从 2010 年 3 月 15 日起,Redis 的开发工作由 VMware 主持。从 2013 年 5 月开始,Redis 的开发由 Pivotal 赞助。
与 memcached 一样,为了保证效率,数据都是缓存在内存中。区别的是 redis 会周期性的把更新的数据写入磁盘或者把修改操作写入追加的记录文件,并且在此基础上实现了 master-slave(主从)同步。
- 内存存储、持久化,内存中是断电即失、所以说持久化很重要(rdb、aof)。
- 效率高,可以用于高速缓存。
- 发布订阅系统。
- 地图信息分析。
- 计时器、计数器(浏览量!)。
特性。
- 多样的数据类型。
- 持久化。
- 集群。
- 事务。
官网。
https://redis.io/
http://www.redis.cn/
注意:Windows 在 Github 上下载(停更很久了)。
https://github.com/microsoftarchive/redis/releases/download/win-3.0.504/Redis-x64-3.0.504.zip
- Linux 版本。
https://blog.csdn.net/lyfGeek/article/details/104994808
Redis 使用 ANSI C 编写并且能在绝大 Linux 系统上运行,基于 BSD 协议,对 OS X 没有外部依赖。我们支持 Linux 和 OS X 两种系统的开发和测试,我们推荐使用 Linux 部署。Redis 可以像 SmartOS 一样运行在 Solaris 系统中,但是我们会最大力度的支持它。官方不支持 Windows 版本的 Redis,但微软开发和维护着支持 win-64 的 Redis 版本。
http://www.redis.cn/topics/introduction
Redis is written in ANSI C and works in most POSIX systems like Linux, *BSD, OS X without external dependencies. Linux and OS X are the two operating systems where Redis is developed and tested the most, and we recommend using Linux for deploying. Redis may work in Solaris-derived systems like SmartOS, but the support is best effort. There is no official support for Windows builds.
https://redis.io/topics/introduction
安装、配置、使用。
《Redis~从入门到入坑。》
使用。
- 使用 redis-cli 连接 redis-server。
默认使用端口 6376。
[root@localhost redis-4.0.11]# /usr/local/bin/redis-cli
127.0.0.1:6379> ping
PONG
127.0.0.1:6379>
- 查看进程。
[root@localhost ~]# ps -ef | grep redis
root       7190      1  0 05:34 ?        00:00:00 /usr/local/bin/redis-server 127.0.0.1:6379
root       7214   3666  0 05:36 pts/0    00:00:00 /usr/local/bin/redis-cli
root       7232   7218  0 05:39 pts/1    00:00:00 grep redis
- 关闭 redis-server。
[root@localhost redis-4.0.11]# /usr/local/bin/redis-cli
127.0.0.1:6379> shutdown
not connected> exit
在交互命令行中 shutdown,就是关闭 redis-server。
在交互命令行中 exit,就是关闭 redis-cli。
[root@localhost ~]# ps -ef | grep redis
root       7275   7218  0 05:59 pts/1    00:00:00 grep redis
redis-benchmark~测试性能工具。
[root@localhost bin]# ./redis-benchmark
| 选项 | 描述 | 默认值 |
|---|---|---|
| -h | 指定服务器主机名 | 127.0.0.1 |
| -p | 指定服务器端口 | 6379 |
| -s | 指定服务器 socket | |
| -c | 指定并发连接数 | 50 |
| -n | 指定请求数 | 10000 |
| -d | 以字节的形式指定 SET/GET 值的数据大小 | 2 |
| -k | 1=keep alive 0=reconnect | 1 |
| -r | SET/GET/INCR 使用随机 key, SADD 使用随机值 | |
| -P | 通过管道传输 |
1 |
| -q | 强制退出 redis。仅显示 query/sec 值 | |
| –csv | 以 CSV 格式输出 | |
| -l | 生成循环,永久执行测试 | |
| -t | 仅运行以逗号分隔的测试命令列表。 | |
| -I | Idle 模式。仅打开 N 个 idle 连接并等待。 |
[root@192 ~]# redis-benchmark -h localhost -p 6379 -c 100 -n 100000
// 100000 条数据 100 个并发。
基本知识。
Redis 默认有 16 个数据库。
keys *
// 查看所有 key。
127.0.0.1:6379> FLUSHDB # 清空当前库。
OK
127.0.0.1:6379> FLUSHALL # 清空所有库。
OK
-
Redis 是单线程的。
-
Redis 是基于内存的,CPU 不是 Redis 的瓶颈,Redis 的瓶颈是机器的内在和网络带宽。
-
Redis 是 C 语言写的,官方提供的数据为 100000+ 的 QPS,完全不比同样使用 key-value 的 MemCache 差。
误区 1:高性能的服务器不一定是多线程的。(×)。
误区 2:多线程(CPU 上下文会切换)一定比单线程效率高。(×)。
CPU > 内存 > 硬盘(读写速度)。
Redis 是将所有的数据全部放在内存中,所以说使用单线程去操作效率就是最高的,多线程(CPU 上下文会切换:耗时的操作),对于内存系统来说,如果没有上下文切换效率就是最高的。多次读写都是在一个 CPU 上的,在内存情况下,这个就是最佳的方案!
五大数据类型。
Redis is an open source (BSD licensed), in-memory data structure store, used as a database, cache and message broker. It supports data structures such as strings, hashes, lists, sets, sorted sets with range queries, bitmaps, hyperloglogs, geospatial indexes with radius queries and streams. Redis has built-in replication, Lua scripting, LRU eviction, transactions and different levels of on-disk persistence, and provides high availability via Redis Sentinel and automatic partitioning with Redis Cluster. Learn more →
Redis 是一个开源(BSD 许可)的,内存中的数据结构存储系统,它可以用作
数据库、缓存和消息中间件。 它支持多种类型的数据结构,如字符串(strings),散列(hashes),列表(lists),集合(sets),有序集合(sorted sets) 与范围查询,bitmaps,hyperloglogs 和地理空间(geospatial) 索引半径查询。 Redis 内置了 复制(replication),LUA 脚本(Lua scripting),LRU 驱动事件(LRU eviction),事务(transactions)和不同级别的 磁盘持久化(persistence),并通过 Redis 哨兵(Sentinel)和自动分区(Cluster)提供高可用性(high availability)。
String。
[root@192 redis-4.0.14]# redis-cli
127.0.0.1:6379> ping
PONG
127.0.0.1:6379> FLUSHALL
OK
127.0.0.1:6379> keys *
(empty list or set)
127.0.0.1:6379> set name geek
OK
127.0.0.1:6379> keys *
1) "name"
127.0.0.1:6379> set age 1
OK
127.0.0.1:6379> EXISTS name
(integer) 1
127.0.0.1:6379> EXISTS name1
(integer) 0
127.0.0.1:6379> move name 1
(integer) 1
127.0.0.1:6379> keys *
1) "age"
127.0.0.1:6379> set name geek
OK
127.0.0.1:6379> get name
"geek"
# 设置过期。
127.0.0.1:6379> set name geek
OK
127.0.0.1:6379> EXPIRE name 10
(integer) 1
127.0.0.1:6379> ttl name
(integer) 7
127.0.0.1:6379> ttl name
(integer) 6
127.0.0.1:6379> ttl name
(integer) 3
127.0.0.1:6379> ttl name
(integer) -2
127.0.0.1:6379> get name
(nil)

// 查看 key 类型。
127.0.0.1:6379> type age
string
127.0.0.1:6379> type name
string
127.0.0.1:6379> set key1 v1
OK
127.0.0.1:6379> get key1
"v1"
127.0.0.1:6379> EXISTS key1
(integer) 1
127.0.0.1:6379> APPEND key1 "hello"
(integer) 7
127.0.0.1:6379> get key1
"v1hello"
127.0.0.1:6379> STRLEN key1
(integer) 7
- 加减。
127.0.0.1:6379> set views 0
OK
127.0.0.1:6379> INCR views
(integer) 1
127.0.0.1:6379> get views
"1"
127.0.0.1:6379> DECR views
(integer) 0
127.0.0.1:6379> DECR views
(integer) -1
127.0.0.1:6379> get views
"-1"
- 加减。(步长)。
127.0.0.1:6379> INCRBY views 10
(integer) 9
127.0.0.1:6379> DECRBY views 2
(integer) 7
- 字符串范围。
127.0.0.1:6379> set key1 "hello, geek"
OK
127.0.0.1:6379> GETRANGE key1 0 3
"hell"
127.0.0.1:6379> GETRANGE key1 0 -1
"hello, geek"
- 替换。
127.0.0.1:6379> set key2 123456
OK
127.0.0.1:6379> get key2
"123456"
127.0.0.1:6379> SETRANGE key2 1 xx
(integer) 6
127.0.0.1:6379> get key2
"1xx456"
- setex(set with expire)。设置过期时间。
127.0.0.1:6379> setex k3 30 "hello"
OK
127.0.0.1:6379> ttl k3
(integer) 24
127.0.0.1:6379> setnx mykey "redis"
(integer) 1
127.0.0.1:6379> ttl k3
(integer) -2
127.0.0.1:6379> setnx mykey "mongodb"
(integer) 0
127.0.0.1:6379> get mykey
"redis"
-
setnx(set if not exist)。不存在再设置。(在分布式锁中常用)。
-
同时设置多个值。(原子性操作)。
127.0.0.1:6379> mset k1 v1 k2 v2 k3 v3
OK
127.0.0.1:6379> keys *
1) "k3"
2) "k2"
3) "k1"
127.0.0.1:6379> mget k1 k2 k3
1) "v1"
2) "v2"
3) "v3"
127.0.0.1:6379> msetnx k1 v1 k4 v4
(integer) 0
- 对象。
user1 {
	name: "zhangsan",
	age: 3
}
127.0.0.1:6379> mset user:1:name zhangsan user:1:age 3
OK
127.0.0.1:6379> mget user:1:name user:1:age
1) "zhangsan"
2) "3"
- 先 get 后 set。
127.0.0.1:6379> GETSET db redis
(nil)
127.0.0.1:6379> get db
"redis"
127.0.0.1:6379> GETSET db mongodb
"redis"
127.0.0.1:6379> GET db
"mongodb"
String 类型的使用场景。
Value 除了是字符串还可以是数字。
- 计数器。
- 统计多单位数量。
- 粉丝数。
- 存储。
List。
应用:栈或队列。
实际上是一个链表, before Node after,left,right 都可以插入值。
如果 key 不存在,创建新的链表。
如果 key 存在,新增内容。
如果移除了所有值,空链表,也代表不存在!
在两边插入或者改动值,效率高!中间元素相对来说效率会低一点。
127.0.0.1:6379> LPUSH list one
(integer) 1
127.0.0.1:6379> LPUSH list two
(integer) 2
127.0.0.1:6379> LPUSH list three
(integer) 3
127.0.0.1:6379> LRANGE list 0 -1
1) "three"
2) "two"
3) "one"
127.0.0.1:6379> LRANGE list 0 1
1) "three"
2) "two"
127.0.0.1:6379> LRANGE list 0 1
1) "three"
2) "two"
127.0.0.1:6379> RPUSH list 0 1
(integer) 5
127.0.0.1:6379> LRANGE list 0 -1
1) "three"
2) "two"
3) "one"
4) "0"
5) "1"
127.0.0.1:6379> LPOP list  # 移除第一个。
"three"
127.0.0.1:6379> RPOP list  # 移除第二个。
"1"
127.0.0.1:6379> LRANGE list 0 -1
1) "two"
2) "one"
3) "0"
127.0.0.1:6379>
- 通过下标获取值。
127.0.0.1:6379> LINDEX list 1
"one"
127.0.0.1:6379> LINDEX list 0
"two"
- 长度。
127.0.0.1:6379> LLEN list
(integer) 3
- 移除指定值。
127.0.0.1:6379> LRANGE list 0 -1
1) "three"
2) "three"
3) "two"
4) "0"
127.0.0.1:6379> LREM list 1 three  # 移除一个 three。
(integer) 1
127.0.0.1:6379> LRANGE list 0 -1
1) "three"
2) "two"
3) "0"
127.0.0.1:6379> LPUSH list three
(integer) 4
127.0.0.1:6379> LRANGE list 0 -1
1) "three"
2) "three"
3) "two"
4) "0"
127.0.0.1:6379> LREM list 2 three  # 移除 2 个three。
(integer) 2
127.0.0.1:6379> LRANGE list 0 -1
1) "two"
2) "0"
- 只保留某一部分 ~ trim。
127.0.0.1:6379> RPUSH mylist "hello"
(integer) 1
127.0.0.1:6379> RPUSH mylist "hello1"
(integer) 2
127.0.0.1:6379> RPUSH mylist "hello2"
(integer) 3
127.0.0.1:6379> RPUSH mylist "hello3"
(integer) 4
127.0.0.1:6379> LTRIM mylist 1 2
OK
127.0.0.1:6379> LRANGE mylist 0 -1
1) "hello1"
2) "hello2"
- rpoplpush ~ 移除列表最后一个元素,并将 ta 添加到新的列表中。
127.0.0.1:6379> RPOPLPUSH mylist myotherlist
"hello2"
127.0.0.1:6379> LRANGE mylist 0 -1
1) "hello"
2) "hello1"
127.0.0.1:6379> LRANGE myotherlist 0 -1
1) "hello2"
127.0.0.1:6379>
- 给第 n 项设置值。
127.0.0.1:6379> EXISTS list
(integer) 0
127.0.0.1:6379> lset list 0  item
(error) ERR no such key
127.0.0.1:6379> lpush list value1
(integer) 1
127.0.0.1:6379> LRANGE list 0 0
1) "value1"
127.0.0.1:6379> lset list 0 item
OK
127.0.0.1:6379> LRANGE list 0 0
1) "item"
127.0.0.1:6379> LSET list 1 other
(error) ERR index out of range
- 将某个值插入到某个元素前面或后面。
127.0.0.1:6379> RPUSH mylist "hello"
(integer) 1
127.0.0.1:6379> RPUSH mylist "world"
(integer) 2
127.0.0.1:6379> LINSERT mylist before "world" "other"
(integer) 3
127.0.0.1:6379> LRANGE mylist 0 -1
1) "hello"
2) "other"
3) "world"
127.0.0.1:6379> LINSERT mylist after world new
(integer) 4
127.0.0.1:6379> LRANGE mylist 0 -1
1) "hello"
2) "other"
3) "world"
4) "new"
Set。
127.0.0.1:6379> sadd myset "hello"
(integer) 1
127.0.0.1:6379> SADD myset "geek"
(integer) 1
127.0.0.1:6379> SADD myset "lovegeek"
(integer) 1
127.0.0.1:6379> SMEMBERS myset
1) "geek"
2) "hello"
3) "lovegeek"
127.0.0.1:6379> SISMEMBER myset hello
(integer) 1
127.0.0.1:6379> SISMEMBER myset world
(integer) 0
- 查询总数。
127.0.0.1:6379> SCARD myset
(integer) 3
127.0.0.1:6379> SADD myset "lovegeek"
(integer) 0
127.0.0.1:6379> SCARD myset
(integer) 3
- 删除。
127.0.0.1:6379> SREM myset "hello"
(integer) 1
127.0.0.1:6379> SCARD myset
(integer) 2
127.0.0.1:6379> SISMEMBER myset world
(integer) 0
127.0.0.1:6379> SMEMBERS myset
1) "geek"
2) "lovegeek"
- 随机。
127.0.0.1:6379> SMEMBERS myset
1) "geek2"
2) "geek"
3) "lovegeek"
127.0.0.1:6379> SRANDMEMBER myset
"geek"
127.0.0.1:6379> SRANDMEMBER myset
"lovegeek"
127.0.0.1:6379> SRANDMEMBER myset
"geek2"
127.0.0.1:6379> SRANDMEMBER myset
"geek"
127.0.0.1:6379> SRANDMEMBER myset
"geek2"
127.0.0.1:6379> SRANDMEMBER myset
"geek2"

127.0.0.1:6379> SRANDMEMBER myset 2
1) "geek"
2) "lovegeek"
127.0.0.1:6379> SRANDMEMBER myset 2
1) "geek2"
2) "lovegeek"
- 删除指定 key。
- 随机删除。
127.0.0.1:6379> SPOP myset
"geek"
127.0.0.1:6379> SMEMBERS myset
1) "geek2"
2) "lovegeek"
- 把一个元素从一个集合移动到另一个集合。
127.0.0.1:6379> SADD myset "hello"
(integer) 1
127.0.0.1:6379> SADD myset "world"
(integer) 1
127.0.0.1:6379> SADD myset "geek"
(integer) 1
127.0.0.1:6379> SADD myset2 "set2"
(integer) 1
127.0.0.1:6379> SMOVE myset myset2 "geek"
(integer) 1
127.0.0.1:6379> SMEMBERS myset
1) "world"
2) "hello"
127.0.0.1:6379> SMEMBERS myset2
1) "geek"
2) "set2"
-
微博、B 站 共同关注。
-
差集。SDIFF
-
交集。SINTER
-
并集。SUNION
127.0.0.1:6379> SADD k1 a
(integer) 1
127.0.0.1:6379> SADD k1 b
(integer) 1
127.0.0.1:6379> SADD k1 c
(integer) 1
127.0.0.1:6379> SADD k2 c
(integer) 1
127.0.0.1:6379> SADD k2 d
(integer) 1
127.0.0.1:6379> SADD k2 e
(integer) 1
127.0.0.1:6379> SDIFF k1 k2
1) "b"
2) "a"
127.0.0.1:6379> SINTER k1 k2
1) "c"
127.0.0.1:6379> SUNION k1 k2
1) "c"
2) "a"
3) "b"
4) "d"
5) "e"
Hash。key - 。
Map 集合。
本质和 string 没有多大区别,还是一个简单的 key-value。
127.0.0.1:6379> HSET myhash field1 geek
(integer) 1
127.0.0.1:6379> HGET myhash field1
"geek"
127.0.0.1:6379> hmset myhash field1 hello field2 world
OK
127.0.0.1:6379> hmget myhash field1 field2
1) "hello"
2) "world"
127.0.0.1:6379> HGETALL myhash
1) "field1"
2) "hello"
3) "field2"
4) "world"
- 删除。
127.0.0.1:6379> HDEL myhash field1
(integer) 1
127.0.0.1:6379> HGETALL myhash
1) "field2"
2) "world"
- 长度。
127.0.0.1:6379> hmset myhash field1 hello field2 world
OK
127.0.0.1:6379> HGETALL myhash
1) "field2"
2) "world"
3) "field1"
4) "hello"
127.0.0.1:6379> HLEN myhash
(integer) 2
- hexists。
127.0.0.1:6379> HEXISTS myhash field1
(integer) 1
127.0.0.1:6379> HEXISTS myhash field3
(integer) 0
- 只获取 key / value。
127.0.0.1:6379> HKEYS myhash
1) "field2"
2) "field1"
127.0.0.1:6379> HVALS myhash
1) "world"
2) "hello"
- 增加 / 减小。
127.0.0.1:6379> hset myhash field3 5
(integer) 1
127.0.0.1:6379> HINCRBY myhash field3
(error) ERR wrong number of arguments for 'hincrby' command
127.0.0.1:6379> HINCRBY myhash field3 1
(integer) 6
127.0.0.1:6379> HINCRBY myhash field3 -1
(integer) 5
127.0.0.1:6379> HSETNX myhash field4 hello
(integer) 1
127.0.0.1:6379> HSETNX myhash field4 world
(integer) 0
- 更适合对象的存储。
- String 更适合字符串的存储。
127.0.0.1:6379> HGET user:1 name
"geek"
Zset。有序集合。
在 set 的基础上增加了一个值 score。
127.0.0.1:6379> zadd myset 1 one
(integer) 1
127.0.0.1:6379> zadd myset 2 two 3 three
(integer) 2
127.0.0.1:6379> ZRANGE myset 0 -1
1) "one"
2) "two"
3) "three"
- 排序。
127.0.0.1:6379> zadd salary 2500 xiaohong
(integer) 1
127.0.0.1:6379> zadd salary 5000 zhangsan
(integer) 1
127.0.0.1:6379> zadd salary 500 geek
(integer) 1
127.0.0.1:6379> ZRANGEBYSCORE salary -inf +inf
1) "geek"
2) "xiaohong"
3) "zhangsan"

127.0.0.1:6379> ZRANGEBYSCORE salary -inf +inf withscores  # 从小到大。
1) "geek"
2) "500"
3) "xiaohong"
4) "2500"
5) "zhangsan"
6) "5000"

127.0.0.1:6379> ZREVRANGE salary 0 -1  # 从大到小。
1) "zhangsan"
2) "geek"

127.0.0.1:6379> ZRANGEBYSCORE salary -inf 2500
1) "geek"
2) "xiaohong"
- 删除元素。
127.0.0.1:6379> ZREM salary xiaohong
(integer) 1
127.0.0.1:6379> zrange salary 0 -1
1) "geek"
2) "zhangsan"
- 总数。
127.0.0.1:6379> ZCARD salary
(integer) 2
- 获取指定区间的数量。
127.0.0.1:6379> zadd myset 10 hello 20 world 30 geek
(integer) 3
127.0.0.1:6379> ZCOUNT myset 1 2
(integer) 0
127.0.0.1:6379> ZCOUNT myset 10 20
(integer) 2
应用思路。
set 排序。
班级成绩表,工资表排序。
普通消息 1,重要消息 2,带权重进行判断。
排行榜 Top 10。
三种特殊数据类型。
Bitmaps。
位存储。
统计用户信息,活跃 / 不活跃,登录 / 未登录,打卡。
两个状态的都可以使用 Bitmaps。
Bitmaps 位图,数据结构。都是操作二进制位来进行记录,只有 0 和 1 两个状态。
365 天 = 365 bit 46 个字节左右。
使用 Bitmap 记录周日到周一的打卡。
127.0.0.1:6379> SETBIT sign 0 1
(integer) 0
127.0.0.1:6379> SETBIT sign 1 0
(integer) 0
127.0.0.1:6379> SETBIT sign 2 0
(integer) 0
127.0.0.1:6379> SETBIT sign 3 1
(integer) 0
127.0.0.1:6379> SETBIT sign 4 1
(integer) 0
127.0.0.1:6379> SETBIT sign 5 0
(integer) 0
127.0.0.1:6379> SETBIT sign 6 0
(integer) 0
- 查看某一天是否打卡。
127.0.0.1:6379> GETBIT sign 3
(integer) 1
127.0.0.1:6379> GETBIT sign 6
(integer) 0
- 统计打卡天数。
127.0.0.1:6379> BITCOUNT sign
(integer) 3
HyperLogLogs。
基数。
A {1, 3, 5, 7, 8, 7}
B {1, 3, 5, 7, 8}
基数:重复的元素的个数:5。
Redis 2.8.9 版本就更新的 Hyperloglog 数据结构。基数统计的算法。
- 网页的 UV(一个人访问一个网站多次,但还是算作一个人)。
传统的方式:set 保存用户的 id,统计 set 中元素数量。
这个方式如果保存大量用户 id,占内存。我们的目的是为了计数,而不是为了保存用户 id。
↓ ↓ ↓
Hyperloglog 优点。
占用的内存是固定的,2^64 个元素,只占用 12 kb 内存。
但是有 0.81% 错误率。
127.0.0.1:6379> PFADD mykey a b c d e f g h i j
(integer) 1
127.0.0.1:6379> PFCOUNT mykey
(integer) 10
127.0.0.1:6379> PFADD mykey2 i j z x c v b n m
(integer) 1
127.0.0.1:6379> PFCOUNT mykey2
(integer) 9
127.0.0.1:6379> PFMERGE mykey3 mykey mykey2
OK
127.0.0.1:6379> PFCOUNT mykey3
(integer) 15
goespatial。
朋友定位,附近的人,打车距离计算。
Redis 的 Geo 在 Redis 3.2 版本推出。
经纬度查询:http://api.map.baidu.com/lbsapi/getpoint/index.html
官方文档:http://www.redis.cn/commands/geoadd.html
geoadd。
添加地理位置。
两级无法直接添加。一般会先下载城市数据,通过 Java 程序一次导入。
127.0.0.1:6379> GEOADD china:city 116.397128 39.916527 beijing
(integer) 1
127.0.0.1:6379> GEOADD china:city 121.48941 31.40527 shanghai
(integer) 1
127.0.0.1:6379> GEOADD china:city 106.54041 29.40268 chongqin 113.88308 22.55329 shenzhen
(integer) 2
127.0.0.1:6379> GEOADD china:city 120.21201 30.2084 hangzhou 108.93425 34.23053 xian
(integer) 2
geopos。
127.0.0.1:6379> GEOPOS china:city beijing
1) 1) "116.39712899923324585"
   2) "39.91652647362980844"
127.0.0.1:6379> GEOPOS china:city xian chongqin
1) 1) "108.93425256013870239"
   2) "34.23053097599082406"
2) 1) "106.54040783643722534"
   2) "29.40268053517299762"
两人之间的距离~GEODIST。
GEODIST key member1 member2 [unit]
时间复杂度:O(log(N))
返回两个给定位置之间的距离。
如果两个位置之间的其中一个不存在, 那么命令返回空值。
指定单位的参数 unit 必须是以下单位的其中一个:
m 表示单位为米。
km 表示单位为千米。
mi 表示单位为英里。
ft 表示单位为英尺。
如果用户没有显式地指定单位参数,那么 GEODIST 默认使用米作为单位。
GEODIST 命令在计算距离时会假设地球为完美的球形,在极限情况下,这一假设最大会造成 0.5% 的误差。
127.0.0.1:6379> GEODIST china:city beijing shanghai
"1052105.5643"
127.0.0.1:6379> GEODIST china:city beijing shanghai km
"1052.1056"
附近的人~GEORADIUS。
- 以 110 30 为中心,寻找方圆 1000km 内的城市。
127.0.0.1:6379> GEORADIUS china:city 110 30 1000 km
1) "chongqin"
2) "xian"
3) "shenzhen"
4) "hangzhou"
127.0.0.1:6379> GEORADIUS china:city 110 30 500 km
1) "chongqin"
2) "xian"
- 显示到中心的位置。
127.0.0.1:6379> GEORADIUS china:city 110 30 500 km withdist
1) 1) "chongqin"
   2) "340.7667"
2) 1) "xian"
   2) "481.1278"
- 显示定位信息。
127.0.0.1:6379> GEORADIUS china:city 110 30 500 km withcoord
1) 1) "chongqin"
   2) 1) "106.54040783643722534"
      2) "29.40268053517299762"
2) 1) "xian"
   2) 1) "108.93425256013870239"
      2) "34.23053097599082406"
- 筛选结果。
127.0.0.1:6379> GEORADIUS china:city 110 30 500 km withdist count 1
1) 1) "chongqin"
   2) "340.7667"
127.0.0.1:6379> GEORADIUS china:city 110 30 500 km withdist count 2
1) 1) "chongqin"
   2) "340.7667"
2) 1) "xian"
   2) "481.1278"
GEORADIUSBUMEMBER。
- 找出位于指定元素周围的其他元素。
127.0.0.1:6379> GEORADIUSBYMEMBER china:city shanghai 1000 km
1) "hangzhou"
2) "shanghai"
GEOHASH。
返回一个或多个位置元素的 Geohash 表示。
通常使用表示位置的元素使用不同的技术,使用Geohash位置52点整数编码。由于编码和解码过程中所使用的初始最小和最大坐标不同,编码的编码也不同于标准。此命令返回一个标准的Geohash,在维基百科和geohash.org网站都有相关描述
Geohash字符串属性
该命令将返回11个字符的Geohash字符串,所以没有精度Geohash,损失相比,使用内部52位表示。返回的geohashes具有以下特性:
他们可以缩短从右边的字符。它将失去精度,但仍将指向同一地区。
它可以在 geohash.org 网站使用,网址 http://geohash.org/。查询例子:http://geohash.org/sqdtr74hyu0.
与类似的前缀字符串是附近,但相反的是不正确的,这是可能的,用不同的前缀字符串附近。
返回值
integer-reply, 具体的:
一个数组, 数组的每个项都是一个 geohash 。 命令返回的 geohash 的位置与用户给定的位置元素的位置一一对应。
127.0.0.1:6379> GEOHASH china:city beijing chongqin
1) "wx4g0dtf9e0"
2) "wm5z22s7520"
GEO 底层是 Zset。
127.0.0.1:6379> ZRANGE china:city 0 -1
1) "chongqin"
2) "xian"
3) "shenzhen"
4) "hangzhou"
5) "shanghai"
6) "beijing"

127.0.0.1:6379> zrem china:city beijing
(integer) 1
127.0.0.1:6379> ZRANGE china:city 0 -1
1) "chongqin"
2) "xian"
3) "shenzhen"
4) "hangzhou"
5) "shanghai"
事务。
Redis 单条命令是保证原子性的,但事务是不保证原子性的。
Redis 事务的本质:一组命令的集合。一个事务中的所有命令都会被序列化,在事务执行过程中,会按照顺序执行。
----- 队列
set
set
set
------
Redis 事务没有隔离级别的概念。
所有的命令在事务中,并没有被直接执行。只有发起执行命令的时候才会执行。
Redis 事务。
- multi
开启事务。- 命令入队。
- exec。
执行事务。
127.0.0.1:6379> multi
OK
127.0.0.1:6379> set k1 v1
QUEUED
127.0.0.1:6379> set k2 v2
QUEUED
127.0.0.1:6379> get k2
QUEUED
127.0.0.1:6379> set k3 v3
QUEUED
127.0.0.1:6379> EXEC
1) OK
2) OK
3) "v2"
4) OK
- 放弃事务。
127.0.0.1:6379> multi
OK
127.0.0.1:6379> set k1 v1
QUEUED
127.0.0.1:6379> set k2 v2
QUEUED
127.0.0.1:6379> set k4 v4
QUEUED
127.0.0.1:6379> DISCARD
OK
127.0.0.1:6379> get k4
(nil)
- 编译器异常(代码有问题,命令有错),事务中索引的命令都不会被执行。
127.0.0.1:6379> MULTI
OK
127.0.0.1:6379> set k1 v1
QUEUED
127.0.0.1:6379> set k2 v2
QUEUED
127.0.0.1:6379> set k3 v3
QUEUED
127.0.0.1:6379> GETSET k3
(error) ERR wrong number of arguments for 'getset' command
127.0.0.1:6379> set k4 v4
QUEUED
127.0.0.1:6379> set k5 v5
QUEUED
127.0.0.1:6379> EXEC
(error) EXECABORT Transaction discarded because of previous errors.
127.0.0.1:6379> get k1
(nil)
- 运行时异常(1 / 0),如果事务队列中存在语法性错误,那么执行的时候,其他的命令是可以正常执行的,错误的命令抛出异常。
127.0.0.1:6379> set k1 "v1"
OK
127.0.0.1:6379> MULTI
OK
127.0.0.1:6379> INCR k1
QUEUED
127.0.0.1:6379> set k2 v2
QUEUED
127.0.0.1:6379> set k3 v3
QUEUED
127.0.0.1:6379> get k3
QUEUED
127.0.0.1:6379> EXEC
1) (error) ERR value is not an integer or out of range
2) OK
3) OK
4) "v3"
127.0.0.1:6379> get k2
"v2"
127.0.0.1:6379> get k3
"v3"
监控 ~ 悲观锁 & 乐观锁。
- 监控!Watch(面试常问)。
- 悲观锁。
很悲观,认为什么时候都会出问题,无论做什么都会加锁。- 乐观锁。
很乐观,认为什么时候都不会出问题,所以不会上锁!更新数据的时候去判断一下,在此期间是否有人修改过这个数据。
获取 version。
更新的时候比较 version。
- 正常执行成功。
127.0.0.1:6379> SET money 100
OK
127.0.0.1:6379> SET out 0
OK
127.0.0.1:6379> WATCH money
OK
127.0.0.1:6379> MULTI
OK
127.0.0.1:6379> DECRBY money 20
QUEUED
127.0.0.1:6379> INCRBY out 20
QUEUED
127.0.0.1:6379> EXEC
1) (integer) 80
2) (integer) 20
- 模拟两个客户端操作同一变量。
127.0.0.1:6379> SET money 100
OK
127.0.0.1:6379> SET out 0
OK
127.0.0.1:6379> WATCH money
OK
127.0.0.1:6379> MULTI
OK
127.0.0.1:6379> DECRBY money 10
QUEUED
127.0.0.1:6379> INCRBY out 10
QUEUED
这时另外一个客户端修改了值。
127.0.0.1:6379> get money
"100"
127.0.0.1:6379> set money 1000
OK
第一个客户端 EXEC。失败。(使用 WATCH 当做乐观锁操作)。
127.0.0.1:6379> EXEC
(nil)
127.0.0.1:6379> EXEC
(nil)
127.0.0.1:6379> UNWATCH  # 如果发现事务失败,就先解锁。
OK
127.0.0.1:6379> WATCH money  # 获取最新的值,再次监视。(select version)
OK
127.0.0.1:6379> MULTI
OK
127.0.0.1:6379> DECRBY money 1
QUEUED
127.0.0.1:6379> INCRBY out 1
QUEUED
127.0.0.1:6379> EXEC
1) (integer) 999
2) (integer) 1
Jedis。
<project xmlns="http://maven.apache.org/POM/4.0.0"
         xmlns:xsi="http://www.w3.org/2001/XMLSchema-instance"
         xsi:schemaLocation="http://maven.apache.org/POM/4.0.0 http://maven.apache.org/xsd/maven-4.0.0.xsd">
    <modelVersion>4.0.0modelVersion>

    <groupId>com.geekgroupId>
    <artifactId>redis-00-jedisartifactId>
    <version>1.0-SNAPSHOTversion>

    <dependencies>
        <dependency>
            <groupId>redis.clientsgroupId>
            <artifactId>jedisartifactId>
            <version>2.9.0version>
        dependency>

        <dependency>
            <groupId>com.alibabagroupId>
            <artifactId>fastjsonartifactId>
            <version>1.2.67version>
        dependency>
    dependencies>
project>
- 连接数据库。
package com.geek;

import redis.clients.jedis.Jedis;

public class TestPing {

    public static void main(String[] args) {
        Jedis jedis = new Jedis("192.168.142.161", 6379);
        String ping = jedis.ping();
        System.out.println("ping = " + ping);
        // ping = PONG

        // Exception in thread "main" redis.clients.jedis.exceptions.JedisDataException: DENIED Redis is running in protected mode because protected mode is enabled, no bind address was specified, no authentication password is requested to clients. In this mode connections are only accepted from the loopback interface. If you want to connect from external computers to Redis you may adopt one of the following solutions: 1) Just disable protected mode sending the command 'CONFIG SET protected-mode no' from the loopback interface by connecting to Redis from the same host the server is running, however MAKE SURE Redis is not publicly accessible from internet if you do so. Use CONFIG REWRITE to make this change permanent. 2) Alternatively you can just disable the protected mode by editing the Redis configuration file, and setting the protected mode option to 'no', and then restarting the server. 3) If you started the server manually just for testing, restart it with the '--protected-mode no' option. 4) Setup a bind address or an authentication password. NOTE: You only need to do one of the above things in order for the server to start accepting connections from the outside.
        //	at redis.clients.jedis.Protocol.processError(Protocol.java:127)
        //	at redis.clients.jedis.Protocol.process(Protocol.java:161)
        //	at redis.clients.jedis.Protocol.read(Protocol.java:215)
        //	at redis.clients.jedis.Connection.readProtocolWithCheckingBroken(Connection.java:340)
        //	at redis.clients.jedis.Connection.getStatusCodeReply(Connection.java:239)
        //	at redis.clients.jedis.BinaryJedis.ping(BinaryJedis.java:196)
        //	at com.geek.TestPing.main(TestPing.java:9)
    }
}
package com.geek;

import redis.clients.jedis.Jedis;

import java.util.Set;

public class TestKey {

    public static void main(String[] args) {

        Jedis jedis = new Jedis("192.168.142.161");

        jedis.flushAll();

        System.out.println("清空数据。 ~ " + jedis.flushAll());
        System.out.println("判断某个键是否存在。 ~ " + jedis.exists("username"));
        System.out.println("新增<'username', 'geek'>键值对。 ~ " + jedis.set("username", "geek"));
        System.out.println("新增<'password', 'password'>键值对。 ~ " + jedis.set("password", "password"));
        System.out.println("系统中所有的键。↓ ↓ ↓");
        Set<String> keys = jedis.keys("*");
        System.out.println("keys = " + keys);
        System.out.println("删除键 password。 ~ " + jedis.del("password"));
        System.out.println("判断键 password 是否存在。 ~ " + jedis.exists("password"));
        System.out.println("查看键 username 所存储的类型。" + jedis.type("username"));
        System.out.println("随机返回一个。" + jedis.randomKey());
        System.out.println("重命名 key。" + jedis.rename("username", "name"));
        System.out.println("取出改后的 name。" + jedis.get("name"));
        System.out.println("按索引查询。" + jedis.select(0));
        System.out.println("返回当前数据库中 key 的数量。" + jedis.dbSize());
        System.out.println("删除当前选择数据库中的所有 key。" + jedis.flushDB());
        System.out.println("删除所有数据库中的所有 key。" + jedis.flushAll());

    }
}
package com.geek;

import redis.clients.jedis.Jedis;

import java.util.concurrent.TimeUnit;

public class TestString {

    public static void main(String[] args) {

        Jedis jedis = new Jedis("192.168.142.161");

        jedis.flushAll();

        System.out.println("~ ~ ~ ~ ~ ~ ~ 添加数据。 ~ ~ ~ ~ ~ ~ ~");
        System.out.println(jedis.set("key1", "value1"));
        System.out.println(jedis.set("key2", "value2"));
        System.out.println(jedis.set("key3", "value3"));
        System.out.println("删除键 key2。 ~ " + jedis.del("key2"));
        System.out.println("获取键 key2。 ~ " + jedis.get("key2"));
        System.out.println("修改 key1。 ~ " + jedis.set("key1", "value1Changed"));
        System.out.println("获取键 key1。 ~ " + jedis.get("key1"));
        System.out.println("在 key3 后面加入值。 ~ " + jedis.append("key3", "End"));
        System.out.println("key3 的值。 ~ " + jedis.get("key3"));
        System.out.println("添加多个键值对。 ~ " + jedis.mset("key01", "value01", "key02", "value02", "key03", "value03"));
        System.out.println("获取多个键值对。 ~ " + jedis.mget("key01", "key02", "key03"));
        System.out.println("获取多个键值对。 ~ " + jedis.mget("key01", "key02", "key03", "key04"));
        System.out.println("删除多个键值对。 ~ " + jedis.del("key01", "key02"));
        System.out.println("获取多个键值对。 ~ " + jedis.mget("key01", "key02", "key03"));

        jedis.flushAll();

        System.out.println("~ ~ ~ ~ ~ ~ ~ 新增键值对防止覆盖原先数据。 ~ ~ ~ ~ ~ ~ ~");
        System.out.println(jedis.setnx("key1", "value1"));
        System.out.println(jedis.setnx("key2", "value2"));
        System.out.println(jedis.setnx("key2", "value2-new"));
        System.out.println(jedis.get("key1"));
        System.out.println(jedis.get("key2"));

        System.out.println("~ ~ ~ ~ ~ ~ ~ 新增键值对并设置有效时间。 ~ ~ ~ ~ ~ ~ ~");
        System.out.println(jedis.setex("key3", 2, "value3"));
        System.out.println(jedis.get("key3"));
        try {
            TimeUnit.SECONDS.sleep(3);
        } catch (InterruptedException e) {
            e.printStackTrace();
        }
        System.out.println(jedis.get("key3"));

        System.out.println("~ ~ ~ ~ ~ ~ ~ 获取原值并更新为新值。 ~ ~ ~ ~ ~ ~ ~");
        System.out.println(jedis.getSet("key2", "key2GetSet"));
        System.out.println(jedis.get("key2"));

        System.out.println("获得 key2 的值的子串。 ~ " + jedis.getrange("key2", 2, 4));

    }
}
package com.geek;

import redis.clients.jedis.Jedis;

public class TestList {

    public static void main(String[] args) {

        Jedis jedis = new Jedis("192.168.142.161");

        jedis.flushAll();

        System.out.println("~ ~ ~ ~ ~ ~ ~ 添加一个 List。 ~ ~ ~ ~ ~ ~ ~");
        jedis.lpush("collections", "ArrayList", "Vector", "stack", "HashMap", "WeakHashMap", "linkedList", "HashMap");
        jedis.lpush("collections", "HashSet");
        jedis.lpush("collections", "TreeSet");
        jedis.lpush("collections", "TreeMap");
        System.out.println("Collections 的内容:" + jedis.lrange("Collections", 0, -1));// -1 代表倒数第一个。
        System.out.println("Collections 区间 0 ~ 3 的元素:" + jedis.lrange("Collections", 0, 3));

        System.out.println("~ ~ ~ ~ ~ ~ ~");

        // 删除列表制定的值。第二个参数为删除的个数(有重复时)。后 add 进去的值先被删,类似于出栈。
        System.out.println("删除指定个数元素。 ~ " + jedis.lrem("collections", 2, "HashMap"));
        System.out.println("Collection 的内容。 ~ " + jedis.lrange("collections", 0, -1));
        System.out.println("删除下标 0 ~ 3 之外的元素。 ~ " + jedis.ltrim("collections", 0, 3));
        System.out.println("collections 的内容。 ~ " + jedis.lrange("collections", 0, -1));
        System.out.println("collections 列表出栈(左端)。 ~ " + jedis.lpop("collections"));
        System.out.println("collections 的内容。 ~ " + jedis.lrange("collections", 0, -1));
        System.out.println("collections 从列表右端,与 lpush 相对应。 ~ " + jedis.rpush("collections", "111"));
        System.out.println("collections 的内容。 ~ " + jedis.lrange("collections", 0, -1));
        System.out.println("collections 列表出栈(右端)。 ~ " + jedis.rpop("collections"));
        System.out.println("collections 的内容。 ~ " + jedis.lrange("collections", 0, -1));
        System.out.println("修改 collections 指定下标 1 的内容。 ~ " + jedis.lset("collections", 1, "LinkedList"));
        System.out.println("collections 的内容。 ~ " + jedis.lrange("collections", 0, -1));

        System.out.println("~ ~ ~ ~ ~ ~ ~");

        System.out.println("collections 的长度。 ~ " + jedis.llen("collections"));
        System.out.println("获取 collections 指定下标 2 的元素。 ~ " + jedis.lindex("collections", 2));

        System.out.println("~ ~ ~ ~ ~ ~ ~");

        jedis.lpush("sortedList", "3", "6", "2", "0", "7", "4");
        System.out.println("sortedList 排序前。 ~ " + jedis.lrange("sortedList", 0, -1));
        System.out.println(jedis.sort("sortedList"));
        System.out.println("sortedList 排序后。 ~ " + jedis.lrange("sortedList", 0, -1));
    }
}
package com.geek;
import redis.clients.jedis.Jedis;
import java.util.HashMap;
import java.util.Map;
public class TestHash {
public static void main(String[] args) {
Jedis jedis = new Jedis("192.168.142.161", 6379);
jedis.flushAll();
Map<String, String> map = new HashMap<String, String>();
map.put("key1", "value1");
map.put("key2", "value2");
map.put("key3", "value3");
map.put("key4", "value4");
// 添加名称为 hash(key)的 hash 元素。
jedis.hmset("hash", map);
// 向名称为 hash 的 hash 中添加 key 为 key5,value 为 value5 元素。
jedis.hset("hash", "key5", "value5");
System.out.println("散列 hash 的所有键值对为:" + jedis.hgetAll("hash"));// return Mappackage com.geek;
import redis.clients.jedis.Jedis;
public class TestSet {
public static void main(String[] args) {
Jedis jedis = new Jedis("192.168.142.161", 6379);
jedis.flushDB();
System.out.println("~ ~ ~ ~ ~ ~ ~ 向集合中添加元素(不重复)~ ~ ~ ~ ~ ~ ~");
System.out.println(jedis.sadd("eleSet", "e1", "e2", "e4", "e3", "e0", "e8", "e7", "e5"));
System.out.println(jedis.sadd("eleSet", "e6"));
System.out.println(jedis.sadd("eleSet", "e6"));
System.out.println("eleSet 的所有元素为:" + jedis.smembers("eleSet"));
System.out.println("删除一个元素 e0:" + jedis.srem("eleSet", "e0"));
System.out.println("eleSet 的所有元素为:" + jedis.smembers("eleSet"));
System.out.println("删除两个元素 e7 和 e6:" + jedis.srem("eleSet", "e7", "e6"));
System.out.println("eleSet 的所有元素为:" + jedis.smembers("eleSet"));
System.out.println("随机的移除集合中的一个元素:" + jedis.spop("eleSet"));
System.out.println("随机的移除集合中的一个元素:" + jedis.spop("eleSet"));
System.out.println("eleSet 的所有元素为:" + jedis.smembers("eleSet"));
System.out.println("eleSet 中包含元素的个数:" + jedis.scard("eleSet"));
System.out.println("e3 是否在 eleSet 中:" + jedis.sismember("eleSet", "e3"));
System.out.println("e1 是否在 eleSet 中:" + jedis.sismember("eleSet", "e1"));
System.out.println("e1 是否在 eleSet 中:" + jedis.sismember("eleSet", "e5"));
System.out.println("~ ~ ~ ~ ~ ~ ~");
System.out.println(jedis.sadd("eleSet1", "e1", "e2", "e4", "e3", "e0", "e8", "e7", "e5"));
System.out.println(jedis.sadd("eleSet2", "e1", "e2", "e4", "e3", "e0", "e8"));
System.out.println("将 eleSet1 中删除 e1 并存入 eleSet3 中:" + jedis.smove("eleSet1", "eleSet3", "e1"));// 移到集合元素。
System.out.println("将 eleSet1 中删除 e2 并存入 eleSet3 中:" + jedis.smove("eleSet1", "eleSet3", "e2"));
System.out.println("eleSet1 中的元素:" + jedis.smembers("eleSet1"));
System.out.println("eleSet3 中的元素:" + jedis.smembers("eleSet3"));
System.out.println("~ ~ ~ ~ ~ ~ ~ 集合运算。~ ~ ~ ~ ~ ~ ~");
System.out.println("eleSet1 中的元素:" + jedis.smembers("eleSet1"));
System.out.println("eleSet2 中的元素:" + jedis.smembers("eleSet2"));
System.out.println("eleSet1 和 eleSet2 的交集:" + jedis.sinter("eleSet1", "eleSet2"));
System.out.println("eleSet1 和 eleSet2 的并集:" + jedis.sunion("eleSet1", "eleSet2"));
System.out.println("eleSet1 和 eleSet2 的差集:" + jedis.sdiff("eleSet1", "eleSet2"));// eleSet1 中有,eleSet2 中没有。
jedis.sinterstore("eleSet4", "eleSet1", "eleSet2");// 求交集并将交集保存到 dstkey 的集合。
System.out.println("eleSet4 中的元素:" + jedis.smembers("eleSet4"));
}
}
事务。
package com.geek;

import com.alibaba.fastjson.JSONObject;
import redis.clients.jedis.Jedis;
import redis.clients.jedis.Transaction;

public class TestTX {

    public static void main(String[] args) {

        Jedis jedis = new Jedis("192.168.142.161");

        jedis.flushAll();

        JSONObject jsonObject = new JSONObject();
        jsonObject.put("hello", "world");
        jsonObject.put("name", "geek");

        // 事务。
        Transaction multi = jedis.multi();

        String result = jsonObject.toJSONString();
        try {
            multi.set("user1", result);
            multi.set("user2", result);

//            int i = 1 / 0;

            multi.exec();// 执行事务。
        } catch (Exception e) {
            e.printStackTrace();
            multi.discard();// 放弃事务。
        } finally {
            System.out.println(jedis.get("user1"));
            System.out.println(jedis.get("user2"));
            jedis.close();// 关闭连接。
        }

        jedis.close();
    }
}
Spring Boot 整合。
Spring Boot 2.x 以后,Jedis 被替换成了 lettuce。
Jedis 采用的是直连,多个线程操作的话,是不安全的。如果要避免线程不安全,使用 Jedis pool 连接池。更像 BIO 模式。
lettuce:采用 netty,实例可以在多个线程中共享,不存在线程不安全问题。更像 NIO 模式。
//
// Source code recreated from a .class file by IntelliJ IDEA
// (powered by Fernflower decompiler)
//

package org.springframework.boot.autoconfigure.data.redis;

import java.net.UnknownHostException;
import org.springframework.boot.autoconfigure.condition.ConditionalOnClass;
import org.springframework.boot.autoconfigure.condition.ConditionalOnMissingBean;
import org.springframework.boot.context.properties.EnableConfigurationProperties;
import org.springframework.context.annotation.Bean;
import org.springframework.context.annotation.Configuration;
import org.springframework.context.annotation.Import;
import org.springframework.data.redis.connection.RedisConnectionFactory;
import org.springframework.data.redis.core.RedisOperations;
import org.springframework.data.redis.core.RedisTemplate;
import org.springframework.data.redis.core.StringRedisTemplate;

@Configuration
@ConditionalOnClass({RedisOperations.class})
@EnableConfigurationProperties({RedisProperties.class})
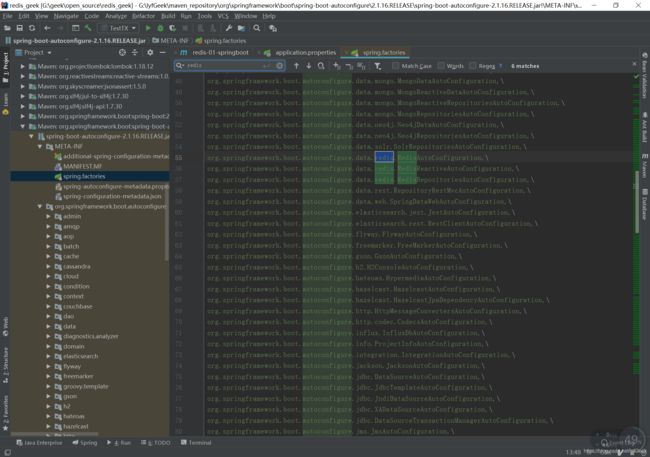
@Import({LettuceConnectionConfiguration.class, JedisConnectionConfiguration.class})
public class RedisAutoConfiguration {
    public RedisAutoConfiguration() {
    }

    @Bean
    @ConditionalOnMissingBean(
        name = {"redisTemplate"}
    )
    public RedisTemplate<Object, Object> redisTemplate(RedisConnectionFactory redisConnectionFactory) throws UnknownHostException {
        RedisTemplate<Object, Object> template = new RedisTemplate();
        template.setConnectionFactory(redisConnectionFactory);
        return template;
    }

    @Bean
    @ConditionalOnMissingBean
    public StringRedisTemplate stringRedisTemplate(RedisConnectionFactory redisConnectionFactory) throws UnknownHostException {
        StringRedisTemplate template = new StringRedisTemplate();
        template.setConnectionFactory(redisConnectionFactory);
        return template;
    }
}
@ConditionalOnMissingBean,当这个类不存在时生效。也就是说可以自己写一个这个类替换自定义。
- 配置。
spring.redis.host=192.168.142.161
spring.redis.port=6379
- 测试。
package com.geek;

import org.junit.Test;
import org.junit.runner.RunWith;
import org.springframework.beans.factory.annotation.Autowired;
import org.springframework.boot.test.context.SpringBootTest;
import org.springframework.data.redis.core.RedisTemplate;
import org.springframework.test.context.junit4.SpringRunner;

@RunWith(SpringRunner.class)
@SpringBootTest
public class Redis01SpringbootApplicationTests {

    @Autowired
    private RedisTemplate redisTemplate;

    @Test
    public void contextLoads() {
        // 操作字符串。类似 String。
//        redisTemplate.opsForValue()

        // 操作 list。
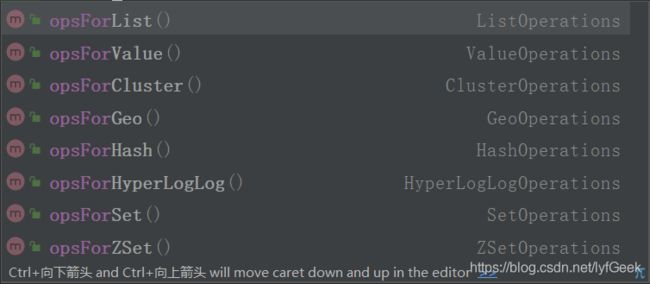
//        redisTemplate.opsForList()

//        redisTemplate.opsForSet()
//        redisTemplate.opsForZSet()
//        redisTemplate.opsForHash()
//        redisTemplate.opsForGeo()
//        redisTemplate.opsForHyperLogLog()

//        RedisConnection connection = redisTemplate.getConnectionFactory().getConnection();
//        connection.flushAll();
//        connection.flushDb();

        redisTemplate.opsForValue().set("mykey", "geek 李");
        System.out.println(redisTemplate.opsForValue().get("mykey"));
    }

}
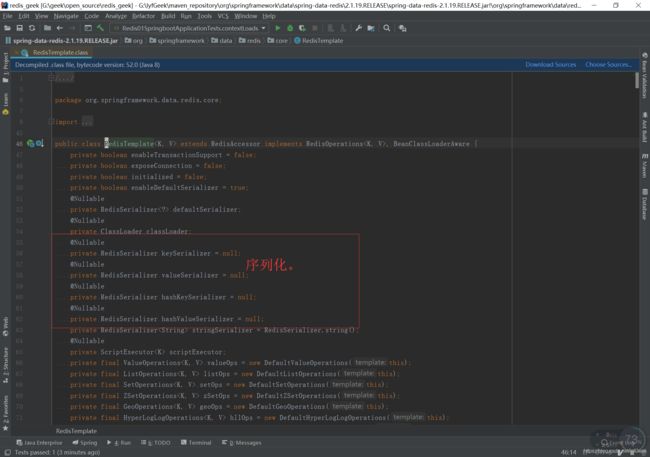
序列化。
- 默认 jdk 序列化。
Redis.conf。
Redis 持久化。
RDB(Redis Database)。
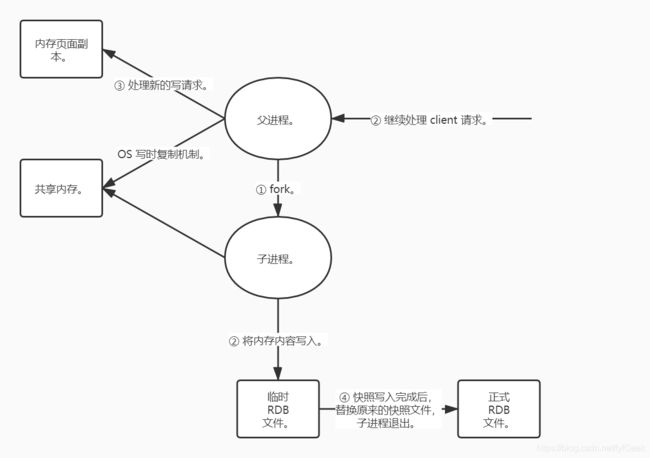
在指定的时间间隔内将内存中的数据集快照写入磁盘,也就是行话讲的 Snapshot 快照。ta 恢复时是将快照文件直接读到内存里。
Redis 会单独创建(fork)一个子进程来进行持久化,会先将数据写到一个临时文件中,待持久化过程结束了,再用这个临时文件替换上次持久化好的文件。整个过程中,主进程是不进行任何 IO 操作的。这就确保的极高的性能。如果需要进行大规模的数据恢复,且对于数据恢复的完整性不是非常敏感,那 RDB 方式要比 AOF 方式更加的高效。
RDB 的缺点是最后一次持久化后的数据可能丢失。
默认的是 RDB,一般不需要修改配置。
################################ SNAPSHOTTING  ################################
#
# Save the DB on disk:
#
#   save
#
#   Will save the DB if both the given number of seconds and the given
#   number of write operations against the DB occurred.
#
#   In the example below the behaviour will be to save:
#   after 900 sec (15 min) if at least 1 key changed
#   after 300 sec (5 min) if at least 10 keys changed
#   after 60 sec if at least 10000 keys changed
#
#   Note: you can disable saving completely by commenting out all "save" lines.
#
#   It is also possible to remove all the previously configured save
#   points by adding a save directive with a single empty string argument
#   like in the following example:
#
#   save ""

#save 900 1
#save 300 10
#save 60 10000
save 60 5
(60s 内如果有 5 个数据产生了变化,就将这些数据保存到 dump.rdb 文件)。
重启 redis-server。
127.0.0.1:6379> keys *
(empty list or set)
127.0.0.1:6379> set k1 v1
OK
127.0.0.1:6379> set k2 v2
OK
127.0.0.1:6379> set k3 v3
OK
127.0.0.1:6379> set k4 v4
OK
127.0.0.1:6379> set k5 v5
OK
127.0.0.1:6379> shutdown
not connected> exit
[geek@192 redis-4.0.11]$ ls
00-RELEASENOTES  COPYING   INSTALL    README.md   runtest-cluster   src
BUGS             deps      Makefile   redis.conf  runtest-sentinel  tests
CONTRIBUTING     dump.rdb  MANIFESTO  runtest     sentinel.conf     utils
[geek@192 redis-4.0.11]$
发现多了一个 dump.rdb 文件。
再次启动 Redis-server。
[geek@192 redis-4.0.11]$ redis-server redis.conf
36078:C 30 Jun 07:24:23.759 # oO0OoO0OoO0Oo Redis is starting oO0OoO0OoO0Oo
36078:C 30 Jun 07:24:23.759 # Redis version=4.0.14, bits=64, commit=00000000, modified=0, pid=36078, just started
36078:C 30 Jun 07:24:23.759 # Configuration loaded
[geek@192 redis-4.0.11]$ redis-cli
127.0.0.1:6379> key *
(error) ERR unknown command `key`, with args beginning with: `*`,
127.0.0.1:6379> keys *
1) "k5"
2) "k1"
3) "k3"
4) "k2"
5) "k4"
- 恢复 rdb 文件。
只需要将 rdb 文件放到 Redis 启动目录下。Redis 启动时会自动检测。
127.0.0.1:6379> config get dir
1) "dir"
2) "/home/geek/tools_my/redis-4.0.11"
- 适合大规模的数据恢复。
- 对数据的完整性要求不高。
- 需要一定的时间间隔。如果 Redis 以外宕机,最后一次修改的数据就没了。
- fork 进程的时候,会占用一定的内存空间。
AOF(Append Only File)。
以日志的形式记录每个写操作,将 Redis 执行过的所有指令记录下来(读操作不记录)。只追加文件而不改写文件。Redis 启动之初会读取该文件重新构建数据。换言之,Redis 重启的话就根据日志文件的内容将写指令从头到尾执行一次以完成数据的恢复工作。
appendonly.aof。
默认不开启。
#appendonly no
appendonly yes
############################## APPEND ONLY MODE ###############################

# By default Redis asynchronously dumps the dataset on disk. This mode is
# good enough in many applications, but an issue with the Redis process or
# a power outage may result into a few minutes of writes lost (depending on
# the configured save points).
#
# The Append Only File is an alternative persistence mode that provides
# much better durability. For instance using the default data fsync policy
# (see later in the config file) Redis can lose just one second of writes in a
# dramatic event like a server power outage, or a single write if something
# wrong with the Redis process itself happens, but the operating system is
# still running correctly.
#
# AOF and RDB persistence can be enabled at the same time without problems.
# If the AOF is enabled on startup Redis will load the AOF, that is the file
# with the better durability guarantees.
#
# Please check http://redis.io/topics/persistence for more information.

#appendonly no
appendonly yes

# The name of the append only file (default: "appendonly.aof")

appendfilename "appendonly.aof"

# The fsync() call tells the Operating System to actually write data on disk
# instead of waiting for more data in the output buffer. Some OS will really flush
# data on disk, some other OS will just try to do it ASAP.
#
# Redis supports three different modes:
#
# no: don't fsync, just let the OS flush the data when it wants. Faster.
# always: fsync after every write to the append only log. Slow, Safest.
# everysec: fsync only one time every second. Compromise.
#
# The default is "everysec", as that's usually the right compromise between
# speed and data safety. It's up to you to understand if you can relax this to
# "no" that will let the operating system flush the output buffer when
# it wants, for better performances (but if you can live with the idea of
# some data loss consider the default persistence mode that's snapshotting),
# or on the contrary, use "always" that's very slow but a bit safer than
# everysec.
#
# More details please check the following article:
# http://antirez.com/post/redis-persistence-demystified.html
#
# If unsure, use "everysec".

# appendfsync always
appendfsync everysec
# appendfsync no

# When the AOF fsync policy is set to always or everysec, and a background
# saving process (a background save or AOF log background rewriting) is
# performing a lot of I/O against the disk, in some Linux configurations
# Redis may block too long on the fsync() call. Note that there is no fix for
# this currently, as even performing fsync in a different thread will block
# our synchronous write(2) call.
#
# In order to mitigate this problem it's possible to use the following option
# that will prevent fsync() from being called in the main process while a
# BGSAVE or BGREWRITEAOF is in progress.
#
# This means that while another child is saving, the durability of Redis is
# the same as "appendfsync none". In practical terms, this means that it is
# possible to lose up to 30 seconds of log in the worst scenario (with the
# default Linux settings).
#
# If you have latency problems turn this to "yes". Otherwise leave it as
# "no" that is the safest pick from the point of view of durability.

no-appendfsync-on-rewrite no

# Automatic rewrite of the append only file.
# Redis is able to automatically rewrite the log file implicitly calling
# BGREWRITEAOF when the AOF log size grows by the specified percentage.
#
# This is how it works: Redis remembers the size of the AOF file after the
# latest rewrite (if no rewrite has happened since the restart, the size of
# the AOF at startup is used).
#
# This base size is compared to the current size. If the current size is
# bigger than the specified percentage, the rewrite is triggered. Also
# you need to specify a minimal size for the AOF file to be rewritten, this
# is useful to avoid rewriting the AOF file even if the percentage increase
# is reached but it is still pretty small.
#
# Specify a percentage of zero in order to disable the automatic AOF
# rewrite feature.

auto-aof-rewrite-percentage 100
auto-aof-rewrite-min-size 64mb

# An AOF file may be found to be truncated at the end during the Redis
# startup process, when the AOF data gets loaded back into memory.
# This may happen when the system where Redis is running
# crashes, especially when an ext4 filesystem is mounted without the
# data=ordered option (however this can't happen when Redis itself
# crashes or aborts but the operating system still works correctly).
#
# Redis can either exit with an error when this happens, or load as much
# data as possible (the default now) and start if the AOF file is found
# to be truncated at the end. The following option controls this behavior.
#
# If aof-load-truncated is set to yes, a truncated AOF file is loaded and
# the Redis server starts emitting a log to inform the user of the event.
# Otherwise if the option is set to no, the server aborts with an error
# and refuses to start. When the option is set to no, the user requires
# to fix the AOF file using the "redis-check-aof" utility before to restart
# the server.
#
# Note that if the AOF file will be found to be corrupted in the middle
# the server will still exit with an error. This option only applies when
# Redis will try to read more data from the AOF file but not enough bytes
# will be found.
aof-load-truncated yes

# When rewriting the AOF file, Redis is able to use an RDB preamble in the
# AOF file for faster rewrites and recoveries. When this option is turned
# on the rewritten AOF file is composed of two different stanzas:
#
#   [RDB file][AOF tail]
#
# When loading Redis recognizes that the AOF file starts with the "REDIS"
# string and loads the prefixed RDB file, and continues loading the AOF
# tail.
#
# This is currently turned off by default in order to avoid the surprise
# of a format change, but will at some point be used as the default.
aof-use-rdb-preamble no
- 重启。
[geek@192 redis-4.0.11]$ redis-server redis.conf
37247:C 30 Jun 07:48:09.215 # oO0OoO0OoO0Oo Redis is starting oO0OoO0OoO0Oo
37247:C 30 Jun 07:48:09.215 # Redis version=4.0.14, bits=64, commit=00000000, modified=0, pid=37247, just started
37247:C 30 Jun 07:48:09.215 # Configuration loaded
[geek@192 redis-4.0.11]$ redis-cli
127.0.0.1:6379> ping
PONG
127.0.0.1:6379> exit
[geek@192 redis-4.0.11]$ ls
00-RELEASENOTES  BUGS          COPYING  dump.rdb  Makefile   README.md   runtest          runtest-sentinel  src    utils
appendonly.aof   CONTRIBUTING  deps     INSTALL   MANIFESTO  redis.conf  runtest-cluster  sentinel.conf     tests
生成了 appendonly.aof。
操作数据库,查看 appendonly.aof 文件,记录了操作。
[geek@192 redis-4.0.11]$ redis-cli
127.0.0.1:6379> keys *
(empty list or set)
127.0.0.1:6379> set k1 v1
OK
127.0.0.1:6379> set k2 v2
OK
127.0.0.1:6379> set k3 v3
OK
127.0.0.1:6379> set k4 v4
OK
127.0.0.1:6379> set k5 v5
OK
127.0.0.1:6379> exit
[geek@192 redis-4.0.11]$ ls
00-RELEASENOTES  BUGS          COPYING  dump.rdb  Makefile   README.md   runtest          runtest-sentinel  src    utils
appendonly.aof   CONTRIBUTING  deps     INSTALL   MANIFESTO  redis.conf  runtest-cluster  sentinel.conf     tests
[geek@192 redis-4.0.11]$ cat appendonly.aof
*2
$6
SELECT
$1
0
*3
$3
set
$2
k1
$2
v1
*3
$3
set
$2
k2
$2
v2
*3
$3
set
$2
k3
$2
v3
*3
$3
set
$2
k4
$2
v4
*3
$3
set
$2
k5
$2
v5
127.0.0.1:6379> shutdown
- 如果破坏 appendonly.aof 文件。
*2
$6
SELECT
$1
0
*3
$3
set
$2
k1
$2
v1
*3
$3
set
$2
k2
$2
v2
*3
$3
set
$2
k3
$2
v3
*3
$3
set
$2
k4
$2
v4
*3
$3
set
$2
k5
$2
v5

lyfGeek
- 不能连接上 Redis 了。
[geek@192 redis-4.0.11]$ redis-server redis.conf
37572:C 30 Jun 07:54:33.382 # oO0OoO0OoO0Oo Redis is starting oO0OoO0OoO0Oo
37572:C 30 Jun 07:54:33.382 # Redis version=4.0.14, bits=64, commit=00000000, modified=0, pid=37572, just started
37572:C 30 Jun 07:54:33.382 # Configuration loaded
[geek@192 redis-4.0.11]$ redis-cli
Could not connect to Redis at 127.0.0.1:6379: Connection refused
Could not connect to Redis at 127.0.0.1:6379: Connection refused
- appendonly.aof 文件被破坏,redis-server 是不能启动的。
[geek@192 redis-4.0.11]$ ps -ef | grep redis
geek      37637  34021  0 07:55 pts/0    00:00:00 grep --color=auto redis
- 使用自动修复软件。redis-check-aof,redis-check-rdb。
[geek@192 redis-4.0.11]$ ls /usr/local/bin/
pcre-config  pcregrep  pcretest  redis-benchmark  redis-check-aof  redis-check-rdb  redis-cli  redis-sentinel  redis-server
[geek@192 redis-4.0.11]$ redis-check-aof
Usage: redis-check-aof [--fix] <file.aof>

[geek@192 redis-4.0.11]$ redis-check-aof --fix appendonly.aof
'x              a8: Expected prefix '*', got: '
AOF analyzed: size=179, ok_up_to=168, diff=11
This will shrink the AOF from 179 bytes, with 11 bytes, to 168 bytes
Continue? [y/N]: y
Successfully truncated AOF
[geek@192 redis-4.0.11]$ cat appendonly.aof
*2
$6
SELECT
$1
0
*3
$3
set
$2
k1
$2
v1
*3
$3
set
$2
k2
$2
v2
*3
$3
set
$2
k3
$2
v3
*3
$3
set
$2
k4
$2
v4
*3
$3
set
$2
k5
$2
v5
- 恢复成功。
[geek@192 redis-4.0.11]$ redis-server redis.conf
37875:C 30 Jun 08:00:33.766 # oO0OoO0OoO0Oo Redis is starting oO0OoO0OoO0Oo
37875:C 30 Jun 08:00:33.766 # Redis version=4.0.14, bits=64, commit=00000000, modified=0, pid=37875, just started
37875:C 30 Jun 08:00:33.766 # Configuration loaded
[geek@192 redis-4.0.11]$ redis-cli
127.0.0.1:6379> ping
PONG
127.0.0.1:6379> keys *
1) "k4"
2) "k2"
3) "k1"
4) "k3"
5) "k5"
aof 默认就是文件的无限追加,文件会越来越大!
# Automatic rewrite of the append only file.
# Redis is able to automatically rewrite the log file implicitly calling
# BGREWRITEAOF when the AOF log size grows by the specified percentage.
#
# This is how it works: Redis remembers the size of the AOF file after the
# latest rewrite (if no rewrite has happened since the restart, the size of
# the AOF at startup is used).
#
# This base size is compared to the current size. If the current size is
# bigger than the specified percentage, the rewrite is triggered. Also
# you need to specify a minimal size for the AOF file to be rewritten, this
# is useful to avoid rewriting the AOF file even if the percentage increase
# is reached but it is still pretty small.
#
# Specify a percentage of zero in order to disable the automatic AOF
# rewrite feature.

auto-aof-rewrite-percentage 100
auto-aof-rewrite-min-size 64mb
如果 aof 文件大于 64m,太大了! fork一个新的进程来将我们的文件进行重写。
appendonly no # 默认是不开启 aof 模式的,默认是使用 rdb 方式持久化的,在大部分所有的情况下,rdb 完全够用!
appendfilename “appendonly.aof” # 持久化的文件的名字。
// appendfsync always # 每次修改都会 sync。消耗性能。
appendfsync everysec # 每秒执行一次 sync,可能会丢失这 1s 的数据!
// # appendfsync no # 不执行 sync,这个时候操作系统自己同步数据,速度最快!
- 优点。
每一次修改都同步,文件的完整会更加好。
每秒同步一次,可能会丢失一秒的数据。
从不同步,效率最高的。
- 缺点。
相对于数据文件来说,aof 远远大于 rdb,修复的速度也比 rdb慢。
aof 运行效率也要比 rdb 慢,所以我们 redis 默认的配置就是 rdb 持久化。
扩展。
-
RDB 持久化方式能够在指定的时间间隔内对你的数据进行快照存储。
-
AOF 持久化方式记录每次对服务器写的操作,当服务器重启的时候会重新执行这些命令来恢复原始的数据,AOF 命令以 Redis 协议追加保存每次写的操作到文件末尾,Redis 还能对 AOF 文件进行后台重写,使得 AOF 文件的体积不至于过大。
-
只做缓存,如果你只希望你的数据在服务器运行的时候存在,你也可以不使用任何持久化。
-
同时开启两种持久化方式在这种情况下,当 redis 重启的时候会优先载入 AOF 文件来恢复原始的数据,因为在通常情况下 AOF 文件保存的数据集要比 RDB 文件保存的数据集要完整。
-
RDB 的数据不实时,同时使用两者时服务器重启也只会找 AOF 文件,那要不要只使用 AOF 呢?作者建议不要,因为 RDB 更适合用于备份数据库(AOF 在不断变化不好备份),快速重启,而且不会有 AOF 可能潜在的 Bug,留着作为一个万一的手段。
-
性能建议。
因为 RDB 文件只用作后备用途,建议只在 Slave 上持久化 RDB 文件,而且只要 15 分钟备份一次就够了,只保留 save 900 1 这条规则。
如果 Enable AOF,好处是在最恶劣情况下也只会丢失不超过两秒数据,启动脚本较简单只 load 自己的 AOF 文件就可以了,代价一是带来了持续的 IO,二是 AOF rewrite 的最后将 rewrite 过程中产生的新数据写到新文件造成的阻塞几乎是不可避免的。只要硬盘许可,应该尽量减少AOF rewrite 的频率,AOF 重写的基础大小默认值 64M 太小了,可以设到 5G 以上,默认超过原大小 100% 大小重写可以改到适当的数值。
如果不 Enable AOF ,仅靠 Master-Slave Replication 实现高可用性也可以,能省掉一大笔 IO,也减少了 rewrite 时带来的系统波动。代价是如果 Master/Slave 同时宕掉,会丢失十几分钟的数据,启动脚本也要比较两个 Master/Slave 中的 RDB 文件,载入较新的那个,微博就是这种架构。
Redis 发布订阅。
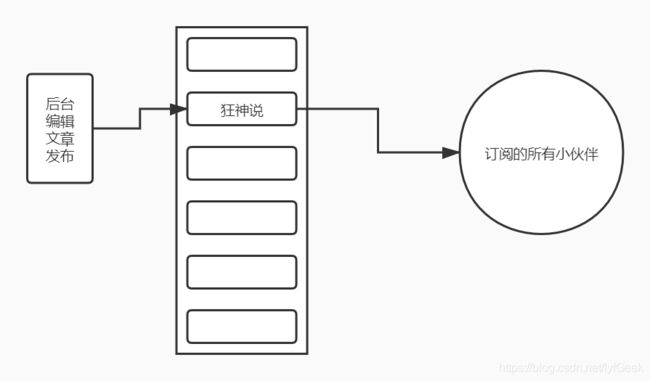
Redis 发布订阅(pub / sub)是一种消息通信模式:发送者(pub)发送消息,订阅者(sub)接收消息。微信、微博、关注系统!
Redis 客户端可以订阅任意数量的频道。
订阅/发布消息图。
第一个:消息发送者。
第二个:频道。
第三个:消息订阅者。
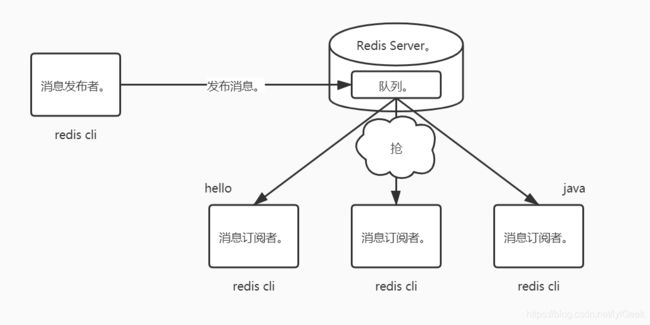
https://www.runoob.com/redis/redis-pub-sub.html
- 订阅端订阅频道消息。
[root@192 ~]# redis-cli
127.0.0.1:6379> ping
PONG
127.0.0.1:6379> SUBSCRIBE geek
Reading messages... (press Ctrl-C to quit)
1) "subscribe"
2) "geek"
3) (integer) 1
- 发布端发布消息。
[root@192 ~]# redis-cli
127.0.0.1:6379> ping
PONG
127.0.0.1:6379> PUBLISH geek hello
(integer) 1
127.0.0.1:6379>
- 自动接收消息。
127.0.0.1:6379> SUBSCRIBE geek
Reading messages... (press Ctrl-C to quit)
1) "subscribe"
2) "geek"
3) (integer) 1
1) "message"
2) "geek"
3) "hello"
Redis 是使用 C 实现的,通过分析 Redis 源码里的 pubsub.c 文件,了解发布和订阅机制的底层实现,籍此加深对 Redis 的理解。
Redis 通过 PUBLISH 、SUBSCRIBE 和 PSUBSCRIBE 等命令实现发布和订阅功能。
微信:
通过 SUBSCRIBE 命令订阅某频道后,redis-server 里维护了一个字典,字典的键就是一个个频道!
而字典的值则是一个链表,链表中保存了所有订阅这个 channel 的客户端。SUBSCRIBE 命令的关键,就是将客户端添加到给定 channel 的订阅链表中。
通过 PUBLISH 命令向订阅者发送消息,redis-server 会使用给定的频道作为键,在它所维护的 channel 字典中查找记录了订阅这个频道的所有客户端的链表,遍历这个链表,将消息发布给所有订阅者。
Pub/Sub 从字面上理解就是发布(Publish)与订阅(Subscribe),在 Redis 中,你可以设定对某一个 key 值进行消息发布及消息订阅,当一个 key 值上进行了消息发布后,所有订阅它的客户端都会收到相应的消息。这一功能最明显的用法就是用作实时消息系统,比如普通的即时聊天,群聊等功能。
- 使用场景。
- 实时消息系统。
- 实时聊天(频道当做聊天室,将信息回显给所有人即可)。
- 订阅,关注系统都是可以的。
稍微复杂的场景我们就会使用 消息中间件 MQ。
主从复制。
主从复制,是指将一台 Redis 服务器的数据,复制到其他的 Redis 服务器。前者称为主节点(master / leader),后者称为从节点(slave / follower)。数据的复制是单向的,只能由主节点到从节点。
Master 以写为主,Slave 以读为主。
默认情况下,每台 Redis 服务器都是主节点。
且一个主节点可以有多个从节点(或没有从节点),但一个从节点只能有一个主节点。
主从复制的作用主要包括。
- 数据冗余:主从复制实现了数据的热备份,是持久化之外的一种数据冗余方式。
- 故障恢复:当主节点出现问题时,可以由从节点提供服务,实现快速的故障恢复;实际上是一种服务的冗余。
- 负载均衡:在主从复制的基础上,配合读写分离,可以由主节点提供写服务,由从节点提供读服务(即写 Redis 数据时应用连接主节点,读Redis数据时应用连接从节点),分担服务器负载。尤其是在写少读多的场景下,通过多个从节点分担读负载,可以大大提高Redis服务器的并发量。
- 高可用(集群)基石:除了上述作用以外,主从复制还是哨兵和集群能够实施的基础,因此说主从复制是 Redis 高可用的基础。
一般来说,要将 Redis 运用于工程项目中,只使用一台 Redis 是万万不能的(宕机),原因如下。
- 从结构上,单个 Redis 服务器会发生单点故障,并且一台服务器需要处理所有的请求负载,压力较大。
-从容量上,单个 Redis 服务器内存容量有限,就算一台 Redis 服务器内存容量为 256G,也不能将所有内存用作 Redis 存储内存,一般来说,单台 Redis 最大使用内存不应该超过 20G。
电商网站上的商品,一般都是一次上传,无数次浏览的,说专业点也就是"多读少写"。
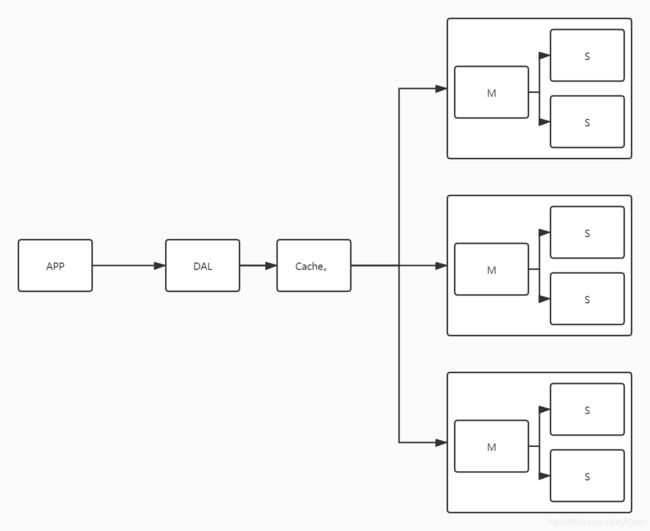
对于这种场景,我们可以使如下这种架构。
搭建。
先看看不是集群的情况。
127.0.0.1:6379> info
# Server
redis_version:4.0.14
redis_git_sha1:00000000
redis_git_dirty:0
redis_build_id:375622ede5a179d9
redis_mode:standalone
os:Linux 3.10.0-1062.18.1.el7.x86_64 x86_64
arch_bits:64
multiplexing_api:epoll
atomicvar_api:atomic-builtin
gcc_version:4.8.5
process_id:47120
run_id:3d872552e2cdf314cc2d41a8ea15a4d7ee8e5299
tcp_port:6379
uptime_in_seconds:6
uptime_in_days:0
hz:10
lru_clock:16428132
executable:/root/geek/tools_my/redis-4.0.14/redis-server
config_file:/root/geek/tools_my/redis-4.0.14/redis.conf

# Clients
connected_clients:1
client_longest_output_list:0
client_biggest_input_buf:0
blocked_clients:0

# Memory
used_memory:849808
used_memory_human:829.89K
used_memory_rss:2273280
used_memory_rss_human:2.17M
used_memory_peak:849808
used_memory_peak_human:829.89K
used_memory_peak_perc:100.15%
used_memory_overhead:836326
used_memory_startup:786688
used_memory_dataset:13482
used_memory_dataset_perc:21.36%
total_system_memory:1019629568
total_system_memory_human:972.39M
used_memory_lua:37888
used_memory_lua_human:37.00K
maxmemory:0
maxmemory_human:0B
maxmemory_policy:noeviction
mem_fragmentation_ratio:2.67
mem_allocator:jemalloc-4.0.3
active_defrag_running:0
lazyfree_pending_objects:0

# Persistence
loading:0
rdb_changes_since_last_save:0
rdb_bgsave_in_progress:0
rdb_last_save_time:1593486430
rdb_last_bgsave_status:ok
rdb_last_bgsave_time_sec:-1
rdb_current_bgsave_time_sec:-1
rdb_last_cow_size:0
aof_enabled:0
aof_rewrite_in_progress:0
aof_rewrite_scheduled:0
aof_last_rewrite_time_sec:-1
aof_current_rewrite_time_sec:-1
aof_last_bgrewrite_status:ok
aof_last_write_status:ok
aof_last_cow_size:0

# Stats
total_connections_received:1
total_commands_processed:1
instantaneous_ops_per_sec:0
total_net_input_bytes:31
total_net_output_bytes:10163
instantaneous_input_kbps:0.00
instantaneous_output_kbps:0.00
rejected_connections:0
sync_full:0
sync_partial_ok:0
sync_partial_err:0
expired_keys:0
expired_stale_perc:0.00
expired_time_cap_reached_count:0
evicted_keys:0
keyspace_hits:0
keyspace_misses:0
pubsub_channels:0
pubsub_patterns:0
latest_fork_usec:0
migrate_cached_sockets:0
slave_expires_tracked_keys:0
active_defrag_hits:0
active_defrag_misses:0
active_defrag_key_hits:0
active_defrag_key_misses:0

# Replication
role:master
connected_slaves:0
master_replid:faf22ac33924f8ea786964caa42772336ac61ac6
master_replid2:0000000000000000000000000000000000000000
master_repl_offset:0
second_repl_offset:-1
repl_backlog_active:0
repl_backlog_size:1048576
repl_backlog_first_byte_offset:0
repl_backlog_histlen:0

# CPU
used_cpu_sys:0.00
used_cpu_user:0.00
used_cpu_sys_children:0.00
used_cpu_user_children:0.00

# Cluster
cluster_enabled:0

# Keyspace
-
配置文件。
-
6379。
# Specify the log file name. Also the empty string can be used to force
# Redis to log on the standard output. Note that if you use standard
# output for logging but daemonize, logs will be sent to /dev/null
logfile "6379.log"

# The filename where to dump the DB
dbfilename dump6379.rdb
- 6380。
# Accept connections on the specified port, default is 6379 (IANA #815344).
# If port 0 is specified Redis will not listen on a TCP socket.
port 6380

# If a pid file is specified, Redis writes it where specified at startup
# and removes it at exit.
#
# When the server runs non daemonized, no pid file is created if none is
# specified in the configuration. When the server is daemonized, the pid file
# is used even if not specified, defaulting to "/var/run/redis.pid".
#
# Creating a pid file is best effort: if Redis is not able to create it
# nothing bad happens, the server will start and run normally.
pidfile /var/run/redis_6380.pid

# Specify the log file name. Also the empty string can be used to force
# Redis to log on the standard output. Note that if you use standard
# output for logging but daemonize, logs will be sent to /dev/null
logfile "6380.log"

# The filename where to dump the DB
dbfilename dump6380.rdb
- 6381。
# Accept connections on the specified port, default is 6379 (IANA #815344).
# If port 0 is specified Redis will not listen on a TCP socket.
port 6381

# If a pid file is specified, Redis writes it where specified at startup
# and removes it at exit.
#
# When the server runs non daemonized, no pid file is created if none is
# specified in the configuration. When the server is daemonized, the pid file
# is used even if not specified, defaulting to "/var/run/redis.pid".
#
# Creating a pid file is best effort: if Redis is not able to create it
# nothing bad happens, the server will start and run normally.
pidfile /var/run/redis_6381.pid

# Specify the log file name. Also the empty string can be used to force
# Redis to log on the standard output. Note that if you use standard
# output for logging but daemonize, logs will be sent to /dev/null
logfile "6381.log"

# The filename where to dump the DB
dbfilename dump6381.rdb
- 启动。
[geek@192 geekconfig]$ redis-server redis79.conf
[geek@192 geekconfig]$ redis-server redis80.conf
[geek@192 geekconfig]$ redis-server redis81.conf
[geek@192 geekconfig]$ !ps
ps -ef | grep redis
geek      48777      1  0 11:35 ?        00:00:00 redis-server *:6379
geek      48786      1  0 11:35 ?        00:00:00 redis-server *:6380
geek      48794      1  0 11:35 ?        00:00:00 redis-server *:6381
geek      48803  47934  0 11:35 pts/0    00:00:00 grep --color=auto redis
一主二从。
每个 Redis Server 都是自己的主机。
[geek@192 ~]$ redis-cli
127.0.0.1:6379> ping
PONG
127.0.0.1:6379> info replication
# Replication
role:master
connected_slaves:0
master_replid:11d4815adba7f3b5bbfd8fa7e8be56e8ca8b2125
master_replid2:0000000000000000000000000000000000000000
master_repl_offset:0
second_repl_offset:-1
repl_backlog_active:0
repl_backlog_size:1048576
repl_backlog_first_byte_offset:0
repl_backlog_histlen:0
[geek@192 ~]$ redis-cli -p 6380
127.0.0.1:6380> ping
PONG
127.0.0.1:6380> info replication
# Replication
role:master
connected_slaves:0
master_replid:7b28c3aadda58048c36e17621ee2181495bebf05
master_replid2:0000000000000000000000000000000000000000
master_repl_offset:0
second_repl_offset:-1
repl_backlog_active:0
repl_backlog_size:1048576
repl_backlog_first_byte_offset:0
repl_backlog_histlen:0
[geek@192 ~]$ redis-cli -p 6381
127.0.0.1:6381> ping
PONG
127.0.0.1:6381> info replication
# Replication
role:master
connected_slaves:0
master_replid:594323bd7ed6914985f005aca69f348eb078848d
master_replid2:0000000000000000000000000000000000000000
master_repl_offset:0
second_repl_offset:-1
repl_backlog_active:0
repl_backlog_size:1048576
repl_backlog_first_byte_offset:0
repl_backlog_histlen:0
-
配置从机:认老大。
-
6380。
127.0.0.1:6380> SLAVEOF 127.0.0.1 6379
OK
127.0.0.1:6380> info replication
# Replication
role:slave
master_host:127.0.0.1
master_port:6379
master_link_status:up
master_last_io_seconds_ago:1
master_sync_in_progress:0
slave_repl_offset:0
slave_priority:100
slave_read_only:1
connected_slaves:0
master_replid:0fe1d317c2b82cd38cc7fc9b9cdb715beb33ffca
master_replid2:0000000000000000000000000000000000000000
master_repl_offset:0
second_repl_offset:-1
repl_backlog_active:1
repl_backlog_size:1048576
repl_backlog_first_byte_offset:1
repl_backlog_histlen:0
- 6381。
127.0.0.1:6381> SLAVEOF 127.0.0.1 6379
OK
127.0.0.1:6381> info replication
# Replication
role:slave
master_host:127.0.0.1
master_port:6379
master_link_status:up
master_last_io_seconds_ago:1
master_sync_in_progress:0
slave_repl_offset:140
slave_priority:100
slave_read_only:1
connected_slaves:0
master_replid:0fe1d317c2b82cd38cc7fc9b9cdb715beb33ffca
master_replid2:0000000000000000000000000000000000000000
master_repl_offset:140
second_repl_offset:-1
repl_backlog_active:1
repl_backlog_size:1048576
repl_backlog_first_byte_offset:127
repl_backlog_histlen:14
- 主机查看。
127.0.0.1:6379> info replication
# Replication
role:master
connected_slaves:2
slave0:ip=127.0.0.1,port=6380,state=online,offset=154,lag=1
slave1:ip=127.0.0.1,port=6381,state=online,offset=154,lag=1
master_replid:0fe1d317c2b82cd38cc7fc9b9cdb715beb33ffca
master_replid2:0000000000000000000000000000000000000000
master_repl_offset:154
second_repl_offset:-1
repl_backlog_active:1
repl_backlog_size:1048576
repl_backlog_first_byte_offset:1
repl_backlog_histlen:154
命令配置是临时的,配置文件是永久的。
主机可以写,从机只能读,不能写。
127.0.0.1:6379> keys *
(empty list or set)
127.0.0.1:6379> set k1 v1
OK
127.0.0.1:6379> get k1
"v1"
127.0.0.1:6380> get k1
"v1"
127.0.0.1:6380> set k2 v2
(error) READONLY You can't write against a read only slave.
主机断了。从机还是 salve。
127.0.0.1:6379> shutdown
not connected> exit

[geek@192 ~]$ ps -ef | grep redis
geek      48786      1  0 11:35 ?        00:00:00 redis-server *:6380
geek      48794      1  0 11:35 ?        00:00:00 redis-server *:6381
geek      49015  48980  0 11:39 pts/3    00:00:00 redis-cli -p 6380
geek      49056  49031  0 11:39 pts/4    00:00:00 redis-cli -p 6381
geek      49633  48896  0 11:51 pts/1    00:00:00 grep --color=auto redis
127.0.0.1:6380> info replication
# Replication
role:slave
master_host:127.0.0.1
master_port:6379
master_link_status:down
master_last_io_seconds_ago:-1
master_sync_in_progress:0
slave_repl_offset:696
master_link_down_since_seconds:76
slave_priority:100
slave_read_only:1
connected_slaves:0
master_replid:0fe1d317c2b82cd38cc7fc9b9cdb715beb33ffca
master_replid2:0000000000000000000000000000000000000000
master_repl_offset:696
second_repl_offset:-1
repl_backlog_active:1
repl_backlog_size:1048576
repl_backlog_first_byte_offset:1
repl_backlog_histlen:696
主机回来后,从机依旧可以同步。
[geek@192 geekconfig]$ redis-server redis79.conf

[geek@192 ~]$ redis-cli
127.0.0.1:6379> ping
PONG
127.0.0.1:6379> get k2
(nil)
127.0.0.1:6379> get k1
"v1"
127.0.0.1:6379> set k2 v2
OK
127.0.0.1:6381> get k1
"v1"
127.0.0.1:6381> get k2
(nil)

127.0.0.1:6381> get k2
"v2"
使用命令行配置的主从,从机断开后连接,自己就变成了主机。只要变为从机,立马可以从主机拿到数据。
复制原理。
Slave 启动成功连接到 master 后会发送一个 sync 同步命令。
Master 接到命令,启动后台的存盘进程,同时收集所有接收到的用于修改数据集命令,在后台进程执行完毕之后,master 将传送整个数据文件到 slave,并完成一次完全同步。
全量复制:而 slave 服务在接收到数据库文件数据后,将其存盘并加载到内存中。
增量复制:Master 继续将新的所有收集到的修改命令依次传给slave,完成同步。
但是只要是重新连接master,一次完全同步(全量复制)将被自动执行。我们的数据一定可以在从机中看到。
层层链路。
谋朝篡位~SLAVEOF no one。
如果主机断开了连接,我们可以使用 SLAVEOF no one 让自己变成主机!其他的节点就可以手动连接到最新的这个主节点(手动)。如果这个时候老大修复了,那就重新连接。
哨兵模式。(自动选举老大的模式)。
主从切换技术的方法是:当主服务器宕机后,需要手动把一台从服务器切换为主服务器,这就需要人工干预,费事费力,还会造成一段时间内服务不可用。这不是一种推荐的方式,更多时候,我们优先考虑哨兵模式。Redis 从 2.8 开始正式提供了 Sentinel(哨兵) 架构来解决这个问题。
谋朝篡位的自动版,能够后台监控主机是否故障,如果故障了根据投票数自动将从库转换为主库。
哨兵模式是一种特殊的模式,首先 Redis 提供了哨兵的命令,哨兵是一个独立的进程,作为进程,它会独立运行。其原理是哨兵通过发送命令,等待 Redis 服务器响应,从而监控运行的多个 Redis 实例。
- 通过发送命令,让 Redis 服务器返回监控其运行状态,包括主服务器和从服务器。
- 当哨兵监测到 master 宕机,会自动将 slave 切换成 master,然后通过发布订阅模式通知其他的从服务器,修改配置文件,让它们切换主机。
然而一个哨兵进程对 Redis 服务器进行监控,可能会出现问题,为此,我们可以使用多个哨兵进行监控。
各个哨兵之间还会进行监控,这样就形成了多哨兵模式。

假设主服务器宕机,哨兵1 先检测到这个结果,系统并不会马上进行 failover 过程,仅仅是哨兵1 主观的认为主服务器不可用,这个现象成为主观下线。当后面的哨兵也检测到主服务器不可用,并且数量达到一定值时,那么哨兵之间就会进行一次投票,投票的结果由一个哨兵发起,进行 failover [故障转移] 操作。
切换成功后,就会通过发布订阅模式,让各个哨兵把自己监控的从服务器实现切换主机,这个过程称为客观下线。
- 配置。
[geek@192 geekconfig]$ vim sentinel.conf

sentinel monitor myredis 127.0.0.1 6379 1
后面的这个数字1,代表主机挂了,slave 投票看让谁接替成为主机,票数最多的,就会成为主机。
- 启动。
[geek@192 geekconfig]$ redis-sentinel sentinel.conf
51563:X 30 Jun 12:30:42.668 # oO0OoO0OoO0Oo Redis is starting oO0OoO0OoO0Oo
51563:X 30 Jun 12:30:42.668 # Redis version=4.0.14, bits=64, commit=00000000, modified=0, pid=51563, just started
51563:X 30 Jun 12:30:42.668 # Configuration loaded
                _._
           _.-``__ ''-._
      _.-``    `.  `_.  ''-._           Redis 4.0.14 (00000000/0) 64 bit
  .-`` .-```.  ```\/    _.,_ ''-._
 (    '      ,       .-`  | `,    )     Running in sentinel mode
 |`-._`-...-` __...-.``-._|'` _.-'|     Port: 26379
 |    `-._   `._    /     _.-'    |     PID: 51563
  `-._    `-._  `-./  _.-'    _.-'
 |`-._`-._    `-.__.-'    _.-'_.-'|
 |    `-._`-._        _.-'_.-'    |           http://redis.io
  `-._    `-._`-.__.-'_.-'    _.-'
 |`-._`-._    `-.__.-'    _.-'_.-'|
 |    `-._`-._        _.-'_.-'    |
  `-._    `-._`-.__.-'_.-'    _.-'
      `-._    `-.__.-'    _.-'
          `-._        _.-'
              `-.__.-'

51563:X 30 Jun 12:30:42.669 # WARNING: The TCP backlog setting of 511 cannot be enforced because /proc/sys/net/core/somaxconn is set to the lower value of 128.
51563:X 30 Jun 12:30:42.670 # Sentinel ID is 08240b809ef559df2012ee5b2d67fb8e01f6c38b
51563:X 30 Jun 12:30:42.670 # +monitor master myredis 127.0.0.1 6379 quorum 1
51563:X 30 Jun 12:30:42.671 * +slave slave 127.0.0.1:6380 127.0.0.1 6380 @ myredis 127.0.0.1 6379
51563:X 30 Jun 12:30:42.672 * +slave slave 127.0.0.1:6381 127.0.0.1 6381 @ myredis 127.0.0.1 6379
- 测试主机,崩了。
127.0.0.1:6379> shutdown
51563:X 30 Jun 12:32:37.373 # +sdown master myredis 127.0.0.1 6379
51563:X 30 Jun 12:32:37.373 # +odown master myredis 127.0.0.1 6379 #quorum 1/1
51563:X 30 Jun 12:32:37.373 # +new-epoch 1
51563:X 30 Jun 12:32:37.373 # +try-failover master myredis 127.0.0.1 6379
51563:X 30 Jun 12:32:37.374 # +vote-for-leader 08240b809ef559df2012ee5b2d67fb8e01f6c38b 1
51563:X 30 Jun 12:32:37.374 # +elected-leader master myredis 127.0.0.1 6379
51563:X 30 Jun 12:32:37.374 # +failover-state-select-slave master myredis 127.0.0.1 6379
51563:X 30 Jun 12:32:37.451 # +selected-slave slave 127.0.0.1:6381 127.0.0.1 6381 @ myredis 127.0.0.1 6379
51563:X 30 Jun 12:32:37.451 * +failover-state-send-slaveof-noone slave 127.0.0.1:6381 127.0.0.1 6381 @ myredis 127.0.0.1 6379
51563:X 30 Jun 12:32:37.510 * +failover-state-wait-promotion slave 127.0.0.1:6381 127.0.0.1 6381 @ myredis 127.0.0.1 6379
51563:X 30 Jun 12:32:38.172 # +promoted-slave slave 127.0.0.1:6381 127.0.0.1 6381 @ myredis 127.0.0.1 6379
51563:X 30 Jun 12:32:38.172 # +failover-state-reconf-slaves master myredis 127.0.0.1 6379
51563:X 30 Jun 12:32:38.257 * +slave-reconf-sent slave 127.0.0.1:6380 127.0.0.1 6380 @ myredis 127.0.0.1 6379
51563:X 30 Jun 12:32:39.186 * +slave-reconf-inprog slave 127.0.0.1:6380 127.0.0.1 6380 @ myredis 127.0.0.1 6379
51563:X 30 Jun 12:32:39.186 * +slave-reconf-done slave 127.0.0.1:6380 127.0.0.1 6380 @ myredis 127.0.0.1 6379
51563:X 30 Jun 12:32:39.252 # +failover-end master myredis 127.0.0.1 6379
51563:X 30 Jun 12:32:39.252 # +switch-master myredis 127.0.0.1 6379 127.0.0.1 6381
51563:X 30 Jun 12:32:39.252 * +slave slave 127.0.0.1:6380 127.0.0.1 6380 @ myredis 127.0.0.1 6381
51563:X 30 Jun 12:32:39.252 * +slave slave 127.0.0.1:6379 127.0.0.1 6379 @ myredis 127.0.0.1 6381
- 6381 成为了主机。
127.0.0.1:6381> info replication
# Replication
role:master
connected_slaves:1
slave0:ip=127.0.0.1,port=6380,state=online,offset=14265,lag=1
master_replid:50966f106d3f59323584e2c162c165f430de4955
master_replid2:1635bf35b219e9c8121e644218c700c58b8bd6c1
master_repl_offset:14265
second_repl_offset:8587
repl_backlog_active:1
repl_backlog_size:1048576
repl_backlog_first_byte_offset:1
repl_backlog_histlen:14265
- 6379 服务重新开启后,自动变为从机。
[geek@192 geekconfig]$ redis-server redis79.conf
51563:X 30 Jun 12:32:39.252 # +switch-master myredis 127.0.0.1 6379 127.0.0.1 6381
51563:X 30 Jun 12:32:39.252 * +slave slave 127.0.0.1:6380 127.0.0.1 6380 @ myredis 127.0.0.1 6381
51563:X 30 Jun 12:32:39.252 * +slave slave 127.0.0.1:6379 127.0.0.1 6379 @ myredis 127.0.0.1 6381
51563:X 30 Jun 12:33:09.267 # +sdown slave 127.0.0.1:6379 127.0.0.1 6379 @ myredis 127.0.0.1 6381
51563:X 30 Jun 12:35:42.794 # -sdown slave 127.0.0.1:6379 127.0.0.1 6379 @ myredis 127.0.0.1 6381
51563:X 30 Jun 12:35:52.747 * +convert-to-slave slave 127.0.0.1:6379 127.0.0.1 6379 @ myredis 127.0.0.1 6381
哨兵。
- 优点。
- 哨兵集群,基于主从复制模式,所有的主从配置优点,它全有。
- 主从可以切换,故障可以转移,系统的可用性就会更好。
- 哨兵模式就是主从模式的升级,手动到自动,更加健壮。
- 缺点。
- Redis 不好在线扩容的,集群容量一旦到达上限,在线扩容就十分麻烦。
- 实现哨兵模式的配置其实是很麻烦的,里面有很多选择。
- 哨兵模式的全部配置!
# Example sentinel.conf

# 哨兵 sentinel 实例运行的端口。默认 26379。
port 26379

# 哨兵 sentinel 的工作目录。

dir /tmp

# 哨兵 sentinel 监控的 redis 主节点的 ip port。
# master-name 可以自己命名的主节点名字 只能由字母A-z、数字0-9 、这三个字符".-_"组成。
# quorum 配置多少个sentinel哨兵统一认为master主节点失联,那么这时客观上认为主节点失联了。
# sentinel monitor
sentinel monitor mymaster 127.0.0.1 6379 2

# 当在 Redis 实例中开启了 requirepass foobared 授权密码 这样所有连接 Redis 实例的客户端都要提供密码。
# 设置哨兵 sentinel 连接主从的密码,注意必须为主从设置一样的验证密码。
# sentinel auth-pass
sentinel auth-pass mymaster MySUPER--secret-0123passw0rd

# 指定多少毫秒之后 主节点没有应答哨兵 sentinel 此时 哨兵主观上认为主节点下线 默认 30 秒。
# sentinel down-after-milliseconds
sentinel down-after-milliseconds mymaster 30000

# 这个配置项指定了在发生 failover 主备切换时最多可以有多少个 slave 同时对新的 master 进行同步,这个数字越小,完成 failover 所需的时间就越长,但是如果这个数字越大,就意味着越多的 slave 因为 replication 而不可用。可以通过将这个值设为 1 来保证每次只有一个slave 处于不能处理命令请求的状态。
# sentinel parallel-syncs
sentinel parallel-syncs mymaster 1

# 故障转移的超时时间 failover-timeout 可以用在以下这些方面:
# 同一个 sentinel 对同一个 master 两次 failover 之间的间隔时间。
# 当一个 slave 从一个错误的 master 那里同步数据开始计算时间。直到 slave 被纠正为向正确的 master 那里同步数据时。
# 当想要取消一个正在进行的 failover 所需要的时间。
# 当进行 failover 时,配置所有 slaves 指向新的 master 所需的最大时间。不过,即使过了这个超时,slaves 依然会被正确配置为指向 master,但是就不按 parallel-syncs 所配置的规则来了。
# 默认三分钟。

# sentinel failover-timeout
sentinel failover-timeout mymaster 180000

# SCRIPTS EXECUTION

#配置当某一事件发生时所需要执行的脚本,可以通过脚本来通知管理员,例如当系统运行不正常时发邮件通知

相关人员。

#对于脚本的运行结果有以下规则:

#若脚本执行后返回1,那么该脚本稍后将会被再次执行,重复次数目前默认为10

#若脚本执行后返回2,或者比2更高的一个返回值,脚本将不会重复执行。

#如果脚本在执行过程中由于收到系统中断信号被终止了,则同返回值为1时的行为相同。

#一个脚本的最大执行时间为60s,如果超过这个时间,脚本将会被一个SIGKILL信号终止,之后重新执行。

#通知型脚本:当sentinel有任何警告级别的事件发生时(比如说redis实例的主观失效和客观失效等等),

将会去调用这个脚本,这时这个脚本应该通过邮件,SMS等方式去通知系统管理员关于系统不正常运行的信

息。调用该脚本时,将传给脚本两个参数,一个是事件的类型,一个是事件的描述。如果sentinel.conf配

置文件中配置了这个脚本路径,那么必须保证这个脚本存在于这个路径,并且是可执行的,否则sentinel无

法正常启动成功。

#通知脚本

# shell编程

# sentinel notification-script

sentinel notification-script mymaster /var/redis/notify.sh

# 客户端重新配置主节点参数脚本

# 当一个master由于failover而发生改变时,这个脚本将会被调用,通知相关的客户端关于master地址已

经发生改变的信息。

# 以下参数将会在调用脚本时传给脚本:

#

# 目前总是“failover”,

# 是“leader”或者“observer”中的一个。

# 参数 from-ip, from-port, to-ip, to-port是用来和旧的master和新的master(即旧的slave)通

信的

# 这个脚本应该是通用的,能被多次调用,不是针对性的。

# sentinel client-reconfig-script

sentinel client-reconfig-script mymaster /var/redis/reconfig.sh # 一般都是由运维来配置。
Redis 缓存穿透和雪崩。
服务的高可用问题。
在这里我们不会详细的区分析解决方案的底层!
Redis 缓存的使用,极大的提升了应用程序的性能和效率,特别是数据查询方面。但同时,它也带来了一些问题。其中,最要害的问题,就是数据的一致性问题,从严格意义上讲,这个问题无解。如果对数据的一致性要求很高,那么就不能使用缓存。
另外的一些典型问题就是,缓存穿透、缓存雪崩和缓存击穿。目前,业界也都有比较流行的解决方案。
缓存穿透(查不到)。
用户想要查询一个数据,发现 Redis 内存数据库没有,也就是缓存没有命中,于是向持久层数据库查询。发现也没有,于是本次查询失败。当用户很多的时候,缓存都没有命中(秒杀!),于是都去请求了持久层数据库。这会给持久层数据库造成很大的压力,这时候就相当于出现了缓存穿透。
解决方案。
布隆过滤器。
布隆过滤器是一种数据结构,对所有可能查询的参数以 hash 形式存储,在控制层先进行校验,不符合则丢弃,从而避免了对底层存储系统的查询压力。
布隆过滤器(Bloom Filter)是1970年由布隆提出的。它实际上是一个很长的二进制向量和一系列随机映射函数。布隆过滤器可以用于检索一个元素是否在一个集合中。它的优点是空间效率和查询时间都比一般的算法要好的多,缺点是有一定的误识别率和删除困难。
缓存空对象。
当存储层不命中后,即使返回的空对象也将其缓存起来,同时会设置一个过期时间,之后再访问这个数据将会从缓存中获取,保护了后端数据源。
但是这种方法会存在两个问题。
如果空值能够被缓存起来,这就意味着缓存需要更多的空间存储更多的键,因为这当中可能会有很多的空值的键。
即使对空值设置了过期时间,还是会存在缓存层和存储层的数据会有一段时间窗口的不一致,这对于需要保持一致性的业务会有影响。
缓存击穿(量太大,缓存过期)。
这里需要注意和缓存击穿的区别,缓存击穿,是指一个 key 非常热点,在不停的扛着大并发,大并发集中对这一个点进行访问,当这个 key 在失效的瞬间,持续的大并发就穿破缓存,直接请求数据库,就像在一个屏障上凿开了一个洞。
当某个 key 在过期的瞬间,有大量的请求并发访问,这类数据一般是热点数据,由于缓存过期,会同时访问数据库来查询最新数据,并且回写缓存,会导使数据库瞬间压力过大。
解决方案。
- 设置热点数据永不过期。
从缓存层面来看,没有设置过期时间,所以不会出现热点 key 过期后产生的问题。
- 加互斥锁。
分布式锁:使用分布式锁,保证对于每个 key 同时只有一个线程去查询后端服务,其他线程没有获得分布式锁的权限,因此只需要等待即可。这种方式将高并发的压力转移到了分布式锁,因此对分布式锁的考验很大。
缓存雪崩。
缓存雪崩,是指在某一个时间段,缓存集中过期失效。Redis 宕机!
产生雪崩的原因之一,比如在写本文的时候,马上就要到双十二零点,很快就会迎来一波抢购,这波商品时间比较集中的放入了缓存,假设缓存一个小时。那么到了凌晨一点钟的时候,这批商品的缓存就都过期了。而对这批商品的访问查询,都落到了数据库上,对于数据库而言,就会产生周期性的压力波峰。于是所有的请求都会达到存储层,存储层的调用量会暴增,造成存储层也会挂掉的情况。
解决方案。
Redis 高可用。
这个思想的含义是,既然 Redis 有可能挂掉,那我多增设几台 Redis,这样一台挂掉之后其他的还可以继续工作,其实就是搭建的集群。(异地多活)。
限流降级(Spring Cloud)。
这个解决方案的思想是,在缓存失效后,通过加锁或者队列来控制读数据库写缓存的线程数量。比如对某个 key 只允许一个线程查询数据和写缓存,其他线程等待。
数据预热。
数据加热的含义就是在正式部署之前,我先把可能的数据先预先访问一遍,这样部分可能大量访问的数据就会加载到缓存中。在即将发生大并发访问前手动触发加载缓存不同的 key,设置不同的过期时间,让缓存失效的时间点尽量均匀。
https://www.bilibili.com/video/BV1S54y1R7SB?p=1

