springboot快速详细配置搭建
前言
本文章只局限于springBoot的快速配置搭建,原理部分请阅读本人的另一篇原理剖析的文章,同时本文章会有一部分配置未写入:
1 本文章只介绍本人认为代码量最少的配置
2 有部分配置比较多,以文件形式放在项目中
如果朋友想看全部配置方式,欢迎下载本文章对应的测试项目查看
https://gitee.com/XiaoSa12138/springboot-basis.git
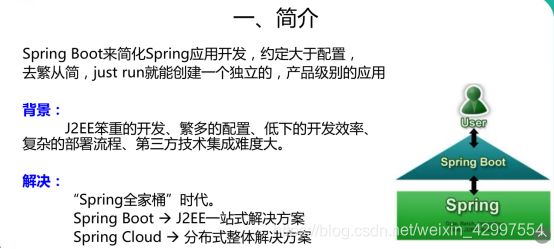
Spring boot 简介
Spring boot应用的构建
以后的工程都以idea为例,eclipse创建springboot应用,只需要正常的创建maven工程即可,只不过就是pom导入的包的区别
1 打开idea --> Create New Project

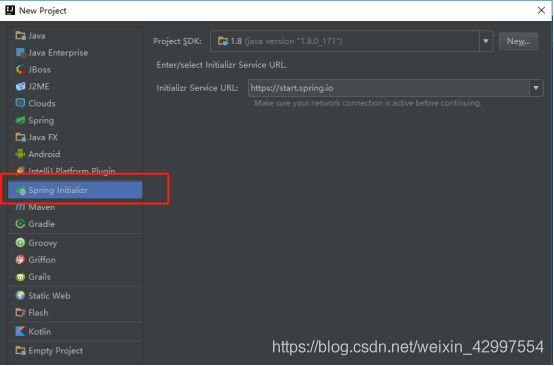
2 创建 spring Initializr 项目
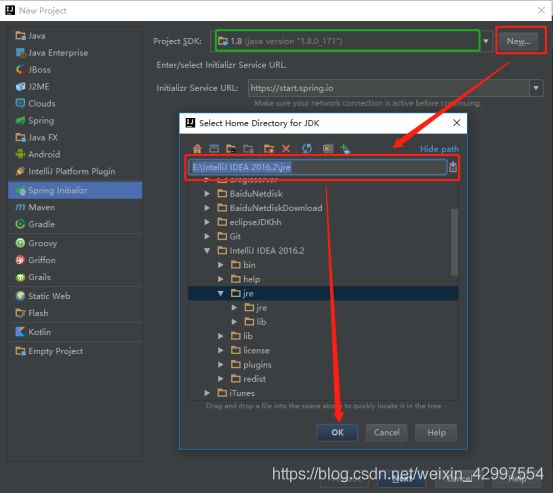
3 选择jdk版本,建议1.8+,1.7也可以,如果idea是初始使用,需要指定jdk的存储路径(红线)
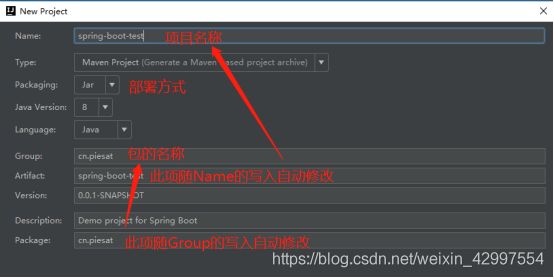
4 修改名称
5 选择spring boot的版本及项目需要集成的组件(本次不选择,后面逐个集成)

6 输入项目存储路径

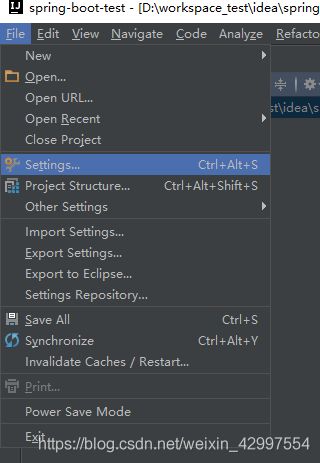
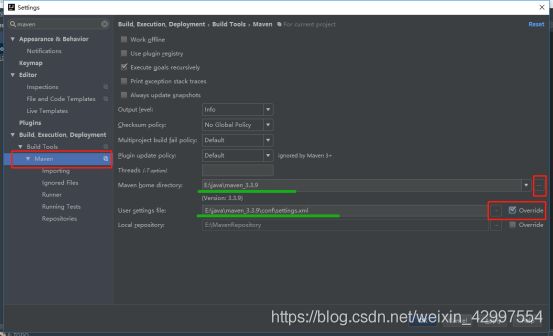
7 修改maven配置(默认仓库到c盘)
8 spring boot项目构成(红框可删除)

9 修改springboot版本(使用1.5.x)

Springboot 初体验
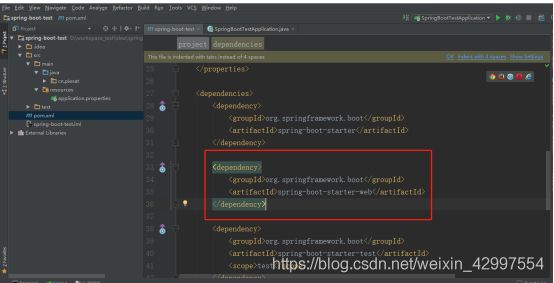
1 导入web模块,修改pom
<dependency>
    <groupId>org.springframework.boot</groupId>
 	<artifactId>spring-boot-starter-web</artifactId>
</dependency>
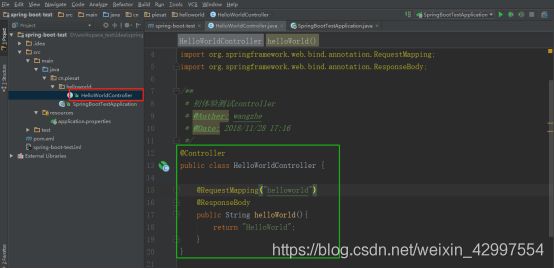
2 创建controller
@Controller
public class HelloWorldController {

	@RequestMapping("helloworld")
	@ResponseBody
	public String helloWorld(){
		return "HelloWorld";
	}
}
构建结果详解
starter 场景启动器
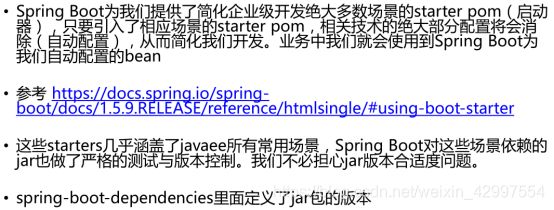
spring boot 可集成的starter参考官网:
https://docs.spring.io/spring-boot/docs/1.5.9.RELEASE/reference/htmlsingle/#using-boot-starter
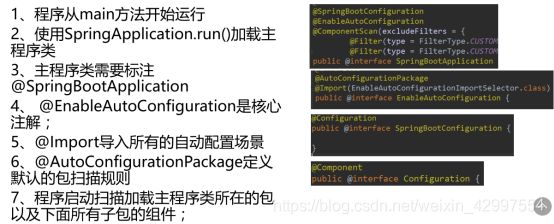
入口类和@SpringBootApplication注解
自动配置
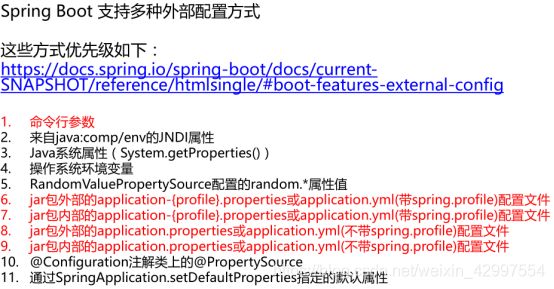
配置文件

默认spring Initializr创建的配置文件是application.properties文件,你们应该已经很熟悉了,但是本次我们不介绍此格式,使用yml格式配置文件
1 YML格式
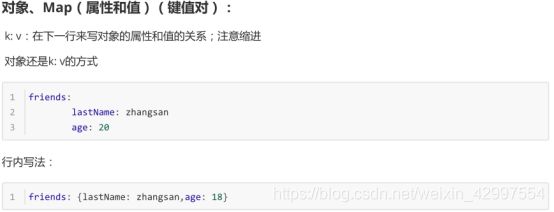
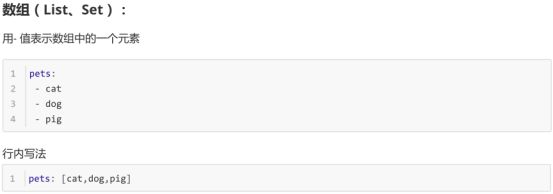
1-1 YML语法
1-2 YML常用写法
示例
网址:
https://docs.spring.io/spring-boot/docs/1.5.9.RELEASE/reference/htmlsingle/#using-boot-starter
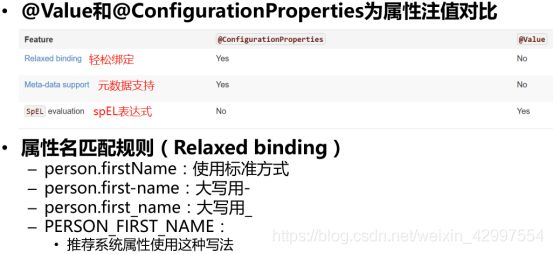
2 配置文件值注入
2-1 读取properties配置文件

修改properties配置文件编码(中文会乱码)

Jdbc.java
/**
 * properties配置文件读取
 * @PropertySource 注解将配置文件导入到springContext中
 * @Component 注解将对象作文组件添加到springContext中
 * @ConfigurationProperties 中的 prefix 用来指明我们配置文件中需要注入信息的前缀
 * */
@ConfigurationProperties(prefix = "jdbc")
@PropertySource(value = {"classpath:pro1.properties"})
@Component public class Jdbc2 {
	private String url;
	private String name;
	private String password;
	//gets&sets
}
Pro1.properties
jdbc.url=localhost
jdbc.name=root
jdbc.password=123456
TestController.java
@Controller
public class TestController {
	@Autowired
	private Jdbc jdbc;

	@RequestMapping("pro1")
	@ResponseBody
	public String getPro1(){
		String s = jdbc.getUrl()+ "==" + jdbc.getName() + "==" + jdbc.getPassword();
		return s;
	}
}
2-2读取yml配置文件
System.java
/**
 * yml配置文件读取
 * @Component 注解将对象作文组件添加到springContext中
 * @ConfigurationProperties 中的 prefix 用来指明我们配置文件中需要注入信息的前缀
 */
@Component
@ConfigurationProperties(prefix = "system")
public class System {
	private String name;
	private int id;
	private List<String> group;
	//sets&gets
}
application.yml
system:
 name: 我的系统
 id: 111
 group:
  - 登录系统
  - 主系统
  - 管理系统
TestController.java
@Controller
public class TestController {
	@Autowired
	private System system;

	@RequestMapping("pro3")
	@ResponseBody
	public String getPro3(){
		String s = system.getName() + " " + system.getId() + " " + system.getGroup().get(0) + "" + system.getGroup().get(1);
		return s;
	}
}
3 自定义yml文件
名称格式为:application-my[my为自定义名称].yml
然后在主yml文件中引用即可


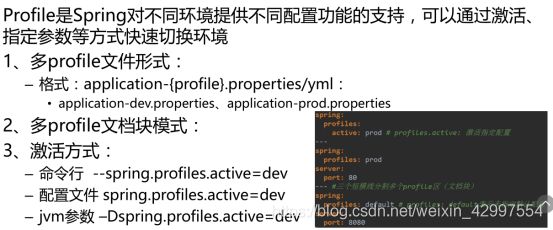
system:
 name: 我的系统
 id: 111
spring:
 profiles:
  include: system2
---
server:
 port: 8088
spring:
 profiles: ceshi
---
我们可以将项目打包成jar包直接运行,同时在jar包旁边配置一个application,yml配置文件,此时会以外部配置文件为准,非常方便

system:
 group:
  - 外部登录系统
  - 外部主系统
  - 管理系统
server:
 port: 8085
cmd运行:java -jar spring-boot…(省略)
日志配置
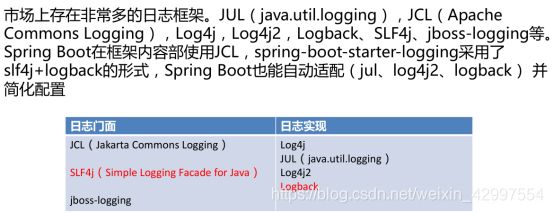
1 日志框架
2 默认配置
3 推荐日志配置
在我们的开发中,我们可以使用springboot默认的日志形式,在控制台打印即可
在测试及生产环境中,我们可以使用LogBack日志,此日志与springboot天然集成,只需要在classpath下创建一个名为logback.xml的配置文件,springboot就会自动读取
具体文件配置内容参见本文章码云项目files下logback.xml配置文件
web之模板引擎
1 Thymeleaf模板引擎
1-1 Thymeleaf场景启动器
<dependency>
  <groupId>org.springframework.bootgroupId>
  <artifactId>spring-boot-starter-thymeleafartifactId>
dependency>
修改Thymeleaf版本(springboot默认使用thymeleaf2.x版本,不太强大)
<thymeleaf.version>3.0.3.RELEASEthymeleaf.version>
<thymeleaf-layout-dialect.version>2.1.2thymeleaf-layout-dialect.version>
1-2测试
Thymeleaf.html
<html lang="en" xmlns:th="http://www.thymeleaf.org">
<head>
  <meta charset="UTF-8">
  <title>thymeleaf模板测试title>
head>
<body>
  <h1 th:text="${ name }" >测试h1>
  <h1>[[${type}]]h1>
body>
html>
ThymeleafController.java
@Controller
public class ThymeleafController {

	@RequestMapping("/thy")
	public String test(Model m){
		m.addAttribute("name","成功读取");
		m.addAttribute("type","我是类型");
		return "thymeleaf";
	}
}
1-3必要配置(application.yml)
spring:
  thymeleaf:
      cache: false #关闭thymeleaf模板的缓存
1-4基本语法
内置对象具体配置内容参见参见本文章码云项目files下thymeleaf模板.yml配置文件
2 JSP模板引擎
2-1为内嵌Tomcat添加jsp支持(pom.xml)
<dependency>
	<groupId>jstlgroupId>
	<artifactId>jstlartifactId>
	<version>1.2version>
dependency>
<dependency>
	<groupId>org.apache.tomcat.embedgroupId>
	<artifactId>tomcat-embed-jasperartifactId>
dependency>
2-2 创建jsp存放目录

Webapp需要设置为源文件夹使其与resources文件夹同级

2-3 application.yml配置jsp映射路径
spring:
  mvc:
    view:
      prefix: /WEB-INF/ #jsp路径前缀
      suffix: .jsp #jsp路径后缀
2-4 测试
@Controller
public class JspController {

    @RequestMapping("/jsp")
    public String test(Model m){
        m.addAttribute("name","成功读取");
        m.addAttribute("type","我是类型");
        return "testJsp";
    }
}
错误处理
1 默认跳转页面(Thymeleaf模板)

5xx命名:匹配所有以5开头的状态码跳转页面
404命名:精确匹配状态码跳转页面
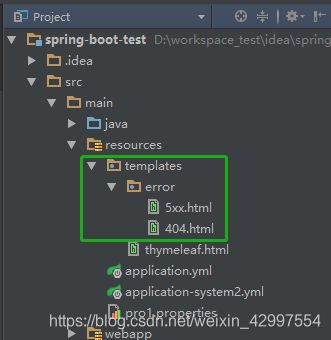
其中一个页面
<html lang="en">
<head>
	<meta charset="UTF-8">
	<title>Titletitle>
head>
<body>
	来到404页面了<br/>
	[[${status}]]<br/>
	[[${exception}]]<br/>
	[[${timestamp}]]<br/>
	[[${errorStatus}]]<br/>
	[[${message}]]<br/>
body>
html>
2 自定义异常
2-1添加增强控制器(MyExceptionHandler)
@ControllerAdvice
public class MyExceptionHandler {

    //指定捕获的异常类型
    @ExceptionHandler(NullPointerException.class)
    public String nullPointerException(Exception e, HttpServletRequest request){
        //自定义异常信息并添加到请求域中
        Map<String,Object> map = new HashMap<String,Object>();
        map.put("errorStatus",true);
        map.put("message","空指针异常啦...");
        request.setAttribute("my-error-info",map);
        //设置异常状态码(必须)
        request.setAttribute("javax.servlet.error.status_code",404);
        return "forward:/error";
    }

    @ExceptionHandler(ArithmeticException.class)
    public String ArithmeticException(Exception e, HttpServletRequest request){
        //自定义异常信息并添加到请求域中
        Map<String,Object> map = new HashMap<String,Object>();
        map.put("errorStatus",true);
        map.put("message","除数为零啦...");
        request.setAttribute("my-error-info",map);
        //设置异常状态码(必须)
        request.setAttribute("javax.servlet.error.status_code",404);
        return "forward:/error";
    }

}
2-2携带自定义的异常信息(MyErrorAttributes)
@Component
public class MyErrorAttributes extends DefaultErrorAttributes {
    @Override
    public Map<String, Object> getErrorAttributes(RequestAttributes request, boolean includeStackTrace) {
        Map<String, Object> map = super.getErrorAttributes(request, includeStackTrace);
        //自定异常处理器携带的数据添加到返回的map中
        Map<String,Object> myMap = (Map<String,Object>) request.getAttribute("my-error-info", 0);
        map.putAll(myMap);
        return map;
    }
}
2-3测试
public class Person {

    private String name;
    private Integer age;

    //gets&sets
}
@Controller
public class ErrorController {

    private Person person = new Person();

    @RequestMapping("error1")
    public void test(){
        person.getAge().toString();
    }

    @RequestMapping("error2")
    public void test2(){
        int i = 1/0;
    }

}
Servlet容器
1 注册三大组件
2 外部servlet容器
2-1内嵌式servlet容器设置
<dependency>
   <groupId>org.springframework.bootgroupId>
   <artifactId>spring-boot-starter-tomcatartifactId>
   <scope>providedscope>
dependency>
2-2打包方式为war
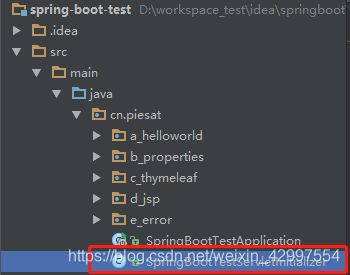
public class SpringBootTestServletInitializer extends SpringBootServletInitializer{

    @Override
    protected SpringApplicationBuilder configure(SpringApplicationBuilder application){
        //传入SpringBoot应用的主程序
        return application.sources(SpringBootTestApplication.class);
    }
}
数据整合
1 Druid数据源
1-1pom.xml
<dependency>
   <groupId>mysqlgroupId>
   <artifactId>mysql-connector-javaartifactId>
   <scope>runtimescope>
dependency>
<dependency>
   <groupId>com.alibabagroupId>
   <artifactId>druidartifactId>
   <version>1.1.9version>
dependency>
1-2yml配置
spring:
datasource:
    type: com.alibaba.druid.pool.DruidDataSource #实例化数据库连接类
    url: jdbc:mysql://localhost:3306/springbottest?useUnicode=true&characterEncoding=utf-8 #数据库连接路径
    username: root #数据库连接名
    password: admin #数据库连接密码
    driver-class-name: com.mysql.jdbc.Driver #数据库驱动
    max-idle: 10 #最大的空闲连接
    max-wait: 1000 #等待连接返回的最大等待时间,毫秒单位
    min-idle: 5 #最小的空闲连接
    initial-size: 5 #数据库初始连接
    timeBetweenEvictionRunsMillis: 60000 #指定空闲连接检查、废弃连接清理、空闲连接池大小调整之间的操作时间间隔
    minEvictableIdleTimeMillis: 300000 #空闲连接最少空闲多久后可被清除
    validationQuery: select 'x' #获取连接时连接校验的sql查询语句
    testWhileIdle: true #当连接空闲时,是否执行连接测试
    testOnBorrow: false #当从连接池借用连接时,是否测试该连接
    testOnReturn: true #在连接归还到连接池时是否测试该连接
    poolPreparedStatements: true #指定是否池化statements
    maxOpenPreparedStatements: 50 #最大的打开的prepared statements数量
#   配置监控统计拦截的filters,去掉后监控界面sql无法统计,'wall'用于防火墙
    filters: stat,wall,log4j
    maxPoolPreparedStatementPerConnectionSize: 20
    useGlobalDataSourceStat: true
    connectionProperties: druid.stat.mergeSql=true;druid.stat.slowSqlMillis=500
1-3初始化Druid数据源
@Configuration
public class DruidConfig {

    //手动添加Druid的配置项,否则springBoot不加载Druid独有配置,如初始连接,最大连接等
    @ConfigurationProperties(prefix = "spring.datasource")
    @Bean
    public DataSource druid(){
        return new DruidDataSource();
    }
}
1-4 配置druid数据源监控(可选)
在DruidConfig类中添加配置
    /**
     * 配置Druid监控
     */
    //1.配置一个管理后台的sevlet
    @Bean
    public ServletRegistrationBean statViewServlet(){
        ServletRegistrationBean bean = new ServletRegistrationBean(new StatViewServlet(),"/druid/*");
        Map<String,String> initParams = new HashMap<String,String>();

        initParams.put("loginUsername", "admin");
        initParams.put("loginPassword", "123456");
        //设置ip白名单
        initParams.put("allow", "");
        //设置ip黑名单。deny优先级高于allow
        initParams.put("deny", "192.168.10.125");

        bean.setInitParameters(initParams);
        return bean;
    }

    //2.配置一个web监控的filter
    @Bean
    public FilterRegistrationBean webStatFilter(){
        FilterRegistrationBean bean = new FilterRegistrationBean();
        bean.setFilter(new WebStatFilter());

        Map<String,String> initParams = new HashMap<String,String>();
        //忽略过滤的形式
        initParams.put("exclusions", "*.js,*.css,/druid/*");

        bean.setInitParameters(initParams);
        //设置过滤器过滤路径
        bean.setUrlPatterns(Arrays.asList("/*"));
        return bean;
    }
}
2 MyBatis
2-1 pom.xml
<dependency>
   <groupId>org.mybatis.spring.bootgroupId>
   <artifactId>mybatis-spring-boot-starterartifactId>
   <version>1.3.2version>
dependency>
2-2 yml配置
#MyBatis配置
mybatis:
  mapper-locations: classpath:mapping/*.xml #Mapper配置文件扫描路径
  type-aliases-package: cn.piesat.g_mybatis #pojo类别名包
2-3 数据库
CREATE DATABASE springboottest;

CREATE TABLE person(
NAME VARCHAR(10),
age INT
)

INSERT INTO person VALUES('张三',10);
INSERT INTO person VALUES('李四',10);
INSERT INTO person VALUES('王五',10);
INSERT INTO person VALUES('赵六',10);
2-4接口扫描配置
@MapperScan(value = {"cn.piesat.g_mybatis.mapping"})
@Configuration
public class MybatisConfig {
}
2-5 pojo类
public class Person {

    private String name;
    private Integer age;
    //gets&sets
}
2-6 mybatismapping.xml
<mapper namespace="cn.piesat.g_mybatis.mapping.MybatisMapper" >
  <resultMap id="BaseResultMap" type="cn.piesat.g_mybatis.Person" >
    <id column="name" property="name" jdbcType="VARCHAR" />
    <result column="age" property="age" jdbcType="INTEGER" />
  resultMap>
  <select id="select" resultMap="BaseResultMap" >
    select * from person
  select>
mapper>
2-7 MybatisMapper.java
public interface MybatisMapper {

    List<Person> select();
}
2-8 测试
@Controller
public class MybatisController {

    @Autowired
    private MybatisMapper mapper;

    @RequestMapping("mybatis")
    @ResponseBody
    public List<Person> select(){
        return mapper.select();
    }
}
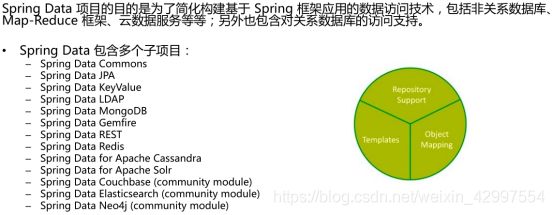
3 spring Data Jpa(可选)
3-1 概念
3-2 pom.xml
<dependency>
   <groupId>org.springframework.bootgroupId>
   <artifactId>spring-boot-starter-data-jpaartifactId>
dependency>
3-3 application.yml
spring:
 jpa:
   hibernate:
     ddl-auto: update #更新或者创建数据表结构
   show-sql: true #显示sql语句
   properties:
     hibernate:
       format_sql: true #格式化sql语句
3-4 实体类User.java
@Entity //告诉JPA这是一个实体类(和数据表映射的类)
@Table(name = "tb_user") //@Table来指定和哪个数据表对应;如果省略默认表名就是user;
public class User {

    @Id //这是一个主键
    @GeneratedValue(strategy = GenerationType.IDENTITY)//自增主键
    private Integer id;

    @Column(name = "last_name", length = 50) //这是和数据表对应的一个列
    private String lastName;
    @Column //省略默认列名就是属性名
    private String email;

    //gets&sets
}
3-5 UserRepository.java
/**
 * 继承JpaRepository来完成对数据库的操作
 * 泛型1:实体类  泛型2:主键类型
 */
public interface UserRepository extends JpaRepository<User,Integer> {
}
3-6 测试
@RestController
public class JpaController {

    @Autowired
    private UserRepository userRepository;

    @GetMapping("/user/{id}")
    public User getUser(@PathVariable("id") Integer id){
        return userRepository.findOne(id);
    }

    @GetMapping("/user")
    public User insertUser(User user){
        return userRepository.save(user);
    }

}
至此,我们可以搭建一个简单的框架,当然只是满足项目的普遍需求,稍后会有多款技术与springBoot整合的文章发出,此文也许有错误之处或者更好的配置方式,愿大神指点!
