Vue项目中实现用户登录及token验证
在前后端完全分离的情况下,Vue项目中实现token验证大致思路如下:
1、第一次登录的时候,前端调后端的登陆接口,发送用户名和密码
2、后端收到请求,验证用户名和密码,验证成功,就给前端返回一个token
3、前端拿到token,将token存储到localStorage和vuex中,并跳转路由页面
4、前端每次跳转路由,就判断 localStroage 中有无 token ,没有就跳转到登录页面,有则跳转到对应路由页面
5、每次调后端接口,都要在请求头中加token
6、后端判断请求头中有无token,有token,就拿到token并验证token,验证成功就返回数据,验证失败(例如:token过期)就返回401,请求头中没有token也返回401
7、如果前端拿到状态码为401,就清除token信息并跳转到登录页面
下面说说具体的操作:
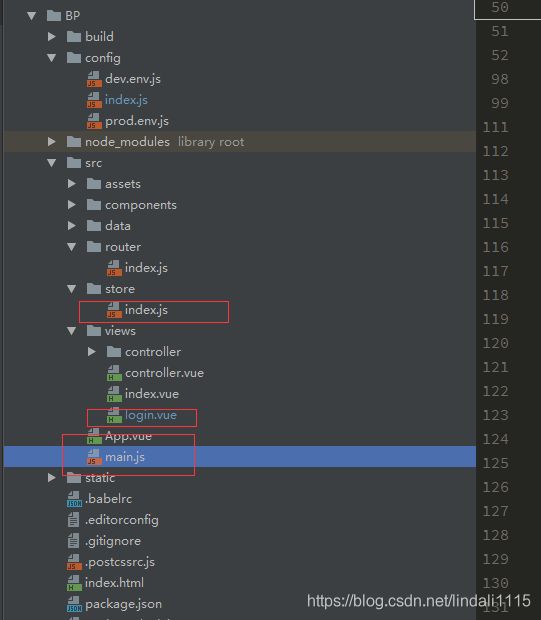
一、在store的index.js中添加保存和删除token的方法。
二、在login.vue中登入方法调用接口成功把token传给localsortage。
三、在main.js中添加拦截器并且在请求头中添加token。
1.mutation的方法中增加setSorage和removeStorage的方法,为后面的获取token放在localsortage做准备。
import Vue from 'vue'
import Vuex from 'vuex'
import {getproductByIndex} from '@/data/getdata.js'

Vue.use(Vuex)
const key ='token'
const store =new Vuex.Store({
 state(){
   return{
     token:localStorage.getItem('token') ? localStorage.getItem('token'):''
   }
 },
  getters:{
    getSortage:function (state) {
      if(!state.token){
        state.token =JSON.parse(localStorage.getItem(key))
      }
      return state.token
    }
  },
  mutations:{
   $_setStorage(state,value){
     state.token =value;
     localStorage.setItem(key,JSON.stringify(value))
   },
   $_removeStorage(state){
     state.token =null;
     localStorage.removeItem(key)
   }
  },
})
export default store
2.login.vue中method方法
checkLogin(){
        if(this.checkCode()==true){
          let mymes ={
            userId:this.user,
            userPwd:this.psw,
          }
          gologin(mymes).then(res=>{
            if(res.status==200){
              if(res.data.result==4){
                //token的值储存到localsortage
                this.$store.commit('$_setStorage',res.data.data[0].token)
                this.$router.push({path:'/index'})
              }else{
                this.$message.error(res.request.response.msg);
              }
            }
          })
        }
      },
注:this.$store.commit('$_setStorage',res.data.data[0].token) 这里的token是需要和store index.js中的state的token命名一致
3.main.js中添加拦截器
// The Vue build version to load with the `import` command
// (runtime-only or standalone) has been set in webpack.base.conf with an alias.
import Vue from 'vue'
import App from './App'
import router from './router'
import ElementUI from 'element-ui'
import store from './store'
import 'element-ui/lib/theme-chalk/index.css'
import 'font-awesome/css/font-awesome.css'
/*引入axios插件*/
import axios from 'axios'
Vue.use(ElementUI);
Vue.config.productionTip = false;
Vue.prototype.$http = axios;
/* eslint-disable no-new */
router.beforeEach((to, from, next) => {
if(to.path === '/login'){
next();
}else{
let token =window.localStorage.token;
if(token ==='null' || token ==='' || token === undefined){
next('/login');
}else{
next();
}
}
})
//添加请求拦截器
axios.interceptors.request.use(
config =>{
if(store.state.token){
config.headers.common['token'] =store.state.token.token
}
return config;
},
error =>{
//对请求错误做什么
return Promise.reject(error);
}
)
//http reponse拦截器
axios.interceptors.response.use(
response =>{
return response;
},
error=>{
if(error.response){
switch(error.response.status){
case 401:
localStorage.removeItem('token');
/* router.push('/views/login');*/
router.replace({
path: '/views/login',
query: {redirect: router.currentRoute.fullPath}//登录成功后跳入浏览的当前页面
})
}
}
}
)
new Vue({
el: '#app',
router,
store,
components: { App },
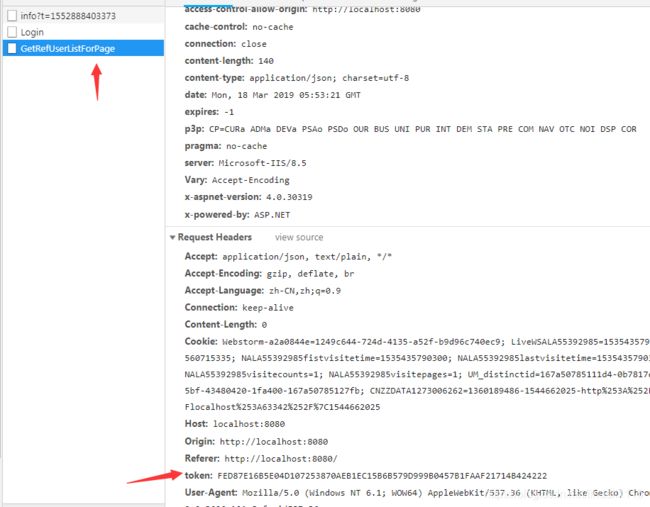
template: '4.查看token是否添加成功,这边是需要调用一个接口的

