android属性动画(Kotlin)
大佬详细讲解属性动画: https://www.jianshu.com/p/2412d00a0ce4
另一位大佬的视频讲解,短小精悍: https://www.imooc.com/video/5447
两个概念:
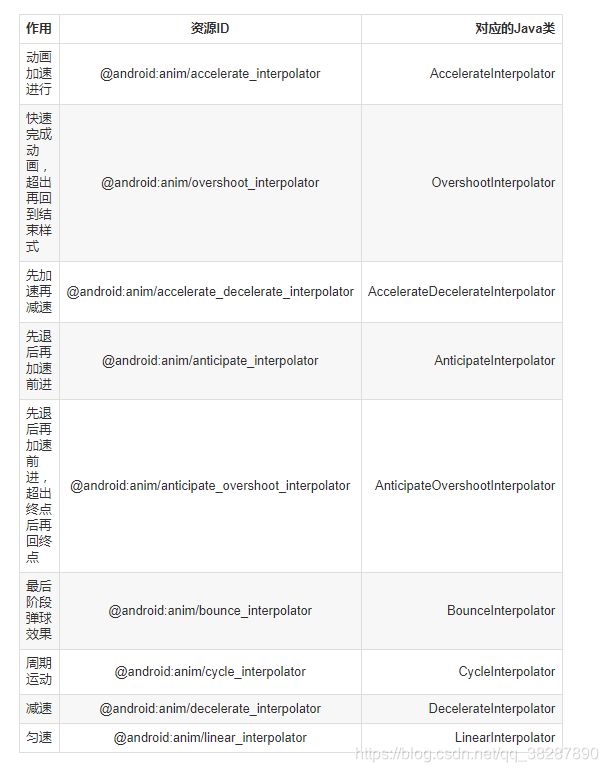
插值器(Interpolator) 决定 值 的变化模式(匀速、加速blabla)
估值器(TypeEvaluator) 决定 值 的具体变化数值
1. ValueAnimator类:
是什么: 属性动画机制中 最核心的一个类,通过不断控制 值 的变化,再不断 手动 赋给对象的属性,从而实现动画效果。如图下
它的方法:
ValueAnimator.ofInt(int values)   //整型估值器
ValueAnimator.ofFloat(float values) //浮点型估值器
ValueAnimator.ofObject(int values)  //对象型估值器
怎么办:
通过整型估值器来试试:实现的是在2秒内让数值从0变化到300
如果在addUpdateListener方法中将变化的数值付给控件的属性 就可以为控件添加上动画了
PS:把数值赋值给属性后,一定要调用该控件的requestLayout()方法,不然动画不会显示
 val valueAnimator = ValueAnimator.ofInt(0,300)  //数值从0到300
        valueAnimator.duration = 2000   //时间2秒
        valueAnimator.addUpdateListener(object : ValueAnimator.AnimatorUpdateListener{
            override fun onAnimationUpdate(animation: ValueAnimator) {
                Log.e("AA","数值变化:${animation.animatedValue}")
            }
        })
        valueAnimator.start()  //启动
2.ObjectAnimator类:
是什么:
直接对对象的属性值进行改变操作,从而实现动画效果
如直接改变 View的 alpha 属性 从而实现透明度的动画效果
继承自ValueAnimator类,即底层的动画实现机制是基于ValueAnimator类
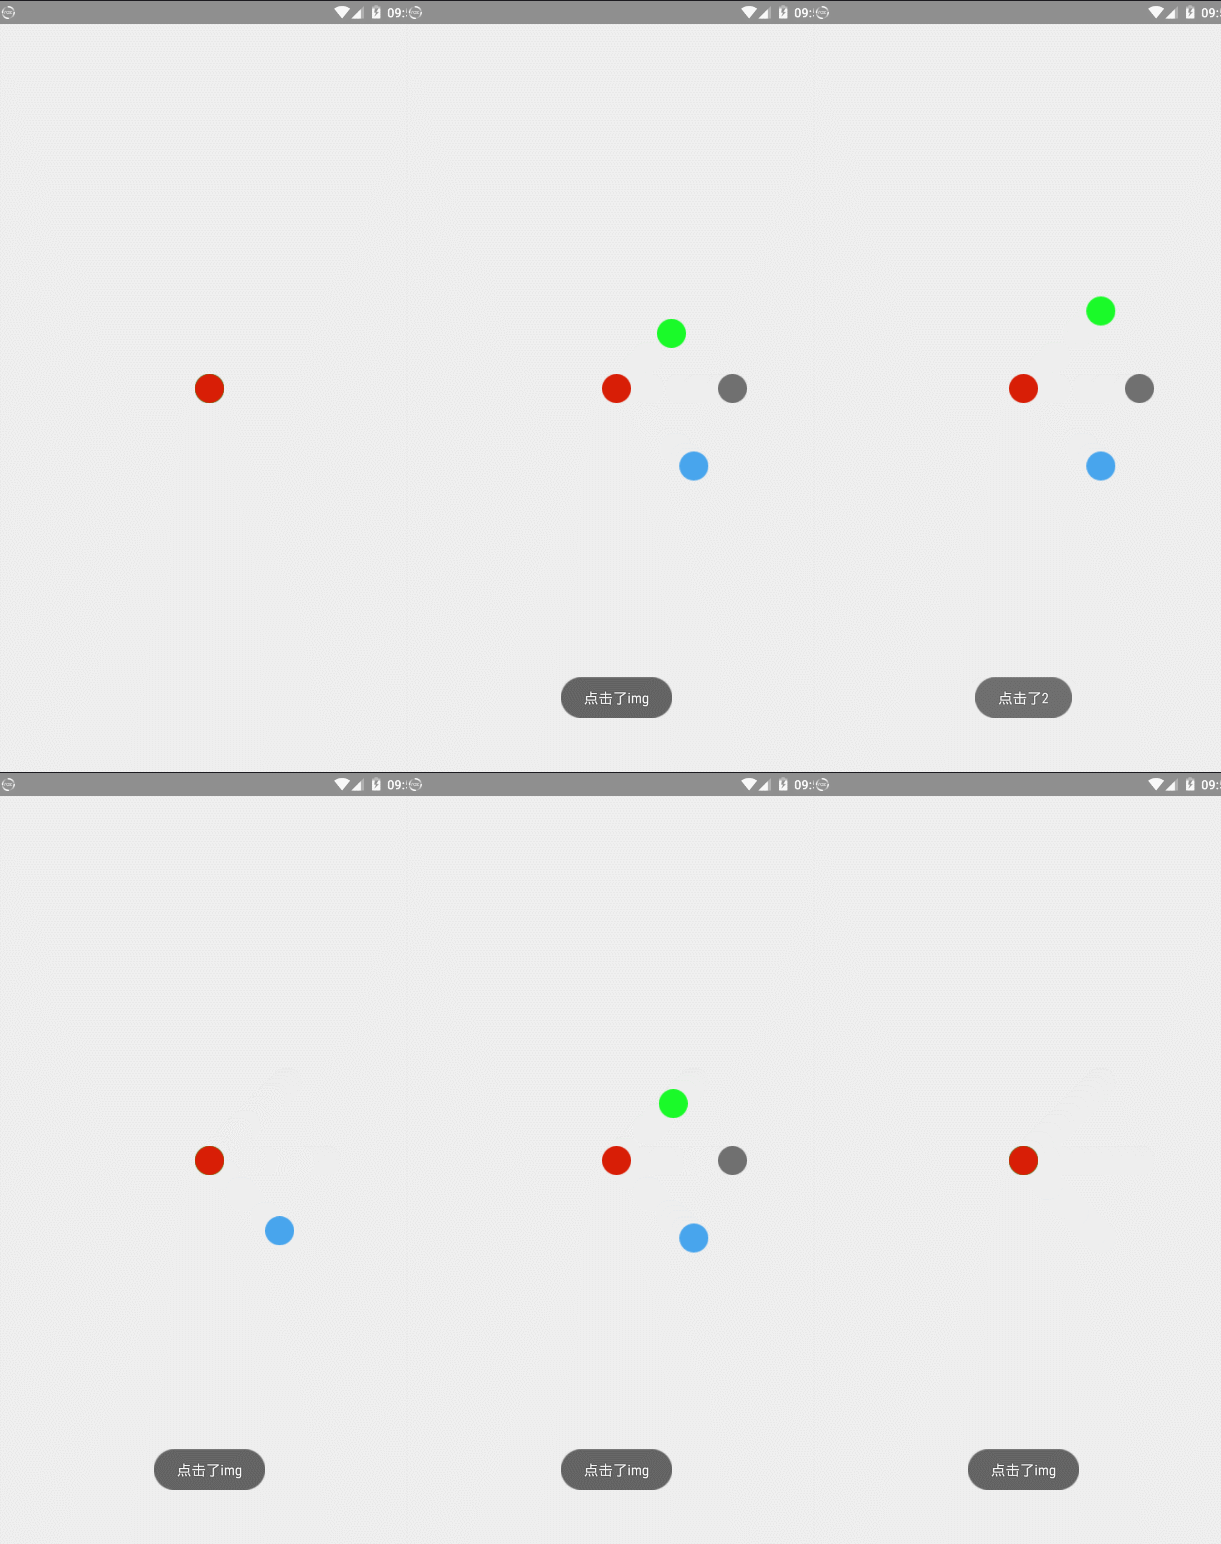
通过一个例子来了解:
首先新建布局文件让它的布局为FrameLayout,边放上准备好的小圆点层叠放在一起:
<FrameLayout xmlns:android="http://schemas.android.com/apk/res/android"
    xmlns:app="http://schemas.android.com/apk/res-auto"
    xmlns:tools="http://schemas.android.com/tools"
    android:layout_width="match_parent"
    android:layout_height="match_parent"
    android:id="@+id/ll"
    android:orientation="vertical"
    android:gravity="center">
    <ImageView
        android:id="@+id/img1"
        android:layout_gravity="center"
        android:layout_width="wrap_content"
        android:layout_height="wrap_content"
        android:src="@drawable/a"/>
    <ImageView
        android:id="@+id/img2"
        android:layout_gravity="center"
        android:layout_width="wrap_content"
        android:layout_height="wrap_content"
        android:src="@drawable/b"/>
    <ImageView
        android:id="@+id/img3"
        android:layout_gravity="center"
        android:layout_width="wrap_content"
        android:layout_height="wrap_content"
        android:src="@drawable/c"/>
    <ImageView
        android:id="@+id/img"
        android:layout_gravity="center"
        android:layout_width="wrap_content"
        android:layout_height="wrap_content"
        android:src="@drawable/d"/>

FrameLayout>
然后就是activity中的代码了:
package com.example.administrator.myktnotepad

import android.animation.*
import android.app.Activity
import android.content.pm.ActivityInfo
import android.os.Build
import android.os.Bundle
import android.view.View
import android.view.Window
import android.view.WindowManager
import android.view.animation.AccelerateInterpolator
import android.view.animation.BounceInterpolator
import android.view.animation.OvershootInterpolator
import android.widget.ImageView
import android.widget.Toast
import kotlinx.android.synthetic.main.activity_main.*
import android.util.DisplayMetrics
import android.util.Log
import android.widget.AdapterViewAnimator


class MainActivity : Activity(), View.OnClickListener {
    private var isOpen: Boolean = false
    private var width = 0
    private var height = 0
    override fun onClick(v: View) {
        when (v.id) {
            R.id.img -> {
                isOpen = if (!isOpen) {
                    startAnim(); true
                } else {
                    endAnim(); false
                }
                Toast.makeText(this, "点击了img", Toast.LENGTH_SHORT).show()
            }
            R.id.img1 -> Toast.makeText(this, "点击了1", Toast.LENGTH_SHORT).show()
            R.id.img2 -> Toast.makeText(this, "点击了2", Toast.LENGTH_SHORT).show()
            R.id.img3 -> Toast.makeText(this, "点击了3", Toast.LENGTH_SHORT).show()
        }
    }

    override fun onCreate(savedInstanceState: Bundle?) {
        super.onCreate(savedInstanceState)
        setContentView(R.layout.activity_main)
        if (Build.VERSION.SDK_INT >= 21) { // 实现状态栏半透明
            window.setFlags(WindowManager.LayoutParams.FLAG_TRANSLUCENT_STATUS, WindowManager.LayoutParams.FLAG_TRANSLUCENT_STATUS)
        }
        img.setOnClickListener(this)
        img1.setOnClickListener(this)
        img2.setOnClickListener(this)
        img3.setOnClickListener(this)
        val manager = this.windowManager
        val outMetrics = DisplayMetrics()
        manager.defaultDisplay.getMetrics(outMetrics)
        width = outMetrics.widthPixels
        height = outMetrics.heightPixels

    }

    //动画
    private fun startAnim() {
        val anim1 = ObjectAnimator.ofFloat(img1, View.TRANSLATION_X, 0f, height / 10f)
        val anim11 = ObjectAnimator.ofFloat(img1, View.TRANSLATION_Y, 0f, height / 10f)

        val anim2 = ObjectAnimator.ofFloat(img2, View.TRANSLATION_X, 0f, height / 10 * 1.5f)

        val anim3 = ObjectAnimator.ofFloat(img3, View.TRANSLATION_X, 0f, height / 10f)
        val anim33 = ObjectAnimator.ofFloat(img3, View.TRANSLATION_Y, 0f, -height / 10f)

        val anim = AnimatorSet()
//        anim.playSequentially(anim1, anim2, anim3)
//        anim.playTogether(anim1,anim2,anim3)
        anim.play(anim1).with(anim11)
        anim.play(anim2).after(anim1)
        anim.play(anim3).with(anim33).after(anim2)
        anim.duration = 1000
        anim.interpolator = BounceInterpolator()  /  /插值器  有弹球效果
        anim.addListener(object : AnimatorListenerAdapter() {
            override fun onAnimationStart(animation: Animator?) {
                super.onAnimationStart(animation)
                img.isEnabled = false
            }

            override fun onAnimationEnd(animation: Animator?) {
                super.onAnimationEnd(animation)
                img.isEnabled = true
            }
        })
        anim.start()

    }

    private fun endAnim() {
        val anim1 = ObjectAnimator.ofFloat(img1, View.TRANSLATION_X, 0f)
        val anim11 = ObjectAnimator.ofFloat(img1, View.TRANSLATION_Y, 0f)

        val anim2 = ObjectAnimator.ofFloat(img2, View.TRANSLATION_X, 0f)

        val anim3 = ObjectAnimator.ofFloat(img3, View.TRANSLATION_X, 0f)
        val anim33 = ObjectAnimator.ofFloat(img3, View.TRANSLATION_Y, 0f)

        val anim = AnimatorSet()
        anim.play(anim1).with(anim11).with(anim2).with(anim3).with(anim33)
        anim.interpolator = AccelerateInterpolator()   //插值器  有起始加速结束减速效果
        anim.duration = 1000
        anim.addListener(object : AnimatorListenerAdapter() {
            override fun onAnimationStart(animation: Animator?) {
                super.onAnimationStart(animation)
                img.isEnabled = false
            }

            override fun onAnimationEnd(animation: Animator?) {
                super.onAnimationEnd(animation)
                img.isEnabled = true
            }
        })
        anim.start()
    }
}
代码可以直接拷贝使用
我们来看一下代码动画实现的核心代码:
ObjectAnimator的方法:
// ObjectAnimator.ofFloat(,,...):这是ObjectAnimator的浮点型估值器,
   一参:要加动画的对象;
   二参:要改变哪个属性;
   后面参数:是一个可填写一个至多个的参数,是你动画数值的变化,
                     写一个就是目标值,
                     写两个就是起始值和结束值,
                     写3个到多个,除了起点和结束中间都是动画持续时间中它会改变的值

 val anim1 = ObjectAnimator.ofFloat(img1, View.TRANSLATION_X, 0f, height / 10f)
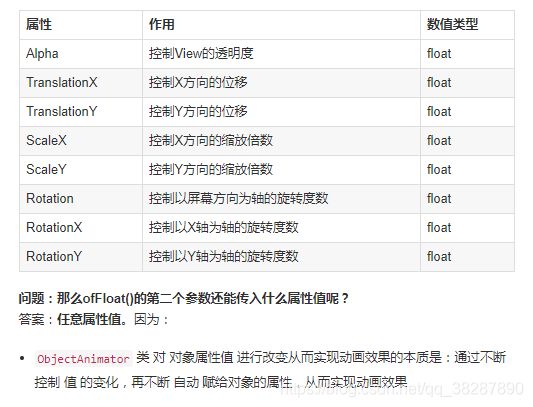
ObjectAnimator.ofFloat()第二个参数可以控制的属性(任意属性值!!):

通过AnimatorSet实现多动画的组合:
方法:
组合动画的执行顺序:
anim.playSequentially(anim1, anim2, anim3) // 依次执行参数中的3个方法
anim.playTogether(anim1,anim2,anim3) // 一块执行参数中的3个方法
更加灵活的顺序:
anim.play(anim1).with(anim11) // anim1与anim11一块执行
anim.play(anim2).after(anim1) // anim2在anim1执行之后再执行
anim.play(anim3).with(anim33).after(anim2) // anim3和anim33会在anim2执行后在一块执行
val anim = AnimatorSet()
//        anim.playSequentially(anim1, anim2, anim3)
//        anim.playTogether(anim1,anim2,anim3)
        anim.play(anim1).with(anim11)
        anim.play(anim2).after(anim1)
        anim.play(anim3).with(anim33).after(anim2)
        anim.duration = 1000
        anim.interpolator = BounceInterpolator()    //插值器  有弹球效果
        anim.addListener(object : AnimatorListenerAdapter() {
            override fun onAnimationStart(animation: Animator?) {
                super.onAnimationStart(animation)
                img.isEnabled = false
            }

            override fun onAnimationEnd(animation: Animator?) {
                super.onAnimationEnd(animation)
                img.isEnabled = true
            }
        })
        anim.start()
文章写的不好,主要为了个人的理解记忆,但是大佬写的很棒啊,你们可以去看大佬的链接!加油加油~哈哈

