Android性能优化(一)--图片优化
文章目录
- 一、引言
- 二、基础知识
- 2.1. 图片内存大小
- 2.1.1.dp、dpi、px、density区别
- 2.1.2.计算图片大小
- 三、图片优化
- 3.1.降低图片分辨率
- 3.1.1.设置图片格式
- 3.1.2.采样率压缩
- 3.1.3.质量压缩
- 3.1.4.缩放压缩
- 3.2.减少每个像素点所在内存大小
- 四、超大图片加载
一、引言
昨天,测试说,APP的圈子列表里面,如果用户是在网页端发送的圈子动态,并且全是图片,在 APP 端加载会非常卡。因为在网页端图片没有经过压缩出来,都是原图,一张图片可能就 10多兆,而在 APP 端所有上传的 图片都是经过 鲁班 这个第三方库进行压缩,不会出现这种问题。
我们的文件服务器采用的阿里 OSS,只需要修改图片URL拼接参数,就可以得到比较小的缩略图,另外配合 Glide 也可以实现不卡顿。下面总结一下图片相关性能优化点。
二、基础知识
这里有一个问题需要清楚:
Q1:一张图片需要的内存空间是如何计算的?
2.1. 图片内存大小
图片的内存大小是如何计算的,这里有一个通用公式:图片分辨率 * 每个像素点所占内存的大小,但这个公式不具体,这里先略过。
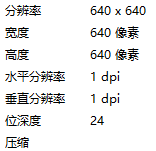
图片分辨率,这个很好理解,这里我们找一张测试图片,如下图所示:

我们用鼠标右键查看样式,可以很直观了解到这张图片的分辨率为 640 * 640;

我们知道上面那个通用公式前一个参数,那么后面那个参数是怎么回尼。在此之前我们要了解几个非常重要的单位概念。
2.1.1.dp、dpi、px、density区别
| 单位 | 简介 |
|---|---|
| dp | 1. 独立像素,又称与设备无关像素,1dp = 1个 160 dpi的屏幕上一个物理像素的长度(1dp = 1px);2.160dpi 屏幕被 Andoid 定义为基准屏幕(mdpi)。3.最终要转换成像素来衡量大小的 |
| dpi | 1.每英寸多少个像素点,衡量手机屏幕好坏的标准;2.我的手机是小米MIX3,手机屏幕分辨率为 2340 * 1080,手机为 6.39 英寸(对角线),那么 dpi = 234 0 2 108 0 2 / 6.39 \sqrt{2340^2 1080^2} \quad / 6.39 2340210802/6.39 = 403 ,那么在我手机上 1dp = 403 / 160 = 2.5px;4.像素密度 |
| px | 屏幕上像素点 |
| density | dpi / 160 |
我们可以得出这三者之间关系:px = dp * (dpi / 160) = dp * density
| 密度 | ldpi | mdpi(基准) | hdpi | xhdpi | xxhdpi | xxxhdpi |
|---|---|---|---|---|---|---|
| 密度值(屏幕密度) | 120 | 160 | 240 | 320 | 480 | 640 |
| 代表分辨率 | 240*320 | 320*480 | 480*800 | 720*1280 | 1080*1920 | 2160*3840 |
| desity | 0.75 | 1 | 1.5 | 2 | 3 | 4 |
上表中我们可以看出在 xhdpi 密度下,1dp = 2px,以此类推。
2.1.2.计算图片大小
通常我们使用图片有三种方式:
- 通过 res 资源文件加载图片
- 通过磁盘加载图片
- 通过网络加载图片(这里中方式略过,一般使用第三方框架,例如 Glide 等来处理图片,原理都是相似的)
Android 中使用 Bitmap 来加载图片,通常代码为这样:
  BitmapFactory.Options options = new BitmapFactory.Options();
  Bitmap bitmap = BitmapFactory.decodeResource(getResources(), R.drawable.test);
我们来看看 decodeResource 源码里面干了什么
//最终调用 BitmapFactory.java 的 decodeResourceStream
@Nullable
public static Bitmap decodeResourceStream(@Nullable Resources res, @Nullable TypedValue value,
            @Nullable InputStream is, @Nullable Rect pad, @Nullable Options opts) {
     validate(opts);
     if (opts == null) {
         //设置默认的规格参数
         opts = new Options();
       }

      if (opts.inDensity == 0 && value != null) {
          final int density = value.density;
          if (density == TypedValue.DENSITY_DEFAULT) {
             //1.inDensity 默认为图片所在文件夹的密度
              opts.inDensity = DisplayMetrics.DENSITY_DEFAULT;
          } else if (density != TypedValue.DENSITY_NONE) {
              opts.inDensity = density;
          }
      }
      if (opts.inTargetDensity == 0 && res != null) {
           //2.inTargetDensity 当前系统密度
           opts.inTargetDensity = res.getDisplayMetrics().densityDpi;
      }
     return decodeStream(is, pad, opts);
 }

//我们发现最终调用 BitmapFactory,cpp 的 doDecode
static jobject doDecode(JNIEnv* env, SkStreamRewindable* stream, jobject padding, jobject options) {
   .....
   //缩放系数
   float scale = 1.0f;
   ....
   if (env->GetBooleanField(options, gOptions_scaledFieldID)) {
        //1.获取 density
         const int density = env->GetIntField(options, gOptions_densityFieldID);
         //2.获取 targetDensity
         const int targetDensity = env->GetIntField(options, gOptions_targetDensityFieldID);
         const int screenDensity = env->GetIntField(options, gOptions_screenDensityFieldID);
         if (density != 0 && targetDensity != 0 && density != screenDensity) {
             //缩放系数 = 当前设备系数密度/图片所在文件夹的密度;
              scale = (float) targetDensity / density;
          }
   }
   //获取 Bitmap 原始宽高
   int scaledWidth = size.width();
   int scaledHeight = size.height();
  //使用缩放系数进行缩放,缩放后的宽高;
   if (willScale && decodeMode != SkImageDecoder::kDecodeBounds_Mode) {
         scaledWidth = int(scaledWidth * scale   0.5f);
         scaledHeight = int(scaledHeight * scale   0.5f);
    }
   const float sx = scaledWidth / float(decodingBitmap.width());
   const float sy = scaledHeight / float(decodingBitmap.height());
   canvas.scale(sx, sy);
   canvas.drawARGB(0x00, 0x00, 0x00, 0x00);
   canvas.drawBitmap(decodingBitmap, 0.0f, 0.0f, &paint);
   // 创建 java 的 bitmap
   return GraphicsJNI::createBitmap(env, javaAllocator.getStorageObjAndReset(),
            bitmapCreateFlags, ninePatchChunk, ninePatchInsets, -1);
}
上面代码看出加载 res 资源图片,占用内存 = width * height * inTargetDensity/inDensity * inTargetDensity/inDensity 一个像素所占的内存大小。
接下来,我们将前面用到的图片(640 * 640),放到 drawable-xhdpi 目录下
//不做处理,默认
val options = BitmapFactory.Options()
val bitmap = BitmapFactory.decodeResource(resources, R.drawable.test,options)
Log.i(TAG, "byteCount: "   bitmap.byteCount)
Log.i(TAG, "allocationByteCount:"   bitmap.allocationByteCount)
Log.i(TAG, "width:"   bitmap.width)
Log.i(TAG, "height:"   bitmap.height)
Log.i(TAG, "inDensity:"   options.inDensity)
Log.i(TAG, "inTargetDensity:"   options.inTargetDensity)

//手动设置 inDensity、inTargetDensity,影响缩放比例
val options = BitmapFactory.Options()
options.inDensity = 640
options.inTargetDensity = 640

//输出 1
//byteCount: 3097600 //所占内存大小 = 880 * 880 * (440 / 320) *(440 * 320) * 4
//allocationByteCount:3097600
//width:880   640 * (440 / 320)
//height:880  640 * (440 / 320)
//inDensity:320
//inTargetDensity:440

//输出 1
//byteCount: 1638400  //所占内存大小 = 640 * 640 * 1 * 1 * 4
//allocationByteCount:1638400
//width:640
//height:640 //手动设置 inDensity、inTargetDensity 比例不变
//inDensity:640
//inTargetDensity:640
上面是文件存放在 res 中,假如将文件存放到磁盘中有会怎么样。
val bitmap =  BitmapFactory.decodeFile(Environment.getExternalStorageDirectory().path   File.separator   "test.jpg")
Log.i(TAG, "byteCount: "   bitmap.byteCount)
Log.i(TAG, "allocationByteCount:"   bitmap.allocationByteCount)
Log.i(TAG, "width:"   bitmap.width)
Log.i(TAG, "height:"   bitmap.height)

//byteCount: 1638400  //所占内存大小 = 640 * 640 * 4
//allocationByteCount:1638400
//width:640
//height:640
从上面代码不让看出,只是少了 density 和 inTargetDensity(与缩放系数相关)。
因此我们可以得出以下结论:
- 1.当图片存放在 res 资源目录,图片占用内存大小 = width * scale * height * scale * 一个像素所占内存大小 ,scale = inTargetDensity / density
- 2.当图片存放在磁盘空间,图片占用内存大小 = width * height * 一个像素所占内存大小
那么问题来了,一个像素所占内存大小是如何得到的。这个很好理解,系统规定的,Bitmap.Config 用来描述图片的像素:
- ARGB_8888: 每个像素占 4 字节,共 32 位,默认设置
- Alpha_8: 只保存透明度,每个像素占 1 字节,共8位
- ARGB_4444: 每个像素占 2 字节,共 16 位
- RGB_565:只存储RGB值,每个像素占 2 字节,共 16 位
三、图片优化
从上面的分析,我们的得出图片内存优化两个方向:
- 降低图片分辨率
- 减少每个像素点所在内存大小
3.1.降低图片分辨率
3.1.1.设置图片格式
目前 Android 常用图片格式有三种:
- png: 无损压缩图片格式
- jpeg/jpg: 有损压缩图片格式,不支持背景透明
- WebP: 是一种同时提供了有损压缩与无损压缩的图片文件格式,派生自图像编码格式VP8 。是由Google购买On2 Technologies后发展出来的格式,以BSD授权条款发布,通过牺牲图片质量来降低图片文件大小,例如一张通过 JPEG 编码,文件大小为 677662byte 的图片,保存为WebP格式后,图片大小为 164910byte,压缩率24.34%。(压缩率是文件压缩后的大小与压缩前的大小之比)。
3.1.2.采样率压缩
采样率压缩是通过设置 BitmapFactory.Options.inSampleSize,设置的inSampleSize 会导致压缩的图片的宽高都为 1/inSampleSize,但是使用时候要注意一下两点:
- inSampleSize 小于等于1会按照1处理
- inSampleSize 只能设置为 2 的平方,不是 2 的平方则最终会减小到最近的2的平方数,例如设置 5 按照 4 处理
/**
 * @param inSampleSize  可以根据需求计算出合理的 inSampleSize
 */
public static Bitmap compress(int inSampleSize,String file) {
    BitmapFactory.Options options = new BitmapFactory.Options();
    //设置此参数是仅仅读取图片的宽高到 options 中,不会将整张图片读到内存中
    options.inJustDecodeBounds = true;
    Bitmap bitmap = BitmapFactory.decodeFile(file, options);
    options.inJustDecodeBounds = false;
    //设置采样率
    options.inSampleSize = inSampleSize;
    bitmap = BitmapFactory.decodeFile(file, options);
    return bitmap;
}
3.1.3.质量压缩
注意,质量压缩并不会改变图片在内存中的大小,仅仅会减小图片所占用的磁盘空间的大小,原理是通过改变图片的位深和透明度来减小图片占用的磁盘空间大小。
public static Bitmap compress(Bitmap bitmap){
    ByteArrayOutputStream baos = new ByteArrayOutputStream();
    //参数quality: 图像压缩率,0-100。 0 压缩100%,100 意味着不压缩
    //参数stream: 写入压缩数据的输出流。
    bitmap.compress(Bitmap.CompressFormat.JPEG, 90, baos);
    byte[] bytes = baos.toByteArray();
    return BitmapFactory.decodeByteArray(bytes, 0, bytes.length);
}
3.1.4.缩放压缩
通过减少图片的像素来降低图片的磁盘空间大小和内存大小,可以用于缓存缩略图
public static Bitmap compress(Bitmap bitmap){
      Matrix matrix = new Matrix();
      matrix.setScale(0.5f, 0.5f);
      retutn  Bitmap.createBitmap(bit, 0, 0, bitmap.getWidth(),
      bitmap.getHeight(), matrix, true);
}
3.2.减少每个像素点所在内存大小
使用 Bitmap.Config.RGB_565 替换默认的 ARGB_8888。
Bitmap.createBitmap(bitmap.getWidth() / radio, bitmap.getHeight() / radio, Bitmap.Config.ARGB_8888)
四、超大图片加载
在很多图片类的 APP 中,常常会有超大图片的加载,比如以前接触到一款博物馆的 APP,里面有些图片超级大,大都是一些超级长的画。实物可能有七八米长,三四米宽,将这些超级大,超级长的画展示在手机屏幕上,一次性加载出来,显然不合适。
解决方法就是,只加载图片的局部区域,这部分区域适配屏幕大小,配合手势移动的时候更新显示对应的区域。Android 中提供 BitmapRegionDecoder 来进行图片的局部解析,具体可以通过查找相关资料。