使用IDEA搭建一个SpringBoot的简单登录项目
本文对象是第一次搭建springboot项目的初学人员。使用的软件环境为:win7+JDK1.8+idea 2018.2+mySql 5.1
一、首先,安装软件及工具
1,安装JDK,idea和mysql server
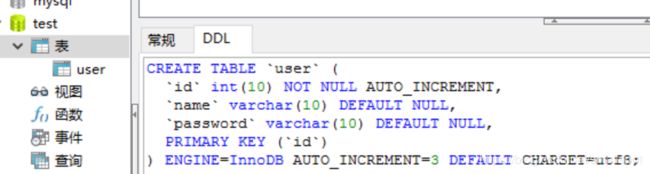
2,使用Navicat或Mysql自带的命令行工具创建数据库表,如下图
二、创建spring boot工程
1.打开idea,create new project;
2.选择“Spring Initializr”,点击next;
3. 组名,项目名可做修改;最终建的项目名为:springboot,src->main->java下包名会是:com.learning.springboot;点击next;

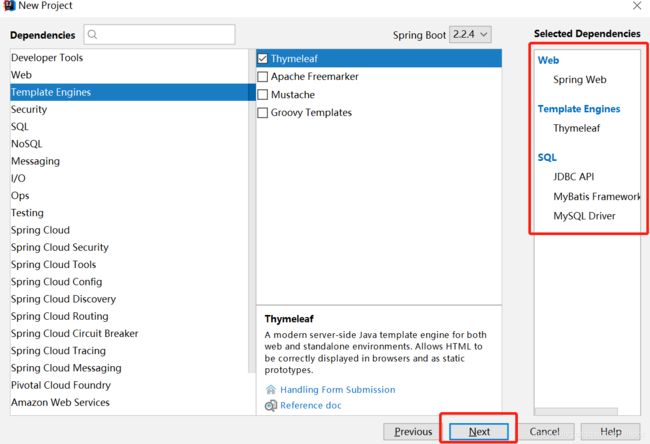
4.Web下勾选Spring Web ;Template Englines勾选Thymeleaf;SQL勾选:MySQL Driver,JDBC API 和 MyBatis Framework三项;点击next;
5,选择项目路径,点击finish;
6.刚创建好的项目目录结构如下:

7.在templates文件下新建index.html页面(New->HTML file->HTML5 file),作为启动的初始页面;
    hello,springboot


第一个spring boot项目!!
8,在com.learning.springboot下新建包 controller (New->Package),在controller文件夹下建一个简单的helloController类(New->Java Class);
package com.learning.springboot.controller;

import org.springframework.stereotype.Controller;
import org.springframework.web.bind.annotation.RequestMapping;

@Controller
public class HelloController {

    @RequestMapping("/index")
    public String sayHello() {
        return "index";
    }
}
这里return index就是用的模板index.html文件
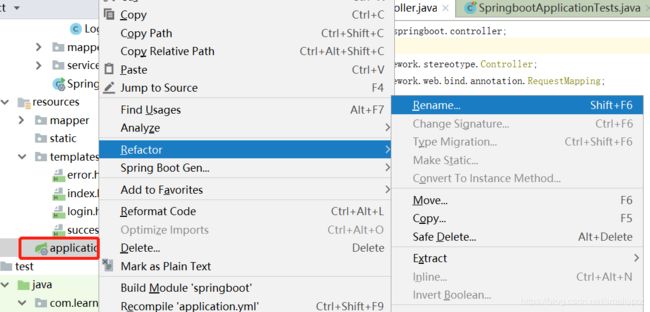
9,在resources文件夹下application中先配置DataSource基本信息,application文件有两种文件格式,一种是以.properties为后缀,一种是以.yml为后缀的,建议用.yml后缀,可读性更好。如不是,则右键application文件选择Refact,选择Rename,将后缀改为yml;
spring:
  datasource:
    name: test  #数据库名
    url: jdbc:mysql://localhost:3306/test #url
    username: root  #用户名
    password: root  #密码
    driver-class-name: com.mysql.jdbc.Driver  #数据库链接驱动
10,到这项目的初步搭建已经完成。运行项目启动类springbootApplication.java,在浏览器中输入localhost:8080/index,回车显示

三,数据库操作及登录业务逻辑
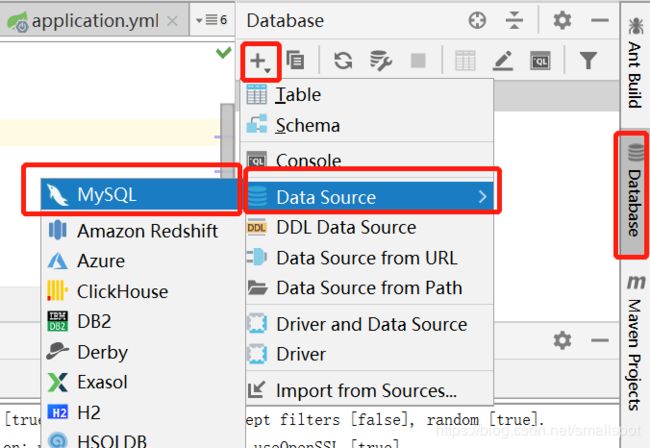
1,首先,添加数据库连接。点击右侧的Database,点“+”,选择Data Source-》MySQL。
2,输入host,database,用户名密码。新建数据库链接。点击 Test Connection,提示 Successful则表示连接成功,然后点击 OK即可。

3,连接成功后,显示数据库信息,user表的基本信息也显示了,如下图:

SpringBoot项目大概分为四层:
(1)DAO层:包括XxxMapper.java(数据库访问接口类),XxxMapper.xml(数据库链接实现);(这个命名,有人喜欢用Dao命名,有人喜欢用Mapper,看个人习惯)
(2)Bean层:也叫model层,entity层,就是数据库表的映射实体类,存放POJO对象;
(3)Service层:也叫服务层,业务层,包括XxxService.java(业务接口类),XxxServiceImpl.java(业务实现类);(可以在service文件夹下新建impl文件放业务实现类,也可以把业务实现类单独放一个文件夹下,更清晰)
(4)Web层:就是Controller层,实现与web前端的交互。
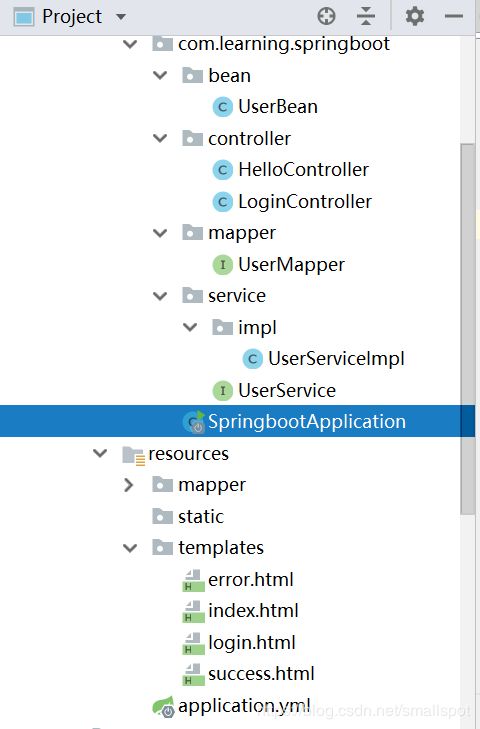
最后工程的目录结构如下:
4,各部分的代码如下
1) pom.xml
    4.0.0

        org.springframework.boot
        spring-boot-starter-parent
        2.2.4.RELEASE


    com.learning
    springboot
    0.0.1-SNAPSHOT
    springboot
    Demo project for Spring Boot


        1.8


            org.springframework.boot
            spring-boot-starter-jdbc


            org.springframework.boot
            spring-boot-starter-thymeleaf


            org.springframework.boot
            spring-boot-starter-web


            org.mybatis.spring.boot
            mybatis-spring-boot-starter
            2.1.1


            mysql
            mysql-connector-java
            5.1.6
            runtime


            org.springframework.boot
            spring-boot-starter-test
            test


                    org.junit.vintage
                    junit-vintage-engine


            junit
            junit
            4.12
            test


                org.springframework.boot
                spring-boot-maven-plugin
2) applicaiton.yml增加mybatis配置
spring:
  datasource:
    name: test  #数据库名
    url: jdbc:mysql://localhost:3306/test #url
    username: root  #用户名
    password: root  #密码
    driver-class-name: com.mysql.jdbc.Driver  #数据库链接驱动


mybatis:
  mapper-locations: classpath:mapper/*.xml  #配置映射文件
  type-aliases-package: com.learning.springboot.bean #配置实体类
3) UserBean,定义
public class UserBean {
    private int id;
    private String name;
    private  String password;
然后右键 generate,选择 Getter And Setter
package com.learning.springboot.bean;

public class UserBean {
    private int id;
    private String name;
    private  String password;

    public String getName() {
        return name;
    }

    public void setName(String name) {
        this.name = name;
    }

    public String getPassword() {
        return password;
    }

    public void setPassword(String password) {
        this.password = password;
    }

    public int getId() {
        return id;
    }

    public void setId(int id) {
        this.id = id;
    }
}
4)UserMapper.java ,获取数据接口。
package com.learning.springboot.mapper;

import com.learning.springboot.bean.UserBean;
import org.apache.ibatis.annotations.Param;

public interface UserMapper {
    UserBean getInfo(String name, String password);
}
注意 ,如果报参数name找不到错误,则可以对参数增加注解@Param:
getInfo(@Para("name")String name, @Para("password")String password);
5) UserMapper.xml 读取数据库,注意包名和类名不要写错
6)UserService 接口和 UserServiceImpl 实现
package com.learning.springboot.service;

import com.learning.springboot.bean.UserBean;

public interface UserService {
    UserBean loginIn(String name, String password);
}
package com.learning.springboot.service.impl;
import com.learning.springboot.bean.UserBean;
import com.learning.springboot.mapper.UserMapper;
import com.learning.springboot.service.UserService;
import org.springframework.beans.factory.annotation.Autowired;
import org.springframework.stereotype.Service;
@Service
public class UserServiceImpl implements UserService {
@Autowired
private UserMapper userMapper;
@Override
public UserBean loginIn(String name, String password) {
return userMapper.getInfo(name, password);
}
}
7)编写LoginController
package com.learning.springboot.controller;

import com.learning.springboot.bean.UserBean;
import com.learning.springboot.service.UserService;
import org.springframework.beans.factory.annotation.Autowired;
import org.springframework.stereotype.Controller;
import org.springframework.web.bind.annotation.RequestMapping;
import org.springframework.web.bind.annotation.RequestMethod;

@Controller
public class LoginController {

    //将Service注入Web层
    @Autowired
    UserService userService;

    @RequestMapping("/login")
    public String show() {
        return "login";
    }

    @RequestMapping(value = "/loginIn", method = RequestMethod.POST)
    public String login(String name, String password) {
        UserBean userBean = userService.loginIn(name, password);
        if (userBean != null) {
            return "success";
        } else {
            return "error";
        }
    }
}
8)依次是几个html页面 login.html, success.html,error.html
login
    success


登录成功!
    error


登录失败!
9)application启动页面,添加 @MapperScan("com.learning.springboot.mapper")
package com.learning.springboot;

import org.mybatis.spring.annotation.MapperScan;
import org.springframework.boot.SpringApplication;
import org.springframework.boot.autoconfigure.SpringBootApplication;

@SpringBootApplication
@MapperScan("com.learning.springboot.mapper")
public class SpringbootApplication {

    public static void main(String[] args) {
        SpringApplication.run(SpringbootApplication.class, args);
    }
}
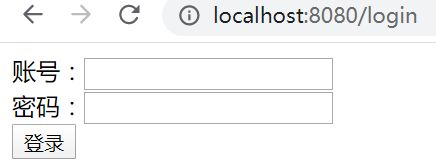
10)启动项目,进入浏览器输入localhost:8080/login 。
如果启动报com.mysql.jdbc.Driver错误,则降低JDBC 版本即可
