Spring Boot集成ActiveMQ
ActiveMQ异步消息主要有两种目的地形式,队列(queue)和主题(topic),队列用于点对点形式的消息通信,主题用于发布/订阅式的消息通信。
ActiveMQ安装:
百度网盘下载:https://pan.baidu.com/s/1BNoOeiZ_Ry0oe-raEEVEmA
提取码:3qba
官网:http://activemq.apache.org/
安装:
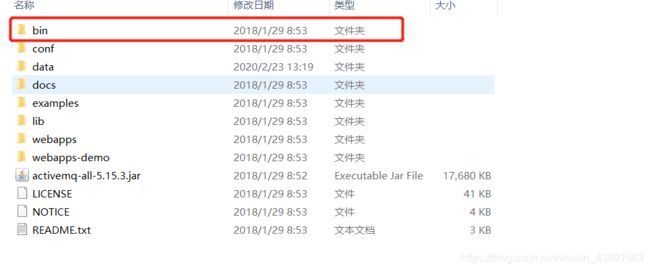
进入路劲

 双击
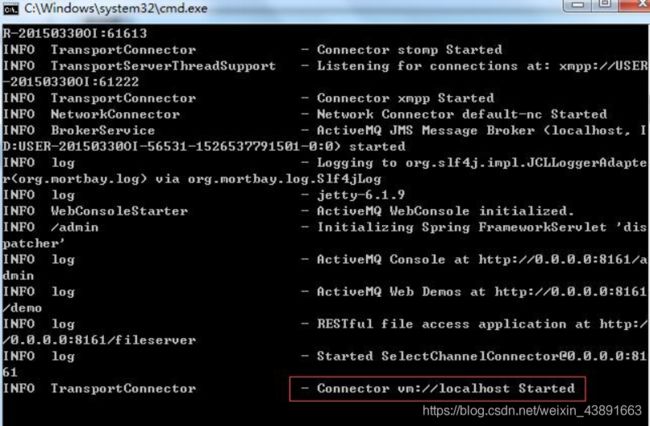
双击 启动成功后,会出现如图所示结果 Connector vm://localhost Started
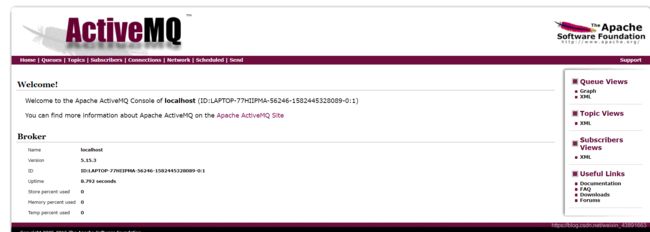
 在浏览器中输入 http://127.0.0.1:8161/admin/ 来访问 ActiveMQ 的服务器,用户名和密码是 admin/admin。如下:
 我们可以看到有 Queues 和 Topics 这两个选项,这两个选项分别是点对点消息和发布/订阅消息的查看窗口
ActiveMQ集成
在 Spring Boot 中集成 ActiveMQ 需要导入如下 starter 依赖:
<dependency>
	<groupId>org.springframework.boot</groupId>
	<artifactId>spring-boot-starter-activemq</artifactId>
</dependency>
然后在 application.yml 配置文件中,对 activemq 做一下配置:
spring:
  activemq:
    broker-url: tcp://localhost:61616
    in-memory: true
    pool:
      # 如果此处设置为true,需要添加activemq-pool的依赖包,否则会自动配置失败,无法注入JmsMessagingTemplate
      enabled: false
server:
  port: 8080
队列(Queue)和主题(Topic)是JMS支持的两种消息传递模型:
1、点对点(point-to-point,简称PTP)Queue消息传递模型:
通过该消息传递模型,一个应用程序(即消息生产者)可以向另外一个应用程序(即消息消费者)发送消息。在此传递模型中,消息目的地类型是队列(即Destination接口实现类实例由Session接口实现类实例通过调用其createQueue方法并传入队列名称而创建)。消息首先被传送至消息服务器端特定的队列中,然后从此对列中将消息传送至对此队列进行监听的某个消费者。同一个队列可以关联多个消息生产者和消息消费者,但一条消息仅能传递给一个消息消费者。如果多个消息消费者正在监听队列上的消息,,JMS消息服务器将根据“先来者优先”的原则确定由哪个消息消费者接收下一条消息。如果没有消息消费者在监听队列,消息将保留在队列中,直至消息消费者连接到队列为止。这种消息传递模型是传统意义上的懒模型或轮询模型。在此模型中,消息不是自动推动给消息消费者的,而是要由消息消费者从队列中请求获得。
2、发布/订阅(publish/subscribe,简称pub/sub)Topic消息传递模型:
通过该消息传递模型,应用程序能够将一条消息发送给多个消息消费者。在此传送模型中,消息目的地类型是主题(即Destination接口实现类实例由Session接口实现类实例通过调用其createTopic方法并传入主题名称而创建)。消息首先由消息生产者发布至消息服务器中特定的主题中,然后由消息服务器将消息传送至所有已订阅此主题的消费者。主题目标也支持长期订阅。长期订阅表示消费者已注册了主题目标,但在消息到达目标时该消费者可以处于非活动状态。当消费者再次处于活动状态时,将会接收该消息。如果消费者均没有注册某个主题目标,该主题只保留注册了长期订阅的非活动消费者的消息。与PTP消息传递模型不同,pub/sub消息传递模型允许多个主题订阅者接收同一条消息。JMS一直保留消息,直至所有主题订阅者都接收到消息为止。pub/sub消息传递模型基本上是一个推模型。在该模型中,消息会自动广播,消息消费者无须通过主动请求或轮询主题的方法来获得新的消息。
Queue 和 Topic 的创建
首先我们需要创建两种消息 Queue 和 Topic,这两种消息的创建,我们放到 ActiveMqConfig 中来创建,如下:
import org.apache.activemq.command.ActiveMQQueue;
import org.apache.activemq.command.ActiveMQTopic;
import org.springframework.boot.autoconfigure.jms.DefaultJmsListenerContainerFactoryConfigurer;
import org.springframework.context.annotation.Bean;
import org.springframework.context.annotation.Configuration;
import org.springframework.jms.config.DefaultJmsListenerContainerFactory;
import org.springframework.jms.config.JmsListenerContainerFactory;

import javax.jms.ConnectionFactory;
import javax.jms.Destination;
@Configuration
public class ActiveMqConfig {
    /**
     * 发布/订阅模式队列名称
     */
    public static final String TOPIC_NAME = "activemq.topic";
    /**
     * 点对点模式队列名称
     */
    public static final String QUEUE_NAME = "activemq.queue";

    @Bean
    public Destination topic() {

        return new ActiveMQTopic(TOPIC_NAME);
    }

    @Bean
    public Destination queue() {
        return new ActiveMQQueue(QUEUE_NAME);
    }
消息发送者:
import org.springframework.jms.core.JmsMessagingTemplate;
import org.springframework.stereotype.Service;

import javax.annotation.Resource;
import javax.jms.Destination;
@Service
public class MsgProducer {

    @Resource
    private JmsMessagingTemplate jmsMessagingTemplate;

    public void sendMessage(Destination destination, String msg) {
        jmsMessagingTemplate.convertAndSend(destination, msg);
    }
}
点对点消息生产与消费
@RestController
@RequestMapping("/activemq")
public class ActiveMqController {

    private static final Logger logger = LoggerFactory.getLogger(ActiveMqController.class);

    @Resource
    private MsgProducer producer;
    @Resource
    private Destination topic;
    @Resource
    private Destination queue;

    @GetMapping("/send/queue")
    public String sendQueueMessage() {
        logger.info("===开始发送点对点消息===");
        producer.sendMessage(queue, "Queue: hello activemq!");
        return "success";
    }
点对点消息的消费
@Service
public class QueueConsumer {

    /**
     * 接收点对点消息
     * @param msg
     */
    @JmsListener(destination = ActiveMqConfig.QUEUE_NAME)
    public void receiveQueueMsg(String msg) {
        System.out.println("收到的消息为:" + msg);
    }
启动项目,在浏览器中输入:http://localhost:8081/activemq/send/queue,观察控制台的输出日志,出现下面的日志说明消息发送和消费成功。
![]()
发布/订阅消息的生产和消费(topic )
@RestController
@RequestMapping("/activemq")
public class ActiveMqController {

    private static final Logger logger = LoggerFactory.getLogger(ActiveMqController.class);

    @Resource
    private MsgProducer producer;
    @Resource
    private Destination topic;

    @GetMapping("/send/topic")
    public String sendTopicMessage() {

        logger.info("===开始发送订阅消息===");
        producer.sendMessage(topic, "Topic: hello activemq!");
        return "success";
    }
}
解决同时接收queue消息和topic消息
   /**
     *
     * 解决同时接收queue消息和topic消息
     */
    @Bean
    public JmsListenerContainerFactory topicListenerContainer(ConnectionFactory connectionFactory) {
        DefaultJmsListenerContainerFactory factory = new DefaultJmsListenerContainerFactory();
        factory.setConnectionFactory(connectionFactory);
        // 相当于在application.yml中配置:spring.jms.pub-sub-domain=true
        factory.setPubSubDomain(true);
        return factory;
    }
Topic消息消费者(可同时支持多个消费者)
@Service
public class TopicConsumer1 {

    /**
     * 接收订阅消息
     * @param msg
     * ,在 @JmsListener 注解中指定这个容器工厂即可消费 topic 消息
     */
    @JmsListener(destination = ActiveMqConfig.TOPIC_NAME, containerFactory = "topicListenerContainer")
    public void receiveTopicMsg(String msg) {
        System.out.println("收到的消息为1:" + msg);
    }

}
@Service
public class TopicConsumer2{

    /**
     * 接收订阅消息
     * @param msg
     * ,在 @JmsListener 注解中指定这个容器工厂即可消费 topic 消息
     */
    @JmsListener(destination = ActiveMqConfig.TOPIC_NAME, containerFactory = "topicListenerContainer")
    public void receiveTopicMsg2(String msg) {
        System.out.println("收到的消息为2:" + msg);
    }

}
测试:
  @GetMapping("/send/topic")
    public String sendTopicMessage() {

        logger.info("===开始发送订阅消息===");
//        Destination destination = new ActiveMQTopic(ActiveMqConfig.TOPIC_NAME);
        producer.sendMessage(topic, "Topic: hello activemq!");
        return "success";
    }
收到的消息为1:Topic: hello activemq!
收到的消息为2:Topic: hello activemq!
topic的持久化配置:
  @Bean(name = "topicContainerFactory1")
    public DefaultJmsListenerContainerFactory topicClient1(ConnectionFactory connectionFactory, DefaultJmsListenerContainerFactoryConfigurer configurer){
        DefaultJmsListenerContainerFactory factory = defaultJmsListenerContainerFactoryTopic(connectionFactory,configurer);
        factory.setConnectionFactory(connectionFactory);
        // 相当于在application.yml中配置:spring.jms.pub-sub-domain=true
        factory.setPubSubDomain(true);
        factory.setClientId("10001");
        return factory;
    }

    @Bean(name = "topicContainerFactory2")
    public DefaultJmsListenerContainerFactory topicClient2(ConnectionFactory connectionFactory, DefaultJmsListenerContainerFactoryConfigurer configurer){
        DefaultJmsListenerContainerFactory factory = defaultJmsListenerContainerFactoryTopic(connectionFactory,configurer);
        factory.setConnectionFactory(connectionFactory);
        // 相当于在application.yml中配置:spring.jms.pub-sub-domain=true
        factory.setPubSubDomain(true);
        factory.setClientId("10002");
        return factory;
    }
    public DefaultJmsListenerContainerFactory defaultJmsListenerContainerFactoryTopic(ConnectionFactory connectionFactory, DefaultJmsListenerContainerFactoryConfigurer configurer) {
        DefaultJmsListenerContainerFactory factory = new DefaultJmsListenerContainerFactory();
        configurer.configure(factory,connectionFactory);
        factory.setPubSubDomain(true);
        factory.setSessionTransacted(true);
        factory.setAutoStartup(true);
        //开启持久化订阅
        factory.setSubscriptionDurable(true);
        return factory;
    }
@JmsListener(destination = ActiveMqConfig.TOPIC_NAME,containerFactory = "topicContainerFactory1") // 监听指定消息主题
    public void receiveMessage1(String message) throws Exception {
        System.out.println("收到的消息为1:" + message);
    }
 @JmsListener(destination = ActiveMqConfig.TOPIC_NAME,containerFactory = "topicContainerFactory2") // 监听指定消息主题
    public void receiveMessage1(String message) throws Exception {
        System.out.println("收到的消息为2:" + message);
    }
测试接收:
先启动项目,注释以下接收代码访问http://localhost:8080/activemq/send/topic 推送消息
将注释放开,重启项目,会接收到刚才推送的消息

参考:https://blog.csdn.net/eson_15/article/details/104347476
https://blog.csdn.net/Cons_Step_By_Step/article/details/78314826