fastDFS + spring +maven 整合及工具类
上文讲完安装后,需要与项目进行整合。
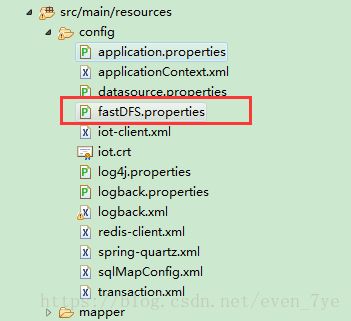
1、将文件放在config文件夹下
1.1文件内容
tracker_server=192.168.1.202:22122 --tracker服务器地址,端口号默认22122
g_connect_timeout=20
g_network_timeout=30
g_charset=ISO8859-1
g_tracker_http_port=80
g_anti_steal_token=no
g_secret_key=FastDFS1234567890 -- 默认密码
g_tracker_group=group1 -- 默认分组
2、相关工具类
package minet.parkingBox.utils;
import java.io.IOException;
import java.net.Socket;
import org.csource.common.NameValuePair;
import org.csource.fastdfs.ClientGlobal;
import org.csource.fastdfs.ProtoCommon;
import org.csource.fastdfs.StorageClient;
import org.csource.fastdfs.StorageClient1;
import org.csource.fastdfs.StorageServer;
import org.csource.fastdfs.TrackerClient;
import org.csource.fastdfs.TrackerServer;
public class FastDFSClient {
private TrackerClient trackerClient = null;
private TrackerServer trackerServer = null;
private StorageServer storageServer = null;
private StorageClient1 storageClient = null;
public FastDFSClient(String conf) throws Exception {
if (conf.contains("classpath:")) {
conf = conf.replace("classpath:", this.getClass().getResource("/").getPath());
}
ClientGlobal.init(conf);
trackerClient = new TrackerClient();
trackerServer = trackerClient.getConnection();
storageServer = null;
storageClient = new StorageClient1(trackerServer, storageServer);
}
/**
* 获取存储服务器连接
*
* @return
* @throws IOException
*/
private static StorageClient getStorageClient() throws IOException {
// 建立tracker server 的连接
/*
* TrackerGroup tg = new TrackerGroup( new InetSocketAddress[] { new
* InetSocketAddress( TRACKER_SERVER_IP, TRACKER_SERVER_PORT) });
*/
// TrackerClient tc = new TrackerClient();
TrackerServer ts = ClientGlobal.getG_tracker_group().getConnection();
if (ts == null) {
System.out.println("getConnection return null");
return null;
}
// 建立存储服务器的连接
StorageServer ss = null;// tc.getStoreStorage(ts);
/*
* if (ss == null) { System.out.println("getStoreStorage return null");
* return null; }
*/
// 建立存储客户端
StorageClient sc = new StorageClient(ts, ss);
/* for test only */
// System.out.println("active test to storage server: " +
// ProtoCommon.activeTest(ss.getSocket()));
// ss.close();
/* for test only */
// System.out.println("active test to tracker server: " +
// ProtoCommon.activeTest(ts.getSocket()));
// ts.close();
/* for test only */
System.out.println("active test to storage server: " + ProtoCommon.activeTest(ss.getSocket()));
ss.close();
/* for test only */
System.out.println("active test to tracker server: " + ProtoCommon.activeTest(ts.getSocket()));
ts.close();
return sc;
}
/**
* 上传文件方法
*
Title: uploadFile
*
Description:
* @param fileName 文件全路径
* @param extName 文件扩展名,不包含(.)
* @param metas 文件扩展信息
* @return
* @throws Exception
*/
public String uploadFile(String fileName, String extName, NameValuePair[] metas) throws Exception {
String result = storageClient.upload_file1(fileName, extName, metas);
return result;
}
public String uploadFile(String fileName) throws Exception {
return uploadFile(fileName, null, null);
}
public String uploadFile(String fileName, String extName) throws Exception {
return uploadFile(fileName, extName, null);
}
/**
* 上传文件方法
*
Title: uploadFile
*
Description:
* @param fileContent 文件的内容,字节数组
* @param extName 文件扩展名
* @param metas 文件扩展信息
* @return
* @throws Exception
*/
public String uploadFile(byte[] fileContent, String extName, NameValuePair[] metas) throws Exception {
// 建立链接
boolean activeTest = ProtoCommon.activeTest(trackerServer.getSocket());
// System.out.println(activeTest);
if (!activeTest) {
// 链接失效,则重新建立链接
trackerServer = trackerClient.getConnection();
storageServer = null;
storageClient = new StorageClient1(trackerServer, storageServer);
}
String result = storageClient.upload_file1(fileContent, extName, metas);
trackerServer.close();
return result;
}
//查询链接
public boolean activeStorageHeartBeat() throws Exception {
StorageServer storeStorage = trackerClient.getStoreStorage(trackerServer);
if(storeStorage==null){
return false;
}
boolean activeStorage = ProtoCommon.activeTest(storeStorage.getSocket());
return activeStorage;
}
public boolean activeTrackerHeartBeat() throws Exception {
if(trackerServer ==null){
return false;
}
Socket socket = trackerServer.getSocket();
if(socket==null){
return false;
}
boolean activeTracker = ProtoCommon.activeTest(socket);
return activeTracker;
}
public String uploadFile(byte[] fileContent) throws Exception {
return uploadFile(fileContent, null, null);
}
public String uploadFile(byte[] fileContent, String extName) throws Exception {
return uploadFile(fileContent, extName, null);
}
public boolean deleteFile(String groupName, String fileName) throws Exception {
// 建立链接
boolean activeTest = ProtoCommon.activeTest(trackerServer.getSocket());
// System.out.println(activeTest);
if (!activeTest) {
// 链接失效,则重新建立链接
trackerServer = trackerClient.getConnection();
storageServer = null;
storageClient = new StorageClient1(trackerServer, storageServer);
}
// System.out.println(ProtoCommon.activeTest(trackerServer.getSocket()));
int i = storageClient.delete_file(groupName, fileName);
return i == 0 ? true : false;
}
public boolean deleteFile(String fileName) throws Exception {
// 将路径分割,获取组名与文件名
String[] split = fileName.split("/");
String replaceAll = fileName.replaceAll(split[0] + "/", "");
return deleteFile(split[0], replaceAll);
}
}
3、在使用时需要new FastDFSClient
FastDFSClient fastDFSClient = new FastDFSClient("classpath:config/fastDFS.properties");
4、注意
4.1 增删文件时,需要测试连接,连接失败则重新请求建立链接
4.2 博主通过spring的定时任务,做fastDFS的心跳检测。当链接失败后,直接执行linux的重启脚本,进行重新启动。需要的话可以留言。
