JavaScript之node.js-web框架Koa学习
声明:本博客学习来源于廖雪峰老师官方网站:廖雪峰老师官方网站koa部分
1. 什么是koa?
koa是javascript基于node.js的一个web框架。node.js本质是javascript语言,却是用于做服务器后台开发的。于javaEE的ssh、springmvc等框架类似,自然有许多框架可以使用,比如express、koa等。
2. 简单使用koa
本文章使用的编辑器是VS Code。
一个简单的例子”hello world !”:
// 导入koa
const Koa = require('koa');
// 创建一个Koa对象表示web app本身:
const app = new Koa();
// 对于任何请求,app将调用该异步函数处理请求:
app.use(async (ctx, next) => {
await next();
ctx.response.type = 'text/html';
ctx.response.body = 'Hello, world!
';
});
// 在端口3000监听:
app.listen(3000);
console.log('app started at port 3000...');代码解释:
首先引入了koa模块,const Koa = require('koa');
然后创建了app对象实例。app.user(…)处理所有请求,也就是说所有的访问都会调用app.user(…)方法。通过ctx.response.body返回内容。
ctx: 请求的request、response等信息被封装在了ctx参数中。
next: 下一个要处理的请求
await next(); 将请求分发到下一个处理函数
运行代码,在浏览器中输入http://localhost:3000/即可看到激动人心的hello world!
3. koa-router和koa-bodyparser的使用
顾名思义,koa-router是用来做路由的,bodyparser是用来做请求体解析的。
对于koa-router的使用直接看代码:
const Koa = require('koa');
// 注意require('koa-router')返回的是函数:
const router = require('koa-router')();
const app = new Koa();
// log request URL:
app.use(async (ctx, next) => {
console.log(`Process ${ctx.request.method} ${ctx.request.url}...`);
await next();
});
// add url-route:
router.get('/hello/:name', async (ctx, next) => {
var name = ctx.params.name;
ctx.response.body = `Hello, ${name}!h1>
`;
});
router.get('/', async (ctx, next) => {
ctx.response.body = 'Index
';
});
// add router middleware:
app.use(router.routes());
app.listen(3000);
console.log('app started at port 3000...');对于bodyparser的使用,看代码:
这里是一个简单的登录表单的提交功能。
//导入koa
const Koa = require('koa');
const router = require('koa-router')();
const bodyParser = require('koa-bodyparser');
//创建一个Koa对象表示Web app对象
const app = new Koa();
//add url-router
router.get('/hello/:name', async (ctx, next) => {
var name = ctx.params.name;
ctx.response.body = `hello ${name}!h1>
`;
});
router.get('/', async (ctx, next) => {
//做一个登录的表单
ctx.response.body = `Index</h1>
post">
Name: " value="
koa">
Password: " type="
password">
" value="
Submit">
`;
});
//post请求的处理函数
router.post('/signin', async (ctx, next) => {
var name = ctx.request.body.name || '',
password = ctx.request.body.password || '';
console.log(`signin with name:${name}, password:${password}`);
if (name == 'koa' && password == '12345') {
ctx.response.body = `welcom ${name}!h1>
`
} else {
ctx.response.body = `login failed!h1>\
<p><a href = "/">Try againp>
`
}
});
//解析post请求中的request的parser,将parser注册到app中
//注意:要写在app.use(router.routes());之前
app.use(bodyParser());
//add router middleware
app.use(router.routes());
app.listen(3000);
console.log(`app started at port3000`);注:koa-bodyparser必须在router之前被注册到app对象上
以上就是处理get和post请求的方法。
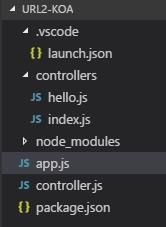
4. 一个完整的模块化的koa框架使用
目录说明:
lanch.json : vs code工程启动文件描述信息
controllers/ : 处理文件所在文件夹
login.js : 处理login相关URL
users.js : 处理用户管理相关URL
app.js :使用koa的js
controller.js : 项目的控制部分,将url与对应的处理文件注册到router中
package.json : 项目描述文件
node_modules/ : npm安装的所有依赖包
完整代码:
app.js :
//导入koa
const Koa = require('koa');
// 导入controller middleware:
const controller = require('./controller');
//导入bodyparser
const bodyParser = require('koa-bodyparser');
//创建app实例
const app = new Koa();
//log request URL:随便打印一下请求的方法以及url,可以去掉
app.use(async (ctx, next) => {
    console.log(`Process ${ctx.request.method} ${ctx.request.url}...`);
    await next();
});
// parse request body:
app.use(bodyParser());
// 使用middleware:
app.use(controller());
//监听端口
app.listen(3000);
console.log('server listenning on 3000...')
controller.js 文件:
//引入文件操作模块
const fs = require('fs');
//将url及对应的处理文件添加到router中
function addMapping(router, mapping) {

    for (var url in mapping) {
        if (url.startsWith('GET ')) {
            var path = url.substring(4);//取url的第四位到最后
            router.get(path, mapping[url]);
        } else if (url.startsWith('POST ')) {
            var path = url.substring(5);
            router.post(path, mapping[url]);
        } else {
            console.log(`invalid URL: ${url}`);
        }
    }
}
//扫描controllers文件夹中的处理文件,添加到map中
function addControllers(router) {
    //__dirname指的是当前文件所在的绝对路径
    var files = fs.readdirSync(__dirname + '/controllers');
    var js_files = files.filter((f) => {
        return f.endsWith('.js');
    });
    for (var f of js_files) {
        // console.log(`process controller: ${f}...`);
        let mapping = require(__dirname + '/controllers/' + f);//mapping是一个字典
        addMapping(router, mapping);
    }
}
//本模块的router暴露出去
module.exports = function (dir) {
    let
        controllers_dir = dir || 'controllers', // 如果不传参数,扫描目录默认为'controllers'
        router = require('koa-router')();
    addControllers(router, controllers_dir);
    return router.routes();
};
index.js 文件:
//处理首页请求的方法
var fn_index = async (ctx, next) => {
ctx.response.body = `Index</h1>
post">
Name: " value="
koa">
Password: " type="
password">
" value="
Submit">
`;
};
//处理登录请求的方法
var fn_signin = async (ctx, next) => {
var
name = ctx.request.body.name || '',
password = ctx.request.body.password || '';
console.log(`signin with name: ${name}, password: ${password}`);
if (name === 'koa' && password === '12345') {
ctx.response.body = `Welcome, ${name}!h1>
`;
} else {
ctx.response.body = `Login failed!h1>
<p><a href="/">Try againa>
p>`;
}
};
//将本模块的方法暴露出去
module.exports = {
'GET /': fn_index,
'POST /signin': fn_signin
};
hello.js 文件:
//处理hello请求的方法
var fn_hello = async (ctx, next) => {
var name = ctx.params.name;
ctx.response.body = `Hello, ${name}!h1>
`;
};
//将本模块方法暴露出去
module.exports = {
'GET /hello/:name': fn_hello
};package.json 文件:
{
    "name": "hello-koa2",
    "version": "1.0.0",
    "description": "Hello Koa 2 example with async",
    "main": "app.js",
    "scripts": {
        "start": "node app.js"
    },
    "keywords": [
        "koa",
        "async"
    ],
    "author": "Michael Liao",
    "license": "Apache-2.0",
    "repository": {
        "type": "git",
        "url": "https://github.com/michaelliao/learn-javascript.git"
    },
    "dependencies": {
        "koa": "2.0.0",
        "koa-router":"7.0.0",
        "koa-bodyparser": "3.2.0"
    }
}
launch.json 文件:
{
        "version": "0.2.0",
        "configurations": [
            {
                "type": "node",
                "request": "launch",
                "name": "Launch Program",
                "program": "${workspaceRoot}\\app.js"
            }
        ]
}http://localhost:3000/hello/fxjzzyo其中fxjzzyo是传递的参数,fxjzzyo对应于参数name, 见hello.js文件中的
//将本模块方法暴露出去
module.exports = {
    'GET /hello/:name': fn_hello
};
至此,一个完整的模块化的koa web框架雏形便形成了!
PS : koa的安装方法(其他模块也类似)
- 方法一:npm命令
先打开命令提示符,切换到工程目录,然后执行命令:
npm install koa@2.0.0注:@2.0.0是版本号
做完之后npm会把koa2以及koa2依赖的所有包全部安装到当前目录的node_modules目录下。
2. 方法二:利用packge.json文件+npm
vs code中会自动创建一个package.json文件这个文件描述了工程的配置信息。在 “dependencies”项中添加 “koa”: “2.0.0”。
 "dependencies": {
    "koa": "2.0.0"
 }
然后打开命令提示符,切换到工程目录,然后执行命令:
npm install安装依赖。
完结,撒花~


