DevOps :Jenkins pipeline + sonarQube 完成静态检测 + junit 覆盖率报告。
项目基础:
1,maven3.3.9 + java 1.8
2,jenkins 2.138.2
3,sonarQube6.7.5 + 汉化
前言:jenkins maven java1.8 环境安装过程不在描述,我们采用jenkins pipeline 来实现标题的功能,希望小编踩过的坑对后来人能够提供帮助~good luck.
参考博文:
SonarQube 的安装
比较全面的jenkins pipeline cicd 流程, 仅供参考
步骤一:通过 jenkins 集成 sonarQube 实现‘静态代码检测’
1,只要jenkins 集成其他server,第一想到的就是 jenkins 的插件,进入到Jenkins 的web 控制台,系统设置-》插件管理-》可选插件 ,输入 sonar 后,搜索,找到 “SonarQube Scanner for Jenkins” 的插件 和 “Sonar Quality Gates Plugin”,不通版本的kenkins 插件的名称可能不同,自己灵活处理即可。
解释:SonarQube Scanner for Jenkins 该插件会让你的jenkins 可以通过配置 sonarqube 的地址,账号密码进行远程登陆,第二个插件小编猜测 提供的是:我们构建完项目后,可以在jenkins web 页面直接点击sonarqube 图标的按钮直接跳转到 sonarqube 的web 页面,起到一个重定向作用,具体还望大家抱有怀疑的态度自行扩展。
2,插件有了,jenkins web 管理页面,系统设置-》系统设置-》SonarQube servers
解释:name 名字随便编写,一会我们pipeline 要用到,地址是你的sonarqube server 的地址,token 你再安装sonarqube 的时候会有一步骤提示你创建令牌,此令牌在sonarqube web 管理页面也可以修改。如果没有此配置处,证明你的插件安装不对或者不支持。
3,SonarQube web 控制台的使用,建议大家找找视频,了解一下,我们用到它 无外乎一个“代码的静态检测” 和 “junit 覆盖率” 两项是否合格,当然合格标准你要在sonarqube web 页面进行配置(自行学习),当不合格时,我们需要配置一个SonarQube Webhook 告知我们的jenkins pipeline 所执行的当前行,来拿到 sonarqube 的 检测是否满足我们设置的阀门或者规范,捕捉到 sonarqube 的 success 或者 error 后,可以控制接下来的pipeline 代码的执行分支。
解释:上图中的名称随便起,后面的地址有点讲究,我用的是非账号密码的,这个地址结构:http://jenkins-ip:jenkins-port/sonarqube-webhook/ , 两点注意:sonarqube-webhook 不能改,后面必须跟上/。你只需要把上面的url 中的ip port 改成你的jenkins 的就行了。
4,junit 覆盖率准备
1,maven
解释:jar 包肯定要导入,我用的是springboot 继承了parrent 所以没有定义junit的版本,下面的插件会在项目target 下,将我们junit 的测试报告以xml 的形式生成。我们在pipeline 中通过junit 的插件将此报告的路径告知jenkins ,jinkins就可以将报告已图形化页面的方式展示到 jenkins web page 上。
2,安装插件,系统设置-》插件管理-》可选插件-》Junit 和 JUnit Attachments Plugin。
步骤二:编写jenkins pipeline,声明式定义。
#!groovy
pipeline{

    agent any


    environment{

        REPOSITORY = "https://github.com/DC-Sena/jugg-connection.git"
        ROOT = "/root/.jenkins/workspace"
        MOUDEL_CONNECTION = "jugg-web-connection"
        DEPLOYMENT_APP_JUGG_CONNECTION="jugg-web-connection-deployment"

        // dev pro
        ENVIRONMENT = "dev"

        //9.42.426 : dev,  9.48.24 : pro
        HARBOR_IP = "9.42.426"

        // apply:第一次发布  update: 更新
        OPERATE = "apply"

        //application.properties 文件地址
        APPLICATION_PROPERTIES_FILE_PATH = "/juggconfig/application.properties"
        LOCKBACK_PROPERTIES_FILE_PATH= "/juggconfig/logback.properties"

        POM_PATH= "/root/.jenkins/workspace/jugg-web-connection/pom.xml"
    }

    stages{

        stage('git pull'){
            steps{
                echo "*********************START pull jugg connection moudle form github--测试${GIT_REPOSITORY} *********************"
                echo "start fetch code from git:${REPOSITORY}"
                deleteDir()
                git credentialsId: 'jugg-web-connection', url:"${REPOSITORY}"

                echo "*********************copy application.properties file *********************"
                sh "cp ${APPLICATION_PROPERTIES_FILE_PATH}  /root/.jenkins/workspace/jugg-web-connection/src/main/resources/application.properties -f"
                echo "*********************copy logback.properties file *********************"
                sh "cp ${LOCKBACK_PROPERTIES_FILE_PATH}  /root/.jenkins/workspace/jugg-web-connection/src/main/resources/logback.properties -f"
            }
        }

        stage('mvn 构建+依赖'){
            steps{
                echo "*********************START maven build java project*********************"
                echo "start mvn install build..${MOUDEL_CONNECTION}"
                sh "mvn install:install-file -DgroupId=com.ibm.db2 -DartifactId=db2jcc -Dversion=10.1 -Dpackaging=jar -Dfile=${ROOT}/${MOUDEL_CONNECTION}/cicd/lib/db2jcc-10.1.jar"
                sh "mvn clean package -Dmaven.test.skip=true"
            }
        }


        stage('静态检查') {
            steps {
                echo "starting codeAnalyze with SonarQube......"
                sh "mvn -f pom.xml clean compile sonar:sonar -Dsonar.host.url=http://9.1.226:9000 -Dsonar.login=15035aacaf8f99e50de0f7d667a01faa685440e5"
            }
        }


        stage('Junit') {
            steps {
              echo "starting unitTest......"
              echo "注入jacoco插件配置,clean test执行单元测试代码. jiang结果上传到将SonarQaue."

              withSonarQubeEnv('sonarqube6.7.5') {
	              sh "mvn org.jacoco:jacoco-maven-plugin:prepare-agent -f  pom.xml  clean test -Dautoconfig.skip=true -Dmaven.test.skip=false -Dmaven.test.failure.ignore=true sonar:sonar -Dsonar.host.url=http://9.4.226:9000 -Dsonar.login=15035aacaf8f99e50de0f7d667a01faa685440e5"
	              junit 'target/surefire-reports/*.xml'
              }

              echo "配置单元测试覆盖率要求,未达到要求pipeline将会fail,code coverage.LineCoverage>80%. 作用为将结果打印到jenkins 中,通过 jenkins jacoco plugin "
              /*jacoco changeBuildStatus: true, maximumLineCoverage:"80"*/
              jacoco(
                buildOverBuild: false,
                changeBuildStatus: true,
                classPattern: '**/target/classes/com',
                execPattern: '**/target/coverage-reports/jacoco-ut.exec',
                sourcePattern: '**/app',
                exclusionPattern: '**/repositories/**,**/ForecastDealListTopic*,**/RedisProxy,**/SqlProvider,**/javascript/**,**/Reverse*,**/routes*,**/*$*,**/RedisConnector,**/RedisProxy,**/RedisUtil*,**/dao/**,**/OAuthTokenVerification*,**/dbpool/**,**/module/**,**/modules/**',
                minimumMethodCoverage: '80',
                maximumMethodCoverage: '85',
                minimumClassCoverage: '80',
                maximumClassCoverage: '85',
                minimumLineCoverage: '80',
                maximumLineCoverage: '85'
              )

              script {
                timeout(1) { //一分钟
                    //利用sonar webhook功能通知pipeline代码检测结果,未通过质量阈,pipeline将会fail
                    def qg = waitForQualityGate()
                        if (qg.status != 'OK') {
                            error "未通过Sonarqube的代码质量阈检查,请及时修改!failure: ${qg.status}"
                        }
                    }
                }

            }
        }


        stage('Last'){
            steps{
                echo "********************* ALL END*********************"
            }
        }


    }


   post {
        always {
            echo 'One way or another, I have finished'
            /*deleteDir()*/ /* clean up our workspace */
        }
        success {
            echo 'I succeeeded!'
        }
        unstable {
            echo 'I am unstable :/'
        }
        failure {
            echo 'I failed :('
        }
        changed {
            echo 'Things were different before...'
        }
    }

}
sonar-project.properties
#项目key (随意输入,必填项)
sonar.projectKey=jugg-web-connection

#项目名称和版本(必填项)
sonar.projectName=jugg-web-connection
sonar.projectVersion=1.0

#源码位置(必填项,相对于jenkins的workspace路径,例如,我此时的绝对路径为~/.jenkins/workspace/Test/test-webapp/src/main/java)
#sonar.sources=/root/.jenkins/workspace/jugg-web-connection/src/main/java
sonar.sources=.

#编译后的class位置(必填项,旧版本此项可不填,建议还是填入,相对路径同上)
sonar.java.binaries=/root/.jenkins/workspace/jugg-web-connection/target/classes

sonar.exclusions=**/test/**,**/target/**
解释:echo "配置单元测试覆盖率要求,未达到要求pipeline将会fail,code coverage.LineCoverage>80%. 作用为将结果打印到jenkins 中,通过 jenkins jacoco plugin "
/*jacoco changeBuildStatus: true, maximumLineCoverage:"80"*/
jacoco(
buildOverBuild: false,
changeBuildStatus: true,
classPattern: '**/target/classes/com',
execPattern: '**/target/coverage-reports/jacoco-ut.exec',
sourcePattern: '**/app',
exclusionPattern: '**/repositories/**,**/ForecastDealListTopic*,**/RedisProxy,**/SqlProvider,**/javascript/**,**/Reverse*,**/routes*,**/*$*,**/RedisConnector,**/RedisProxy,**/RedisUtil*,**/dao/**,**/OAuthTokenVerification*,**/dbpool/**,**/module/**,**/modules/**',
minimumMethodCoverage: '80',
maximumMethodCoverage: '85',
minimumClassCoverage: '80',
maximumClassCoverage: '85',
minimumLineCoverage: '80',
maximumLineCoverage: '85'
)
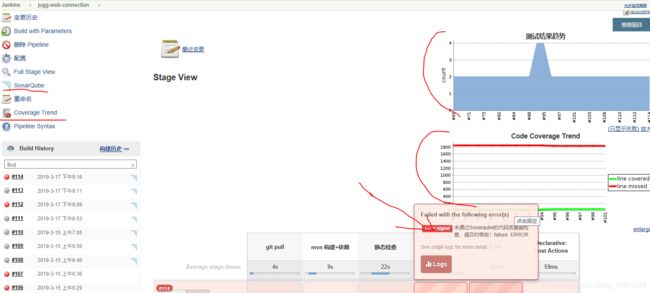
上面这段代码是一段冗余代码,它是借助 Jenkins "JaCoCo plugin" 插件来完成的junit 覆盖率的检测,检测结果会在Jenkins 的web 页图形化展示出来。
效果图:
解释:我在SonarQube 中设置的 Junit 覆盖率的阈值是:百分之80的覆盖率,所以此处构建失败,整体流程可以阅读我的pipeline。
pipeline 常量的使用:
1, 从上面的代码中我可以看到,常量的配置如下
environment{

        REPOSITORY = "https://github.com/DC-Setsuna/jugg-connection.git"
        ROOT = "/root/.jenkins/workspace"
        MOUDEL_CONNECTION = "jugg-web-connection"
        DEPLOYMENT_APP_JUGG_CONNECTION="jugg-web-connection-deployment"

        // dev pro
        ENVIRONMENT = "dev"

        //9.42.41.226 : dev,  9.42.78.24 : pro
        HARBOR_IP = "9.42.41.226"

        // apply:第一次发布  update: 更新
        OPERATE = "apply"

        //application.properties 文件地址
        APPLICATION_PROPERTIES_FILE_PATH = "/juggconfig/application.properties"
        LOCKBACK_PROPERTIES_FILE_PATH= "/juggconfig/logback.properties"

        POM_PATH= "/root/.jenkins/workspace/jugg-web-connection/pom.xml"
    }
2,还可以如下:使用时:${params.lineCoverage} , lineCoverage 是 变量的名称。
#!groovy
pipeline {
    //在任何可用的代理上执行Pipeline
    agent any
    //参数化变量,目前只支持[booleanParam, choice, credentials, file, text, password, run, string]这几种参数类型,其他高级参数化类型还需等待社区支持。
    parameters {
    //git代码路径【参数值对外隐藏】
    string(name:'repoUrl', defaultValue: 'git@git.*****.com:*****/*****.git', description: 'git代码路径')
    //repoBranch参数后续替换成git parameter不再依赖手工输入,JENKINS-46451【git parameters目前还不支持pipeline】
    string(name:'repoBranch', defaultValue: 'master', description: 'git分支名称')
    //pom.xml的相对路径
    string(name:'pomPath', defaultValue: 'pom.xml', description: 'pom.xml的相对路径')
    //war包的相对路径
    string(name:'warLocation', defaultValue: 'rpc/war/target/*.war', description: 'war包的相对路径 ')
    //服务器参数采用了组合方式,避免多次选择,使用docker为更佳实践【参数值对外隐藏】
    choice(name: 'server',choices:'192.168.1.107,9090,*****,*****\n192.168.1.60,9090,*****,*****', description: '测试服务器列表选择(IP,JettyPort,Name,Passwd)')
    //测试服务器的dubbo服务端口
    string(name:'dubboPort', defaultValue: '31100', description: '测试服务器的dubbo服务端口')
    //单元测试代码覆盖率要求,各项目视要求调整参数
    string(name:'lineCoverage', defaultValue: '20', description: '单元测试代码覆盖率要求(%),小于此值pipeline将会失败!')
    //若勾选在pipelie完成后会邮件通知测试人员进行验收
    booleanParam(name: 'isCommitQA',description: '是否邮件通知测试人员进行人工验收',defaultValue: false )
    }
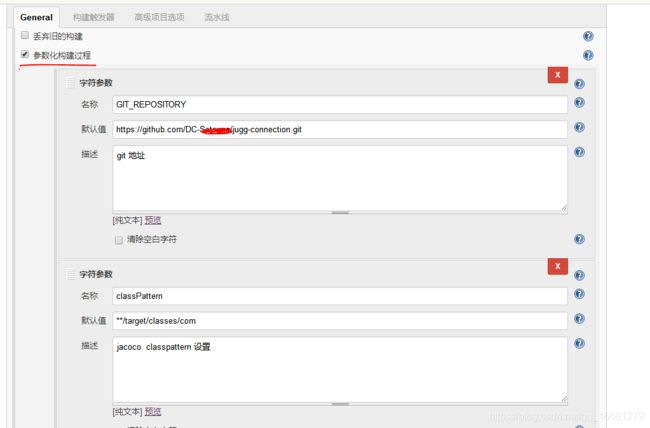
3,最想介绍的的是如下这种,因为它可以在 你点击 jenkins 该项目的 “立即构建” 按钮之前,可以从新设置这些参数后,在去构建项目。进入方式:点击jenkins 项目名称-》点击 ‘配置 ’后,就可以进行如下图中的页面。
效果图:
结束语:
基于以上我们就完成了标题所描述的事情,完整的CICD还要有 可发布的项目包 和 部署流程,小编会在下一篇博文继续基于以上来完善pipeline 的 stage(){}...后续,docker image 的 生成 和 push 到docker 的私人镜像仓库,以及协调 K8S apiserver 或者 kubectl 来完成 docker image 的部署。


