第十五天 黑马十次方 SpringCloud Hystrix、SpringZuul、SpringCloudConfig、SpringCloudBus
第8章-SpringCloud之一统天下
学习目标:
1 熔断器Hystrix
1.1 为什么要使用熔断器
   在微服务架构中通常会有多个服务层调用,基础服务的故障可能会导致级联故障, 进而造成整个系统不可用的情况,这种现象被称为服务雪崩效应。服务雪崩效应是一种 因“服务提供者”的不可用导致“服务消费者”的不可用,并将不可用逐渐放大的过程。
   如果下图所示:A作为服务提供者,B为A的服务消费者,C和D是B的服务消费者。A 不可用引起了B的不可用,并将不可用像滚雪球一样放大到C和D时,雪崩效应就形成 了。
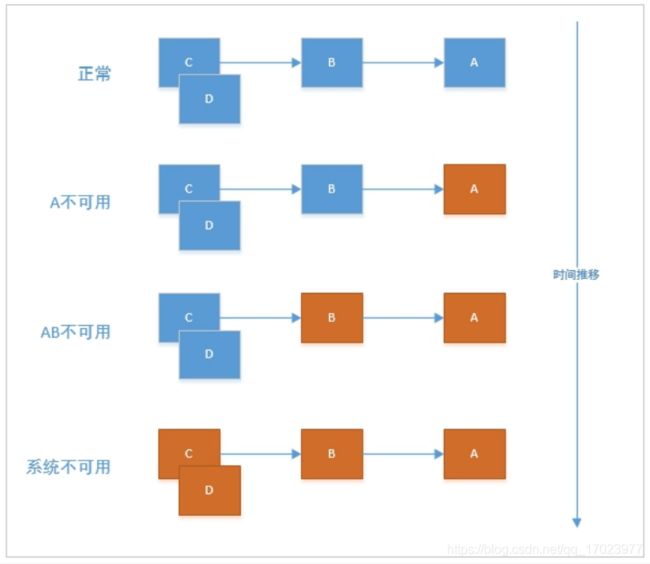
如何避免产生这种雪崩效应呢?我们可以使用Hystrix来实现熔断器。
1.2 什么是Hystrix
Hystrix [hɪst’rɪks]的中文含义是豪猪, 因其背上长满了刺,而拥有自我保护能力

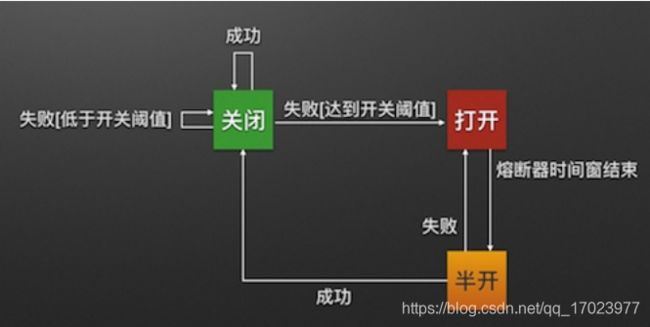
Hystrix 能使你的系统在出现依赖服务失效的时候,通过隔离系统所依赖的服务,防 止服务级联失败,同时提供失败回退机制,更优雅地应对失效,并使你的系统能更快地 从异常中恢复。
了解熔断器模式请看下图:
1.3 快速体验
Feign 本身支持Hystrix,不需要额外引入依赖。
(1)修改tensquare_qa模块的application.yml ,开启hystrix
feign:
  hystrix:
    enabled: true
(2)在com.tensquare.qa.client包下创建impl包,包下创建熔断实现类,实现自接口 LabelClient
@Component
public class LabelClientImpl implements LabelClient {
@Override
public Result findById(String id) {
return new Result(false, StatusCode.ERROR,"熔断器启动了"); } }
(3)修改LabelClient的注解
@FeignClient(value="tensquare‐base",fallback = LabelClientImpl.class)
(4)测试运行
重新启动问答微服务,测试看熔断器是否运行。
2 微服务网关Zuul
2.1 为什么需要微服务网关
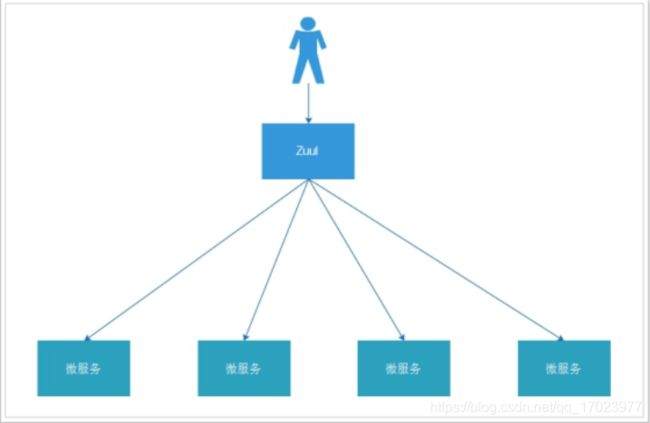
不同的微服务一般有不同的网络地址,而外部的客户端可能需要调用多个服务的接口才 能完成一个业务需求。比如一个电影购票的收集APP,可能回调用电影分类微服务,用户 微服务,支付微服务等。如果客户端直接和微服务进行通信,会存在一下问题:
客户端会多次请求不同微服务,增加客户端的复杂性
存在跨域请求,在一定场景下处理相对复杂
认证复杂,每一个服务都需要独立认证
难以重构,随着项目的迭代,可能需要重新划分微服务,如果客户端直接和微服务通 信,那么重构会难以实施
某些微服务可能使用了其他协议,直接访问有一定困难
2.2 什么是Zuul
Zuul是Netflix开源的微服务网关,他可以和Eureka,Ribbon,Hystrix等组件配合使 用。Zuul组件的核心是一系列的过滤器,这些过滤器可以完成以下功能:
身份认证和安全: 识别每一个资源的验证要求,并拒绝那些不符的请求
#审查与监控:
动态路由:动态将请求路由到不同后端集群
压力测试:逐渐增加指向集群的流量,以了解性能
负载分配:为每一种负载类型分配对应容量,并弃用超出限定值的请求
静态响应处理:边缘位置进行响应,避免转发到内部集群
多区域弹性:跨域AWS Region进行请求路由,旨在实现ELB(ElasticLoad Balancing)使 用多样化
Spring Cloud对Zuul进行了整合和增强。
使用Zuul后,架构图演变为以下形式
2.3 Zuul路由转发
2.3.1 管理后台微服务网关
(1)创建子模块tensquare_manager,pom.xml引入eureka-client 和zuul的依赖
<dependencies>
<dependency>
<groupId>org.springframework.cloud</groupId>
<artifactId>spring‐cloud‐starter‐netflix‐eureka‐ client</artifactId> </dependency>
<dependency>
<groupId>org.springframework.cloud</groupId>
<artifactId>spring‐cloud‐starter‐netflix‐zuul</artifactId>
</dependency>
</dependencies>
(2)创建application.yml
server:
  port: 9011
spring:
  application:
    name: tensquare‐manager #指定服务名
eureka:
  client:
    serviceUrl: #Eureka客户端与Eureka服务端进行交互的地址
      defaultZone: http://127.0.0.1:6868/eureka/
  instance:
    prefer‐ip‐address: true
zuul:
  routes:
    tensquare‐gathering: #活动
      path: /gathering/** #配置请求URL的请求规则
      serviceId: tensquare‐gathering #指定Eureka注册中心中的服务id
    tensquare‐article: #文章
      path: /article/** #配置请求URL的请求规则
      serviceId: tensquare‐article #指定Eureka注册中心中的服务id
    tensquare‐base: #基础
      path: /base/** #配置请求URL的请求规则
      serviceId: tensquare‐base #指定Eureka注册中心中的服务id
    tensquare‐friend: #交友
      path: /friend/** #配置请求URL的请求规则
      serviceId: tensquare‐friend #指定Eureka注册中心中的服务id
    tensquare‐qa: #问答
      path: /qa/** #配置请求URL的请求规则
      serviceId: tensquare‐qa #指定Eureka注册中心中的服务id
    tensquare‐recruit: #招聘
      path: /recruit/** #配置请求URL的请求规则
      serviceId: tensquare‐recruit #指定Eureka注册中心中的服务id
    tensquare‐spit: #吐槽
      path: /spit/** #配置请求URL的请求规则
      serviceId: tensquare‐spit #指定Eureka注册中心中的服务id
    tensquare‐user: #用户
      path: /user/** #配置请求URL的请求规则
      serviceId: tensquare‐user #指定Eureka注册中心中的服务id
(3)编写启动类
@EnableZuulProxy
@SpringBootApplication
public class Application { public static void main(String[] args) { SpringApplication.run(Application.class, args); } }
2.3.2 网站前台的微服务网关
(1)创建子模块tensquare_web,pom.xml引入依赖zuul
<dependencies>
<dependency>
<groupId>org.springframework.cloud</groupId>
<artifactId>spring‐cloud‐starter‐netflix‐eureka‐ client</artifactId> </dependency>
<dependency>
<groupId>org.springframework.cloud</groupId>
<artifactId>spring‐cloud‐starter‐netflix‐zuul</artifactId>
</dependency>
</dependencies>
(2)创建application.yml
server:
  port: 9012
spring:
  application:
    name: tensquare‐web #指定服务名
eureka:
  client:
    serviceUrl: #Eureka客户端与Eureka服务端进行交互的地址
      defaultZone: http://127.0.0.1:6868/eureka/
  instance:
    prefer‐ip‐address: true
zuul:
  routes:
    tensquare‐gathering: #活动
      path: /gathering/** #配置请求URL的请求规则
      serviceId: tensquare‐gathering #指定Eureka注册中心中的服务id
    tensquare‐article: #文章
      path: /article/** #配置请求URL的请求规则
      serviceId: tensquare‐article #指定Eureka注册中心中的服务id
    tensquare‐base: #基础
      path: /base/** #配置请求URL的请求规则
      serviceId: tensquare‐base #指定Eureka注册中心中的服务id
    tensquare‐friend: #交友
      path: /friend/** #配置请求URL的请求规则
      serviceId: tensquare‐friend #指定Eureka注册中心中的服务id
    tensquare‐qa: #问答
      path: /qa/** #配置请求URL的请求规则
      serviceId: tensquare‐qa #指定Eureka注册中心中的服务id
    tensquare‐recruit: #招聘
      path: /recruit/** #配置请求URL的请求规则
      serviceId: tensquare‐recruit #指定Eureka注册中心中的服务id
    tensquare‐spit: #吐槽
      path: /spit/** #配置请求URL的请求规则
      serviceId: tensquare‐spit #指定Eureka注册中心中的服务id
    tensquare‐user: #用户
      path: /user/** #配置请求URL的请求规则
      serviceId: tensquare‐user #指定Eureka注册中心中的服务id
    tensquare‐search: #用户
      path: /search/** #配置请求URL的请求规则
      serviceId: tensquare‐search #指定Eureka注册中心中的服务id
(3)编写启动类
@EnableZuulProxy
@SpringBootApplication
public class WebApplication {
public static void main(String[] args) { SpringApplication.run(WebApplication.class); } }
2.4 Zuul过滤器
2.4.1 Zuul过滤器快速体验
我们现在在tensquare_web 创建一个简单的zuul过滤器
@Component
public class WebFilter extends ZuulFilter {
@Override
public String filterType() { return "pre";// 前置过滤器 }
@Override
public int filterOrder() { return 0;// 优先级为0,数字越大,优先级越低 }
@Override
public boolean shouldFilter() { return true;// 是否执行该过滤器,此处为true,说明需要过滤 }
@Override
public Object run() throws ZuulException { System.out.println("zuul过滤器..."); return null; } }
启动tensquare_web会发现过滤器已经执行
filterType:返回一个字符串代表过滤器的类型,在zuul中定义了四种不同生命周期的过 滤器类型,具体如下:
pre :可以在请求被路由之前调用
route :在路由请求时候被调用
post :在route和error过滤器之后被调用
error :处理请求时发生错误时被调用
filterOrder :通过int值来定义过滤器的执行顺序
shouldFilter :返回一个boolean类型来判断该过滤器是否要执行,所以通过此函数可 实现过滤器的开关。在上例中,我们直接返回true,所以该过滤器总是生效
run :过滤器的具体逻辑。
2.4.2 网站前台的token转发
我们现在在过滤器中接收header,转发给微服务
修改tensquare_web的过滤器。如果有token,直接转发。
@Override
public Object run() throws ZuulException {
System.out.println("zuul过滤器...");
//向header中添加鉴权令牌
RequestContext requestContext = RequestContext.getCurrentContext();
//获取header
HttpServletRequest request = requestContext.getRequest();
String authorization = request.getHeader("Authorization"); if(authorization!=null){ requestContext.addZuulRequestHeader("Authorization",authorization); }
return null; }
2.4.3 管理后台过滤器实现token校验
修改tensquare_manager的过滤器, 因为是管理后台使用,所以需要在过滤器中对token 进行验证。
(1)tensquare_manager引入tensquare_common依赖 ,因为需要用到其中的JWT工 具类
<dependency>
<groupId>com.tensquare</groupId>
<artifactId>tensquare_common</artifactId>
<version>1.0‐SNAPSHOT</version>
</dependency>
(2)修改tensquare_manager配置文件application.yml4
jwt:
  config:
    key: itcast
(3)修改tensquare_manager的启动类,添加bean
@Bean
public JwtUtil jwtUtil(){ return new JwtUtil(); }
(4)tensquare_manager编写过滤器类
@Component
public class ManagerFilter extends ZuulFilter {
@Autowired
private JwtUtil jwtUtil;
@Override
public String filterType() {//过滤器类型 return "pre";//前置过滤器 }
@Override public int filterOrder() { return 0;//优先级,数字越大,优先级越低 }
@Override public boolean shouldFilter() { return true;//过滤器开关,true表示开启 }
@Override public Object run() throws ZuulException {
System.out.println("Zuul过滤器");
RequestContext requestContext=RequestContext.getCurrentContext(); HttpServletRequest request = requestContext.getRequest(); if(request.getMethod().equals("OPTIONS")){ return null; }
String url=request.getRequestURL().toString(); if(url.indexOf("/admin/login")>0){ System.out.println("登陆页面"+url); return null; }
String authHeader =(String)request.getHeader("Authorization");// 获取头信息if(authHeader!=null && authHeader.startsWith("Bearer ") ){
String token = authHeader.substring(7);
Claims claims = jwtUtil.parseJWT(token);
if(claims!=null){
if("admin".equals(claims.get("roles"))){ requestContext.addZuulRequestHeader("Authorization",authHeader); System.out.println("token 验证通过,添加了头信 息"+authHeader);
return null; } } }
requestContext.setSendZuulResponse(false);//终止运行 requestContext.setResponseStatusCode(401);//http状态码 requestContext.setResponseBody("无权访问"); requestContext.getResponse().setContentType("text/html;charset=UTF‐8"); return null; } }
3 集中配置组件SpringCloudConfig
3.1 Spring Cloud Config简介
在分布式系统中,由于服务数量巨多,为了方便服务配置文件统一管理,实时更新,所 以需要分布式配置中心组件。在Spring Cloud中,有分布式配置中心组件spring cloud config ,它支持配置服务放在配置服务的内存中(即本地),也支持放在远程Git仓库 中。在spring cloud config 组件中,分两个角色,一是config server,二是config client。
Config Server是一个可横向扩展、集中式的配置服务器,它用于集中管理应用程序各个 环境下的配置,默认使用Git存储配置文件内容,也可以使用SVN存储,或者是本地文件 存储。
Config Client是Config Server的客户端,用于操作存储在Config Server中的配置内容。 微服务在启动时会请求Config Server获取配置文件的内容,请求到后再启动容器。 详细内容看在线文档: https://springcloud.cc/spring-cloud-config.html
3.2 配置服务端
3.2.1 将配置文件提交到码云
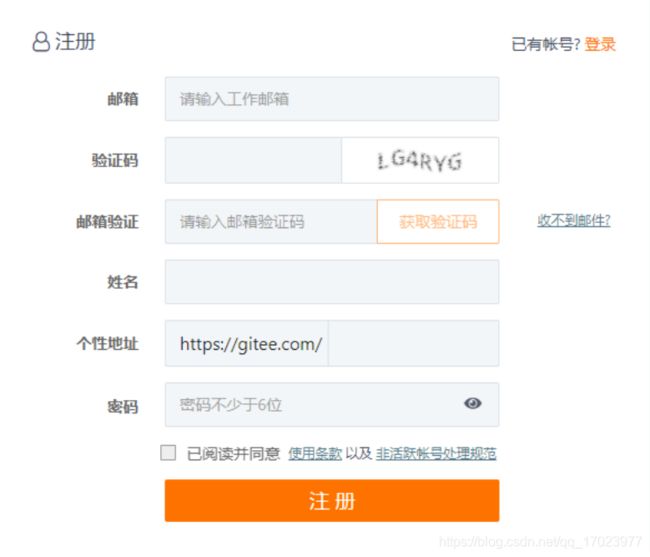
使用GitHub时,国内的用户经常遇到的问题是访问速度太慢,有时候还会出现无法连接 的情况。如果我们希望体验Git飞一般的速度,可以使用国内的Git托管服务——码云 (gitee.com)。 和GitHub相比,码云也提供免费的Git仓库。此外,还集成了代码质量检测、项目演示等 功能。对于团队协作开发,码云还提供了项目管理、代码托管、文档管理的服务。 步骤: (1)浏览器打开gitee.com,注册用户 ,注册后登陆码云管理控制台
(2)创建项目 tensquare-config (点击右上角的加号 ,下拉菜单选择创建项目)
(3)上传配置文件,将tensquare_base工程的application.yml改名为base-dev.yml后 上传

可以通过拖拽的方式将文件上传上去

上传成功后列表可见
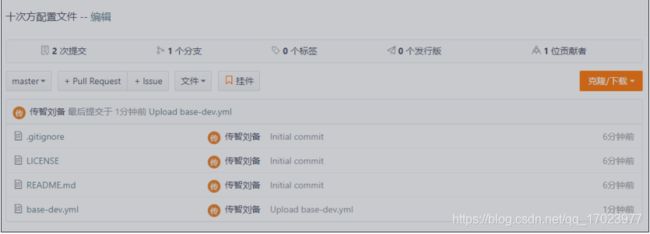
可以再次编辑此文件

文件命名规则:
{application}-{profile}.yml或{application}-{profile}.properties application为应用名称 profile指的开发环境(用于区分开发环境,测试环境、生产环境 等)
(4)复制git地址 ,备用

地址为:https://gitee.com/chuanzhiliubei/tensquare-config.git
3.2.2 配置中心微服务
(1)创建工程模块 配置中心微服务 tensquare_config ,pom.xml引入依赖
<dependencies>
<dependency>
<groupId>org.springframework.cloud</groupId>
<artifactId>spring‐cloud‐config‐server</artifactId>
</dependency>
</dependencies>
(2)创建启动类ConfigServerApplication
@EnableConfigServer //开启配置服务
@SpringBootApplication
public class ConfigServerApplication {
public static void main(String[] args) { SpringApplication.run(ConfigServerApplication.class, args); } }
(3)编写配置文件application.yml
spring:
  application:
    name: tensquare‐config
  cloud:
    config:
      server:
        git:
          uri: https://gitee.com/chuanzhiliubei/tensquare‐config.git server: port: 12000
(4)浏览器测试:http://localhost:12000/base-dev.yml 可以看到配置内容
3.3 配置客户端
(1)在tensquare_base工程添加依赖
<dependency>
<groupId>org.springframework.cloud</groupId>
<artifactId>spring‐cloud‐starter‐config</artifactId>
</dependency>
(2)添加bootstrap.yml ,删除application.yml
spring:
  cloud:
    config:
      name: base
      profile: dev
      label: master
      uri: http://127.0.0.1:12000
(3)测试: 启动工程tensquare_eureka tensquare_config tensquare_base,看是 否可以正常运行
http://localhost:9001/label
4 消息总线组件SpringCloudBus
4.1 SpringCloudBus简介
如果我们更新码云中的配置文件,那客户端工程是否可以及时接受新的配置信息 呢?我们现在来做有一个测试,修改一下码云中的配置文件中mysql的端口 ,然后测试 http://localhost:9001/label 数据依然可以查询出来,证明修改服务器中的配置并没有更 新立刻到工程,只有重新启动程序才会读取配置。 那我们如果想在不重启微服务的情况 下更新配置如何来实现呢? 我们使用SpringCloudBus来实现配置的自动更新。
4.2 代码实现
4.2.1 配置服务端
(1)修改tensquare_config工程的pom.xml,引用依赖
<dependency>
<groupId>org.springframework.cloud</groupId>
<artifactId>spring‐cloud‐bus</artifactId>
</dependency>
<dependency>
<groupId>org.springframework.cloud</groupId>
<artifactId>spring‐cloud‐stream‐binder‐rabbit</artifactId>
</dependency>
(2)修改application.yml ,添加配置
rabbitmq:
  host: 192.168.184.135
management: #暴露触发消息总线的地址
  endpoints:
    web:
      exposure:
        include: bus‐refresh
4.2.2 配置客户端
我们还是以基础模块为例,加入消息总线
(1)修改tensquare_base工程 ,引入依赖
<dependency>
<groupId>org.springframework.cloud</groupId>
<artifactId>spring‐cloud‐bus</artifactId>
</dependency>
<dependency>
<groupId>org.springframework.cloud</groupId>
<artifactId>spring‐cloud‐stream‐binder‐rabbit</artifactId>
</dependency>
<dependency>
<groupId>org.springframework.boot</groupId>
<artifactId>spring‐boot‐starter‐actuator</artifactId>
</dependency>
(2)在码云的配置文件中配置rabbitMQ的地址:
rabbitmq:
  host: 192.168.184.135
(2)启动tensquare_eureka 、tensquare_config和tensquare_base 看是否正常运行
(3)修改码云上的配置文件 ,将数据库连接IP 改为127.0.0.1 ,在本地部署一份数据 库。
(4)postman测试 Url: http://127.0.0.1:12000/actuator/bus-refresh Method: post
(5)再次观察输出的数据是否是读取了本地的mysql数据。
4.2.3 自定义配置的读取
(1)修改码云上的配置文件,增加自定义配置
sms:
  ip: 127.0.0.1
(2)在tensquare_base工程中新建controller
@RestController
public class TestController {
@Value("${sms.ip}")
private String ip;
@RequestMapping(value = "/ip", method = RequestMethod.GET)
public String ip() { return ip; } }
(3)运行测试看是否能够读取配置信息 ,OK.
(4)修改码云上的配置文件中的自定义配置
sms:
  ip: 192.168.184.134
(5)通过postman测试 Url: http://127.0.0.1:12000/actuator/bus-refresh Method: post
测试后观察,发现并没有更新信息。
这是因为我们的 controller少了一个注解@RefreshScope 此注解用于刷新配置
@RefreshScope
@RestController
public class TestController {
@Value("${sms.ip}")
private String ip;
@RequestMapping(value = "/ip", method = RequestMethod.GET)
public String ip() { return ip; } }
添加后再次进行测试。
4.2.4 完成十次方工程的配置集中管理
步骤:
(1)将每一个工程的配置文件提取出来,重命名

(2)将这些文件上传到码云
(3)修改每一个微服务工程,pom.xml中添加依赖
<dependency>
<groupId>org.springframework.cloud</groupId>
<artifactId>spring‐cloud‐starter‐config</artifactId>
</dependency>
<dependency>
<groupId>org.springframework.cloud</groupId>
<artifactId>spring‐cloud‐bus</artifactId>
</dependency>
<dependency>
<groupId>org.springframework.cloud</groupId>
<artifactId>spring‐cloud‐stream‐binder‐rabbit</artifactId>
</dependency>
<dependency>
<groupId>org.springframework.boot</groupId>
<artifactId>spring‐boot‐starter‐actuator</artifactId>
</dependency>
(4)删除每一个微服务的application.yml
(5)为每一个微服务添加bootstrap.yml (参考tesquare_base工程)
(6)修改码云上的配置文件添加rabbitmq地址
rabbitmq:
  host: 192.168.184.135
面试问题总监
解释雪崩效应,为什么要使用熔断器
解释为什么使用微服务网关
(1)微服务工程统一入口,方便前端调用
(2)集中处理权限问题
解释为什么使用集中配置管理
将配置文件放到云端,方便后期维护
解释为什么使用消息总线
我们可以在不重启微服务的情况下,更新配置文件,让其立刻生效