1. Handler源码分析(API 29)
在分析Handler源码之前,我们先来看下下面这条异常
android.view.ViewRootImpl$CalledFromWrongThreadException: Only the original thread that created a view hierarchy can touch its views.
        at android.view.ViewRootImpl.checkThread(ViewRootImpl.java:6094)
        at android.view.ViewRootImpl.requestLayout(ViewRootImpl.java:824)
        at android.view.View.requestLayout(View.java:16431)
作为Android开发人员,这样异常的信息应该并不陌生,产生的原因就是在子线程操作UI控件了。那么为什么在子线程操作UI控件,就会抛出异常呢?
我们再来看另一条异常信息
java.lang.RuntimeException: Can't toast on a thread that has not called Looper.prepare()
        at android.widget.Toast$TN.(Toast.java:435)
        at android.widget.Toast.(Toast.java:150)
        at android.widget.Toast.makeText(Toast.java:313)
        at android.widget.Toast.makeText(Toast.java:303)
抛出这条异常信息是因为在子线程中弹toast导致的。为什么跟第一条产生的异常信息不一样呢?
让我们带着疑问开始探索源码之旅吧~~~
1、其实第一条异常信息我们都知道是在哪里抛出的,跟View的绘制机制有关,也就是为什么不允许在子线程中操作UI控件?
这是因为Android的UI控件不是线程安全的,如果在多线程中并发访问可能会导致UI控件不可预期的状态,那么为什么系统不对UI控件的访问加上锁机制呢?
- 首先加上锁机制会让UI访问的逻辑变得复杂
- 锁机制会降低UI访问效率,因为锁机制会阻塞某些线程的执行
所以最简单且高效的方法就是采用单线程模型来处理UI操作,那么Android中子线程一定不能更新UI控件吗?
其实Android系统在更新UI控件时,会调用ViewRootImpl类的checkThread()来检测当前线程是否是创建UI控件的线程,如果不在同一个线程就会抛出异常。
// ViewRootImpl.java
    public ViewRootImpl(Context context, Display display) {

        mThread = Thread.currentThread();
        // ... 省略无关代码
    }

    @Override
    public void requestLayout() {
        checkThread();
        // ...
    }

    void checkThread() {
        if (mThread != Thread.currentThread()) {
            throw new CalledFromWrongThreadException(
                    "Only the original thread that created a view hierarchy can touch its views.");
        }
    }
2、只要我们执行下面这段代码就会抛出第二条崩溃日志
new Thread(new Runnable() {
    @Override
    public void run() {
         Toast.makeText(MainActivity.this, "handler", Toast.LENGTH_LONG).show();
    }
}).start();
// 抛出:java.lang.RuntimeException: Can't toast on a thread that has not called
看到这里很多人感到奇怪,子线程中更新UI控件应该是第一条崩溃日志啊。
来看下Toast源码:
Toast.java

    public Toast(@NonNull Context context, @Nullable Looper looper) {
        // 创建TN
        mTN = new TN(context.getPackageName(), looper);
       // ...
    }

    private static class TN extends ITransientNotification.Stub {

        final Handler mHandler;

        TN(String packageName, @Nullable Looper looper) {
           // ...
            // 看到这里,我相信大家知道为什么原因了。
            if (looper == null) {
                // Use Looper.myLooper() if looper is not specified.
                looper = Looper.myLooper();
                if (looper == null) {
                    throw new RuntimeException(
                            "Can't toast on a thread that has not called Looper.prepare()");
                }
            }
            mHandler = new Handler(looper, null) {
                @Override
                public void handleMessage(Message msg) {

                }
            };
        }
    }
阅读Toast源码后发现,弹toast时需要获取当前线程的Looper,如果当前线程没有Looper,就会抛出异常。看到这里会有一个疑问,为什么在main线程中弹toast不会报错呢?
我们可以猜想,既然在main线程没有报错,那么肯定main线程中已经创建过Looper对象。是谁创建的呢?
在Android系统中,App启动入口是在ActivityThread类的main方法。
ActivityThread.java

    public static void main(String[] args) {

        // 创建Looper对象和MessageQueue对象,用于处理主线程的消息
        Looper.prepareMainLooper();

        // 创建ActivityThread对象
        ActivityThread thread = new ActivityThread();
        // 创建Binder通道
        thread.attach(false, startSeq);

        // 主线程的Handler
        if (sMainThreadHandler == null) {
            sMainThreadHandler = thread.getHandler();
        }

        // End of event ActivityThreadMain.
        Trace.traceEnd(Trace.TRACE_TAG_ACTIVITY_MANAGER);
        Looper.loop(); // 消息循环运行

        throw new RuntimeException("Main thread loop unexpectedly exited");
    }
阅读ActivityThread源码后,我们知道main线程的Looper在App启动时就帮我们创建了,所以我们可以直接在main线程中弹toast了。 Binder 线程会向 H(就是main线程的Handler) 发送消息,H 收到消息后处理Activity的生命周期,所以在主线程中可以直接更新UI控件了。
主线程的消息循环模型:
ActivityThread 通过 ApplicationThread 和 AMS 进行进程间通讯,AMS 以进程间通信的方式完成 ActivityThread 的请求后会回调 ApplicationThread 中的 Binder 方法,然后 ApplicationThread 会向 H 发送消息,H 收到消息后会将 ApplicationThread 中的逻辑切换到 ActivityThread 中去执行,即切换到主线程中去执行。
1.1 Looper 、Thread之间的关系
先来看这段代码,在子线程中创建Handler,运行后抛出异常了
new Thread(new Runnable() {
    @Override
    public void run() {
         Handler handler = new Handler();
    }
}).start();
出现崩溃日志如下,提示说明:调用线程中没有调用过Looper.prepare(),就不能创建Handler
 java.lang.RuntimeException: Can't create handler inside thread that has not called Looper.prepare()
        at android.os.Handler.(Handler.java:200)
        at android.os.Handler.(Handler.java:114)
为什么Looper.prepare()会影响Handler的创建呢?走进Handler的源码分析:
//Handler.java

    final Looper mLooper;
    final MessageQueue mQueue;

    public Handler(@Nullable Callback callback, boolean async) {
        mLooper = Looper.myLooper();
        if (mLooper == null) {
            throw new RuntimeException(
                "Can't create handler inside thread " + Thread.currentThread()
                        + " that has not called Looper.prepare()");
        }
        mQueue = mLooper.mQueue;
       // ...
    }

---------------------------------
// Looper.java
    // 返回与调用线程相关联的Looper对象
    // 如果调用的线程没有关联Looper(也就是没调用过Looper.prepare())返回null
    public static @Nullable Looper myLooper() {
        // Looper对象怎么与调用线程关联?设计到ThreadLocal知识
        return sThreadLocal.get();
    }
从Handler构造方法中可知:在创建Handler对象时,会检查调用线程中是否有Looper关联,如果没有就抛出异常。
1.2 Handler、Looper、MessageQueue、Message之间的关系
Looper源码:
//Looper.java

   final MessageQueue mQueue;

    private Looper(boolean quitAllowed) {
        mQueue = new MessageQueue(quitAllowed);
        mThread = Thread.currentThread();
    }

    public static void prepare() {
        prepare(true);
    }

    private static void prepare(boolean quitAllowed) {
        if (sThreadLocal.get() != null) {
            throw new RuntimeException("Only one Looper may be created per thread");
        }
        sThreadLocal.set(new Looper(quitAllowed));
    }

    // 在ActivityThread中的main方法调用
    public static void prepareMainLooper() {
        prepare(false);
        synchronized (Looper.class) {
            if (sMainLooper != null) {
                throw new IllegalStateException("The main Looper has already been prepared.");
            }
            sMainLooper = myLooper();
        }
    }
Looper类中主要作用:
- 提供prepare方法,关联调用线程与Looper对象
- 主线程通过prepareMainLooper方法关联Looper,可以通过Looper.getMainLooper()获取主线程Looper
- Looper对象与MessageQueue对象建立关系,一个Looper对象对用一个MessageQueue对象
其它的线程怎么拥有自己的Looper呢?Android系统为我们提供了一个非常方便的类:HandlerThread
// HandlerThread.java

public class HandlerThread extends Thread {
    @Override
    public void run() {
        Looper.prepare();
        synchronized (this) {
            mLooper = Looper.myLooper();
            notifyAll();
        }
        onLooperPrepared();
        Looper.loop();
    }
}
HandlerThread继承Thread类,当Thread.start()线程,调用Looper.prepare()后,就会创建一个Looper与这个Thread关联。
Handler、Looper、MessageQueue、Message之间的关系:一个Thread持有一个Looper,一个Looper持有一个MessageQueue和多个与之关联的Handler,一个Handler持有一个Looper,一个MessageQueue维护Message单项链表。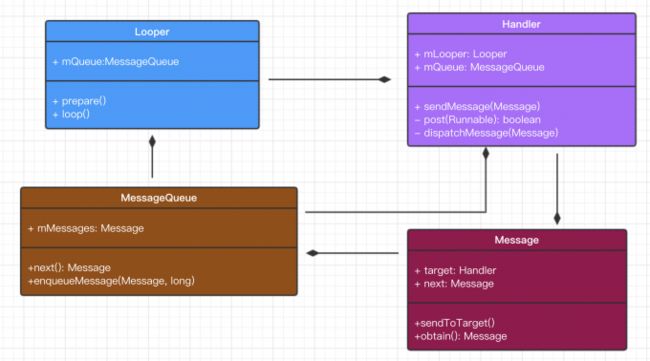
1.3 Handler工作机制
用一张图来描述Handler的工作机制
简单描述上图:使用Handler发送消息到MessageQueue,Looper不断轮询MessageQueue中消息,分发消息到Handler中处理。
Looper的loop()源码:
// Looper.java
    public static void loop() {
        final Looper me = myLooper();
        if (me == null) {
            throw new RuntimeException("No Looper; Looper.prepare() wasn't called on this thread.");
        }
        final MessageQueue queue = me.mQueue;
        // ...
        for (;;) {
           // 堵塞调用,从MessageQueue中获取消息
            Message msg = queue.next(); // might block
            if (msg == null) {
                // No message indicates that the message queue is quitting.
                return;
            }
           // ...
           // 消息的分发及处理
           msg.target.dispatchMessage(msg);
           // ...
        }
    }
Looper不断从MessageQueue中轮询到消息后,分发给Handler处理。
// Handler.java
    public void dispatchMessage(@NonNull Message msg) {
        if (msg.callback != null) {
            handleCallback(msg);
        } else {
            if (mCallback != null) {
                if (mCallback.handleMessage(msg)) {
                    return;
                }
            }
            handleMessage(msg);
        }
    }
分发消息Message处理的顺序:
- 如果Message中设置了callback (Runnable),执行回调后直接返回
- 如果Handler设置了mCallback (Callback),执行回调;如果处理结果返回true,直接返回,否则执行Handler的handleMessage方法
- 如果Message和Handler都没有设置callback,执行Handler的handleMessage方法
总结:如果想拦截Handler中callback或者Handler中handleMessage方法,可以给Message设置callback,这样Handler中Message处理就不会被执行。
接下来分析关键的MessageQueue中的next():
    Message next() {
        // ...
        int nextPollTimeoutMillis = 0;
        for (;;) {
            // 阻塞在native层
            nativePollOnce(ptr, nextPollTimeoutMillis);

            synchronized (this) {
                Message prevMsg = null;
                Message msg = mMessages;
                if (msg != null && msg.target == null) {
                    // Stalled by a barrier.  Find the next asynchronous message in the queue.
                    do {
                        prevMsg = msg;
                        msg = msg.next;
                    } while (msg != null && !msg.isAsynchronous());
                }
                if (msg != null) {
                    if (now < msg.when) {
                        // msg定义的when还没有到,让native继续等nextPollTimeoutMillis时长
                        nextPollTimeoutMillis = (int) Math.min(msg.when - now, Integer.MAX_VALUE);
                    } else {
                        // 有到点的msg,返回给Looper的loop处理
                        mBlocked = false;
                        if (prevMsg != null) {
                            prevMsg.next = msg.next;
                        } else {
                            mMessages = msg.next;
                        }
                        msg.next = null;
                        return msg;
                    }
                } else {
                    // 没有消息,在native层阻塞
                    nextPollTimeoutMillis = -1;
                }

                // 如果调用了quit(),Looper的loop()就会退出无限循环
                if (mQuitting) {
                    dispose();
                    return null;
                }
            }

            // ...

            // 当在处理idle handler的时,可以发送一个新的Message
            // nextPollTimeoutMillis设置为0,立即查询挂起的消息,无需等待
            nextPollTimeoutMillis = 0;
        }
    }
1.4 源码分析后的问题思考
1、 Looper.loop() 死循环为什么不会导致应用卡死?
这里就涉及到 Linux pipe/epoll机制,简单说就是在主线程的 MessageQueue 没有消息时,便阻塞在 loop 的 queue.next() 中的 nativePollOnce() 方法里,此时主线程会释放 CPU 资源进入休眠状态,直到下个消息到达或者有事务发生,通过往 pipe 管道写端写入数据来唤醒主线程工作。这里采用的 epoll 机制,是一种IO多路复用机制,可以同时监控多个描述符,当某个描述符就绪(读或写就绪),则立刻通知相应程序进行读或写操作,本质同步I/O,即读写是阻塞的。 所以说,主线程大多数时候都是处于休眠状态,并不会消耗大量CPU资源。
2.Handler的使用细节
2.1 子线程更新UI的方法
1、直接在main线程创建Handler,那么Looper就会与main线程绑定,子线程就可以通过该Handler更新UI
   // 使用方式
    private static Handler mHandler = new Handler() {
        @Override
        public void handleMessage(@NonNull Message msg) {
            super.handleMessage(msg);
        }
    };
2、用Activity的runOnUiThread方法,判断调用线程是否是main线程,如果不是,使用Handler发送到main线程。原理也是使用Handler机制
// Activity.java源码

    final Handler mHandler = new Handler();

    public final void runOnUiThread(Runnable action) {
        if (Thread.currentThread() != mUiThread) {
            mHandler.post(action);
        } else {
            action.run();
        }
    }
3、创建Handler时,在Handler构造方法中传入main Looper。可以在子线程创建该Handler,然后更新UI。
  // 使用方式
  new Thread(new Runnable() {
       @Override
       public void run() {
            Handler handler = new Handler(Looper.getMainLooper());
            handler.post(new Runnable() {
                @Override
                public void run() {
                    //  TODO 更新UI
                    Log.d(TAG, "run: "+Thread.currentThread().getName());
                    // run: main
                }
           });
       }
  }).start();
4、View.post(Runnable action),先看下源码API 29:
// View.java源码

    public boolean post(Runnable action) {
        final AttachInfo attachInfo = mAttachInfo;
        if (attachInfo != null) {
            return attachInfo.mHandler.post(action);
        }

        // Postpone the runnable until we know on which thread it needs to run.
        // Assume that the runnable will be successfully placed after attach.
        getRunQueue().post(action);
        return true;
    }

   private HandlerActionQueue getRunQueue() {
        if (mRunQueue == null) {
            mRunQueue = new HandlerActionQueue();
        }
        return mRunQueue;
    }
在来看下HandlerActionQueue的源码:
// HandlerActionQueue.java源码

   private HandlerAction[] mActions;
   private int mCount;
   public void post(Runnable action) {
        postDelayed(action, 0);
    }

    public void postDelayed(Runnable action, long delayMillis) {
        final HandlerAction handlerAction = new HandlerAction(action, delayMillis);

        synchronized (this) {
            if (mActions == null) {
                mActions = new HandlerAction[4];
            }
            mActions = GrowingArrayUtils.append(mActions, mCount, handlerAction);
            mCount++;
        }
    }

   // 关键:executeActions调用时机不同,可能导致不会被执行
    public void executeActions(Handler handler) {
        synchronized (this) {
            final HandlerAction[] actions = mActions;
            for (int i = 0, count = mCount; i < count; i++) {
                final HandlerAction handlerAction = actions[i];
                handler.postDelayed(handlerAction.action, handlerAction.delay);
            }

            mActions = null;
            mCount = 0;
        }
    }
这种方式有不靠谱的地方,区别在于API 24(Android7.0)以上,可能post()的Runnable,永远不能运行。
根本原因在于,API 24(Android7.0)以上 executeActions() 方法的调用时机不同,导致 View 在没有 mAttachInfo 对象的时候,表现不一样了。而executeActions()执行只会在View.dispatchAttachedToWindow()方法中调用
如果你只是通过 new 或者使用 LayoutInflater 创建了一个 View ,而没有将它通过 addView() 加入到 布局视图中去,你通过这个 View.post() 出去的 Runnable ,将永远不会被执行到。
举一个例子说明问题:
    private ViewGroup mRootLayout;

    private Handler handler = new Handler(Looper.getMainLooper());

    @Override
    protected void onCreate(Bundle savedInstanceState) {
        super.onCreate(savedInstanceState);
        setContentView(R.layout.activity_main);

        mRootLayout = findViewById(R.id.rootLayout);

        final View view = new View(this);

        Log.e("View.post()>>>>", "当前设备的SDK的版本:" + Build.VERSION.SDK_INT);
        view.post(new Runnable() {
            @Override
            public void run() {
                Log.e("View.post()>>>>", "直接new一个View,然后post的Runnable被执行了");
            }
        });

        handler.postDelayed(new Runnable() {
            @Override
            public void run() {
                Log.e("View.post()>>>>", "delay addView被执行了");
                mRootLayout.addView(view);
            }
        }, 1000);
    }
}
在API 24(Android7.0)以下运行结果。从执行结果中的时间可以看出,new出来的View,post的Runnable立即被执行了。
11-04 14:40:20.614 View.post()>>>>: 当前设备的SDK的版本:19
11-04 14:40:20.664 View.post()>>>>: 直接new一个View,然后post的Runnable被执行了
11-04 14:40:22.614 View.post()>>>>: delay addView被执行了
而在API 24(Android7.0)以上(包括7.0)运行的结果。从执行时间上可以看出,post的Runnable没有立即被执行,而是addView后才被执行。
2019-11-04 14:44:36.240 View.post()>>>>: 当前设备的SDK的版本:28
2019-11-04 14:44:38.243 View.post()>>>>: delay addView被执行了
2019-11-04 14:44:38.262 View.post()>>>>: 直接new一个View,然后post的Runnable被执行了
2.2 sendMessage发送消息
通过Handler可以发送的Message的方法如下:
public final boolean sendEmptyMessage(int what)
public final boolean sendEmptyMessageDelayed(int what, long delayMillis)
public final boolean sendEmptyMessageAtTime(int what, long uptimeMillis)

public final boolean sendMessage(@NonNull Message msg)
public final boolean sendMessageDelayed(@NonNull Message msg, long delayMillis)
public boolean sendMessageAtTime(@NonNull Message msg, long uptimeMillis)
public final boolean sendMessageAtFrontOfQueue(@NonNull Message msg)

public final boolean post(@NonNull Runnable r)
public final boolean postAtTime(@NonNull Runnable r, long uptimeMillis)
public final boolean postDelayed(@NonNull Runnable r, long delayMillis)
public final boolean postAtFrontOfQueue(@NonNull Runnable r)
这些方法最终调用的是enqueueMessage方法
// Handler.java源码

    private boolean enqueueMessage(@NonNull MessageQueue queue, @NonNull Message msg,
            long uptimeMillis) {
        msg.target = this;
        msg.workSourceUid = ThreadLocalWorkSource.getUid();

        if (mAsynchronous) {
            msg.setAsynchronous(true);
        }
        return queue.enqueueMessage(msg, uptimeMillis);
    }
Handler源码分析到这了,但是它的精髓远远不止这些,还有很多不为人知的秘密,需要我们去探索。
下一篇:Handler扩展知识探索~~~
如果我的文章对您有帮助,不妨点个赞鼓励一下(^_^)