一、概要
本文记录hbase高可用集群部署过程,在部署hbase之前需要事先部署好hadoop集群,因为hbase的数据需要存放在hdfs上,hadoop集群的部署后续会有一篇文章记录,本文假设hadoop集群已经部署好,分布式hbase集群需要依赖zk,并且zk可以是hbase自己托管的也可以是我们自己单独搭建的,这里我们使用自己单独搭建的zk集群,我们的hadoop集群是用的cdh的发行版,所以hbase也会使用cdh的源。
二、环境
1、软件版本
centos6
zookeeper-3.4.5+cdh5.9.0+98-1.cdh5.9.0.p0.30.el6.x86_64
hadoop-2.6.0+cdh5.9.0+1799-1.cdh5.9.0.p0.30.el6.x86_64
hbase-1.2.0+cdh5.9.0+205-1.cdh5.9.0.p0.30.el6.x86_64
2、角色
a、zk集群
|
1
2
3
|
10.10.20.64:2181
10.10.40.212:2181
10.10.102.207:2181
|
b、hbase
|
1
2
3
4
5
|
10.10.40.212 HMaster
10.10.20.64 HMaster
10.10.10.114 HRegionServer
10.10.40.169 HRegionServer
10.10.30.174 HRegionServer
|
三、部署
1、配置cdh的yum源
|
1
2
3
4
5
6
7
8
9
10
11
12
13
14
|
vim /etc/yum.repos.d/cloudera-cdh.repo
[cloudera-cdh5]
# Packages
for
Cloudera's Distribution
for
Hadoop, Version
5.4
.
4
, on RedHat or CentOS
6
x86_64
name=Cloudera's Distribution
for
Hadoop, Version
5.4
.
8
baseurl=http:
//archive.cloudera.com/cdh5/redhat/6/x86_64/cdh/5.9.0/
gpgkey=http:
//archive.cloudera.com/cdh5/redhat/6/x86_64/cdh/RPM-GPG-KEY-cloudera
gpgcheck=
1
[cloudera-gplextras5b2]
# Packages
for
Cloudera's GPLExtras, Version
5.4
.
4
, on RedHat or CentOS
6
x86_64
name=Cloudera's GPLExtras, Version
5.4
.
8
baseurl=http:
//archive.cloudera.com/gplextras5/redhat/6/x86_64/gplextras/5.9.0/
gpgkey=http:
//archive.cloudera.com/gplextras5/redhat/6/x86_64/gplextras/RPM-GPG-KEY-cloudera
gpgcheck=
1
|
2、安装zk集群(所有zk节点都操作)
1、安装
|
1
|
yum -y
install
zookeeper zookeeper-server
|
b、配置
|
1
2
3
4
5
6
7
8
9
10
11
12
13
|
vim
/etc/zookeeper/conf/zoo
.cfg
tickTime=2000
initLimit=10
syncLimit=5
dataDir=
/data/lib/zookeeper
clientPort=2181
maxClientCnxns=0
server.1=10.10.20.64:2888:3888
server.2=10.10.40.212:2888:3888
server.3=10.10.102.207:2888:3888
autopurge.snapRetainCount=3
autopurge.purgeInterval=1
|
|
1
|
mkdir
-p
/data/lib/zookeeper
#建zk的dir目录
|
|
1
2
3
|
echo
1 >
/data/lib/zookeeper/myid
#10.10.20.64上操作
echo
2 >
/data/lib/zookeeper/myid
#10.10.40.212上操作
echo
3 >
/data/lib/zookeeper/myid
#10.10.102.207上操作
|
c、启动服务
|
1
|
/etc/init
.d
/zookeeper-server
start
|
3、安装配置hbase集群
a、安装
|
1
2
|
yum -y
install
hbase hbase-master
#HMaster节点操作
yum -y
install
hbase hbase-regionserver
#HRegionServer节点操作
|
b、配置(所有base节点操作)
|
1
2
3
4
5
6
7
8
9
10
11
12
13
14
15
16
17
18
19
20
21
22
23
24
25
26
27
28
|
vim
/etc/hbase/conf/hbase-site
.xml
/name
>
/value
>
<
/property
>
/name
>
/value
>
<
/property
>
/name
>
/data/lib/zookeeper/
<
/value
>
<
/property
>
/name
>
//mycluster
:8020
/hbase
<
/value
>
<
/property
>
/name
>
true
<
/value
>
false
的话,HBase进程和Zookeeper进程在同一个JVM进程
<
/description
>
<
/property
>
<
/configuration
>
|
|
1
2
|
echo
"export HBASE_MANAGES_ZK=false"
>>
/etc/hbase/conf/hbase-env
.sh
#设置hbase使用独立的zk集群
|
|
1
2
3
4
5
|
vim
/etc/hbase/conf/regionservers
ip-10-10-30-174.ec2.internal
ip-10-10-10-114.ec2.internal
ip-10-10-40-169.ec2.internal
#添加HRegionServer的主机名到regionservers,我没有在/etc/hosts下做主机名的映射,直接用了ec2的默认主机名
|
c、启动服务
|
1
2
|
/etc/init
.d
/hbase-master
start
#HMaster节点操作
/etc/init
.d
/hbase-regionserver
start
#HRegionServer节点操作
|
4、验证
a、验证基本功能
|
1
2
3
4
5
6
7
8
9
10
11
12
13
14
15
16
17
18
19
20
21
22
23
24
25
26
27
28
29
|
[root@ip-10-10-20-64 ~]
# hbase shell
2017-05-10 16:31:20,225 INFO [main] Configuration.deprecation: hadoop.native.lib is deprecated. Instead, use io.native.lib.available
HBase Shell; enter
'help
for
list of supported commands.
Type
"exit
to leave the HBase Shell
Version 1.2.0-cdh5.9.0, rUnknown, Fri Oct 21 01:19:47 PDT 2016
hbase(main):001:0> status
1 active master, 1 backup masters, 3 servers, 0 dead, 1.3333 average load
hbase(main):002:0> list
TABLE
test
test1
2 row(s)
in
0.0330 seconds
=> [
"test"
,
"test1"
]
hbase(main):003:0> describe
'test'
Table
test
is ENABLED
test
COLUMN FAMILIES DESCRIPTION
{NAME =>
'id'
, BLOOMFILTER =>
'ROW'
, VERSIONS =>
'1'
, IN_MEMORY =>
'false'
, KEEP_DELETED_CELLS =>
'FALSE'
, DATA_BLOCK_ENCODING =>
'NONE'
, TTL =>
'FOREVER'
, COMPRESSION =>
'NONE'
, MIN_VERSIO
NS =>
'0'
, BLOCKCACHE =>
'true'
, BLOCKSIZE =>
'65536'
, REPLICATION_SCOPE =>
'0'
}
{NAME =>
'name'
, BLOOMFILTER =>
'ROW'
, VERSIONS =>
'1'
, IN_MEMORY =>
'false'
, KEEP_DELETED_CELLS =>
'FALSE'
, DATA_BLOCK_ENCODING =>
'NONE'
, TTL =>
'FOREVER'
, COMPRESSION =>
'NONE'
, MIN_VERS
IONS =>
'0'
, BLOCKCACHE =>
'true'
, BLOCKSIZE =>
'65536'
, REPLICATION_SCOPE =>
'0'
}
{NAME =>
'text'
, BLOOMFILTER =>
'ROW'
, VERSIONS =>
'1'
, IN_MEMORY =>
'false'
, KEEP_DELETED_CELLS =>
'FALSE'
, DATA_BLOCK_ENCODING =>
'NONE'
, TTL =>
'FOREVER'
, COMPRESSION =>
'NONE'
, MIN_VERS
IONS =>
'0'
, BLOCKCACHE =>
'true'
, BLOCKSIZE =>
'65536'
, REPLICATION_SCOPE =>
'0'
}
3 row(s)
in
0.1150 seconds
hbase(main):004:0>
|
b、验证HA功能
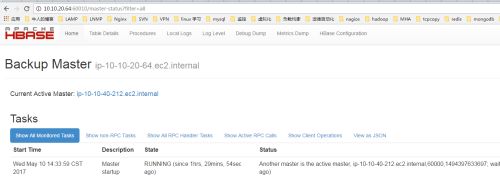
1、hbase默认的web管理端口是60010,两个HMaster谁先启动谁就是主active节点,10.10.40.212先启动,10.10.20.64后启动,web截图如下:
2、停止10.10.40.212的HMaster进程,查看10.10.20.64是否会提升为master
|
1
|
/etc/init
.d
/hbase-master
stop
|

