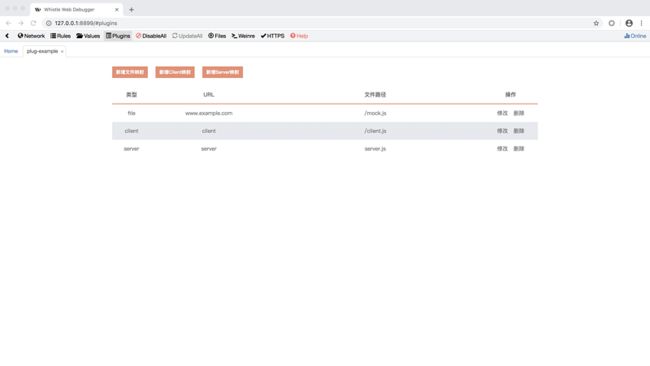
一、页面扩展
1、新增按钮
按钮相关样式调整如下:
.btn {
    float: left;
    min-width: 70px;
    height: 30px;
    color: #fff;
    padding: 0 10px;
    cursor: pointer;
    font-size: 12px;
    font-weight: bold;
    line-height: 30px;
    text-align: center;
    margin-right: 20px;
    background: #ec8e72;
}
.btn_wrap {
    height: 30px;
    overflow: hidden;
    margin-bottom: 20px;
}
对应dom结构调整如下:
    新增文件映射
    新增Client映射
    新增Server映射
2、列表扩展
main类的样式调整如下:
.main {
    margin: auto;
    width: 1100px;
    padding-top: 24px;
}
列表区域新增type列,template区域新增一列用来表示类型,如下所示:
类型
{type}
3、交互调整
新增按钮事件逻辑调整如下:
$('#main .btn').on('click', function btnEvent() {
    Page.showDialog(-1, $(this).data('type'));
});
新增配置弹框的显示逻辑如下:
if (type === 'file') {
    $('#dialog').find('.title').html('文件映射').end()
        .find('.row span').first().html('URL: ');
} else if (type === 'client') {
    $('#dialog').find('.title').html('WebSocket-Client映射').end()
        .find('.row span').first().html('传输内容: ');
} else if (type === 'server') {
    $('#dialog').find('.title').html('WebSocket-Server映射').end()
        .find('.row span').first().html('传输内容: ');
}
$('#dialog').removeClass('hide').find('.btn').data('index', index).data('type', type);
调整配置弹框确定按钮部分逻辑如下:
const result = {
    type: $(this).data('type'),
    url: $($('#dialog input')[0]).val(),
    file: $($('#dialog input')[1]).val(),
};
调整渲染函数部分逻辑如下:
list.forEach((item) => {
    $('tbody').append(tpl.replace('{type}', item.type).replace('{url}', item.url).replace('{file}', item.file));
});二、Websocket映射
1、追加相关依赖库
项目目录下执行npm install --save ws lodash安装依赖库,接着执行npm install --save-dev @types/ws @types/lodash
2、增加工具类
在src下添加shared文件夹,并增加WebSocketTool.ts文件,并增加后续需要的相关定义
// whistle提供的Websocket对象
type WhistleWebSocket = WebSocket;

// whistle提供的Request对象
interface WhistleRequest extends http.IncomingMessage {
    originalReq: {
        url: string;
        headers: {
            [key: string]: string;
        };
    };
    curSendState: string;
    curReceiveState: string;
    wsReceiveClient: WhistleWebSocket;
}

// whistle提供的Options对象
interface Options {
    storage: {
        setProperty: Function;
        getProperty: Function;
    };
}

// websocket单配置对象
interface WebSocketItem {
    rule: string;
    file: string;
    type: 'server' | 'client';
}
增加WebSocketTool类,并添加websocket转发逻辑:
// 库
import {
    Server,
} from 'ws';
import * as http from 'http';
// WebSocket库
import WebSocket = require('ws');

/**
 * WebSocket工具类
 */
export default class WebSocketTool {
    /**
     * 监听websocket请求
     * @param server []
     */
    static handleWebSockeListening(server: http.Server, options: Options): void {
        const wss = new Server({
            server,
            verifyClient: WebSocketTool.verifyClient,
        });
        wss.on('connection', (ws: WhistleWebSocket, req: WhistleRequest) => {
            const {
                wsReceiveClient,
            } = req;

            // 监听服务端发送到客户端的数据
            wsReceiveClient.on('message', (data) => {
                const isIgnore = req.curReceiveState === 'ignore';
                // 触发一下
                req.emit('serverFrame', `Server: ${data}`, isIgnore);
                // 转发请求,确保ws请求返回到真实的客户端
                !isIgnore && ws.send(data);
            });

            // 监听客户端发送到服务端的数据
            ws.on('message', (data) => {
                const isIgnore = req.curSendState === 'ignore';
                // 触发一下
                req.emit('clientFrame', `Client: ${data}`, isIgnore);
                // 转发请求,方便代码生成的客户端进行捕获
                !isIgnore && wsReceiveClient.send(data);
            });
        });
    }

    /**
     * 利用ws库生成Server中需要的参数
     * @param info     [信息对象,req为whistle提供的Request对象]
     * @param callback [回调函数]
     */
    private static verifyClient(info: {req: http.IncomingMessage}, callback: Function): void {
        const req = info.req as WhistleRequest;
        const {
            url,
            headers,
        } = req.originalReq;

        const protocols = [headers['sec-websocket-protocol'] || ''];
        delete headers['sec-websocket-key'];

        const client = new WebSocket(url, protocols, {
            headers,
            rejectUnauthorized: false,
        });

        let isDone = false;
        const checkContinue = (error: Error): void => {
            if (isDone) {
                return;
            }
            isDone = true;
            if (error) {
                callback(false, 502, error.message);
            } else {
                callback(true);
            }
        };

        client.on('error', checkContinue);
        client.on('open', () => {
            req.wsReceiveClient = client as WhistleWebSocket;
            checkContinue(null);
        });
    }
}
3、添加映射逻辑
WebSocketTool类增加映射匹配逻辑:
private static getProxyDataFromType(data: WebSocket.Data, type: 'client' | 'server', options: Options): WebSocket.Data {
    let filePath = '';
    const content = data.toString();
    const list: WebSocketItem[] = options.storage.getProperty('list') || [];

    // 过滤对应类型的配置数据
    list.filter((item) => item.type === type).some((item) => {
        const reg = new RegExp(item.rule);

        if (reg.test(content)) {
            filePath = item.file;
            return true;
        }
        return false;
    });

    // 没有匹配的映射规则,则直接返回
    if (_.isEmpty(filePath)) {
        return data;
    }

    // 如果对应文件不存在在,则直接返回
    if (!fs.existsSync(filePath)) {
        return data;
    }

    // 读取对应文件,并返回
    return fs.readFileSync(filePath).toString();
}
调整websocket监听逻辑如下:
// 监听服务端发送到客户端的数据
wsReceiveClient.on('message', (data) => {
    const isIgnore = req.curReceiveState === 'ignore';
    // 触发一下
    req.emit('serverFrame', `Server: ${data}`, isIgnore);
    // 转发请求,确保ws请求返回到真实的客户端
    if (!isIgnore) {
        // 这里进行数据修改
        const result = WebSocketTool.getProxyDataFromType(data, 'client', options);
        ws.send(result);
    }
});
// 监听客户端发送到服务端的数据
ws.on('message', (data) => {
    const isIgnore = req.curSendState === 'ignore';
    // 触发一下
    req.emit('clientFrame', `Client: ${data}`, isIgnore);
    // 转发请求,方便代码生成的客户端进行捕获
    if (!isIgnore) {
        // 这里进行数据修改
        const result = WebSocketTool.getProxyDataFromType(data, 'server', options);
        wsReceiveClient.send(result);
    }
});
server.ts增加websocket处理逻辑:
import WebSocketTool from '../shared/WebSocketTool';
WebSocketTool.handleWebSockeListening(server, options);
4、预览
三、更新包
1、修改package.json中的version为1.0.1
2、命令行中执行npm publish进行包更新
