如何在Android设备中用NDK编译SQLite并且对SQLite进行操作(增删)-How to Compile SQLite for Android using NDK
文章的英文版如下:http://www.roman10.net/how-to-compile-sqlite-for-android-using-ndk/
According to SQLite home page, SQLite is a open source software library that implements a self-contained, serverless, zero-configuration, transactional SQL database engine.
根据SQLite主页信息可以知道,SQLite是一个开源软件库,实现了一个自包含的,无服务器的,不需要配置、包含事务的SQL数据库引擎。
Self-contained means SQLite depends little on external libraries; serverless means SQLite doesn’t follow the client-server model that most other SQL database engines follow. SQLite reads and writes directly from the database files on disk. zero-configuraiton means SQLite is easy to deploy and set up; Transactional means all changes and queries are atomic, consistent, isolated and durable. Details of these terms can be found on SQLite home page at reference 0.
自包含意味着SQLite很少地依靠外部的库,无服务器意味着SQLite不需要遵守大多数其他的SQL数据库引擎遵守的客户端-服务器模式。SQLite直接读写存储设备中的数据库文件。零配置意味着SQLite比较容易部署和启动。可事务化意味着所有的变化和查询是原子的,一致的,隔离的,持久的。这些术语的详细信息可以参考SQLite的主页信息中的相关参考。
This post covers how to compile SQLite for using with native code. Currently Android only provides APIs to access SQLite database on SDK using Java. No NDK interface is publicly available. However, as SQLite is open source and self-contained, it’s possible to build an embedded version of SQLite for using with NDK.
这篇文章包含如何用本地代码编译SQLite。现在Android提供了APIs用Java来访问SQLite数据库。没有NDK接口是公共可用的。然而,因为SQLite是开源并且自包含的,所以使用NDK编译一个嵌入版本的SQLite是可能的。
0. Download SQLite Source Code
One can download the SQLite source code here. It’s easier to build the version with all C source code combined into a single file, so download the amalgamation version. Once downloaded, extract the source files to your Android project’s jni folder.
下载SQLite源码 从提供的网址下载源码,下载完成之后把源码解压到Android项目下的jni文件夹下面。如下图所示:
The source code consists of only four files, sqlite3.h, sqlite3.c, sqlite3ext.h, shell.c. If we want to build an embedded version of SQLite, we only need sqlite3.h and sqlite3.c. Shell.c is for building a command line utility to access SQLite database, sqlite3ext.h is for building extension for SQLite.
源码包括四个文件,上面是对这四个文件的介绍。
1. A Simple Example of Using SQLite
For simplicity, we provided a C program modified from SQLite website example, the code is as below,
为了简单化,我们提供了一个C应用的例子来创建数据库,并添加一条记录。
#include
static int callback(void *NotUsed, int argc, char **argv, char **azColName) {
int i;
for (i = 0; i < argc; ++i) {
printf("%s = %s\n", azColName[i], argv[i] ? argv[i] : "NULL");
}
printf("\n");
return 0;
}
int main(int argc, char **argv) {
char create_table[100] = "CREATE TABLE IF NOT EXISTS customers (id INTEGER PRIMARY KEY,name TEXT NOT NULL)";
char insert_value[100] = "INSERT INTO customers VALUES('1', 'roman10')";
sqlite3 *db;
char *errMsg;
int rv;
if (argc != 2) {
printf("Usage: %s database\n", argv[0]);
return 1;
}
rv = sqlite3_open(argv[1], &db);
if (rv) {
printf("Cannot open database: %s\n", sqlite3_errmsg(db));
sqlite3_close(db);
return 1;
}
rv = sqlite3_exec(db, create_table, callback, 0, &errMsg);
if (rv != SQLITE_OK) {
printf("SQLite statement execution error: %s\n", errMsg);
}
rv = sqlite3_exec(db, insert_value, callback, 0, &errMsg);
if (rv != SQLITE_OK) {
printf("SQLite statement execution error: %s\n", errMsg);
}
sqlite3_close(db);
return 0;
}
The code accepts a database name as input parameter. It first uses sqlite3_open to open (or create, if the database doesn’t exist) a database. It then execute two SQL query. The first one create a new table “customers” with columns “id” and “name”. The second SQL
query insert a record with id = 0, name = “roman10” into the table “customers”.
这个代码接受一个数据库名称作为输入参数。它首先打开数据库,如果没有就创建此名称的数据库。然后执行两条SQL查询,首先创建"customers"表,然后在"customers"表插入一条id=o,name=“roman10”。
2. Android.mk to Build the Example
To build the example for Android, you can use the Android.mk file below,
为了构建Android的例子,我们可以使用如下的Android.mk文件:
#LOCAL_PATH is used to locate source files in the development tree.
#the macro my-dir provided by the build system, indicates the path of the current directory
LOCAL_PATH:=$(call my-dir)
#####################################################################
# build sqlite3 #
#####################################################################
include $(CLEAR_VARS)
LOCAL_C_INCLUDES := $(LOCAL_PATH)/sqlite-amalgamation-3070900
LOCAL_MODULE:=sqlite3
LOCAL_SRC_FILES:=sqlite-amalgamation-3070900/sqlite3.c
include $(BUILD_STATIC_LIBRARY)
#include $(BUILD_SHARED_LIBRARY)
#####################################################################
# build our code #
#####################################################################
include $(CLEAR_VARS)
LOCAL_C_INCLUDES := $(LOCAL_PATH)/sqlite-amalgamation-3070900
LOCAL_MODULE:=sqlitetest
LOCAL_SRC_FILES:=sqlite_test.c
LOCAL_STATIC_LIBRARIES:=libsqlite3
#LOCAL_SHARED_LIBRARIES:=libsqlite3
LOCAL_LDLIBS:=-llog -lm
#include $(BUILD_SHARED_LIBRARY)
include $(BUILD_EXECUTABLE)
Note that the above build file builds the sqlite as static library, you can also build it as shared library.
注意上边的构建文件构建了一个sqlite的静态库,我们也可以把它构建成共享库。
Also note that the example illustrates how to build executable using SQLite, you can also call sqlite API in your JNI method, and provide an interface for your Java code to access the SQLite APIs you have embedded.
也要注意这个例子说明了如何使用SQLite构建可执行的文件,我们也可以再JNI方法中调用sqlite API,也可以把我们已经集成到SQLite APIs提供给Java访问。
3. Run the Code
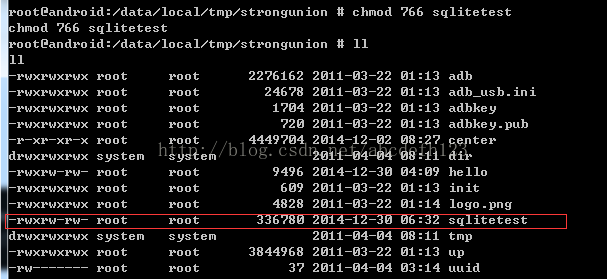
The compiled sqlitetest program should be found under your Android project’s libs/armabi-* folder. You can use adb push to push the executable to your phone. And you might want to change the permission of the sqlitetest to executable. Note that this operation need rooted device.
这个编译的sqlitetest程序应该被发现在你的Android项目的libs/armeabi-*文件件下面。你可以使用adb push命令把它推动你的手机上面。你应该需要把这个sqlitetest文件的权限改变成可执行的权限。注意:这个操作要求你的手机已经被root。
But root is not required to build SQLite and provide database access through JNI. It’s the limitation of the example provided here. If you don’t have a rooted device, just study the code and build scripts and I believe you can still get the idea.
但是root不是编译SQLite和通过JNI访问数据库所必须的。这是这个例子的局限性所在。如果你没有一个已经root的手机,仅仅学习这个代码和这个编译脚本我认为也是能够明白大致意思的。
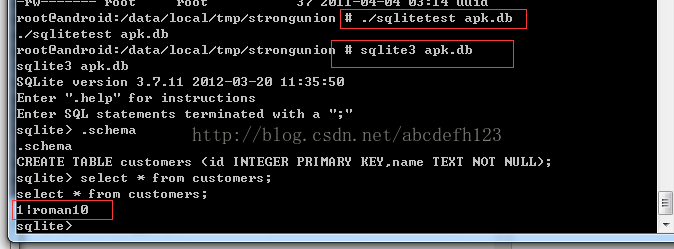
Below is a screenshot of running sqlitetest program we compiled under Android,
下面是执行和运行sqlitetest应用的截图:
编译的截图如下所示:
我使用的NDK版本是r9。
把sqlitetest推送的Android设备的某个目录下面如下图所示:
更改sqlitetest的执行权限,如下图所示:
执行sqlitetest apk.db,打开apk.db,查看“customers”表中是否已经存在一条记录,如下图所示:
如上图所示已经存在一条记录,说明通过C代码已经可以创建表,并且能够插入数据,对数据的删除,查询和删除道理是一样的,下去可以自己研究一下。


