【Android系列】View的绘制之layout过程
layout作为View绘制的三个过程中的第二个过程,负责在measure过程完成之后确定每个View的位置,也是在这个阶段,View的最终宽高才能真正确定(measure过程计算的是测量宽高)。如果你还不清楚measure过程是如何进行的,可以浏览【Android系列】View的绘制之measure过程。
layout过程和measure过程类似,也是从DecorView开始,并经由父View传递到子View,最终在View树的叶子节点处结束。在layout过程中,通过layout方法可以确定View自身的位置,通过onLayout方法可以确定子View在父View中的位置。
layout第一步:从DecorView开始
layout过程是由performLayout方法执行的。在performLayout方法中有这样一段代码:
/* ViewRootImpl.performLayout */
final View host = mView;
host.layout(0, 0, host.getMeasuredWidth(), host.getMeasuredHeight());
从这里可以看出,layout过程同样是从DecorView开始的。
layout第二步:从父View向子View传递
在文章一开头就提到过:“在layout过程中,通过layout方法可以确定View自身的位置,通过onLayout方法可以确定子View在父View中的位置”。也就是说,layout过程是在父View确定子View位置的时候传递到子View的。
父View确定自身的位置
layout方法负责确定View自身的位置,和measure方法类似,在layout方法的注释中有这样一段话:
Derived classes should not override this method. Derived classes with children should override onLayout. In that method, they should call layout on each of their children.
因此,在自定义ViewGroup时不需要重写layout方法,而只要也必须重写onLayout方法。下面我们还是来看看layout方法的源码:
/* View.layout */
public void layout(int l, int t, int r, int b) {
    int oldL = mLeft;
    int oldT = mTop;
    int oldB = mBottom;
    int oldR = mRight;

    boolean changed = isLayoutModeOptical(mParent) ?
            setOpticalFrame(l, t, r, b) : setFrame(l, t, r, b);

    if (changed || (mPrivateFlags & PFLAG_LAYOUT_REQUIRED) == PFLAG_LAYOUT_REQUIRED) {
        onLayout(changed, l, t, r, b);

        mPrivateFlags &= ~PFLAG_LAYOUT_REQUIRED;
    }
}首先,layout方法的四个参数分别代表当前View的四个顶点的位置;接着,通过setFrame方法设置自身的位置(setOpticalFrame方法内部调用了setFrame方法);最后,又调用了onLayout方法设置子View的位置。
在setFrame方法中:
/* View.setFrame */
if (mLeft != left || mRight != right || mTop != top || mBottom != bottom) {
    changed = true;

    mLeft = left;
    mTop = top;
    mRight = right;
    mBottom = bottom;
}可以看到,这里设置了mLeft、mTop、mRight和mBottom四个成员变量的值,而它们正好表示View的边界,这样就设置了View的位置。
父View确定子View的位置
就像我们不能在ViewGroup中找到onMeasure方法一样,在ViewGroup中同样“没有”onLayout方法。实际上,ViewGroup的onLayout方法是一个抽象方法(不同View容器的布局规则不同),View的onLayout方法是一个空方法(View没有子View)。通过layout方法的注释我们知道,每个ViewGroup都要重写onLayout方法。这里我们仍以FrameLayout为例,看看它的onLayout方法做了些什么。由于FrameLayout的onLayout方法直接调用了layoutChildren方法,因此我们直接看它的源码:
/* FrameLayout.layoutChildren */
void layoutChildren(int left, int top, int right, int bottom,
        boolean forceLeftGravity) {
    final int count = getChildCount();
    for (int i = 0; i < count; i++) {
        final View child = getChildAt(i);
        if (child.getVisibility() != GONE) {
            final LayoutParams lp = (LayoutParams) child.getLayoutParams();

            final int width = child.getMeasuredWidth();
            final int height = child.getMeasuredHeight();

            int childLeft;
            int childTop;

            int gravity = lp.gravity;
            if (gravity == -1) {
                gravity = DEFAULT_CHILD_GRAVITY;
            }

            final int layoutDirection = getLayoutDirection();
            final int absoluteGravity = Gravity.getAbsoluteGravity(
                    gravity, layoutDirection);
            final int verticalGravity = gravity & Gravity.VERTICAL_GRAVITY_MASK;

            switch (absoluteGravity & Gravity.HORIZONTAL_GRAVITY_MASK) {
            case Gravity.CENTER_HORIZONTAL:
                childLeft = parentLeft + (parentRight - parentLeft - width) / 2 +
                        lp.leftMargin - lp.rightMargin;
                break;
            case Gravity.RIGHT:
                if (!forceLeftGravity) {
                    childLeft = parentRight - width - lp.rightMargin;
                    break;
                }
            case Gravity.LEFT:
            default:
                childLeft = parentLeft + lp.leftMargin;
            }

            // vertical cases

            child.layout(childLeft, childTop, childLeft + width, childTop + height);
        }
    }
}在FrameLayout的onLayout方法中,是通过子View的gravity来确定其位置的,换句话说,只要确定了子View的gravity,就确定了子View在FrameLayout中的位置。那么子View的gravity是如何确定的呢?
首先,通过getLayoutDirection方法确定当前布局的水平方向是从左到右还是从右到左;接着,通过getAbsoluteGravity方法把相对gravity转换成绝对gravity,即把start和end转换成left和right;最后,通过掩码得到水平方向的gravity和垂直方向的gravity。
在得到子View的gravity之后,会根据其计算子View的左边界和上边界位置,即左上方顶点的位置。在得到子View的左上方顶点的位置后,由于子View的测量宽高已经确定了,因此又调用了子View的layout方法确定子View的位置,layout过程也在此进入到了子View中。
layout第三步:在View处终止
就像上面提到的,View的onLayout方法是一个空方法,因此,layout过程到这里也结束了。
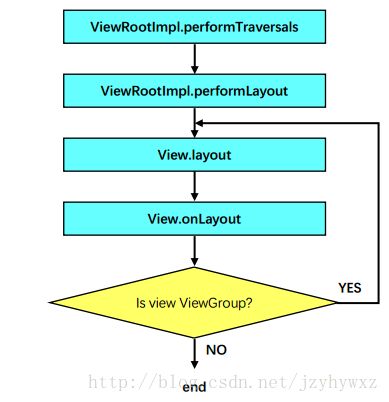
和measure过程比起来,layout过程简单了很多,如果你已经清楚了measure过程,相信layout过程也难不倒你,最后,同样给出一个layout过程的流程图:
扫一扫,关注我٩(๑>◡<๑)۶

