1、准备工作
下载Selenium Standalone Server、Selenium Client、对应os的Mozilla GeckoDriver以及
eclipse及jdk1.8
2、配置path
(1)将java1.8配置在系统路径中
(2)将GeckoDriver放在firefox的安装目录中
(3)将firefox配置在系统路径中
(4)打开eclipse,在工具栏中点击help/install new software安装TestNG软件
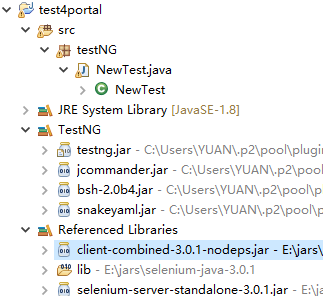
(5)在eclipse中创建java工程,配置build path,将TestBG及 selenium-server-standalone-3.0.1.jar、selenium client中的lib及client-combined-3.0.1-nodeps.jar加入buildpath,效果如下图所示
(6)右击工程名test4portal,点击new/other/TestNG class创建testNG类,填写测试代码
import org.testng.annotations.Test;
import org.testng.annotations.BeforeTest;
import org.testng.annotations.AfterTest;
import java.util.concurrent.TimeUnit;
import org.openqa.selenium.*;
import org.openqa.selenium.firefox.FirefoxDriver;
import org.testng.annotations.AfterTest;
import org.testng.annotations.BeforeTest;
import org.testng.annotations.Test;
public class NewTest
{
WebDriver driver = new FirefoxDriver();
@BeforeTest
public void launchapp()
{
//Puts a Implicit wait, Will wait for 10 seconds before throwing exception
driver.manage().timeouts().implicitlyWait(10, TimeUnit.SECONDS);
//Launch website
driver.navigate().to("http://test2.scgrid.cn/");
driver.manage().window().maximize();
}
@Test
public void portal2()
{
driver.findElement(By.xpath("//input[@id='username']")).sendKeys("xiexw");
driver.findElement(By.xpath("//input[@id='su']")).click();
System.out.println(" The Result is Fail");
}
@AfterTest
public void terminatetest()
{
driver.close();
}
}
(7)右击你刚刚创建的java文件,点击run as/testng test,查看运行结果
3.安装的常见问题
(1)请注意使用driver.close 而不是drive.quit()
(2)注意配置各个路径