使用ElementUi中的el-upload组件,后台服务器签名,前端直传阿里云OSS。
需要有前面的操作:开启OSS对象存储服务,创建Bucket以及添加一些必要的设置
后台服务器签名:阿里云OSS文档地址
首先需要有一个能获取签名的地址
第一步、搭建签名服务器
方式一、有外网服务器的情况
下载java端的sdk
OSS签名程序的sdk下载地址
下载完后,修改源码中的
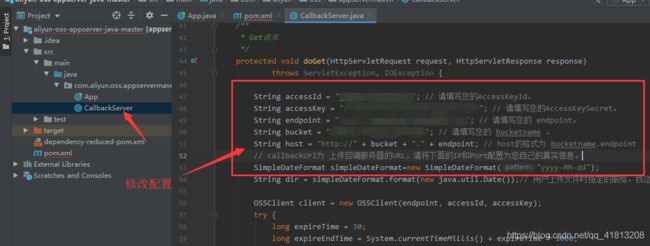
如果有修改端口的需求,修改App中的port

将项目打成jar包
找到下面这个jar包
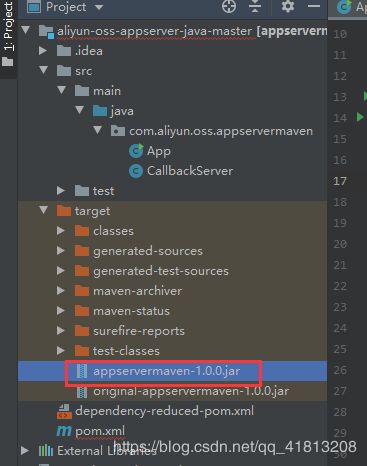
通过java -jar appservermaven-1.0.0.jar将其部署到自己的服务器上
方式二、集成到自己的springboot项目中
OSS的文档地址
第一步、添加maven依赖
<dependency>
    <groupId>com.aliyun.ossgroupId>
    <artifactId>aliyun-sdk-ossartifactId>
    <version>3.10.2version>
dependency>

<dependency>
    <groupId>com.alibabagroupId>
    <artifactId>fastjsonartifactId>
    <version>1.2.72version>
dependency>
第二步、编写一个Controller
import com.alibaba.fastjson.JSONObject;
import com.aliyun.oss.OSSClient;
import com.aliyun.oss.common.utils.BinaryUtil;
import com.aliyun.oss.model.MatchMode;
import com.aliyun.oss.model.PolicyConditions;
import org.springframework.web.bind.annotation.CrossOrigin;
import org.springframework.web.bind.annotation.GetMapping;
import org.springframework.web.bind.annotation.RestController;
import java.io.UnsupportedEncodingException;
import java.sql.Date;
import java.text.SimpleDateFormat;
import java.util.LinkedHashMap;
import java.util.Map;

@RestController
public class OssController {

    @GetMapping("/asign")
    @CrossOrigin  //开启跨域访问
    public JSONObject policyAsign() {
        String accessId = "";  // 请填写您的 AccessKeyId。
        String accessKey = ""; // 请填写您的 AccessKeySecret。
        String endpoint = "";  // 请填写您的 endpoint。
        String bucket = "";    // 请填写您的 bucketname 。

        String host = "http://" + bucket + "." + endpoint; // host的格式为 bucketname.endpoint
        // callbackUrl为 上传回调服务器的URL,请将下面的IP和Port配置为您自己的真实信息。
        SimpleDateFormat simpleDateFormat = new SimpleDateFormat("yyyy-MM-dd");
        String dir = simpleDateFormat.format(new java.util.Date());// 用户上传文件时指定的前缀。我这里设置日期为前缀

        OSSClient client = new OSSClient(endpoint, accessId, accessKey);

        long expireTime = 30;
        long expireEndTime = System.currentTimeMillis() + expireTime * 1000;
        Date expiration = new Date(expireEndTime);
        PolicyConditions policyConds = new PolicyConditions();
        policyConds.addConditionItem(PolicyConditions.COND_CONTENT_LENGTH_RANGE, 0, 1048576000);
        policyConds.addConditionItem(MatchMode.StartWith, PolicyConditions.COND_KEY, dir);

        String postPolicy = client.generatePostPolicy(expiration, policyConds);
        byte[] binaryData = new byte[0];
        try {
            binaryData = postPolicy.getBytes("utf-8");
        } catch (UnsupportedEncodingException e) {
            e.printStackTrace();
        }
        String encodedPolicy = BinaryUtil.toBase64String(binaryData);
        String postSignature = client.calculatePostSignature(postPolicy);

        Map<String, Object> respMap = new LinkedHashMap<String, Object>();
        respMap.put("accessid", accessId);
        respMap.put("policy", encodedPolicy);
        respMap.put("signature", postSignature);
        respMap.put("dir", dir);
        respMap.put("host", host);
        respMap.put("expire", String.valueOf(expireEndTime / 1000));
        // respMap.put("expire", formatISO8601Date(expiration));

        JSONObject jasonCallback = new JSONObject();
//			jasonCallback.put("callbackUrl", callbackUrl);
        jasonCallback.put("callbackBody",
                "filename=${object}&size=${size}&mimeType=${mimeType}&height=${imageInfo.height}&width=${imageInfo.width}");
        jasonCallback.put("callbackBodyType", "application/x-www-form-urlencoded");
        String base64CallbackBody = BinaryUtil.toBase64String(jasonCallback.toString().getBytes());
        respMap.put("callback", base64CallbackBody);

        return new JSONObject(respMap);//将签名数据暴露出去

    }
}
第三步、启动springboot项目,将签名数据暴露出去
通过controller得到签名后的数据
签名地址为 服务器地址+端口+访问路径,例如http://localhost:8088/asign
第二步、axios上传文件到阿里OSS服务器
引入axios
官网中文文档地址
cdn方式引入
<script src="https://unpkg.com/axios/dist/axios.min.js">script>
<el-upload
        class="avatar-uploader"
        :show-file-list="false"
        :http-request="Uploadfile">
    <img v-if="pictureUrl.trim()!=''" :src="pictureUrl" class="avatar">
    <i v-else class="el-icon-plus avatar-uploader-icon">i>
el-upload>
注意这里的:http-request="Uploadfile"使用的是这个方法上传文件
其中的img是上传后,判断是否获取到图片的url来显示图片。
需要有一个保存图片的url变量
<script type="text/javascript">
    const vm = new Vue({ // 配置对象 options
        // 配置选项(option)
        el: '#app',  // element: 指定用vue来管理页面中的哪个标签区域
        data() {
            return {
                pictureUrl: ''
            };
        },
        methods: {
            //自己编写的函数用于生成文件名,防止上传的文件重名
            getUUID() {
                return 'xxxxxxxx-xxxx-4xxx-yxxx-xxxxxxxxxxxx'.replace(/[xy]/g, c => {
                    return (c === 'x' ? (Math.random() * 16 | 0) : ('r&0x3' | '0x8')).toString(16)
                })
            },

            Uploadfile(param) {
                let file = param.file; // 得到文件的内容
                console.log(file);
                //填写获取签名的地址
                const getPolicyApiUrl = 'http://localhost:8088/asign'; //获取oss签名的地址
                // 获取oss签名
                axios({
                    method: 'get',
                    url: getPolicyApiUrl,
                    headers: {
                        'Content-Type': 'application/x-www-form-urlencoded',
                        'Access-Control-Allow-Origin': '*',
                    }
                }).then((response) => {
                    if (response.status == 200) {
                        let policyData = response.data;
                        console.log(policyData);
                        /**
                         ossUrl 换成自己的Bucket的外网地址,
                         例如 https://human-resource-manage.oss-cn-shenzhen.aliyuncs.com
                         */
                        let ossUrl = '';//填写自己OSS服务器的地址
                        let accessUrl = policyData.dir + '/' + this.getUUID() + file.name;//设置上传的访问路径
                        let sendData = new FormData();// 上传文件的data参数
                        sendData.append('OSSAccessKeyId', policyData.accessid);
                        sendData.append('policy', policyData.policy);
                        sendData.append('Signature', policyData.signature);
                        sendData.append('keys', policyData.dir);
                        sendData.append('key', accessUrl);//上传的文件路径
                        sendData.append('success_action_status', 200); // 指定返回的状态码
                        sendData.append('type', 'image/jpeg');
                        sendData.append('file', file);
                        console.log(sendData);
                        axios.post(ossUrl, sendData).then((res) => {
                            this.pictureUrl = ossUrl + '/' + accessUrl;//获得到的url需要将其存数据库中
                            console.log('上传到阿里云的图片地址:' + ossUrl + '/' + accessUrl)
                        })
                    }
                })
            },

        }
    })
script>
完整的html代码
<html lang="en">
<head>
    <meta charset="UTF-8">
    <title>用户个人信息管理页面title>

    <link rel="stylesheet" href="https://unpkg.com/element-ui/lib/theme-chalk/index.css">
    <style>
        html, body {
            width: 100%;
            height: 100%;
            margin: 0;
        }

        .avatar-uploader .el-upload {
            border: 1px dashed #d9d9d9;
            border-radius: 6px;
            cursor: pointer;
            position: relative;
            overflow: hidden;
        }

        .avatar-uploader .el-upload:hover {
            border-color: #409EFF;
        }

        .avatar-uploader-icon {
            font-size: 28px;
            color: #8c939d;
            width: 178px;
            height: 178px;
            line-height: 178px;
            text-align: center;
        }

        .avatar {
            width: 178px;
            height: 178px;
            display: block;
        }
    style>
head>
<body>
<div id="app" style="height: 100%">
    <div>
        <el-upload
                class="avatar-uploader"
                :show-file-list="false"
                :http-request="Uploadfile">
            <img v-if="pictureUrl.trim()!=''" :src="pictureUrl" class="avatar">
            <i v-else class="el-icon-plus avatar-uploader-icon">i>
        el-upload>
    div>
div>


<script src="https://cdn.jsdelivr.net/npm/vue/dist/vue.js">script>

<script src="https://unpkg.com/element-ui/lib/index.js">script>

<script src="https://unpkg.com/axios/dist/axios.min.js">script>

<script type="text/javascript">
    const vm = new Vue({ // 配置对象 options
        // 配置选项(option)
        el: '#app',  // element: 指定用vue来管理页面中的哪个标签区域
        data() {
            return {
                pictureUrl: ''
            };
        },
        methods: {
            //自己编写的函数用于生成文件名,防止上传的文件重名
            getUUID() {
                return 'xxxxxxxx-xxxx-4xxx-yxxx-xxxxxxxxxxxx'.replace(/[xy]/g, c => {
                    return (c === 'x' ? (Math.random() * 16 | 0) : ('r&0x3' | '0x8')).toString(16)
                })
            },

            Uploadfile(param) {
                let file = param.file; // 得到文件的内容
                console.log(file);
                //填写获取签名的地址
                const getPolicyApiUrl = 'http://localhost:8088/asign'; //获取oss签名的地址
                // 获取oss签名
                axios({
                    method: 'get',
                    url: getPolicyApiUrl,
                    headers: {
                        'Content-Type': 'application/x-www-form-urlencoded',
                        'Access-Control-Allow-Origin': '*',
                    }
                }).then((response) => {
                    if (response.status == 200) {
                        let policyData = response.data;
                        console.log(policyData);
                        /**
                         ossUrl 换成自己的Bucket的外网地址,
                         例如 https://human-resource-manage.oss-cn-shenzhen.aliyuncs.com
                         */
                        let ossUrl = 'https://human-resource-manage.oss-cn-shenzhen.aliyuncs.com';//填写自己OSS服务器的地址
                        let accessUrl = policyData.dir + '/' + this.getUUID() + file.name;//设置上传的访问路径
                        let sendData = new FormData();// 上传文件的data参数
                        sendData.append('OSSAccessKeyId', policyData.accessid);
                        sendData.append('policy', policyData.policy);
                        sendData.append('Signature', policyData.signature);
                        sendData.append('keys', policyData.dir);
                        sendData.append('key', accessUrl);//上传的文件路径
                        sendData.append('success_action_status', 200); // 指定返回的状态码
                        sendData.append('type', 'image/jpeg');
                        sendData.append('file', file);
                        console.log(sendData);
                        axios.post(ossUrl, sendData).then((res) => {
                            this.pictureUrl = ossUrl + '/' + accessUrl;//获得到的url需要将其存数据库中
                            console.log('上传到阿里云的图片地址:' + ossUrl + '/' + accessUrl)
                        })
                    }
                })
            },

        }
    })
script>


body>
html>
如下图