Okhttp源码分析(一)
OkHttp的源码是很庞大的,这篇我想应该会写的很长或者出后续继续分析。OkHttp的源码做过很多次修改,到现在最新代码,OkHttp可以说是自己实现了一整套HTTP协议,所以针对okhttp的源码学习,一定要对HTTP协议有非常好的了解才行,OkHttp里也有很多可以学到的设计模式,好了,接下来就开始源码分析走起吧。
Okhttp异步源码解析
我下载了okhttp整体的源码,就是用okhttp源码中提供的example来举例子吧。
OkHttpClient client = new OkHttpClient();
        Request request = new Request.Builder()
                .url("https://raw.github.com/square/okhttp/master/README.md")
                .build();
        client.newCall(request).enqueue(new Callback() {
            @Override
            public void onFailure(Call call, IOException e) {

            }

            @Override
            public void onResponse(Call call, Response response) throws IOException {
                Log.d("xxx",response.body().string());
            }
        });
这是一个get异步请求的例子,同步我们都知道用execute,返回response,这里先从异步最常用的开始分析,源码分析一般从我们用到的方式开始,首先我们看我们是如何发起一个网络请求的,我们先从enqueue看起,发现点进去是一个Call接口,enqueue肯定走的是接口实现类的方法,那这个接口实现类就需要从client.newCall来看了
/**
   * Prepares the {@code request} to be executed at some point in the future.
   */
  @Override public Call newCall(Request request) {
    return RealCall.newRealCall(this, request, false /* for web socket */);
  }

    static RealCall newRealCall(OkHttpClient client, Request originalRequest, boolean forWebSocket) {
    // Safely publish the Call instance to the EventListener.
    RealCall call = new RealCall(client, originalRequest, forWebSocket);
    call.eventListener = client.eventListenerFactory().create(call);
    return call;
  }
client中的newCall方法,调用了RealCall的newRealCall静态方法,在newCall方法中,我们可以看到首先是创建了RealCall对象,然后通过client.eventListenerFactory().create(call)对call设置了监听,这个监听接口里面监听了很多包括请求发起,结束,失败,DNS开始结束等等,这块不在详细说,然后我们看在new RealCall的时候我们传入了一些参数,再看一下传入了OkhttpClient,Request,forWebSocket,这个参数我们可以看到最后一个forWebSocket一般都为false,回头看我们刚刚调用的是equeue方法他是一个接口我们需要找到他的实现类现在看也就是RealCall类,这次可以详细看看RealCall类,还是我们先看一下enqueue方法。
@Override public void enqueue(Callback responseCallback) {
    synchronized (this) {
      if (executed) throw new IllegalStateException("Already Executed");
      executed = true;
    }
    captureCallStackTrace();
    eventListener.callStart(this);
    client.dispatcher().enqueue(new AsyncCall(responseCallback));
  }
一看enqueue方法只有短短几行哈,好像很简单,但是里面做了很多事情,从第一行开始读,首先我们要改变一下当前的执行状态,executed标志位置为true表示现在这个清求要被执行,当然这需要是同步的,然后再看下一行,从函数名我们可以看他好像是用来捕获堆栈信息的不是我们关注的重点,先跳过,然后是我们之前设置的监听接口设置监听,然后就是比较重要的地方了,这里我们调用了OkhttpClient的dispatcher方法然后调用了他的enqueue传入了一个new AsyncCall,这块引入了一个新的我们之前不知道的就是OkhttpClient的dispatcher(),它返回了一个dispatcher对象,然后调用了他的enqueue,这个Dispatcher主要负责的是线程的调度,我们先看一下Dispatcher类中的几个成员变量
  private int maxRequests = 64;//最大请求数
  private int maxRequestsPerHost = 5;//对每个主机的最大请求数
  private @Nullable Runnable idleCallback;

  /** Executes calls. Created lazily. */
  private @Nullable ExecutorService executorService;

  /** Ready async calls in the order they'll be run. */
  private final Deque readyAsyncCalls = new ArrayDeque<>();

  /** Running asynchronous calls. Includes canceled calls that haven't finished yet. */
  private final Deque runningAsyncCalls = new ArrayDeque<>();

  /** Running synchronous calls. Includes canceled calls that haven't finished yet. */
  private final Deque runningSyncCalls = new ArrayDeque<>();
可以看到这里面有一个ExecutorService,他就是我们实现异步调度最关键的一个类,具体可以找一篇文章详细了解这里不会再多介绍了,然后看这里有三个队列第一个readyAsyncCalls准备执行队列,当正在执行达到限制,就会把任务存入这个队列,runningAsyncCall表示正在执行队列,这块有一个同步正在执行和异步正在执行,同样我们还是先看异步的,回到enqueue最后一行代码,调用了dispatcher的enqueue
void enqueue(AsyncCall call) {
    synchronized (this) {
      readyAsyncCalls.add(call);
    }
    promoteAndExecute();
  }
这里也是先进入一个同步代码块,然后将任务添加到准备执行的队列,在执行promoteAndExecute方法,可以看到任务先是被放到了准备执行的队列中,然后再看promoteAndExecute方法
private boolean promoteAndExecute() {
    assert (!Thread.holdsLock(this));

    List executableCalls = new ArrayList<>();
    boolean isRunning;
    synchronized (this) {
      for (Iterator i = readyAsyncCalls.iterator(); i.hasNext(); ) {
        AsyncCall asyncCall = i.next();

        if (runningAsyncCalls.size() >= maxRequests) break; // Max capacity.
        if (runningCallsForHost(asyncCall) >= maxRequestsPerHost) continue; // Host max capacity.

        i.remove();
        executableCalls.add(asyncCall);
        runningAsyncCalls.add(asyncCall);
      }
      isRunning = runningCallsCount() > 0;
    }

    for (int i = 0, size = executableCalls.size(); i < size; i++) {
      AsyncCall asyncCall = executableCalls.get(i);
      asyncCall.executeOn(executorService());
    }

    return isRunning;
  }
同步代码块中遍历准备执行的任务队列,可以看到这块有两个条件判断,第一个是判断是否当前最大运行数大于等于最大请求数,如果是那就退出循环,第二个条件是当前这个请求是不是对一个主机请求数大于等于限制的每个主机请求数,如果大于等于就继续循环遍历,如果都不满足那就把当前任务从准备队列中移出,然后加入运行队列runningAsyncCalls.add(asyncCall)以及我们新建的执行队列executableCalls.add(asyncCall),然后就开始对可以执行的任务进行遍历,asyncCall.executeOn(executorService())这段代码是对任务进行执行,传入的是一个ExecuteService对象,然后我们看一下内部的具体实现
final class AsyncCall extends NamedRunnable {
    private final Callback responseCallback;

    AsyncCall(Callback responseCallback) {
      super("OkHttp %s", redactedUrl());
      this.responseCallback = responseCallback;
    }

    String host() {
      return originalRequest.url().host();
    }

    Request request() {
      return originalRequest;
    }

    RealCall get() {
      return RealCall.this;
    }

    /**
     * Attempt to enqueue this async call on {@code executorService}. This will attempt to clean up
     * if the executor has been shut down by reporting the call as failed.
     */
    void executeOn(ExecutorService executorService) {
      assert (!Thread.holdsLock(client.dispatcher()));
      boolean success = false;
      try {
        executorService.execute(this);
        success = true;
      } catch (RejectedExecutionException e) {
        InterruptedIOException ioException = new InterruptedIOException("executor rejected");
        ioException.initCause(e);
        eventListener.callFailed(RealCall.this, ioException);
        responseCallback.onFailure(RealCall.this, ioException);
      } finally {
        if (!success) {
          client.dispatcher().finished(this); // This call is no longer running!
        }
      }
    }

    @Override protected void execute() {
      boolean signalledCallback = false;
      timeout.enter();
      try {
        Response response = getResponseWithInterceptorChain();
        if (retryAndFollowUpInterceptor.isCanceled()) {
          signalledCallback = true;
          responseCallback.onFailure(RealCall.this, new IOException("Canceled"));
        } else {
          signalledCallback = true;
          responseCallback.onResponse(RealCall.this, response);
        }
      } catch (IOException e) {
        e = timeoutExit(e);
        if (signalledCallback) {
          // Do not signal the callback twice!
          Platform.get().log(INFO, "Callback failure for " + toLoggableString(), e);
        } else {
          eventListener.callFailed(RealCall.this, e);
          responseCallback.onFailure(RealCall.this, e);
        }
      } finally {
        client.dispatcher().finished(this);
      }
    }
  }
executeOn方法主要其实就两行代码, executorService.execute(this)注意这里我们传入的是this,我们知道ExecuteService应该接受runnable方法,这里传入的是this也就是说当前类AsynCall实现了runnable接口
public abstract class NamedRunnable implements Runnable {
  protected final String name;

  public NamedRunnable(String format, Object... args) {
    this.name = Util.format(format, args);
  }

  @Override public final void run() {
    String oldName = Thread.currentThread().getName();
    Thread.currentThread().setName(name);
    try {
      execute();
    } finally {
      Thread.currentThread().setName(oldName);
    }
  }

  protected abstract void execute();
}
的确,那我们就需要找到他的run方法,可以看到里面调用了execute方法并且他还是个抽象方法,好了这次我们可以去找AsynCall的execute方法了,这里很明显就是一个执行请求网络拿到response结果的全过程了,这里的关键代码我们注意看
getResponseWithInterceptorChain();

Response getResponseWithInterceptorChain() throws IOException {
    // Build a full stack of interceptors.
    List interceptors = new ArrayList<>();
    interceptors.addAll(client.interceptors());
    interceptors.add(retryAndFollowUpInterceptor);
    interceptors.add(new BridgeInterceptor(client.cookieJar()));
    interceptors.add(new CacheInterceptor(client.internalCache()));
    interceptors.add(new ConnectInterceptor(client));
    if (!forWebSocket) {
      interceptors.addAll(client.networkInterceptors());
    }
    interceptors.add(new CallServerInterceptor(forWebSocket));

    Interceptor.Chain chain = new RealInterceptorChain(interceptors, null, null, null, 0,
        originalRequest, this, eventListener, client.connectTimeoutMillis(),
        client.readTimeoutMillis(), client.writeTimeoutMillis());

    return chain.proceed(originalRequest);
  }
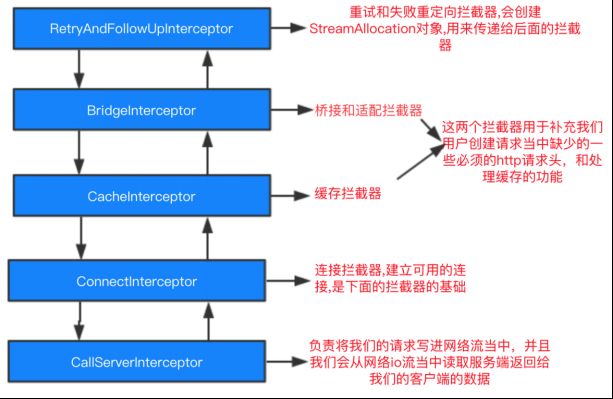
这里就是我们在使用过程中用到过的拦截器,责任链模式,我们先粗略来看一下okhttp的拦截器,显示建立一个拦截器列表list,首先将我们自定义的拦截器加入,然后加入重试失败重定向拦截器,桥接拦截器,缓存拦截器,连接拦截器,这里引用一张图来说明
注意这张图的箭头指向,是一个来一个回,一会将通过源码了解,我们把拦截器集合inteceptors传入一个RealInterceptorChain,先来看一下都传入了哪些参数
public RealInterceptorChain(List interceptors, StreamAllocation streamAllocation,
      HttpCodec httpCodec, RealConnection connection, int index, Request request, Call call,
      EventListener eventListener, int connectTimeout, int readTimeout, int writeTimeout) {
    this.interceptors = interceptors; //拦截器列表
    this.connection = connection;
    this.streamAllocation = streamAllocation;
    this.httpCodec = httpCodec;
    this.index = index;              //拦截器列表下标
    this.request = request;
    this.call = call;
    this.eventListener = eventListener;
    this.connectTimeout = connectTimeout;
    this.readTimeout = readTimeout;
    this.writeTimeout = writeTimeout;
  }
主要注意我注释的参数,其他都只是一些参数的赋值操作,然后调用了chain.proceed()
public Response proceed(Request request, StreamAllocation streamAllocation, HttpCodec httpCodec,
      RealConnection connection) throws IOException {
    if (index >= interceptors.size()) throw new AssertionError();

    calls++;

    // If we already have a stream, confirm that the incoming request will use it.
    if (this.httpCodec != null && !this.connection.supportsUrl(request.url())) {
      throw new IllegalStateException("network interceptor " + interceptors.get(index - 1)
          + " must retain the same host and port");
    }

    // If we already have a stream, confirm that this is the only call to chain.proceed().
    if (this.httpCodec != null && calls > 1) {
      throw new IllegalStateException("network interceptor " + interceptors.get(index - 1)
          + " must call proceed() exactly once");
    }

    // Call the next interceptor in the chain.
    RealInterceptorChain next = new RealInterceptorChain(interceptors, streamAllocation, httpCodec,
        connection, index + 1, request, call, eventListener, connectTimeout, readTimeout,
        writeTimeout);
    Interceptor interceptor = interceptors.get(index);
    Response response = interceptor.intercept(next);

    // Confirm that the next interceptor made its required call to chain.proceed().
    if (httpCodec != null && index + 1 < interceptors.size() && next.calls != 1) {
      throw new IllegalStateException("network interceptor " + interceptor
          + " must call proceed() exactly once");
    }

    // Confirm that the intercepted response isn't null.
    if (response == null) {
      throw new NullPointerException("interceptor " + interceptor + " returned null");
    }

    if (response.body() == null) {
      throw new IllegalStateException(
          "interceptor " + interceptor + " returned a response with no body");
    }

    return response;
  }
这个方法贯穿了这个拦截器的调用流程,其实整个函数最重要的的代码一共就三行,首先我们new出RealInterceptorChain对象这个对象我们在之前也new过这次不同在于传入的index参数+1了,然后我们获取了第一个拦截器并去调用他的intercept方法,然后传入我们的next,然后在去调用里面的proceed方法从而实现,链式调用一个一个拦截器,从而最后获取到response。
