读书笔记(二)---看看LayoutInflater的源码
饱汉模式
在读完单例模式的介绍之后,发现android的很多系统级的服务都是以单例模式存在的,我们很多时候都是以这种方式进行调用的:
LayoutInflater inflater = (LayoutInflater) getSystemService(LAYOUT_INFLATER_SERVICE);这里的getSystemService我们可以看源码:
 @Override
    public Object getSystemService(String name) {
        ServiceFetcher fetcher = SYSTEM_SERVICE_MAP.get(name);
        return fetcher == null ? null : fetcher.getService(this);
    }
源码来自andorid.app.ContextImpl中,因为Context是一个抽象类,而ContextImpl就是它的实现类,而SYSTEM_SERVICE_MAP是一个静态的Map对象:
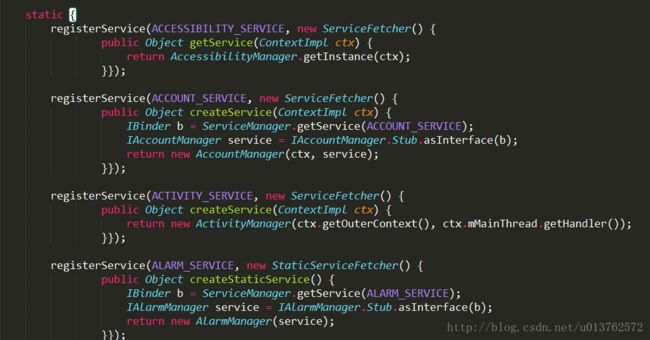
当ContextImpl类字节码加载时,android系统就开始注册各种服务了:

如果需要使用各种服务时,我只需要从静态的MAP中获取就行了:

显然这是单例模式中非常经典的饱汉模式了。
LayoutInflater
再次看ContextImpl中关于LayoutInflater注册代码:

有个PolicyManager类,估计是个java类,使用everything 搜索一下源码,可以发现:
/**
 * {@hide}
 */

public final class PolicyManager {
    private static final String POLICY_IMPL_CLASS_NAME =
        "com.android.internal.policy.impl.Policy";

    private static final IPolicy sPolicy;

    static {
        // Pull in the actual implementation of the policy at run-time
        try {
            Class policyClass = Class.forName(POLICY_IMPL_CLASS_NAME);
            sPolicy = (IPolicy)policyClass.newInstance();
        } catch (ClassNotFoundException ex) {
            throw new RuntimeException(
                    POLICY_IMPL_CLASS_NAME + " could not be loaded", ex);
        } catch (InstantiationException ex) {
            throw new RuntimeException(
                    POLICY_IMPL_CLASS_NAME + " could not be instantiated", ex);
        } catch (IllegalAccessException ex) {
            throw new RuntimeException(
                    POLICY_IMPL_CLASS_NAME + " could not be instantiated", ex);
        }
    }

    // Cannot instantiate this class
    private PolicyManager() {}

    // The static methods to spawn new policy-specific objects
    public static Window makeNewWindow(Context context) {
        return sPolicy.makeNewWindow(context);
    }

    public static LayoutInflater makeNewLayoutInflater(Context context) {
        return sPolicy.makeNewLayoutInflater(context);
    }

    public static WindowManagerPolicy makeNewWindowManager() {
        return sPolicy.makeNewWindowManager();
    }

    public static FallbackEventHandler makeNewFallbackEventHandler(Context context) {
        return sPolicy.makeNewFallbackEventHandler(context);
    }
}
很显然PolicyManager是一个代理类,真正实现其作用的是 通过反射的com.android.internal.policy.impl.Policy的Policy,找到该类:

看到这里,我们才发现以前一直用的LayoutInflater,原来是其子类PhoneLayoutInflater,好吧,我们去看看这个PhoneLayoutInflater是怎么写的:
public class PhoneLayoutInflater extends LayoutInflater {
    private static final String[] sClassPrefixList = {
        "android.widget.",
        "android.webkit."
    };

    /**
     * Instead of instantiating directly, you should retrieve an instance
     * through {@link Context#getSystemService}
     *
     * @param context The Context in which in which to find resources and other
     *                application-specific things.
     *
     * @see Context#getSystemService
     */
    public PhoneLayoutInflater(Context context) {
        super(context);
    }

    protected PhoneLayoutInflater(LayoutInflater original, Context newContext) {
        super(original, newContext);
    }

    /** Override onCreateView to instantiate names that correspond to the
        widgets known to the Widget factory. If we don't find a match,
        call through to our super class.
    */
    @Override protected View onCreateView(String name, AttributeSet attrs) throws ClassNotFoundException {
        for (String prefix : sClassPrefixList) {
            try {
                View view = createView(name, prefix, attrs);
                if (view != null) {
                    return view;
                }
            } catch (ClassNotFoundException e) {
                // In this case we want to let the base class take a crack
                // at it.
            }
        }

        return super.onCreateView(name, attrs);
    }

    public LayoutInflater cloneInContext(Context newContext) {
        return new PhoneLayoutInflater(this, newContext);
    }
}
它只是重写了onCreateView方法,感觉也没干什么嘛,先等一下,再去看看我们很熟悉的LayoutInflater方法:

所有的方法最终都转化为了
public View inflate(XmlPullParser parser, @Nullable ViewGroup root, boolean attachToRoot) {这个方法中源码比较多,稍微理清一下思路再看:
//....代码省略
View result = root;
int type;
while ((type = parser.next()) != XmlPullParser.START_TAG &&
type != XmlPullParser.END_DOCUMENT) {
// Empty
}
final String name = parser.getName();
//解析merge标签下View视图
if (TAG_MERGE.equals(name)) {
if (root == null || !attachToRoot) {
throw new InflateException("总结一下解析的过程:
A.解析XML的根标签,也就是第一个标签;
B.如果是merge标签,那么会调用rInflate方法,rInflate就将merge标签下的所有子View直接添加到根标签中;
C.如果是一般标签,直接调用createViewFromTag方法进行解析;
D.递归所有子视图,并将其添加到其parentView中;
E.返回解析到的根视图.
先不看merge,先看我们一般情况下的createViewFromTag方法,看看它是怎么解析的:
        View view;
            //代码省略.....

            if (view == null) {
                final Object lastContext = mConstructorArgs[0];
                mConstructorArgs[0] = context;
                try {
                    if (-1 == name.indexOf('.')) {
                        view = onCreateView(parent, name, attrs);
                    } else {
                        view = createView(name, null, attrs);
                    }
                } finally {
                    mConstructorArgs[0] = lastContext;
                }
            }

            return view;

    }
其它无关或者说不重要的代码都去掉了,主要是看一下比较重要的代码,看到主要判断是name.indexOf(“.”)方法,当然我们一般在XML布局文件中写View视图时,如果是TextView,Button,WebView等等android系统内置的标签,都是可以不写前缀的,就像一下:
    <TextView
        android:layout_width="wrap_content"
        android:layout_height="wrap_content"
        android:text="Hello World!"/>
而对于自定义的View,都需要加上自定义View的全路径,也就是前缀,如下:
    <com.micro.view.MyTextView
        android:layout_width="wrap_content"
        android:layout_height="wrap_content"
        android:text="Hello World!"/>
从这里我们就可以知道其中的原因了。
而onCreateView方法,作为LayoutInflater的具体实现,我们的PhoneLayoutInflater已经重写了该方法,还是上面的代码,我们再拿过来用一下,PhoneLayoutInflater中的onCreateView方法:
    private static final String[] sClassPrefixList = {
        "android.widget.",
        "android.webkit."
    };

    @Override
    protected View onCreateView(String name, AttributeSet attrs) throws ClassNotFoundException {
    for (String prefix : sClassPrefixList) {
            try {
                View view = createView(name, prefix, attrs);
                if (view != null) {
                    return view;
                }
            } catch (ClassNotFoundException e) {
                // In this case we want to let the base class take a crack
                // at it.
            }
        }

        return super.onCreateView(name, attrs);
    }
好吧,我们发现这个onCreateView方法最终还是调用了createView,这是给我们自动加上了android.widget. 或者android.webkit前缀,这个我们可以确定的是,Google为了让开发者节省时间和精力,减少书写鸡肋代码,将这些前缀都给我们去掉了,那我们去看看这个createView方法吧:
public final View createView(String name, String prefix, AttributeSet attrs)
            throws ClassNotFoundException, InflateException {

        //这个是缓存构造器的容器
        Constructor extends View> constructor = sConstructorMap.get(name);

        if (constructor != null && !verifyClassLoader(constructor)) {
            constructor = null;
            sConstructorMap.remove(name);
        }
        Classextends View> clazz = null;

        //容器不存在时,首先使用反射将constructor搞出来,然后缓存起来
        if (constructor == null) {
                clazz = mContext.getClassLoader().loadClass(
                        prefix != null ? (prefix + name) : name).asSubclass(View.class);

                constructor = clazz.getConstructor(mConstructorSignature);
                constructor.setAccessible(true);
                sConstructorMap.put(name, constructor);
        } else {
            //其他的一些啥判断....
        }

        Object[] args = mConstructorArgs;
        args[1] = attrs;

        //此时调用constructor的newInstance创建对象,所以啊我们的构造函数很重要的啊
        final View view = constructor.newInstance(args);
            if (view instanceof ViewStub) {
                // Use the same context when inflating ViewStub later.
                final ViewStub viewStub = (ViewStub) view;
                viewStub.setLayoutInflater(cloneInContext((Context) args[0]));
            }
            return view;
抛开其它判断的逻辑,可以看到createView还是很清晰简单的,先获取构造器缓存,没有则使用classLoader加载一个,然后使用newInstance方法获取我们需要的View对象。过程还是蛮简单的。
好了,那么现在就来看看解析子View中的方法吧,rInflateChildren方法最终调用的是:
    final void rInflateChildren(XmlPullParser parser, View parent, AttributeSet attrs,
            boolean finishInflate) throws XmlPullParserException, IOException {
        rInflate(parser, parent, parent.getContext(), attrs, finishInflate);
    }
现在来看看这个rInflate方法:
 void rInflate(XmlPullParser parser, View parent, Context context,
            AttributeSet attrs, boolean finishInflate) throws XmlPullParserException, IOException {

        //获取视图树的深度,深度优先遍历
        final int depth = parser.getDepth();
        int type;

        while (((type = parser.next()) != XmlPullParser.END_TAG ||
                parser.getDepth() > depth) && type != XmlPullParser.END_DOCUMENT) {

            if (type != XmlPullParser.START_TAG) {
                continue;
            }

            final String name = parser.getName();

            //....其余代码.....
            //解析子元素对象View
            final View view = createViewFromTag(parent, name, context, attrs);
            final ViewGroup viewGroup = (ViewGroup) parent;
            //再次递归获取子元素
            final ViewGroup.LayoutParams params = viewGroup.generateLayoutParams(attrs);
            rInflateChildren(parser, view, attrs, true);
            //添加子元素到ViewGroup中
            viewGroup.addView(view, params);

        }

        if (finishInflate) {
            parent.onFinishInflate();
        }
    }
rInflate通过深度优先遍历来构造视图树,每解析到一个View元素就会递归调用rInflate,直到这条路径下的最后一个元素,然后再回溯过来将每一个View元素添加到它们的parent中,通过rInfalte的解析之后,整棵视图树就构建完毕了,当onResume方法之后,视图就在在我们眼中了。
当然个人感受有一下几种:
1.感觉PhoneLayoutInflater是android的一个补丁,为什么这么说呢?我们可以看一下LayoutInflater的onCreateView方法:

我个人的感觉就是当初andorid设计,所有的View类是在到android.view.* 包下,后来在编码的时候,View类不在这个view包下了,然后就打了补丁,重写了onCreateView方法,使之可以重新访问android.widget.,或者android.webkit.下的View类了,不能不说,这个‘补丁’打得很有水平啊,绕了好几道弯啊。。。
2.XML解析基本上都忘记了,这个rInflate就是因为XML解析绕了很久。
好了,断断续续写完了,明天继续上班了啊。。。
