Android高级-View是如何被添加到屏幕窗口上
View被添加到屏幕上分为以下几个步骤:
1 创建 顶层布局容器DecorView
新建一个extends的Activty 类,从onCreate方法的setContentView方法进入源码开始分析
setContentView(R.layout.activity_s_econd);
/**
 * Set the activity content from a layout resource.  The resource will be
 * inflated, adding all top-level views to the activity.
 *
 * @param layoutResID Resource ID to be inflated.
 *
 * @see #setContentView(android.view.View)
 * @see #setContentView(android.view.View, android.view.ViewGroup.LayoutParams)
 */
public void setContentView(@LayoutRes int layoutResID) {
    getWindow().setContentView(layoutResID);
    initWindowDecorActionBar();
}
其中getWindow()返回的是Window对象,/** * Retrieve the current {@link android.view.Window} for the activity. * This can be used to directly access parts of the Window API that * are not available through Activity/Screen. * * @return Window The current window, or null if the activity is not * visual. */ public Window getWindow() { return mWindow; }
因 Winow是抽象类,所以我们需要找到它的实现类,红字部分提示,PhoneWindow是Window的唯一实现类,所以我们继续进入PhoneWindow的源码查看setContentView()方法
/** * Abstract base class for a top-level window look and behavior policy. An * instance of this class should be used as the top-level view added to the * window manager. It provides standard UI policies such as a background, title * area, default key processing, etc. * *The only existing implementation of this abstract class is * android.view.PhoneWindow, which you should instantiate when needing a * Window. */ public abstract class Window {
PhoneWindow的setContentView()
@Override
public void setContentView(int layoutResID) {
    // Note: FEATURE_CONTENT_TRANSITIONS may be set in the process of installing the window
    // decor, when theme attributes and the like are crystalized. Do not check the feature
    // before this happens.
    if (mContentParent == null) {
        installDecor();  重点
    } else if (!hasFeature(FEATURE_CONTENT_TRANSITIONS)) {
        mContentParent.removeAllViews();
    }
    if (hasFeature(FEATURE_CONTENT_TRANSITIONS)) {
        final Scene newScene = Scene.getSceneForLayout(mContentParent, layoutResID,
                getContext());
        transitionTo(newScene);
    } else {
        mLayoutInflater.inflate(layoutResID, mContentParent);
    }
   //省略...
}
接上文的installDecor()方法
private void installDecor() {
    mForceDecorInstall = false;
    if (mDecor == null) {
        mDecor = generateDecor(-1);
        mDecor.setDescendantFocusability(ViewGroup.FOCUS_AFTER_DESCENDANTS);
        mDecor.setIsRootNamespace(true);
        if (!mInvalidatePanelMenuPosted && mInvalidatePanelMenuFeatures != 0) {
            mDecor.postOnAnimation(mInvalidatePanelMenuRunnable);
        }
    } else {
        mDecor.setWindow(this);
    }
    if (mContentParent == null) {
        mContentParent = generateLayout(mDecor);
        // Set up decor part of UI to ignore fitsSystemWindows if appropriate.
        mDecor.makeOptionalFitsSystemWindows();

        final DecorContentParent decorContentParent = (DecorContentParent) mDecor.findViewById(
                R.id.decor_content_parent);
    //省略....
    }
}
从上面可以看到当mDecor (private DecorView mDecor) 为空时候,调用generateDecor方法创建了一个新的,
protected DecorView generateDecor(int featureId) {
    // System process doesn't have application context and in that case we need to directly use
    // the context we have. Otherwise we want the application context, so we don't cling to the
    // activity.
    Context context;
    if (mUseDecorContext) {
        Context applicationContext = getContext().getApplicationContext();
        if (applicationContext == null) {
            context = getContext();
        } else {
            context = new DecorContext(applicationContext, getContext().getResources());
            if (mTheme != -1) {
                context.setTheme(mTheme);
            }
        }
    } else {
        context = getContext();
    }
    return new DecorView(context, featureId, this, getAttributes());
}
中间一大段都是在初始化不同的上下文对象,而方法最终返回的是 new DecorView();
2 在顶层布局中加载基础布局ViewGroup
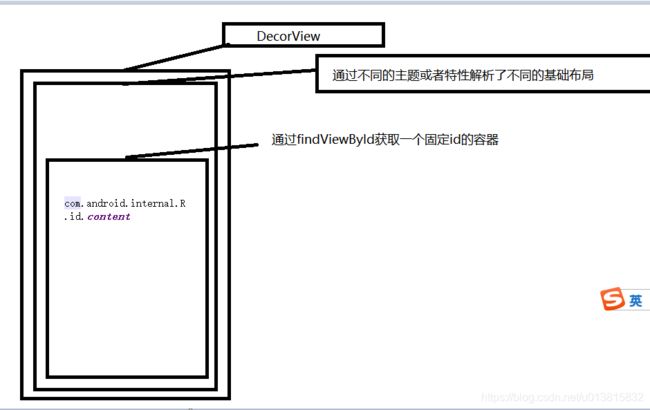
拿到DecorView 以后,,,继续看的installDecor()方法中的 mContentParent = generateLayout(mDecor); 方法 其中这个
很长的一段
protected ViewGroup generateLayout(DecorView decor) {
    // Apply data from current theme.
    TypedArray a = getWindowStyle();
   //省略....

    if (a.getBoolean(R.styleable.Window_windowNoTitle, false)) {
        requestFeature(FEATURE_NO_TITLE);
    } else if (a.getBoolean(R.styleable.Window_windowActionBar, false)) {
        // Don't allow an action bar if there is no title.
        requestFeature(FEATURE_ACTION_BAR);
    }
     //省略很多类似于上文的requestFeature

    // Inflate the window decor.  加载dector的基础布局
    int layoutResource;
    int features = getLocalFeatures();
    // System.out.println("Features: 0x" + Integer.toHexString(features));
    if ((features & (1 << FEATURE_SWIPE_TO_DISMISS)) != 0) {
        layoutResource = R.layout.screen_swipe_dismiss;//这是一个优化退出的布局
        setCloseOnSwipeEnabled(true);
    }//省略很多.....
        layoutResource =
    else {
        // Embedded, so no decoration is needed.
        layoutResource = R.layout.screen_simple;
        // System.out.println("Simple!");
    }
    mDecor.startChanging();
    mDecor.onResourcesLoaded(mLayoutInflater, layoutResource);

    ViewGroup contentParent = (ViewGroup)findViewById(ID_ANDROID_CONTENT);
    if (contentParent == null) {
        throw new RuntimeException("Window couldn't find content container view");
    }
     // Remaining setup -- of background and title -- that only applies
    // to top-level windows.
    if (getContainer() == null) {
        final Drawable background;
        if (mBackgroundResource != 0) {
            background = getContext().getDrawable(mBackgroundResource);
        } else {
            background = mBackgroundDrawable;
        }
        mDecor.setWindowBackground(background);

        final Drawable frame;
        if (mFrameResource != 0) {
            frame = getContext().getDrawable(mFrameResource);
        } else {
            frame = null;
        }
        mDecor.setWindowFrame(frame);

        mDecor.setElevation(mElevation);
        mDecor.setClipToOutline(mClipToOutline);

        if (mTitle != null) {
            setTitle(mTitle);
        }
        if (mTitleColor == 0) {
            mTitleColor = mTextColor;
        }
        setTitleColor(mTitleColor);
    }

    mDecor.finishChanging();

    return contentParent;
}
通过解析基础布局,将View添加到DecorView上,这个onResourcesLoaded()方法是DecorView的
void onResourcesLoaded(LayoutInflater inflater, int layoutResource) {
    mStackId = getStackId();

//省略....
    mDecorCaptionView = createDecorCaptionView(inflater);
    final View root = inflater.inflate(layoutResource, null);
    if (mDecorCaptionView != null) {
        if (mDecorCaptionView.getParent() == null) {
            addView(mDecorCaptionView,
                    new ViewGroup.LayoutParams(MATCH_PARENT, MATCH_PARENT));
        }
        mDecorCaptionView.addView(root,
                new ViewGroup.MarginLayoutParams(MATCH_PARENT, MATCH_PARENT));
    } else {

        // Put it below the color views.
        addView(root, 0, new ViewGroup.LayoutParams(MATCH_PARENT, MATCH_PARENT));
    }
    mContentRoot = (ViewGroup) root;
    initializeElevation();
}
解析完基础布局以后,我们接着看generateLayout()方法的
ViewGroup contentParent = (ViewGroup)findViewById(ID_ANDROID_CONTENT);
通过findViewById获取一个容器,这个容器的id是固定的值,通过注释可以看到,这个是主容器的id,而且是必须要存在的
/**
 * The ID that the main layout in the XML layout file should have.
 */
public static final int ID_ANDROID_CONTENT = com.android.internal.R.id.content;
然后将这个容器返回。
到此为止,我们的创建DecorView的操作就完成了。
总结关系图
1,Window是抽象类,提供了绘制窗口的一些列API
2,PhoneWindow是Window的具体继承实现类,而且该类包含了一个DecorView对象,这个对象是所有应用窗口(Activity界面)的根View
3,DecorView是PhoneWindow的内部类,是FrameLayout的子类,是对Framelayout功能的修饰。
补充:
DecorView:顶层视图,将要显示的具体内容呈现在PhoneWindow上. DecorView
是当前Activity所有View的祖先,它并不会向用户呈现任何东西,它主要有如下几个功能,可能不全
· A. Dispatch ViewRoot分发来的key、touch、trackball等外部事件;
· B. DecorView有一个直接的子View,我们称之为System Layout,这个View是从系统的Layout.xml中解析出的,它包含当前UI的风格,如是否带title、是否带process bar等。可以称这些属性为Window decorations。
· C. 作为PhoneWindow与ViewRoot之间的桥梁,ViewRoot通过DecorView设置窗口属性。//可以这样获取 View view = getWindow().getDecorView();· DecorView只有一个子元素为LinearLayout。代表整个Window界面,包含通知栏,标题栏,内容显示栏三块区域。DecorView里面TitleView:标题,可以设置requestWindowFeature(Window.FEATURE_NO_TITLE)取消掉ContentView:是一个id为content的FrameLayout。我们平常在Activity使用的setContentView就是设置在这里,也就是在FrameLayout上
3: 将ContentView添加到基础布局中去
分析完上面的,我们接着回到PhoneWindow的setContentView方法中
@Override
public void setContentView(int layoutResID) {
   if (mContentParent == null) {
        installDecor();
    } else if (!hasFeature(FEATURE_CONTENT_TRANSITIONS)) {
        mContentParent.removeAllViews();
    }
    if (hasFeature(FEATURE_CONTENT_TRANSITIONS)) {
        final Scene newScene = Scene.getSceneForLayout(mContentParent, layoutResID,
                getContext());
        transitionTo(newScene);
    } else {
        mLayoutInflater.inflate(layoutResID, mContentParent);
    }
 //省略...
}
分析完installDecor方法,创建了DecorView,根据不同的主题或者特性解析了不同的基础布局,并将基础布局加载到DecorView上,创建完成后,我们将主activity上
setContentView(R.layout.activity_s_econd);
set过来的R.layout.activity_s_econd 这个布局文件,添加到mContentParent中去,而mContentParent就是解析过的基础布局,
到此,只是完成了创建DecorView,以及将需要展示的view添加到基础布局上,真正的view并没有展示---接着看下面的文章


