Glide-图片的剪裁(ScaleType)
前言:
这一节里面我们将讲到关于Glide的图片的剪裁
Glide 系列目录
- 1.Glide-入门教程
- 2.Glide-占位图以及加载动画
- 3.Glide-加载本地图片
- 4.Glide-加载Gif
- 5.Glide-绑定生命周期
- 6.Glide-内存缓存与磁盘缓存
- 7.Glide-通过Modules定制Glide
- 8.Glide-自定义缓存
- 9.Glide-图片的压缩
- 10.Glide-图片预处理(圆角,高斯模糊等)
- 11.Glide-图片的剪裁(ScaleType)
- 12.Glide-源码详解
1.基础知识
这里会涉及到Glide的变换处理transform,在之前的文章中已经讲过了,这里就不做介绍了,没有看过的朋友最好去了解一下,不然接下来的分析可能会理解不了
Glide-图片预处理(transform)
http://blog.csdn.net/yulyu/article/details/55261351
2.ImageView默认的ScaleType
讲到图片的剪裁,我们首先要介绍一下ImageView默认的ScaleType设置效果
ImageView的ScaleType一共有8种属性:
- matrix
- center
- centerInside
- centerCrop
- fitCenter(默认)
- fitStart
- fitEnd
- fitXY
有些文章说默认是matrix,是不正确的,其实默认是FIT_CENTER
可以通过ImageView的源码看到默认设置
private void initImageView() {
    mMatrix = new Matrix();
    mScaleType = ScaleType.FIT_CENTER;

    if (!sCompatDone) {
        final int targetSdkVersion = mContext.getApplicationInfo().targetSdkVersion;
        sCompatAdjustViewBounds = targetSdkVersion <= Build.VERSION_CODES.JELLY_BEAN_MR1;
        sCompatUseCorrectStreamDensity = targetSdkVersion > Build.VERSION_CODES.M;
        sCompatDrawableVisibilityDispatch = targetSdkVersion < Build.VERSION_CODES.N;
        sCompatDone = true;
    }
}
2.1属性介绍
(1)matrix
不缩放 ,图片与控件 左上角 对齐,当图片大小超过控件时将被 裁剪
(2)center
不缩放 ,图片与控件 中心点 对齐,当图片大小超过控件时将被 裁剪
(3)centerInside
以完整显示图片为目标, 不剪裁 ,当显示不下的时候将缩放,能够显示的情况下不缩放**
(4)centerCrop
以填满整个控件为目标,等比缩放,超过控件时将被 裁剪 ( 宽高都要填满 ,所以只要图片宽高比与控件宽高比不同时,一定会被剪裁)
(5)fitCenter(默认)
自适应控件, 不剪裁 ,在不超过控件的前提下,等比 缩放 到 最大 ,居中显示
(6)fitStart
自适应控件, 不剪裁 ,在不超过控件的前提下,等比 缩放 到 最大 ,靠左(上)显示
(7)fitEnd
自适应控件, 不剪裁 ,在不超过控件的前提下,等比 缩放 到 最大 ,靠右(下)显示
(8)fitXY
以填满整个控件为目标, 不按比例 拉伸或缩放(可能会变形), 不剪裁
2.2效果图
当你不使用Glide,直接在ImageView的xml的src中设置图片效果如下
图片 336 * 448
控件 300 * 300
3.Glide配置
Glide有两个方法可以设置图片剪裁的策略
①fitCenter()
②centerCrop()
这两个方法其实都是通过调用transform方法来对图片进行处理
3.1默认策略
当你没有调用上述两个方法,并且也没有调用transform方法的时候,在Glide调用into方法时,会根据你设置的ScaleType来做处理
    if (!isTransformationSet && view.getScaleType() != null) {
        switch (view.getScaleType()) {
            case CENTER_CROP:
                applyCenterCrop();
                break;
            case FIT_CENTER:
            case FIT_START:
            case FIT_END:
                applyFitCenter();
                break;
            //$CASES-OMITTED$
            default:
                // Do nothing.
        }
    }
applyCenterCrop其实还是调用的centerCrop
applyFitCenter其实还是调用的applyFitCenter
通过默认的配置加载图片
Glide.with(this).load(url).into(iv1);
效果如下(跟ImageView设置src一样)
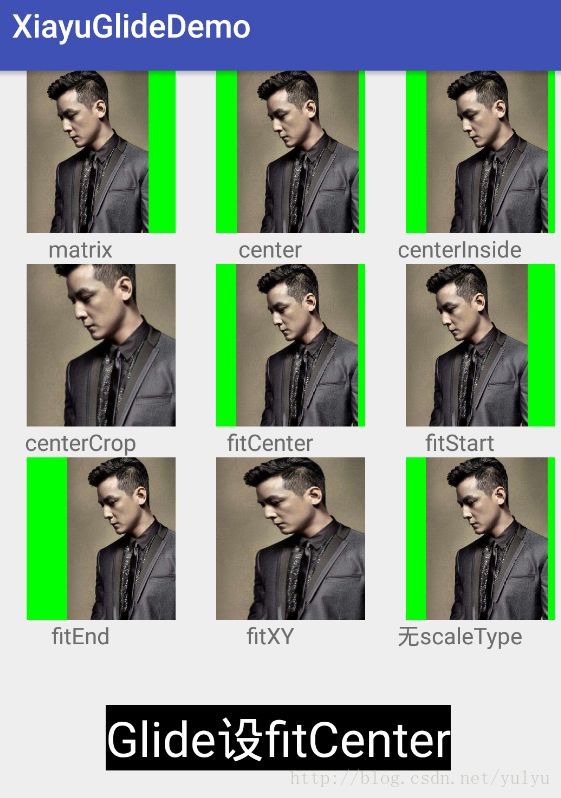
3.2 fitCenter
内部是调用transform方法来处理的,处理代码这边只是展示一下,就不做详细的介绍了,有兴趣的朋友可以研究
public static Bitmap fitCenter(Bitmap toFit, BitmapPool pool, int width, int height) {
        if (toFit.getWidth() == width && toFit.getHeight() == height) {
            if (Log.isLoggable(TAG, Log.VERBOSE)) {
                Log.v(TAG, "requested target size matches input, returning input");
            }
            return toFit;
        }
        final float widthPercentage = width / (float) toFit.getWidth();
        final float heightPercentage = height / (float) toFit.getHeight();
        final float minPercentage = Math.min(widthPercentage, heightPercentage);

        // take the floor of the target width/height, not round. If the matrix
        // passed into drawBitmap rounds differently, we want to slightly
        // overdraw, not underdraw, to avoid artifacts from bitmap reuse.
        final int targetWidth = (int) (minPercentage * toFit.getWidth());
        final int targetHeight = (int) (minPercentage * toFit.getHeight());

        if (toFit.getWidth() == targetWidth && toFit.getHeight() == targetHeight) {
            if (Log.isLoggable(TAG, Log.VERBOSE)) {
                Log.v(TAG, "adjusted target size matches input, returning input");
            }
            return toFit;
        }

        Bitmap.Config config = getSafeConfig(toFit);
        Bitmap toReuse = pool.get(targetWidth, targetHeight, config);
        if (toReuse == null) {
            toReuse = Bitmap.createBitmap(targetWidth, targetHeight, config);
        }
        // We don't add or remove alpha, so keep the alpha setting of the Bitmap we were given.
        TransformationUtils.setAlpha(toFit, toReuse);

        if (Log.isLoggable(TAG, Log.VERBOSE)) {
            Log.v(TAG, "request: " + width + "x" + height);
            Log.v(TAG, "toFit:   " + toFit.getWidth() + "x" + toFit.getHeight());
            Log.v(TAG, "toReuse: " + toReuse.getWidth() + "x" + toReuse.getHeight());
            Log.v(TAG, "minPct:   " + minPercentage);
        }

        Canvas canvas = new Canvas(toReuse);
        Matrix matrix = new Matrix();
        matrix.setScale(minPercentage, minPercentage);
        Paint paint = new Paint(PAINT_FLAGS);
        canvas.drawBitmap(toFit, matrix, paint);

        return toReuse;
    }
效果图:
Glide.with(this).load(url).fitCenter().into(iv1);
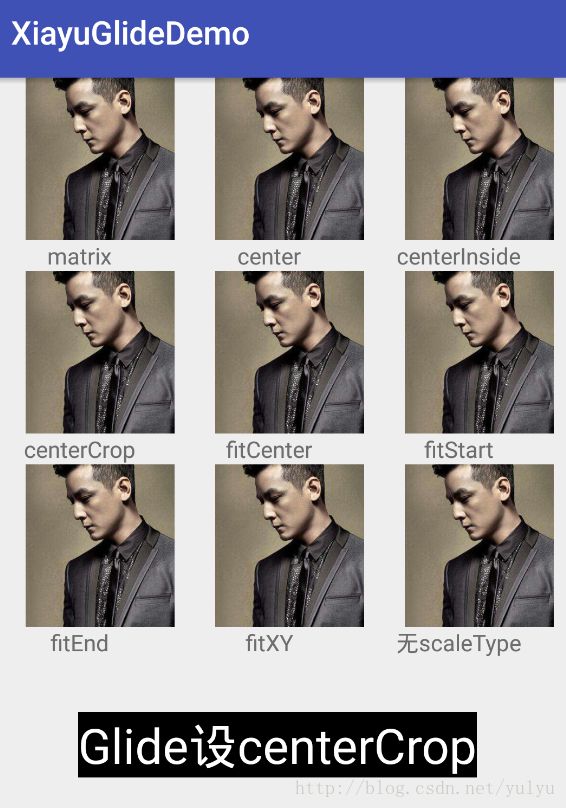
3.3 centerCrop
跟fitCenter的原理一样,只是具体处理逻辑不一样
public static Bitmap centerCrop(Bitmap recycled, Bitmap toCrop, int width, int height) {
    if (toCrop == null) {
        return null;
    } else if (toCrop.getWidth() == width && toCrop.getHeight() == height) {
        return toCrop;
    }
    // From ImageView/Bitmap.createScaledBitmap.
    final float scale;
    float dx = 0, dy = 0;
    Matrix m = new Matrix();
    if (toCrop.getWidth() * height > width * toCrop.getHeight()) {
        scale = (float) height / (float) toCrop.getHeight();
        dx = (width - toCrop.getWidth() * scale) * 0.5f;
    } else {
        scale = (float) width / (float) toCrop.getWidth();
        dy = (height - toCrop.getHeight() * scale) * 0.5f;
    }

    m.setScale(scale, scale);
    m.postTranslate((int) (dx + 0.5f), (int) (dy + 0.5f));
    final Bitmap result;
    if (recycled != null) {
        result = recycled;
    } else {
        result = Bitmap.createBitmap(width, height, getSafeConfig(toCrop));
    }

    // We don't add or remove alpha, so keep the alpha setting of the Bitmap we were given.
    TransformationUtils.setAlpha(toCrop, result);

    Canvas canvas = new Canvas(result);
    Paint paint = new Paint(PAINT_FLAGS);
    canvas.drawBitmap(toCrop, m, paint);
    return result;
}
效果图(所有的都是与centerCrop效果一样):
Glide.with(this).load(url).centerCrop().into(iv2);
4.统一展示(方便对比)
5.其他
有一点要注意的就是fitCenter和centerCrop方法与transform方法可以共存,但是有时候会互相影响,如果说圆角处理遇到了剪裁,圆角那一部分可能会刚好被剪裁掉了
这一章节涉及到的主要是取图方面的知识,如果是对取图方面要求不高的项目,那么用原生的scaletpye或者是Glide提供的两个方法即可,但是如果是取图规则特别复杂的项目(比如我现在的项目(┬_┬)),那么就需要通过自定义transform了,具体可以参考Glide的两个transform的处理,也可以用github上不错的三方库
热门文章
- Glide-图片预处理(圆角,高斯模糊等)
- Glide-图片的压缩
- Glide-内存缓存与磁盘缓存
- Glide-自定义缓存
- Glide-入门教程
- Okhttputils终极封装
- FaceBook推出的调试神器
- Android代码优化工具


