Linux安装MySQL数据库,Navicat远程连接MySQL
一、安装前清理工作
1、使用以下命令查找出安装的mysql软件包和依赖包:
rpm -qa | grep mysql
可以看到以下内容:
mysql80-community-release-el7-3.noarch
mysql-community-libs-8.0.17-1.el7.x86_64
mysql-community-server-8.0.17-1.el7.x86_64
mysql-community-common-8.0.17-1.el7.x86_64
mysql-community-client-8.0.17-1.el7.x86_64
mysql-community-libs-compat-8.0.17-1.el7.x86_64
2、使用以下命令一次删除所有包:
yum remove mysql*
3、查看所有mysql相关目录文件:find / -name mysql
[root@localhost ~]# find / -name mysql
/etc/logrotate.d/mysql
/etc/selinux/targeted/active/modules/100/mysql
/var/lib/mysql
/var/lib/mysql/mysql
/usr/bin/mysql
/usr/lib64/mysql
4、使用rm - rf命令删除所有mysql相关目录
rm - rf xxx
5、注意:卸载后/etc/my.cnf不会删除,需要进行手工删除
rm -rf /etc/my.cnf
二、开始安装MySQL
1、下载yum源
下载地址:https://dev.mysql.com/downloads/repo/yum/
下载完成拖到Linux,或者在Linux直接下载
wget http://dev.mysql.com/get/mysql80-community-release-el7-3.noarch.rpm
使用rpm -ivh命令安装rpm源
[root@localhost soft]# rpm -ivh mysql80-community-release-el7-3.noarch.rpm
准备中... ################################# [100%]
正在升级/安装...
1:mysql80-community-release-el7-3 ################################# [100%]
2、安装mysql
yum -y install mysql-community-server
3、开启mysql服务
systemctl start mysqld.service
查看mysql是否启动服务:
ps -ef | grep mysqld
4、获取初始密码登录mysql,修改初始密码
初始的密码可以在/var/log/mysqld.log文件中找到:
cat /var/log/mysqld.log | grep password
或
grep 'temporary password' /var/log/mysqld.log
登录mysql:mysql -uroot -p
[root@localhost ~]# mysql -uroot -p
Enter password: 输入初始密码
Welcome to the MySQL monitor. Commands end with ; or \g.
Your MySQL connection id is 8
Server version: 8.0.17 MySQL Community Server - GPLCopyright (c) 2000, 2019, Oracle and/or its affiliates. All rights reserved.
Oracle is a registered trademark of Oracle Corporation and/or its
affiliates. Other names may be trademarks of their respective
owners.Type 'help;' or '\h' for help. Type '\c' to clear the current input statement.
mysql>
登录成功后,修改初始密码,mysql新的安全机制要求,mysql的密码必须包含英文大小写、数字以及特殊字符:
ALTER USER USER() IDENTIFIED BY 'password';
三、开启远程连接Linux服务器上的MySQL
1、在防火墙中开启3306端口
CentOS7默认使用的是firewall作为防火墙,改为习惯常用的iptables防火墙:
第1步: 关闭firewall防火墙
systemctl stop firewalld.service
systemctl disable firewalld.service
systemctl mask firewalld.service
第2步: 安装iptables防火墙
yum install iptables-services -y
第3步: 启动iptable防火墙
systemctl enable iptables
systemctl start iptables
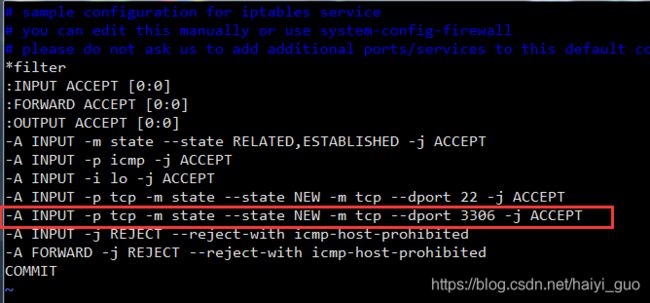
第4步: 编辑防火墙增加端口 防火墙文件位置为: /etc/sysconfig/iptables
vim /etc/sysconfig/iptables
在倒数第四行上增加:-A INPUT -p tcp -m state --state NEW -m tcp --dport 3306 -j ACCEPT
第5步: 重启防火墙
#systemctl restart iptables.service
service iptables restart
2、将mysql服务加入开机启动项,并启动mysql进程
systemctl enable mysqld.service --开机自动开启服务
systemctl start mysqld.service --启动服务
systemctl stop mysqld.service --结束服务
systemctl restart mysqld.service --重启服务
3、开启mysql远程服务:
3.1 修改mysql数据库下的user表中host的值
第1步:登录mysql -u root -p
mysql -uroot -p
第2步:切换到mysql数据库
use mysql
第3步:更改"mysql"数据库里的"user"表里的"host"项,从"localhost"改称"%"
update user set host='%' where user='root';
第4步:查看更改情况:
select host, user from user;
3.2 使用授权的方式
==> 赋予任何主机连接到mysql服务器
mysql> GRANT ALL PRIVILEGES ON *.* TO 'root'@'%' WITH GRANT OPTION;
mysql> FLUSH PRIVILEGES;
==> 赋予指定user用户,使用指定password密码,从任何主机连接到mysql服务器
GRANT ALL PRIVILEGES ON *.* TO 'user'@'%'IDENTIFIED BY 'password' WITH GRANT OPTION;
==> 允许用户user从指定主机连接到mysql服务器,并使用password作为密码登录
GRANT ALL PRIVILEGES ON *.* TO 'user'@'192.168.1.101'IDENTIFIED BY 'mypassword' WITH GRANT OPTION;
4、远程连接mysql:
4.1 使用Navicat连接:
注意:在使用 Navicat for Mysql连接mysql 8.0时如果会报如下错误
Authentication plugin 'caching_sha2_password' cannot be loaded:
这是因为mysql8.0 引入了新特性caching_sha2_password;这种密码加密方式客户端不支持;客户端支持的是mysql_native_password 这种加密方式,可以使用命令将他修改成mysql_native_password加密模式:
update user set plugin='mysql_native_password' where user='root';
查看mysql 数据库中user表的 plugin字段:
4.2 连接成功后就可以在Navicat操作mysql数据库了


