ambari大数据平台搭建
一.环境准备
![]()
centos下载地址:
https://www.centos.org/download/
Ambari下载地址:
http://docs.hortonworks.com/HDPDocuments/Ambari-2.4.1.0/bk_ambari-installation/content/ambari_repositories.html
HDP和HDP UTILS下载地址:
http://docs.hortonworks.com/HDPDocuments/Ambari-2.4.1.0/bk_ambari-installation/content/hdp_stack_repositories.html
jdk下载地址:
https://www.oracle.com/technetwork/java/javase/downloads/jdk8-downloads-2133151.html
二.配置linux系统
(1)更改主机名
我们为了能够更加方便来识别主机,我们使用主机名而不是使用IP地址,以免多处配置带来更多的麻烦。把localhost三台虚拟机服务器中的主机名(hostname)分别更改为master、node1、node2。
命令如下:
hostnamectl set-hostname master
如图1所示:
图1 更改主机名
(2)开启主机的DHCP模式,自动获取ip地址
输入命令:
cd /etc/sysconfig/network-scripts/ //进入网卡编辑目录
ls //列出目录下的所有配置文件
vi ifcfg-enp0s3 /编辑网卡enp0s3的配置文件
在打开的ifcfg-enp0s3的配置文件中更改如下配置:
ONBOOT=no
更改为:
ONBOOT=yes
然后重启网卡
图2 重启网卡
使用同样的方式更改node1和node2的网卡配置。
配置结果如下:
master ip : 172.19.210.7
node1 ip : 172.19.210.8
node2 ip : 172.19.210.9
(3)配置hosts
配置hosts主要是为了让机器能够互相识别主机名。
注:hosts文件是域名解析文件,在hosts文件内配置了 ip地址和主机名的对应关系,配置之后,通过主机名,电脑就可以定位到相应的ip地址 。
使用命令如下:
cd /etc //进入配置目录
vi hosts //编辑hosts配置文件
在hosts配置文件内容输入如下内容:
命令如下:
172.19.210.7 master
172.19.210.8 node1
172.19.210.9 node2
图3 配置hosts文件
(4)配置yum源
使用命令如下
cd /etc/yum.repos.d/
rm -rf *
vi centos.repo
在master的centos.repo里输入
[centos]
baseurl=file:///opt/centos/
gpgcheck=0
enabled=1
name=centos
[ambari]
name=ambari
baseurl=file:///opt/bigdata/ambari
gpgcheck=0
enabled=1
运行命令
yum list
如图4所示
图4 验证yum源
下载vsftp
运行命令:
yum install -y vsftpd
vi /etc/vsftpd/vsftpd.conf
在vsftpd.conf里输入
anon_root=/opt
然后重启vsftpd
systemctl restart vsftpd
然后在node节点的centos.repo里输入
[centos]
baseurl=ftp://172.19.210.7/centos
gpgcheck=0
enabled=1
name=centos
[ambari]
name=ambari
baseurl=ftp://172.19.210.7/bigdata/ambari
gpgcheck=0
enabled=1
(5)配置ntp
在master节点输入:
yum -y install ntp
vi /etc/ntp.conf
在ntp.conf里注释或者删除以下四行
server 0.centos.pool.ntp.org iburst
server 1.centos.pool.ntp.org iburst
server 2.centos.pool.ntp.org iburst
server 3.centos.pool.ntp.org iburst
添加以下两行
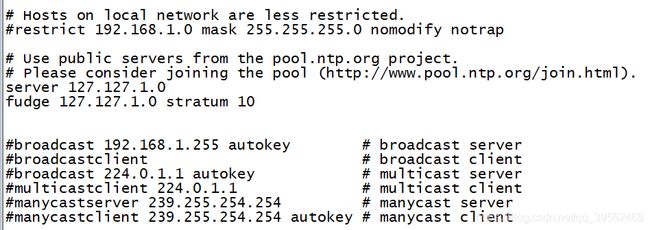
server 127.127.1.0
fudge 127.127.1.0 stratum 10
systemctl enable ntpd
systemctl start ntpd
图5 配置ntp
在node节点输入
yum -y install ntpdate
ntpdate master
systemctl enable ntpdate
(6)配置ssh
在所有节点输入:
yum install openssh-clients
ssh-keygen
ssh-copy-id master
ssh-copy-id node1
ssh-copy-id node2
ssh 登录远程主机查看是否成功:
ssh master
ssh node1
ssh node2
(7)配置httpd服务
yum -y install httpd
将文件夹中 HDP-2.4-BASE 和 HDP-UTILS-1.1.0.20 两个文件夹拷贝到/var/www/html/目录下。启动 httpd 服务。
systemctl enable httpd.service
systemctl status httpd.service
三.禁用 Transparent Huge Pages
操作系统后台有一个叫做 khugepaged 的进程,它会一直扫描所有进程占用的内存,在可能的情况下会把 4kpage 交换为 Huge Pages,在这个过程中,对于操作的内存的各种分配活动都需要各种内存锁,直接影响程序的内存访问性能,并且,这个过程对于应用是透明的, 在应用层面不可控制,对于专门为 4k page 优化的程序来说,可能会造成随机的性能下降现象。
在各节点:
查看进程状态:
cat /sys/kernel/mm/transparent_hugepage/enabled
更改进程配置文件:
echo never > /sys/kernel/mm/transparent_hugepage/enabled
echo never > /sys/kernel/mm/transparent_hugepage/defrag
再次查看:
cat /sys/kernel/mm/transparent_hugepage/enabled
图6 查看进程状态
四.安装配置JDK
在所有节点输入
mkdir /usr/java
tar -zxvf /opt/bigdata/jdk-8u77-linux-x64.tar.gz -C /usr/java/
更改linux的环境变量
在 /etc/profile添加
export JAVA_HOME=/usr/java/jdk1.8.0_77
export PATH=$JAVA_HOME/bin:$PATH
生效环境变量
source /etc/profile
图7 环境变量添加成功
五.配置ambari-server
在master输入
(1)安装ambari-server服务
yum -y install ambari-server
(2)安装并配置Mariadb数据库
安装Mariadb
yum -y install mariadb mariadb-server mysql-connector-java
systemctl enable mariadb
systemctl start mariadb
配置mariadb
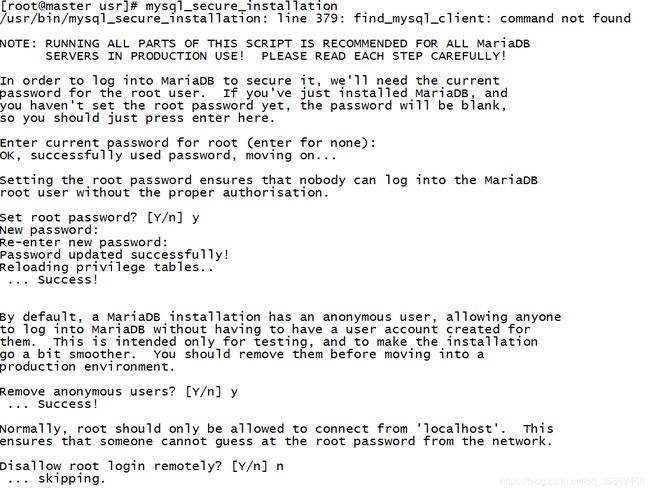
mysql_secure_installation
按 enter 确认后设置数据库 root 密码,我们这里设置为“bigdata”
Remove anonymous users? [Y/n] y
Disallow root login remotely? [Y/n] n
Remove test database and access to it? [Y/n] y
Reload privilege tables now? [Y/n] y
图8 配置mariadb
创建ambari数据库
mysql -uroot -pbigdata
MariaDB [(none)]> create database ambari;
MariaDB [(none)]> grant all privileges on ambari.* to 'ambari'@'localhost' identified by 'bigdata';
MariaDB [(none)]> grant all privileges on ambari.* to 'ambari'@'%' identified by 'bigdata';
MariaDB [(none)]> use ambari;
MariaDB [ambari]> source
/var/lib/ambari-server/resources/Ambari-DDL-MySQL-CREATE.sql
MariaDB [ambari]> Bye
六.安装配置 ambari-server
在master执行
ambari-server setup
图9 配置ambari-server
启动 ambari-server 服务
ambari-server start
登陆界面 http:// 172.19.210.7:8080/
登录用户名密码为 admin:admin
七.配置 ambari-agent
在所有节点
yum -y install ambari-agent
在/etc/ambari-agent/conf/ambari-agent.ini文件下更改
[server]
hostname= master
ambari-agent restart
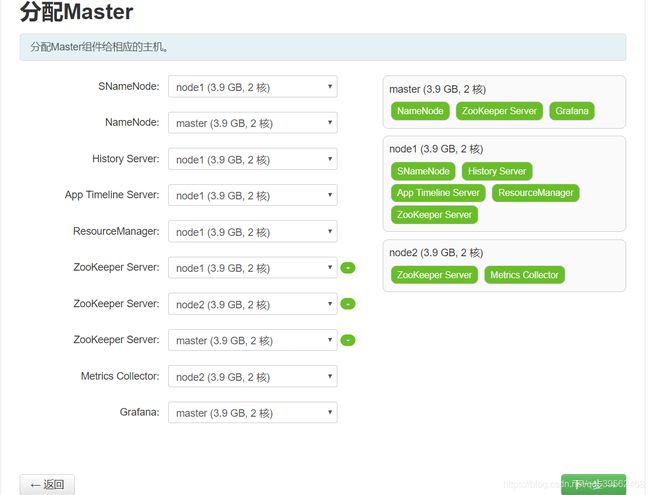
然后安装网站提示一步步安装
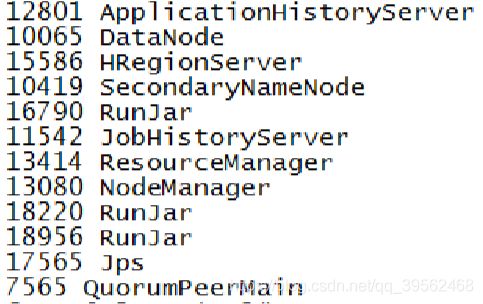
在所有节点输入,查看服务状态、
jps
master:
node:


