elasticsearch springboot head nodejs ik分词器
elasticSearch 分布式搜索引擎
文章目录
- elasticSearch 分布式搜索引擎
- 1 ElasticSearch简介
- 1.1 什么是ElasticSearch
- 1.2 ElasticSearch特点
- 1.3 ElasticSearch体系结构
- 2 走进ElasticSearch
- 2.1 ElasticSearch部署与启动
- 2.2 Postman调用RestAPI
- 2.2.1 新建索引
- 2.2.2 新建文档
- 2.2.3 查询文档
- 2.2.4 更新文档
- 2.2.5 分词查询、模糊查询
- **注意:在文档更新的过程中,如果赋予的id 不存在,则创建文档对象。如果存在则更新对象**
- 2.2.6 删除操作
- 3 Head差价的安装与使用
- 3.1 head 插件安装
- 3.2 head 使用
- 4 分词器
- 4.1 ik分词器
- 4.2 分词器安装
- 4.3 IK分词器测试
- 4.4 词条维护
- 5 检索微服务开发
- 5.1 依赖
- 5.2 pojo类
- 5.3 DAO
- 5.4 service
- 5.5 控制层
- 6 测试
本教程git地址:https://gitee.com/shi860715/boot_parent.git
摘要:
ElasticSearch安装,能够使用restAPI完成基本的CRUD操作;
完成Head插件的安装,熟悉head插件的基本使用方法;
完成IK分词器的安装。能够使用IK及进行分词
springDataElastSearch完成搜索微服务开发
使用logstash完成mysql 和ElasticSearch的同步
elasticSearch在docker下的安装。
1 ElasticSearch简介
1.1 什么是ElasticSearch
Elasticsearch是一个实时的分布式搜索和分析引擎。它可以帮助你用前所未有的速 度去处理大规模数据。ElasticSearch是一个基于Lucene的搜索服务器。它提供了一个分 布式多用户能力的全文搜索引擎,基于RESTful web接口。Elasticsearch是用Java开发 的,并作为Apache许可条款下的开放源码发布,是当前流行的企业级搜索引擎。设计用 于云计算中,能够达到实时搜索,稳定,可靠,快速,安装使用方便。
1.2 ElasticSearch特点
(1)可以作为一个大型分布式集群(数百台服务器)技术,处理PB级数据,服务大公 司;也可以运行在单机上 (2)将全文检索、数据分析以及分布式技术,合并在了一起,才形成了独一无二的ES;
(3)开箱即用的,部署简单;
(4)全文检索,同义词处理,相关度排名,复杂数据分析,海量数据的近实时处理 。
1.3 ElasticSearch体系结构
下表是Elasticsearch与MySQL数据库逻辑结构概念的对比
| Elasticsearch | 关系型数据库Mysql |
|---|---|
| 索引(index) | 数据库(databases) |
| 类型(type) | 表(table) |
| 文档(document) | 行(row) |
2 走进ElasticSearch
2.1 ElasticSearch部署与启动
https://www.elastic.co/cn/downloads/past-releases/
根据需求下载相应的版本,本博客使5.6.8 x64
解压下载后的文件,然后命令行输入
Microsoft Windows [版本 6.1.7601]
版权所有 (c) 2009 Microsoft Corporation。保留所有权利。

D:\elasticsearch-5.6.8\bin>elasticsearch
[2019-08-19T14:32:30,170][INFO ][o.e.n.Node               ] [] initializing ...
[2019-08-19T14:32:30,400][INFO ][o.e.e.NodeEnvironment    ] [_v4RUo_] using [1] data paths, mounts [[鏂板姞鍗?(D:)]], net usable_space [84.2gb], net total_space [195.3gb], spins? [unknown], types [NTFS]
[2019-08-19T14:32:30,406][INFO ][o.e.e.NodeEnvironment    ] [_v4RUo_] heap size [1.9gb], compressed ordinary object pointers [true]
[2019-08-19T14:32:30,409][INFO ][o.e.n.Node               ] node name [_v4RUo_] derived from node ID [_v4RUo_NQnSyk_BlYoD1AQ]; set [node.name] to override
[2019-08-19T14:32:30,410][INFO ][o.e.n.Node               ] version[5.6.8], pid[17240], build[688ecce/2018-02-16T16:46:30.010Z], OS[Windows 7/6.1/amd64], JVM[Oracle Corporation/Java HotSpot(TM) 64-Bit Server VM/1.8.0_172/25.172-b11]
[2019-08-19T14:32:30,411][INFO ][o.e.n.Node               ] JVM arguments [-Xms2g, -Xmx2g, -XX:+UseConcMarkSweepGC, -XX:CMSInitiatingOccupancyFraction=75, -XX:+UseCMSInitiatingOccupancyOnly, -XX:+AlwaysPreTouch, -Xss1m, -Djava.awt.headless=true, -Dfile.encoding=UTF-8, -Djna.nosys=true, -Djdk.io.perm
issionsUseCanonicalPath=true, -Dio.netty.noUnsafe=true, -Dio.netty.noKeySetOptimization=true, -Dio.netty.recycler.maxCapacityPerThread=0, -Dlog4j.shutdownHookEnabled=false, -Dlog4j2.disable.jmx=true, -Dlog4j.skipJansi=true, -XX:+HeapDumpOnOutOfMemoryError, -Delasticsearch, -Des.path.home=D:\elastics
earch-5.6.8]
[2019-08-19T14:32:31,669][INFO ][o.e.p.PluginsService     ] [_v4RUo_] loaded module [aggs-matrix-stats]
[2019-08-19T14:32:31,670][INFO ][o.e.p.PluginsService     ] [_v4RUo_] loaded module [ingest-common]
[2019-08-19T14:32:31,670][INFO ][o.e.p.PluginsService     ] [_v4RUo_] loaded module [lang-expression]
[2019-08-19T14:32:31,670][INFO ][o.e.p.PluginsService     ] [_v4RUo_] loaded module [lang-groovy]
[2019-08-19T14:32:31,671][INFO ][o.e.p.PluginsService     ] [_v4RUo_] loaded module [lang-mustache]
[2019-08-19T14:32:31,671][INFO ][o.e.p.PluginsService     ] [_v4RUo_] loaded module [lang-painless]
[2019-08-19T14:32:31,671][INFO ][o.e.p.PluginsService     ] [_v4RUo_] loaded module [parent-join]
[2019-08-19T14:32:31,672][INFO ][o.e.p.PluginsService     ] [_v4RUo_] loaded module [percolator]
[2019-08-19T14:32:31,672][INFO ][o.e.p.PluginsService     ] [_v4RUo_] loaded module [reindex]
[2019-08-19T14:32:31,672][INFO ][o.e.p.PluginsService     ] [_v4RUo_] loaded module [transport-netty3]
[2019-08-19T14:32:31,673][INFO ][o.e.p.PluginsService     ] [_v4RUo_] loaded module [transport-netty4]
[2019-08-19T14:32:31,673][INFO ][o.e.p.PluginsService     ] [_v4RUo_] no plugins loaded
[2019-08-19T14:32:34,149][INFO ][o.e.d.DiscoveryModule    ] [_v4RUo_] using discovery type [zen]
[2019-08-19T14:32:34,778][INFO ][o.e.n.Node               ] initialized
[2019-08-19T14:32:34,778][INFO ][o.e.n.Node               ] [_v4RUo_] starting ...
[2019-08-19T14:32:35,314][INFO ][o.e.t.TransportService   ] [_v4RUo_] publish_address {127.0.0.1:9300}, bound_addresses {127.0.0.1:9300}, {[::1]:9300}
[2019-08-19T14:32:38,479][INFO ][o.e.c.s.ClusterService   ] [_v4RUo_] new_master {_v4RUo_}{_v4RUo_NQnSyk_BlYoD1AQ}{cGWpGnN8Rki1Pwbj1nhTrg}{127.0.0.1}{127.0.0.1:9300}, reason: zen-disco-elected-as-master ([0] nodes joined)
[2019-08-19T14:32:38,564][INFO ][o.e.g.GatewayService     ] [_v4RUo_] recovered [0] indices into cluster_state
[2019-08-19T14:32:38,709][INFO ][o.e.h.n.Netty4HttpServerTransport] [_v4RUo_] publish_address {127.0.0.1:9200}, bound_addresses {127.0.0.1:9200}, {[::1]:9200}
[2019-08-19T14:32:38,709][INFO ][o.e.n.Node               ] [_v4RUo_] started
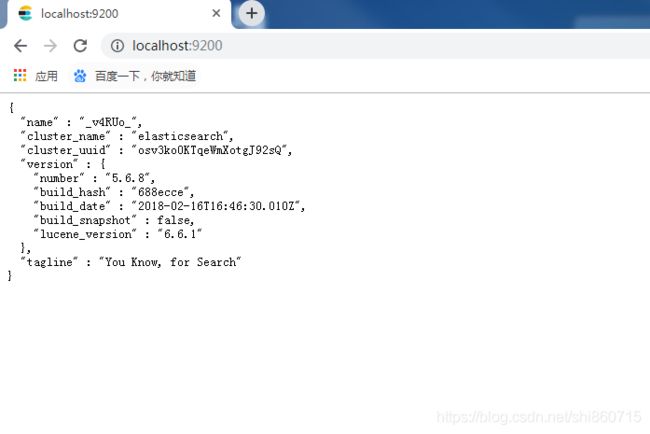
当服务启动后,可以使用浏览器验证
[外链图片转存失败(img-gwIWf4IJ-1566267056107)(C:\Users\Administrator\Desktop\images\el\1566196552322.png)]
因为样式不好看:
https://github.com/gildas-lormeau/JSONView-for-Chrome
建议安装插件,不懂自己百度安装下 jsonview插件安装,安装后的效果还是很不错的。
[外链图片转存失败(img-8NroJ6BI-1566267056107)(C:\Users\Administrator\Desktop\images\el\1566197035688.png)]
2.2 Postman调用RestAPI
2.2.1 新建索引
例如我们要创建studentindex的索引,就以put方式提交
[外链图片转存失败(img-3WFpJqNU-1566267056108)(C:\Users\Administrator\Desktop\images\el\1566197708797.png)]
我们成功创建一个索引库。
2.2.2 新建文档
新建文档,以post的方式提交。
URL:http://localhost:9200/studentindex/student
METHOD :POST
BODY:
RAW:JSON
{
	"name":"小王",
	"age": 10
}
2.2.3 查询文档
url :http://localhost:9200/studentindex/student/_search
METHOD: GET
{
    "took": 2,
    "timed_out": false,
    "_shards": {
        "total": 5,
        "successful": 5,
        "skipped": 0,
        "failed": 0
    },
    "hits": {
        "total": 2,
        "max_score": 1,
        "hits": [
            {
                "_index": "studentindex",
                "_type": "student",
                "_id": "AWyorheV4dbwr9qqjJaK",
                "_score": 1,
                "_source": {
                    "name": "小王",
                    "age": 10
                }
            },
            {
                "_index": "studentindex",
                "_type": "student",
                "_id": "AWyotTbV4dbwr9qqjJaM",
                "_score": 1,
                "_source": {
                    "name": "小强",
                    "age": 10
                }
            }
        ]
    }
}
2.2.4 更新文档
URL:http://localhost:9200/studentindex/student/AWyotTbV4dbwr9qqjJaM
METHOD:PUT
RAW :JSON
BODY:
{
	"name":"小强",
	"age": 10
}
返回结果:
{
    "_index": "studentindex",
    "_type": "student",
    "_id": "AWyotTbV4dbwr9qqjJaM",
    "_version": 2,
    "result": "updated",
    "_shards": {
        "total": 2,
        "successful": 1,
        "failed": 0
    },
    "created": false
}
2.2.5 分词查询、模糊查询
http://localhost:9200/studentindex/student/_search?q=name:强
http://localhost:9200/studentindex/student/_search?q=name:* 强 *
本实例中测试的时候,输入小强 可以查询到两个,说明分词器进行了分词
{
    "took": 2,
    "timed_out": false,
    "_shards": {
        "total": 5,
        "successful": 5,
        "skipped": 0,
        "failed": 0
    },
    "hits": {
        "total": 1,
        "max_score": 0.62191015,
        "hits": [
            {
                "_index": "studentindex",
                "_type": "student",
                "_id": "AWyotTbV4dbwr9qqjJaM",
                "_score": 0.62191015,
                "_source": {
                    "name": "小强",
                    "age": 10
                }
            }
        ]
    }
}
注意:在文档更新的过程中,如果赋予的id 不存在,则创建文档对象。如果存在则更新对象
2.2.6 删除操作
:http://localhost:9200/studentindex/student/AWyotTbV4dbwr9qqjJaM
METHOD: DELETE
这就是完成了,删除的操作
3 Head差价的安装与使用
3.1 head 插件安装
如果都是通过rest请求的方式使用Elasticsearch,未免太过麻烦,而且也不够人性化。我
们一般都会使用图形化界面来实现Elasticsearch的日常管理,最常用的就是Head插件
第一步:
下载head插件:https://github.com/mobz/elasticsearch-head
第二步:
将插件进行解压。和el目录分开放置。
第三部:
安装node js 安装CNPM
>npm install ‐g cnpm ‐‐registry=https://registry.npm.taobao.org
第四部:
将grunt 安装为全局命令,GRUNT是基于node.js的项目构建工具。他可以自动运行你所设定的任务
npm install -g grunt-cli
第五部:安装依赖
cnpm  install
 安装过程中,注意目录的结构,要不然会提示找不到配置文件
D:\elasticsearch\elasticsearch-head-master>cnpm install
- [3/10] Installing path-is-absolute@^1.0.0
WARN node unsupported "[email protected]" is incompatible with [email protected], expected [email protected] || 0.12 || 4 || 5 || 6
/ [7/10] Installing [email protected] unsupported [email protected] › [email protected] › fsevents@^1.0.0 Package require os(d
[fsevents@^1.0.0] optional install error: Package require os(darwin) not compatible with your platform(win32)
√ Installed 10 packages
√ Linked 365 latest versions
[1/2] scripts.install [email protected] › [email protected] › phantomjs-prebuilt@^2.1.3 run "node insta
PhantomJS not found on PATH
Downloading https://cdn.npm.taobao.org/dist/phantomjs/phantomjs-2.1.1-windows.zip
Saving to C:\Users\Administrator\AppData\Local\Temp\phantomjs\phantomjs-2.1.1-windows.zip
Receiving...
  [====================================----] 90%
Received 17767K total.
Extracting zip contents
Removing D:\elasticsearch\elasticsearch-head-master\node_modules\[email protected]@phantomjs-prebuilt\lib\phanto
Copying extracted folder C:\Users\Administrator\AppData\Local\Temp\phantomjs\phantomjs-2.1.1-windows.zip-extract-15662013
Writing location.js file
Done. Phantomjs binary available at D:\elasticsearch\elasticsearch-head-master\node_modules\[email protected]@ph
[1/2] scripts.install [email protected] › [email protected] › phantomjs-prebuilt@^2.1.3 finished in 3s
[2/2] scripts.postinstall [email protected] › core-js@^2.2.0 run "node scripts/postinstall || echo \"ignore\"", root: "D:\\elas
Thank you for using core-js ( https://github.com/zloirock/core-js ) for polyfilling JavaScript standard library!

The project needs your help! Please consider supporting of core-js on Open Collective or Patreon:
> https://opencollective.com/core-js
> https://www.patreon.com/zloirock

Also, the author of core-js ( https://github.com/zloirock ) is looking for a good job -)

[2/2] scripts.postinstall [email protected] › core-js@^2.2.0 finished in 242ms
√ Run 2 scripts
deprecate [email protected] › http2@^3.3.4 Use the built-in module in node 9.0.0 or newer, instead
deprecate [email protected] › coffee-script@~1.10.0 CoffeeScript on NPM has moved to "coffeescript" (no hyphen)
第六步:
进入head目录启动head 在命令提示符下输入命令
grunt server
第七步:
打开浏览器:http://localhost:9100
第八步:当你连接不上el 的时候,可以通过F12 命令查看,是由于我们的el 未允许跨域访问,导致 连接不上。
修改elasticsearch配置文件:elasticsearch.yml,增加以下两句命令:
http.cors.enabled: true
http.cors.allow‐origin: "*"
3.2 head 使用
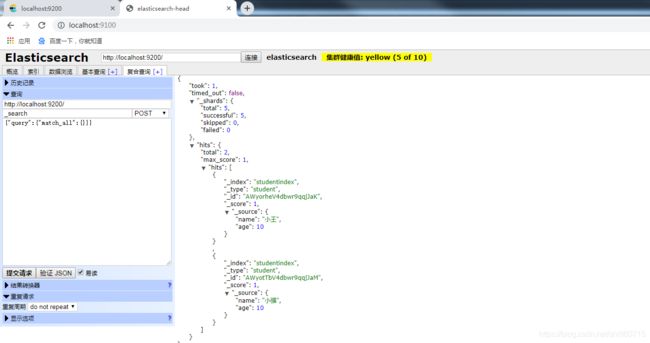
通过以上的配置,我们就可以通过head 来管理el了。
图形化操作我就不做累述了。类似postman。
[外链图片转存失败(img-Q4HyOtAp-1566267056108)(C:\Users\Administrator\Desktop\images\el\1566201890623.png)]
4 分词器
4.1 ik分词器
http://localhost:9200/_analyze?analyzer=chinese&pretty=true&text=我是程序员
通过该实例:我们可以看到原本自带的分词器效果,真心不好用。
[外链图片转存失败(img-lFwf8eNu-1566267056109)(C:\Users\Administrator\Desktop\images\el\1566202484570.png)]
4.2 分词器安装
https://github.com/medcl/elasticsearch-analysis-ik/releases下载相应版本的分词器。
1、先将其解压,将解压后的elasticsearch文件夹重命名文件夹为ik
2、将ik文件夹拷贝到elasticsearch/plugins 目录下。
3、重新启动,即可加载IK分词器
4.3 IK分词器测试
IK提供了两个分词算法ik_smart 和 ik_max_word
其中 ik_smart 为最少切分,ik_max_word为最细粒度划分
测试下:
1)最少切分
http://localhost:9200/_analyze?analyzer=ik_smart&pretty=true&text=我是程序员
{
  "tokens" : [
    {
      "token" : "我",
      "start_offset" : 0,
      "end_offset" : 1,
      "type" : "CN_CHAR",
      "position" : 0
    },
    {
      "token" : "是",
      "start_offset" : 1,
      "end_offset" : 2,
      "type" : "CN_CHAR",
      "position" : 1
    },
    {
      "token" : "程序员",
      "start_offset" : 2,
      "end_offset" : 5,
      "type" : "CN_WORD",
      "position" : 2
    }
  ]
}
- 最细切分
http://localhost:9200/_analyze?analyzer=ik_max_word&pretty=true&text=我是程序员
4.4 词条维护
elasticsearch-5.6.8\plugins\ik\config目录下创建custom.dic文件,收录你需要添加的词条,保存的格式注意为UTF-8编码。
修改iK配置文件IKAnalyzer.cfg.xml
	IK Analyzer 扩展配置

	custom.dic
测试:
http://localhost:9200/_analyze?analyzer=ik_max_word&pretty=true&text=刘必君
通过词条的录入,我们可以查询到我们的分词信息也改变了。
{
  "tokens" : [
    {
      "token" : "刘必君",
      "start_offset" : 0,
      "end_offset" : 3,
      "type" : "CN_WORD",
      "position" : 0
    }
  ]
}
5 检索微服务开发
5.1 依赖
            com.liu
            boot_common
            1.0-SNAPSHOT


            org.springframework.data
            spring-data-elasticsearch
            3.0.6.RELEASE


            org.projectlombok
            lombok
5.2 pojo类
package com.liu.search.pojo;

import lombok.Data;

import org.springframework.data.annotation.Id;
import org.springframework.data.elasticsearch.annotations.Document;
import org.springframework.data.elasticsearch.annotations.Field;

import java.io.Serializable;
import java.lang.annotation.Documented;

/**
 * Created by Administrator on 2019/8/20 0020.
 *
 * 是否索引,就是看该域是否能够被搜索
 * 是否分词,就是表示搜索的时候是整理匹配还是单词匹配
 * 是否存储,就是是否在页面上显示
 *
 */
@Document(indexName = "search",type ="article" )
@Data
public class Article implements Serializable{


    @Id
    private String id; // id

    @Field(index = true,analyzer = "ik_max_word",searchAnalyzer = "ik_max_word")
    private String title; //标题


    @Field(index = true,analyzer = "ik_max_word",searchAnalyzer = "ik_max_word")
    private String content ; // 文章正文

    private String state;//审核状态

}
5.3 DAO
package com.liu.search.dao;

import com.liu.search.pojo.Article;
import org.springframework.data.domain.Page;
import org.springframework.data.domain.Pageable;
import org.springframework.data.elasticsearch.repository.ElasticsearchRepository;

/**
 * Created by Administrator on 2019/8/20 0020.
 */
public interface ArticleDao extends ElasticsearchRepository<Article,String>{

    public Page<Article> findByTitleOrContentLike(String title, String content, Pageable pageable);

}
5.4 service
package com.liu.search.service;

import com.liu.common.utils.IdWorker;
import com.liu.search.dao.ArticleDao;
import com.liu.search.pojo.Article;
import org.springframework.beans.factory.annotation.Autowired;
import org.springframework.data.domain.Page;
import org.springframework.data.domain.PageRequest;
import org.springframework.data.domain.Pageable;
import org.springframework.stereotype.Service;

/**
 * Created by Administrator on 2019/8/20 0020.
 */
@Service

public class ArticleService {

    @Autowired
    private ArticleDao articleDao;

    @Autowired
    private IdWorker idWorker; // ID生成器 工具类


    public void add(Article article){
        article.setId(idWorker.nextId()+"");
        articleDao.save(article);
    }

    public Page<Article> findKey(String key, int page, int rows) {
        Pageable pageable = PageRequest.of(page-1 ,rows);
        return articleDao.findByTitleOrContentLike(key,key,pageable);


    }
}
5.5 控制层
package com.liu.search.controller;

import com.liu.common.entity.PageResult;
import com.liu.common.entity.Result;
import com.liu.common.status.CodeEnum;
import com.liu.search.pojo.Article;
import com.liu.search.service.ArticleService;
import org.springframework.beans.factory.annotation.Autowired;
import org.springframework.data.domain.Page;
import org.springframework.web.bind.annotation.*;

/**
 * Created by Administrator on 2019/8/20 0020.
 */
@RestController
@RequestMapping("/article")
@CrossOrigin // 跨域
public class ArticleController {

    @Autowired
    private ArticleService articleService;


    @PostMapping
    public Result save(@RequestBody Article article){

        articleService.add(article);
        return new Result(true,CodeEnum.OK.getCode(),"添加成功");

    }
     @RequestMapping(value = "/{page}/{rows}",method = RequestMethod.GET)
    public Result findKey(String key,@PathVariable  int page,@PathVariable  int rows){
         Page pages = articleService.findKey(key,page,rows);

        return  new Result(true,CodeEnum.OK.getCode(),"查询成功",new PageResult(pages.getTotalElements(),pages.getContent()));
    }

}
6 测试
这里我使用 postman 作为测试工具,大家可以自己学下。如果需要更专业的工具可以联系我、
