大数据集群Linux CentOS 7.6 系统调优篇
作者:尹正杰
版权声明:原创作品,谢绝转载!否则将追究法律责任。
一.设置主机hosts文件
1>.修改主机名
[[email protected] ~]# cat /etc/hostname
node100.yinzhengjie.org.cn
[[email protected] ~]#
2>. 添加集群各节点主机名称映射关系
[[email protected] ~]# cat /etc/hosts
172.30.1.100 node100.yinzhengjie.org.cn
172.30.1.101 node101.yinzhengjie.org.cn
172.30.1.102 node102.yinzhengjie.org.cn
172.30.1.103 node103.yinzhengjie.org.cn
172.30.1.104 node104.yinzhengjie.org.cn
172.30.1.105 node105.yinzhengjie.org.cn
172.30.1.106 node106.yinzhengjie.org.cn
172.30.1.107 node107.yinzhengjie.org.cn
172.30.1.108 node108.yinzhengjie.org.cn
[[email protected] ~]#
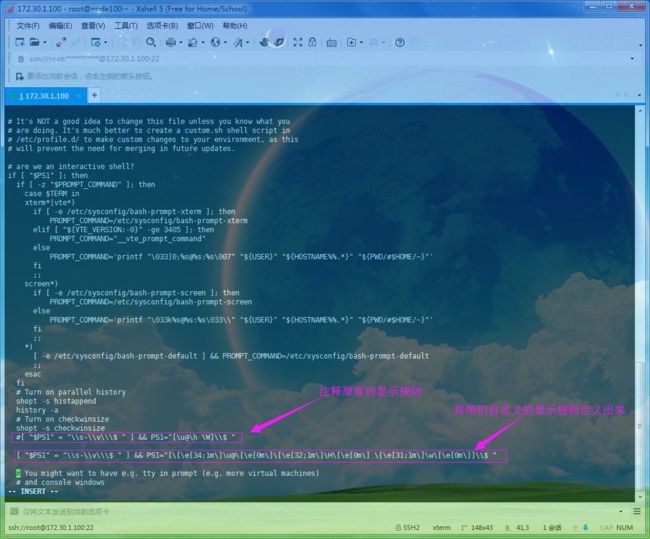
3>.显示优化(针对命令行终端显示信息稍作修改,编辑/etc/bashrc)
1.设置ps1变量的显示

    PS1(是数字1而不是字母l),每个版本bash的PS1变量内的特殊符号可能有些小的差异,你可以先man bash 一下。下面是FC4环境下默认的特殊符号所代表的意义:

    \d :代表日期,格式为weekday month date,例如:"Mon Aug 1"

    \H :完整的主机名称。例如:我的机器名称为:fc4.linux,则这个名称就是fc4.linux

    \h :仅取主机的第一个名字,如上例,则为fc4,.linux则被省略

    \t :显示时间为24小时格式,如:HH:MM:SS

    \T :显示时间为12小时格式

    \A :显示时间为24小时格式:HH:MM

    \u :当前用户的账号名称

    \v :BASH的版本信息

    \w :完整的工作目录名称。家目录会以 ~代替

    \W :利用basename取得工作目录名称,所以只会列出最后一个目录

    \# :下达的第几个命令

    \$ :提示字符,如果是root时,提示符为:# ,普通用户则为:$

    默认的PS1内容为: PS1='[\u@\h \W]\$ ' ,所以默认的提示符就是: [root@linux ~]#。
设置ps1变量的颜色

我们能够通过配置PS1变量使提示符成为彩色。在PS1中配置字符序列颜色的格式为:

    \[\e[F;Bm\]

    基本上是夹在 "\e["(转义开方括号)和 "m" 之间数字值。假如指定一个以上的数字代码,则用分号将他们分开。

    其中 F 为字体颜色,编号30~37; B 为背景色,编号40~47。

    可通过 \e[0m 关闭颜色输出;特别的,当B为1时,将显示加亮加粗的文字,请看下面的颜色表和代码表。

    颜色表

    前景     背景     颜色
    ---------------------------------------
        40         黑色
        41         红色
        42         绿色
        43         黄色
        44         蓝色
        45         紫色
        46         青色
        47         白色
[ "$PS1" = "\\s-\\v\\\$ " ] && PS1="[\[\e[34;1m\]\u@\[\e[0m\]\[\e[32;1m\]\H\[\e[0m\] \[\e[31;1m\]\w\[\e[0m\]]\\$ "
二.关闭防火墙和selinux
1>.关闭防火墙
[[email protected] ~]# systemctl status firewalld
● firewalld.service - firewalld - dynamic firewall daemon
   Loaded: loaded (/usr/lib/systemd/system/firewalld.service; enabled; vendor preset: enabled)
   Active: active (running) since Sat 2019-06-08 21:13:36 CST; 16min ago
     Docs: man:firewalld(1)
 Main PID: 8863 (firewalld)
   CGroup: /system.slice/firewalld.service
           └─8863 /usr/bin/python -Es /usr/sbin/firewalld --nofork --nopid

Jun 08 21:13:35 node100.yinzhengjie.org.cn systemd[1]: Starting firewalld - dynamic firewall daemon...
Jun 08 21:13:36 node100.yinzhengjie.org.cn systemd[1]: Started firewalld - dynamic firewall daemon.
Jun 08 21:13:39 node100.yinzhengjie.org.cn firewalld[8863]: ERROR: Failed to load '/etc/sysconfig/network-scripts/ifcfg-bond0': [Errno 13] ...bond0'
Jun 08 21:13:39 node100.yinzhengjie.org.cn firewalld[8863]: ERROR: Calling post func <function ifcfg_set_zone_of_interface at 0x7fc506f7b14...bond0'
Jun 08 21:13:39 node100.yinzhengjie.org.cn firewalld[8863]: ERROR: Failed to load '/etc/sysconfig/network-scripts/ifcfg-bond0': [Errno 13] ...bond0'
Jun 08 21:13:39 node100.yinzhengjie.org.cn firewalld[8863]: ERROR: Calling post func <function ifcfg_set_zone_of_interface at 0x7fc506f7b14...bond0'
Jun 08 21:13:39 node100.yinzhengjie.org.cn firewalld[8863]: ERROR: Failed to load '/etc/sysconfig/network-scripts/ifcfg-bond0': [Errno 13] ...bond0'
Jun 08 21:13:39 node100.yinzhengjie.org.cn firewalld[8863]: ERROR: Calling post func <function ifcfg_set_zone_of_interface at 0x7fc506f7b14...bond0'
Hint: Some lines were ellipsized, use -l to show in full.
[[email protected] ~]#
[[email protected] ~]#
[[email protected] ~]# systemctl status firewalld
● firewalld.service - firewalld - dynamic firewall daemon
   Loaded: loaded (/usr/lib/systemd/system/firewalld.service; enabled; vendor preset: enabled)
   Active: active (running) since Sat 2019-06-08 21:13:36 CST; 16min ago
     Docs: man:firewalld(1)
 Main PID: 8863 (firewalld)
   CGroup: /system.slice/firewalld.service
           └─8863 /usr/bin/python -Es /usr/sbin/firewalld --nofork --nopid

Jun 08 21:13:35 node100.yinzhengjie.org.cn systemd[1]: Starting firewalld - dynamic firewall daemon...
Jun 08 21:13:36 node100.yinzhengjie.org.cn systemd[1]: Started firewalld - dynamic firewall daemon.
Jun 08 21:13:39 node100.yinzhengjie.org.cn firewalld[8863]: ERROR: Failed to load '/etc/sysconfig/network-scripts/ifcfg-bond0': [Errno 13] ...bond0'
Jun 08 21:13:39 node100.yinzhengjie.org.cn firewalld[8863]: ERROR: Calling post func <function ifcfg_set_zone_of_interface at 0x7fc506f7b14...bond0'
Jun 08 21:13:39 node100.yinzhengjie.org.cn firewalld[8863]: ERROR: Failed to load '/etc/sysconfig/network-scripts/ifcfg-bond0': [Errno 13] ...bond0'
Jun 08 21:13:39 node100.yinzhengjie.org.cn firewalld[8863]: ERROR: Calling post func <function ifcfg_set_zone_of_interface at 0x7fc506f7b14...bond0'
Jun 08 21:13:39 node100.yinzhengjie.org.cn firewalld[8863]: ERROR: Failed to load '/etc/sysconfig/network-scripts/ifcfg-bond0': [Errno 13] ...bond0'
Jun 08 21:13:39 node100.yinzhengjie.org.cn firewalld[8863]: ERROR: Calling post func <function ifcfg_set_zone_of_interface at 0x7fc506f7b14...bond0'
Hint: Some lines were ellipsized, use -l to show in full.
[[email protected] ~]#
[[email protected] ~]#
[[email protected] ~]# systemctl stop firewalld
[[email protected] ~]#
[[email protected] ~]# systemctl status firewalld
● firewalld.service - firewalld - dynamic firewall daemon
   Loaded: loaded (/usr/lib/systemd/system/firewalld.service; enabled; vendor preset: enabled)
   Active: inactive (dead) since Sat 2019-06-08 21:30:20 CST; 5s ago
     Docs: man:firewalld(1)
  Process: 8863 ExecStart=/usr/sbin/firewalld --nofork --nopid $FIREWALLD_ARGS (code=exited, status=0/SUCCESS)
 Main PID: 8863 (code=exited, status=0/SUCCESS)

Jun 08 21:13:35 node100.yinzhengjie.org.cn systemd[1]: Starting firewalld - dynamic firewall daemon...
Jun 08 21:13:36 node100.yinzhengjie.org.cn systemd[1]: Started firewalld - dynamic firewall daemon.
Jun 08 21:13:39 node100.yinzhengjie.org.cn firewalld[8863]: ERROR: Failed to load '/etc/sysconfig/network-scripts/ifcfg-bond0': [Errno 13] ...bond0'
Jun 08 21:13:39 node100.yinzhengjie.org.cn firewalld[8863]: ERROR: Calling post func <function ifcfg_set_zone_of_interface at 0x7fc506f7b14...bond0'
Jun 08 21:13:39 node100.yinzhengjie.org.cn firewalld[8863]: ERROR: Failed to load '/etc/sysconfig/network-scripts/ifcfg-bond0': [Errno 13] ...bond0'
Jun 08 21:13:39 node100.yinzhengjie.org.cn firewalld[8863]: ERROR: Calling post func <function ifcfg_set_zone_of_interface at 0x7fc506f7b14...bond0'
Jun 08 21:13:39 node100.yinzhengjie.org.cn firewalld[8863]: ERROR: Failed to load '/etc/sysconfig/network-scripts/ifcfg-bond0': [Errno 13] ...bond0'
Jun 08 21:13:39 node100.yinzhengjie.org.cn firewalld[8863]: ERROR: Calling post func <function ifcfg_set_zone_of_interface at 0x7fc506f7b14...bond0'
Jun 08 21:30:19 node100.yinzhengjie.org.cn systemd[1]: Stopping firewalld - dynamic firewall daemon...
Jun 08 21:30:20 node100.yinzhengjie.org.cn systemd[1]: Stopped firewalld - dynamic firewall daemon.
Hint: Some lines were ellipsized, use -l to show in full.
[[email protected] ~]#
[[email protected] ~]#
[[email protected] ~]# systemctl disable firewalld
Removed symlink /etc/systemd/system/multi-user.target.wants/firewalld.service.
Removed symlink /etc/systemd/system/dbus-org.fedoraproject.FirewallD1.service.
[[email protected] ~]#
[[email protected] ~]#
2>.关闭selinux
[[email protected] ~]# sed -i s'#SELINUX=enforcing#SELINUX=disabled#' /etc/selinux/config
3>.关闭DNS PTR反向查询(sshd服务优化)
  UseDNS 选项打开状态下,当客户端试图登录SSH服务器时,服务器端先根据客户端的IP地址进行DNS PTR反向查询出客户端的主机名,然后根据查询出的客户端主机名进行DNS正向A记录查询,验证与其原始IP地址是否一致,这是防止客户端欺骗的一种措施,但一般我们的是动态IP不会有PTR记录,打开这个选项不过是在白白浪费时间而已,不如将其关闭。

  具体操作如下:

[[email protected] ~]# grep UseDNS /etc/ssh/sshd_config
#UseDNS yes
[[email protected] ~]#
[[email protected] ~]# sed -i 's@#UseDNS yes@UseDNS no@g' /etc/ssh/sshd_config
[[email protected] ~]#
[[email protected] ~]# grep UseDNS /etc/ssh/sshd_config
UseDNS no
[[email protected] ~]#
[[email protected] ~]#
4>.关闭GSSAPI身份验证(ssh服务优化)
  GSSAPIAuthentication  当这个参数开启( GSSAPIAuthentication  yes )的时候,通过SSH登陆服务器时候会有些会很慢!这是由于服务器端启用了GSSAPI。登陆的时候客户端需要对服务器端的IP地址进行反解析,如果服务器的IP地址没有配置PTR记录,那么就容易在这里卡住了。

  具体操作如下:

[[email protected] ~]# grep GSSAPIAuthentication /etc/ssh/sshd_config
GSSAPIAuthentication yes
[[email protected] ~]#
[[email protected] ~]# sed -i 's@^GSSAPIAuthentication yes@GSSAPIAuthentication no@g' /etc/ssh/sshd_config
[[email protected] ~]#
[[email protected] ~]# grep GSSAPIAuthentication /etc/ssh/sshd_config
GSSAPIAuthentication no
[[email protected] ~]#
[[email protected] ~]# systemctl restart sshd
[[email protected] ~]#
5>.检查DNS配置
[[email protected] ~]# hostname --fqdn
node100.yinzhengjie.org.cn
[[email protected] ~]#
四.关闭透明大页(重启后生效)
一.透明大页(Transparent Huge Pages,简称THP)
    在Linux6.x之后的平台,在安装Oracle数据库的时候都建议关闭透明大页。Linux下的大页分为两种类型:标准大页(Huge Pages)和透明大页(Transparent Huge Pages)。
1>.标准大页(Huge Pages)
    是从Linux Kernel 2.6后被引入的。目的是使用更大的内存页面(memory page size) 以适应越来越大的系统内存,让操作系统可以支持现代硬件架构的大页面容量功能。
2>.透明大页(Transparent Huge Pages)缩写为THP,
    这个是RHEL 6开始引入的一个功能。

3>.HP和THP的区别
    这两者的区别在于大页的分配机制,标准大页管理是预分配的方式,而透明大页管理则是动态分配的方式。目前透明大页与传统大页混合使用会出现一些问题,导致性能问题和系统重启。
    ORACLE官方不建议在使用RedHat 6, OEL 6, SLES 11 and UEK2 kernels 时开启透明大页(THP),因为透明大页存在一些问题:

      3.1>.在RAC环境下 透明大页(Transparent HugePages )会导致异常节点重启和性能问题;

      3.2>.在单机环境中,透明大页(Transparent HugePages ) 也会导致一些异常的性能问题;
      3.3>.THP是一个使用Huge Pages自动化的抽象层。它会引起cpu占用率增大,需要将其关闭。


二.关闭透明大页
    Linux7 默认情况下 是开启透明大页功能的。默认情况下,状态为always,需要调整为never。
[[email protected] ~]#
[[email protected] ~]# uname -r
3.10.0-957.el7.x86_64
[[email protected] ~]#
[[email protected] ~]# cat /etc/redhat-release
CentOS Linux release 7.6.1810 (Core)
[[email protected] ~]#
[[email protected] ~]# cat /sys/kernel/mm/transparent_hugepage/enabled
[always] madvise never
[[email protected] ~]#
[[email protected] ~]#
[[email protected] ~]# cat /etc/default/grub  | grep GRUB_CMDLINE_LINUX        #在原有的配置上添加:transparent_hugepage=never
GRUB_CMDLINE_LINUX="crashkernel=auto rd.lvm.lv=VolGroup/lv_root rd.lvm.lv=VolGroup/lv_swap rhgb quiet transparent_hugepage=never"
[[email protected] ~]#
[[email protected] ~]#
[[email protected] ~]# grub2-mkconfig -o /boot/grub2/grub.cfg
Generating grub configuration file ...
Found linux image: /boot/vmlinuz-3.10.0-957.el7.x86_64
Found initrd image: /boot/initramfs-3.10.0-957.el7.x86_64.img
Found linux image: /boot/vmlinuz-0-rescue-abf2be07fc8c594fb87ff254b58fc5d6
Found initrd image: /boot/initramfs-0-rescue-abf2be07fc8c594fb87ff254b58fc5d6.img
done
[[email protected] ~]#
[[email protected] ~]# reboot                                             #重启操作系统后,配置就会生效!
[[email protected] ~]#
[[email protected] ~]# cat /sys/kernel/mm/transparent_hugepage/enabled                #重启后,查看陪你已经被关闭!
always madvise [never]
[[email protected] ~]#
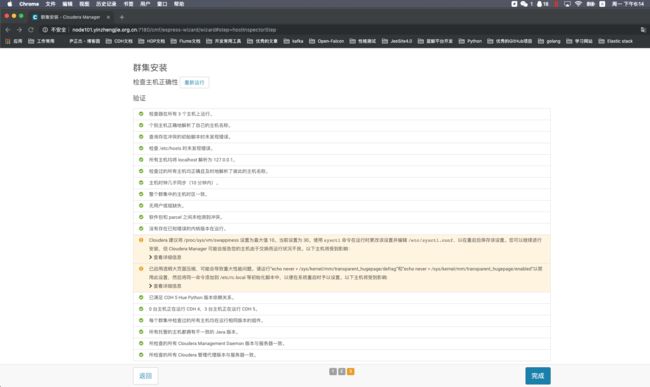
  据Cloudera和Hortonworks的专家介绍,THP压缩会降低Hadoop的性能。所以,禁用脆皮整理是一个很好的做法。具体操作如下:

[[email protected] ~]# vi /etc/rc.d/rc.local
[[email protected] ~]#
[[email protected] ~]# tail -8 /etc/rc.d/rc.local
#ADD BY YINZHENGJIE
if test -f /sys/kernel/mm/transparent_hugepage/enabled; then
      echo never > /sys/kernel/mm/transparent_hugepage/enabled
fi

if test -f /sys/kernel/mm/transparent_hugepage/defrag; then
       echo never > /sys/kernel/mm/transparent_hugepage/defrag
fi
[[email protected] ~]#
[[email protected] ~]# ll /etc/rc.d/rc.local
-rw-r--r--. 1 root root 752 Jun  8 21:47 /etc/rc.d/rc.local
[[email protected] ~]#
[[email protected] ~]# chmod +x /etc/rc.d/rc.local
[[email protected] ~]#
[[email protected] ~]# ll /etc/rc.d/rc.local
-rwxr-xr-x. 1 root root 752 Jun  8 21:47 /etc/rc.d/rc.local
[[email protected] ~]#
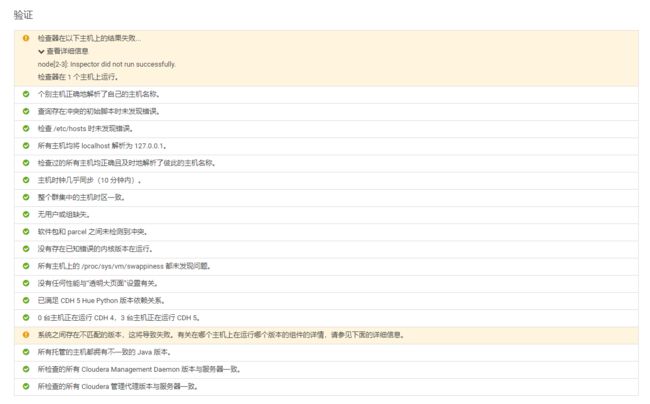
注意,如果没有配置的话,我们在安装CDH服务也能成功安装,可能会出现如下图所示的提示信息:
五.修改Linux内核参数
[[email protected] ~]# tail -8 /etc/sysctl.conf           #编辑内核参数文件,对Linux内核参数的修改如下
#Add by yinzhengjie
fs.aio-max-nr=1048576
net.core.rmem_default=262144
net.core.wmem_default=262144
net.core.rmem_max=16777216
net.core.wmem_max=16777216
net.ipv4.tcp_rmem=4096    262144 16777216
net.ipv4.tcp_wmem=4096  262144 16777216
[[email protected] ~]#
[[email protected] ~]#
[[email protected] ~]# sysctl -p                  #我们使用该命令就可以让"/etc/sysctl.conf"中的配置生效
fs.aio-max-nr = 1048576                                #最大并发I/O请求数
net.core.rmem_default = 262144                            #操作系统接收缓冲区的默认大小
net.core.wmem_default = 262144                            #操作系统发送缓冲区的默认大小
net.core.rmem_max = 16777216                             #操作系统接收缓冲区最大值
net.core.wmem_max = 16777216                             #操作系统发送缓冲区最大值
net.ipv4.tcp_rmem = 4096    262144 16777216                    #接收窗口尺寸的最小,默认,最大值
net.ipv4.tcp_wmem = 4096  262144 16777216                     #发送窗口尺寸的最小,默认,最大值
[[email protected] ~]#
[[email protected] ~]#
六.增加文件限制
为了避免集群中的任何文件描述符错误,需要增加单个用户或进程一次可以打开的文件数量的限制。可以使用以下命令检查当前限制。

[[email protected] ~]# ulimit -Sn        #软限制
1024
[[email protected] ~]#
[[email protected] ~]# ulimit -Hn        #硬限制,很显然,在大数据集群环境中,我们不应该使用默认配置,Hortonworks推荐10000或者更多。
4096
[[email protected] ~]#

通过对limits的设置来优化系统性能
[[email protected] ~]# tail -7 /etc/security/limits.conf
#ADD BY YINZHENGJIE
* soft nofile 1048576
* hard nofile 1048576
* soft nproc 1048576
* hard nproc 1048576
* soft memlock unlimited
* hard memlock unlimited
[[email protected] ~]#
[[email protected] ~]# tail -3 /etc/security/limits.d/20-nproc.conf
#ADD BY YINZHENGJIE
* soft nproc 1048576
root soft nproc unlimited
[[email protected] ~]#


以上参数输出解读:
  第一列表示用户和组
    如果是"*",则表示所有用户或组进行限制。

  第二列表示软限制还是硬限制,
    当进程使用的资源超过软限制时系统日志会有警告产生,当进程使用的资源达到硬限制时,则无法继续使用更多的限制,甚至有的程序会直接抛出异常,比如MySQL程序。

  第三列表示限制的资源类型
    如nofile表示打开文件描述符的最大数目,memlock表示最大锁定内存地址空间(KB),nporc表示最大数量的进程,as表示地址空间的限制(KB),cpu表示最大CPU时间(分钟)等等,这些在"/etc/security/limits.conf"配置文件有相应的说明。

  第四列表示限制的最大值
    也就是我们针对某个参数配置的具体数值。比如"* soft nofile 1048576",表示任何用户对于文件句柄数的软限制最大打开文件描述符是1048576。

温馨提示:
  "/etc/security/limits.conf" 配置文件可限制文件打开数,系统进程等资源,在该文件配置中写的最大用户进程数是受"/etc/security/limits.d/90-nproc.conf"配置上限影响的。
  一般系统普通用户进程数满了都是修改/etc/security/limits.d/90-nproc.conf文件。
七.禁用Swap
  理想情况下,服务器都不应该swap,尤其是DataNodes。

  可以使用一下命令检查服务器上的swap状态。
[[email protected] ~]# swapon -s
Filename                Type        Size    Used    Priority
/dev/dm-1                                  partition    1572860    0    -2
[[email protected] ~]#

  可以使用以下命令在这些服务器上完全禁用该功能。
[[email protected] ~]# free -h
              total        used        free      shared  buff/cache   available
Mem:           3.7G        133M        3.4G         11M        174M        3.3G
Swap:          1.5G          0B        1.5G
[[email protected] ~]#
[[email protected] ~]# swapoff -a
[[email protected] ~]#
[[email protected] ~]# swapon -s
[[email protected] ~]#
[[email protected] ~]# free -h
              total        used        free      shared  buff/cache   available
Mem:           3.7G        132M        3.4G         11M        173M        3.3G
Swap:            0B          0B          0B
[[email protected] ~]#
[[email protected] ~]#

  默认情况下,大多数Linux操作系统的swappiness被设置为60.如果swappiness设置为0,除非内存不足,Linux将避免使用磁盘,而设置100表示操作系统立即将程序切换到磁盘。我们知道,这是为60意味着从内存使用量达到操作系统分配的内存的一半左右的时间开始,操作系统会相当频繁地使用磁盘上的交换文件。例如,如果将swappiness调低到10,则只有当RAM占用率达到90%左右时,操作系统才会使用磁盘上的交换文件。
[[email protected] ~]# cat /proc/sys/vm/swappiness
30
[[email protected] ~]#

  Linux管理员可以将以下设置添加到"/etc/sysctl.conf"文件中来更改系统的swappiness值:
[[email protected] ~]# tail -1 /etc/sysctl.conf
vm.swappiness = 1
[[email protected] ~]#

  管理员必须重新启动服务器或者执行"sysctl -p"指定才能使新的swappiness设置生效。对于将swappiness值设置多低,没有特别明确的强制规定。Cloudera专家建议将其设置为1。如果你的服务器是256G的内存的且你确定你的程序永远不必发生OOM,可以将改值设置为0.
[[email protected] ~]# sysctl -q vm.swappiness
vm.swappiness = 1
[[email protected] ~]#
八.禁用IPv6
  IPv6被认为是IPv4的替代产品,它用来解决现有IPv4地址空间即将耗尽的问题。但我们的大数据集群一般都在内网运行。压根就用不到IPv6的地址,因此开始IPv6功能对系统占用的资源是浪费的,因此我们可以考虑将其禁用。

  可以通过编辑"/etc/sysctl.conf"文件并在文件末尾加以下来禁用IPv6:
[[email protected] ~]# tail -1 /etc/sysctl.conf
net.ipv6.conf.all.disable_ipv6 = 1
[[email protected] ~]#

  有的网友说除了上面一行,还得添加"net.ipv6.conf.default.disable_ipv6 = 1"和"net.ipv6.conf.lo.disable_ipv6 = 1"两个参数,其实这两个参数压根就不需要往上写,我们"net.ipv6.conf.all.disable_ipv6"就以及表示禁用当前服务器所有的网卡的ipv6功能啦~
九.磁盘设置
1>.挂载磁盘
  确保在挂载所有磁盘时使用noatime时间以及挂载所有目录时使用nodir时间。这样,可以避免在对Linux文件系统中的文件或目录进行读取操作时的不必要写入操作,从而提高集群性能。

[[email protected] ~]# egrep -v "^#|^$" /etc/fstab
/dev/mapper/centos-root /                       xfs     defaults,noatime,nodiratime        0 0
UUID=db0c809d-1a32-4009-b8f1-ca48ddfb294a /boot                   xfs     defaults        0 0
/dev/mapper/centos-swap swap                    swap    defaults        0 0
/dev/sdb1        /yinzhengjie        xfs    defaults,noatime,nodiratime    0 0
[[email protected] ~]#
2>.测试磁盘I/O速度
博主推荐阅读:https://www.cnblogs.com/yinzhengjie/p/9935478.html

[[email protected] ~]# hdparm -t /dev/sdb1

/dev/sdb1:
Timing buffered disk reads: 2502 MB in 3.01 seconds = 832.18 MB/sec          #如果你没有看到70MB以上的速度,这意味着有一个潜在的问题存在,即你的磁盘性能读取很低!可能会对服务造成影响!(需要检查磁盘是否有故障)
[[email protected] ~]#
3>.检查服务器的BIOS设置
通过确保不启用磁盘驱动IDE仿真等功能来保证服务器BIOS为最佳性能配置。存储和系统管理员一般会关注这个配置。
十.更换默认的yum源
1>.创建备份目录
[[email protected] ~]# ll /etc/yum.repos.d/
total 32
-rw-r--r--. 1 root root 1664 Nov 23  2018 CentOS-Base.repo
-rw-r--r--. 1 root root 1309 Nov 23  2018 CentOS-CR.repo
-rw-r--r--. 1 root root  649 Nov 23  2018 CentOS-Debuginfo.repo
-rw-r--r--. 1 root root  314 Nov 23  2018 CentOS-fasttrack.repo
-rw-r--r--. 1 root root  630 Nov 23  2018 CentOS-Media.repo
-rw-r--r--. 1 root root 1331 Nov 23  2018 CentOS-Sources.repo
-rw-r--r--. 1 root root 5701 Nov 23  2018 CentOS-Vault.repo
[[email protected] ~]#
[[email protected] ~]# mkdir -p /etc/yum.repos.d/{default,back}
[[email protected] ~]#
[[email protected] ~]# ll /etc/yum.repos.d/
total 32
drwxr-xr-x  2 root root    6 Jun 13 05:27 back
-rw-r--r--. 1 root root 1664 Nov 23  2018 CentOS-Base.repo
-rw-r--r--. 1 root root 1309 Nov 23  2018 CentOS-CR.repo
-rw-r--r--. 1 root root  649 Nov 23  2018 CentOS-Debuginfo.repo
-rw-r--r--. 1 root root  314 Nov 23  2018 CentOS-fasttrack.repo
-rw-r--r--. 1 root root  630 Nov 23  2018 CentOS-Media.repo
-rw-r--r--. 1 root root 1331 Nov 23  2018 CentOS-Sources.repo
-rw-r--r--. 1 root root 5701 Nov 23  2018 CentOS-Vault.repo
drwxr-xr-x  2 root root    6 Jun 13 05:27 default
[[email protected] ~]#
[[email protected] ~]#
2>.备份所有默认的配置文件
[[email protected] ~]# ll /etc/yum.repos.d/
total 32
drwxr-xr-x  2 root root    6 Jun 13 05:27 back
-rw-r--r--. 1 root root 1664 Nov 23  2018 CentOS-Base.repo
-rw-r--r--. 1 root root 1309 Nov 23  2018 CentOS-CR.repo
-rw-r--r--. 1 root root  649 Nov 23  2018 CentOS-Debuginfo.repo
-rw-r--r--. 1 root root  314 Nov 23  2018 CentOS-fasttrack.repo
-rw-r--r--. 1 root root  630 Nov 23  2018 CentOS-Media.repo
-rw-r--r--. 1 root root 1331 Nov 23  2018 CentOS-Sources.repo
-rw-r--r--. 1 root root 5701 Nov 23  2018 CentOS-Vault.repo
drwxr-xr-x  2 root root    6 Jun 13 05:27 default
[[email protected] ~]#
[[email protected] ~]# mv /etc/yum.repos.d/*repo /etc/yum.repos.d/default/
[[email protected] ~]#
[[email protected] ~]# ll /etc/yum.repos.d/
total 0
drwxr-xr-x 2 root root   6 Jun 13 05:27 back
drwxr-xr-x 2 root root 187 Jun 13 05:28 default
[[email protected] ~]#
[[email protected] ~]#
3>.下载阿里的yum源
[[email protected] ~]# ll /etc/yum.repos.d/
total 0
drwxr-xr-x 2 root root   6 Jun 13 05:27 back
drwxr-xr-x 2 root root 187 Jun 13 05:28 default
[[email protected] ~]#
[[email protected] ~]# curl -o /etc/yum.repos.d/CentOS-Base.repo http://mirrors.aliyun.com/repo/Centos-7.repo
  % Total    % Received % Xferd  Average Speed   Time    Time     Time  Current
                                 Dload  Upload   Total   Spent    Left  Speed
100  2523  100  2523    0     0  31161      0 --:--:-- --:--:-- --:--:-- 31537
[[email protected] ~]#
[[email protected] ~]# ll /etc/yum.repos.d/
total 4
drwxr-xr-x 2 root root    6 Jun 13 05:27 back
-rw-r--r-- 1 root root 2523 Jun 13 05:30 CentOS-Base.repo
drwxr-xr-x 2 root root  187 Jun 13 05:28 default
[[email protected] ~]#
[[email protected] ~]#
4>.安装第三方软件源REPL
[[email protected] ~]# ll /etc/yum.repos.d/
total 4
drwxr-xr-x 2 root root    6 Jun 13 05:27 back
-rw-r--r-- 1 root root 2523 Jun 13 05:30 CentOS-Base.repo
drwxr-xr-x 2 root root  187 Jun 13 05:28 default
[[email protected] ~]#
[[email protected] ~]# yum -y install epel-release
Loaded plugins: fastestmirror
Loading mirror speeds from cached hostfile
 * base: mirrors.aliyun.com
 * extras: mirrors.aliyun.com
 * updates: mirrors.aliyun.com
base                                                                                                                                                                                                                        | 3.6 kB  00:00:00
extras                                                                                                                                                                                                                      | 3.4 kB  00:00:00
updates                                                                                                                                                                                                                     | 3.4 kB  00:00:00
Resolving Dependencies
--> Running transaction check
---> Package epel-release.noarch 0:7-11 will be installed
--> Finished Dependency Resolution

Dependencies Resolved

===================================================================================================================================================================================================================================================
 Package                                                         Arch                                                      Version                                                 Repository                                                 Size
===================================================================================================================================================================================================================================================
Installing:
 epel-release                                                    noarch                                                    7-11                                                    extras                                                     15 k

Transaction Summary
===================================================================================================================================================================================================================================================
Install  1 Package

Total download size: 15 k
Installed size: 24 k
Downloading packages:
epel-release-7-11.noarch.rpm                                                                                                                                                                                                |  15 kB  00:00:00
Running transaction check
Running transaction test
Transaction test succeeded
Running transaction
  Installing : epel-release-7-11.noarch                                                                                                                                                                                                        1/1
  Verifying  : epel-release-7-11.noarch                                                                                                                                                                                                        1/1

Installed:
  epel-release.noarch 0:7-11

Complete!
[[email protected] ~]#
[[email protected] ~]# ll /etc/yum.repos.d/
total 12
drwxr-xr-x 2 root root    6 Jun 13 05:27 back
-rw-r--r-- 1 root root 2523 Jun 13 05:30 CentOS-Base.repo
drwxr-xr-x 2 root root  187 Jun 13 05:28 default
-rw-r--r-- 1 root root  951 Oct  2  2017 epel.repo
-rw-r--r-- 1 root root 1050 Oct  2  2017 epel-testing.repo
[[email protected] ~]#
[[email protected] ~]#
5>.生成缓存(此步骤可选,如果网络比较卡的话可能会需要5~10分钟左右)
[[email protected] ~]# yum makecache
Loaded plugins: fastestmirror
Loading mirror speeds from cached hostfile
epel/x86_64/metalink                                                                                                                                                                                                        | 6.6 kB  00:00:00
 * base: mirrors.aliyun.com
 * epel: ftp.riken.jp
 * extras: mirrors.aliyun.com
 * updates: mirrors.aliyun.com
base                                                                                                                                                                                                                        | 3.6 kB  00:00:00
epel                                                                                                                                                                                                                        | 5.3 kB  00:00:00
extras                                                                                                                                                                                                                      | 3.4 kB  00:00:00
updates                                                                                                                                                                                                                     | 3.4 kB  00:00:00
(1/15): base/7/x86_64/filelists_db                                                                                                                                                                                          | 7.1 MB  00:00:03
(2/15): epel/x86_64/group_gz                                                                                                                                                                                                |  88 kB  00:00:03
(3/15): epel/x86_64/prestodelta                                                                                                                                                                                             | 1.6 kB  00:00:00
base/7/x86_64/other_db         FAILED                                                                      25% [=========================                                                                        ] 190 kB/s |  10 MB  00:02:37 ETA
http://mirrors.aliyuncs.com/centos/7/os/x86_64/repodata/fbebcd3de05e22bd1cd526e594f235968401471d4a9aef3c1ad356b6d1965365-other.sqlite.bz2: [Errno 14] curl#7 - "Failed connect to mirrors.aliyuncs.com:80; Connection refused" 10 MB  00:02:37 ETA
Trying other mirror.
(4/15): epel/x86_64/other_db                                                                                                                                                                                                | 3.2 MB  00:00:23
(5/15): extras/7/x86_64/filelists_db                                                                                                                                                                                        | 243 kB  00:00:00
(6/15): extras/7/x86_64/prestodelta                                                                                                                                                                                         |  62 kB  00:00:00
(7/15): extras/7/x86_64/other_db                                                                                                                                                                                            | 125 kB  00:00:00
(8/15): updates/7/x86_64/filelists_db                                                                                                                                                                                       | 4.0 MB  00:00:01
(9/15): updates/7/x86_64/prestodelta                                                                                                                                                                                        | 750 kB  00:00:00
(10/15): updates/7/x86_64/other_db                                                                                                                                                                                          | 629 kB  00:00:00
(11/15): base/7/x86_64/other_db                                                                                                                                                                                             | 2.6 MB  00:00:01
epel/x86_64/updateinfo_zck     FAILED                                                                      49% [================================================                                                 ] 505 kB/s |  20 MB  00:00:40 ETA
https://mirror.ps.kz/epel/7/x86_64/repodata/4584885fc665ab476c27c0577d8e28c8028ae125d7626bf6a7ab3e5bfcdafb08-updateinfo.xml.zck: [Errno 14] curl#7 - "Failed to connect to 2a00:5da0:1:1::141: Network is unreachable" kB/s |  20 MB  00:00:40 ETA
Trying other mirror.
epel/x86_64/primary_db         FAILED                                                                      50% [================================================-                                                ] 150 kB/s |  20 MB  00:02:13 ETA
http://ftp.riken.jp/Linux/fedora/epel/7/x86_64/repodata/42c44d09589f67a9fc551051298e8c6578d592b91074731d6c51dbb9ae770a9a-primary.sqlite.bz2: [Errno 12] Timeout on http://ftp.riken.jp/Linux/fedora/epel/7/x86_64/repodata/42c44d09589f67a9fc551051298e8c6578d592b91074731d6c51dbb9ae770a9a-primary.sqlite.bz2: (28, 'Operation too slow. Less than 1000 bytes/sec transferred the last 30 seconds')
Trying other mirror.
(12/15): epel/x86_64/updateinfo                                                                                                                                                                                             | 977 kB  00:00:48
epel/x86_64/filelists_db       FAILED                                                                      51% [=================================================-                                               ]  40 kB/s |  20 MB  00:08:05 ETA
http://ftp.jaist.ac.jp/pub/Linux/Fedora/epel/7/x86_64/repodata/8956b7e5ab6ff28caf8d112085e1e800b6d2fd9229a98bbcd9900c4c4d09c8c7-filelists.sqlite.bz2: [Errno 12] Timeout on http://ftp.jaist.ac.jp/pub/Linux/Fedora/epel/7/x86_64/repodata/8956b7e5ab6ff28caf8d112085e1e800b6d2fd9229a98bbcd9900c4c4d09c8c7-filelists.sqlite.bz2: (28, 'Operation too slow. Less than 1000 bytes/sec transferred the last 30 seconds')
Trying other mirror.
(13/15): epel/x86_64/updateinfo_zck                                                                                                                                                                                         | 1.4 MB  00:01:46
(14/15): epel/x86_64/filelists_db                                                                                                                                                                                           |  11 MB  00:03:26
(15/15): epel/x86_64/primary_db                                                                                                                                                                                             | 6.8 MB  00:07:37
Metadata Cache Created
[[email protected] ~]#
6>.备份yum 源
[[email protected] ~]# cp /etc/yum.repos.d/CentOS-Base.repo /etc/yum.repos.d/back/
[[email protected] ~]#
[[email protected] ~]# ll /etc/yum.repos.d/
total 12
drwxr-xr-x 2 root root   30 Jun 13 05:43 back
-rw-r--r-- 1 root root 2523 Jun 13 05:30 CentOS-Base.repo
drwxr-xr-x 2 root root  187 Jun 13 05:28 default
-rw-r--r-- 1 root root  951 Oct  2  2017 epel.repo
-rw-r--r-- 1 root root 1050 Oct  2  2017 epel-testing.repo
[[email protected] ~]#
[[email protected] ~]#
[[email protected] ~]#
[[email protected] ~]# ll /etc/yum.repos.d/back/
total 4
-rw-r--r-- 1 root root 2523 Jun 13 05:43 CentOS-Base.repo
[[email protected] ~]#
[[email protected] ~]#
[[email protected] ~]# ll /etc/yum.repos.d/default/
total 32
-rw-r--r--. 1 root root 1664 Nov 23  2018 CentOS-Base.repo
-rw-r--r--. 1 root root 1309 Nov 23  2018 CentOS-CR.repo
-rw-r--r--. 1 root root  649 Nov 23  2018 CentOS-Debuginfo.repo
-rw-r--r--. 1 root root  314 Nov 23  2018 CentOS-fasttrack.repo
-rw-r--r--. 1 root root  630 Nov 23  2018 CentOS-Media.repo
-rw-r--r--. 1 root root 1331 Nov 23  2018 CentOS-Sources.repo
-rw-r--r--. 1 root root 5701 Nov 23  2018 CentOS-Vault.repo
[[email protected] ~]#
7>. 检查某个命令属于哪个安装包(比如检查ifconfig属于哪个安装包)
[[email protected] ~]# yum provides ifconfig
Loaded plugins: fastestmirror
Loading mirror speeds from cached hostfile
 * base: mirrors.aliyun.com
 * epel: ftp.yz.yamagata-u.ac.jp
 * extras: mirrors.aliyun.com
 * updates: mirrors.aliyun.com
net-tools-2.0-0.24.20131004git.el7.x86_64 : Basic networking tools
Repo        : @base
Matched from:
Filename    : /usr/sbin/ifconfig


[[email protected] ~]#
[[email protected] ~]# yum provides htpasswd
Loaded plugins: fastestmirror
Loading mirror speeds from cached hostfile
 * base: mirrors.aliyun.com
 * epel: ftp.riken.jp
 * extras: mirrors.aliyun.com
 * updates: mirrors.aliyun.com
httpd-tools-2.4.6-88.el7.centos.x86_64 : Tools for use with the Apache HTTP Server
Repo        : base
Matched from:
Filename    : /usr/bin/htpasswd


httpd-tools-2.4.6-89.el7.centos.x86_64 : Tools for use with the Apache HTTP Server
Repo        : updates
Matched from:
Filename    : /usr/bin/htpasswd


[[email protected] ~]#
[[email protected] ~]# yum -y install net-tools
Loaded plugins: fastestmirror
Loading mirror speeds from cached hostfile
 * base: mirrors.aliyun.com
 * epel: ftp.riken.jp
 * extras: mirrors.aliyun.com
 * updates: mirrors.aliyun.com
Resolving Dependencies
--> Running transaction check
---> Package net-tools.x86_64 0:2.0-0.24.20131004git.el7 will be installed
--> Finished Dependency Resolution

Dependencies Resolved

===================================================================================================================================================================================================================================================
 Package                                                  Arch                                                  Version                                                                  Repository                                           Size
===================================================================================================================================================================================================================================================
Installing:
 net-tools                                                x86_64                                                2.0-0.24.20131004git.el7                                                 base                                                306 k

Transaction Summary
===================================================================================================================================================================================================================================================
Install  1 Package

Total download size: 306 k
Installed size: 918 k
Downloading packages:
net-tools-2.0-0.24.20131004git.el7.x86_64.rpm                                                                                                                                                                               | 306 kB  00:00:00
Running transaction check
Running transaction test
Transaction test succeeded
Running transaction
  Installing : net-tools-2.0-0.24.20131004git.el7.x86_64                                                                                                                                                                                       1/1
  Verifying  : net-tools-2.0-0.24.20131004git.el7.x86_64                                                                                                                                                                                       1/1

Installed:
  net-tools.x86_64 0:2.0-0.24.20131004git.el7

Complete!
[[email protected] ~]#
十一.安装JDK1.8,并替换JCE文件(Kerberos等需要加密的组件会用到)
详情请参考:https://www.cnblogs.com/yinzhengjie/p/10739218.html
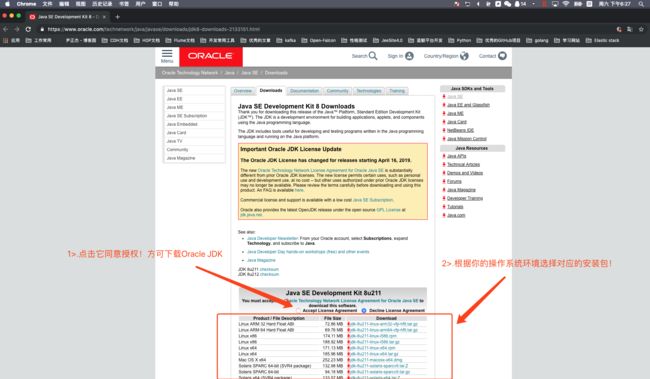
1>.打开Oracle官方网站下载相应的平台的安装包(https://www.oracle.com/technetwork/java/javase/downloads/jdk8-downloads-2133151.html)
2>.扩充密钥长度(下载JCE文件)
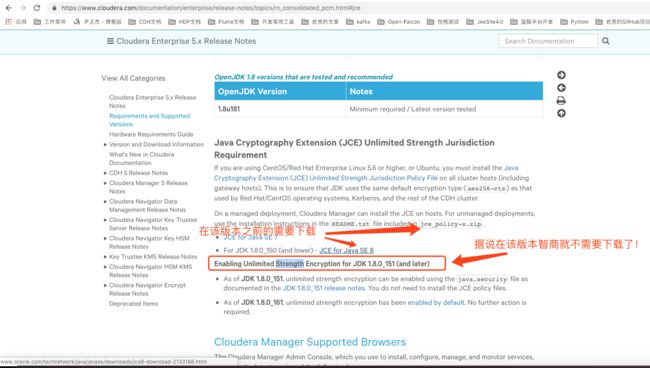
Kerberos 需要使用256为的AES加密算法,而JRE默认中的密钥长度比较短,并且不足以支撑。所以我们需要升级集群中所有服务器节点JRE的安全策略,使其能够解除密钥长度的限制。修改的方式是下载并替换JRE中的Unlimited JCEPolicy文件。

以JDK1.8为例,JCE8的下载地址为:https://www.oracle.com/technetwork/java/javase/downloads/jce8-download-2133166.html。
3>.将下载的jdk版本进行解压安装并配置环境变量
[[email protected] ~]# yum -y install lrzsz
Loaded plugins: fastestmirror
Loading mirror speeds from cached hostfile
 * base: mirrors.huaweicloud.com
 * extras: mirrors.tuna.tsinghua.edu.cn
 * updates: mirrors.tuna.tsinghua.edu.cn
Resolving Dependencies
--> Running transaction check
---> Package lrzsz.x86_64 0:0.12.20-36.el7 will be installed
--> Finished Dependency Resolution

Dependencies Resolved

====================================================================================================================================================
 Package                          Arch                              Version                                   Repository                       Size
====================================================================================================================================================
Installing:
 lrzsz                            x86_64                            0.12.20-36.el7                            base                             78 k

Transaction Summary
====================================================================================================================================================
Install  1 Package

Total download size: 78 k
Installed size: 181 k
Downloading packages:
lrzsz-0.12.20-36.el7.x86_64.rpm                                                                                              |  78 kB  00:00:00
Running transaction check
Running transaction test
Transaction test succeeded
Running transaction
  Installing : lrzsz-0.12.20-36.el7.x86_64                                                                                                      1/1
  Verifying  : lrzsz-0.12.20-36.el7.x86_64                                                                                                      1/1

Installed:
  lrzsz.x86_64 0:0.12.20-36.el7

Complete!
[[email protected] ~]#
[[email protected] ~]# ll
total 187336
-rw-r--r--. 1 root root 8409 Mar 24 22:46 jce_policy-8.zip
-rw-r--r--. 1 root root 191817140 Mar 24 22:27 jdk-8u201-linux-x64.tar.gz
[[email protected] ~]#
[[email protected] ~]# df -h
Filesystem               Size  Used Avail Use% Mounted on
/dev/mapper/centos-root   13G  1.4G   12G  11% /
devtmpfs                 1.9G     0  1.9G   0% /dev
tmpfs                    1.9G     0  1.9G   0% /dev/shm
tmpfs                    1.9G   12M  1.9G   1% /run
tmpfs                    1.9G     0  1.9G   0% /sys/fs/cgroup
/dev/sda1                 50G   33M   50G   1% /yinzhengjie
/dev/sdb1               1014M  146M  869M  15% /boot
tmpfs                    378M     0  378M   0% /run/user/0
[[email protected] ~]#
[[email protected] ~]#
[[email protected] ~]#
[[email protected] ~]# ll /yinzhengjie/
total 0
[[email protected] ~]#
[[email protected] ~]#
[[email protected] ~]# mkdir /yinzhengjie/softwares
[[email protected] ~]#
[[email protected] ~]# tar -zxf jdk-8u201-linux-x64.tar.gz -C /yinzhengjie/softwares/
[[email protected] ~]#
[[email protected] ~]# ll /yinzhengjie/softwares/jdk1.8.0_201/
total 25980
drwxr-xr-x. 2 10 143     4096 Dec 16 03:45 bin
-r--r--r--. 1 10 143     3244 Dec 16 03:45 COPYRIGHT
drwxr-xr-x. 3 10 143      132 Dec 16 03:45 include
-rw-r--r--. 1 10 143  5207434 Dec 12 17:07 javafx-src.zip
drwxr-xr-x. 5 10 143      185 Dec 16 03:45 jre
drwxr-xr-x. 5 10 143      245 Dec 16 03:45 lib
-r--r--r--. 1 10 143       40 Dec 16 03:45 LICENSE
drwxr-xr-x. 4 10 143       47 Dec 16 03:45 man
-r--r--r--. 1 10 143      159 Dec 16 03:45 README.html
-rw-r--r--. 1 10 143      424 Dec 16 03:45 release
-rw-r--r--. 1 10 143 21103945 Dec 16 03:45 src.zip
-rw-r--r--. 1 10 143   108109 Dec 12 17:07 THIRDPARTYLICENSEREADME-JAVAFX.txt
-r--r--r--. 1 10 143   155002 Dec 16 03:45 THIRDPARTYLICENSEREADME.txt
[[email protected] ~]#
[[email protected] ~]# vi /etc/profile
[[email protected] ~]#
[[email protected] ~]# tail -3 /etc/profile
#Add by yinzhengjie
JAVA_HOME=/yinzhengjie/softwares/jdk1.8.0_201
PATH=$PATH:$JAVA_HOME/bin
[[email protected] ~]#
[[email protected] ~]# source /etc/profile
[[email protected] ~]#
[[email protected] ~]# java -version
java version "1.8.0_201"
Java(TM) SE Runtime Environment (build 1.8.0_201-b09)
Java HotSpot(TM) 64-Bit Server VM (build 25.201-b09, mixed mode)
[[email protected] ~]#
[[email protected] ~]#
4>.将下载后的jce文件拷贝已经安装的jdk1.8目录中($JAVA_HOME/jre/lib/security/)
[[email protected] ~]# ll
total 187336
-rw-r--r--. 1 root root      8409 Mar 24 22:46 jce_policy-8.zip
-rw-r--r--. 1 root root 191817140 Mar 24 22:27 jdk-8u201-linux-x64.tar.gz
[[email protected] ~]#
[[email protected] ~]# unzip jce_policy-8.zip
Archive:  jce_policy-8.zip
   creating: UnlimitedJCEPolicyJDK8/
  inflating: UnlimitedJCEPolicyJDK8/local_policy.jar
  inflating: UnlimitedJCEPolicyJDK8/README.txt
  inflating: UnlimitedJCEPolicyJDK8/US_export_policy.jar
[[email protected] ~]#
[[email protected] ~]# ll
total 187336
-rw-r--r--. 1 root root      8409 Mar 24 22:46 jce_policy-8.zip
-rw-r--r--. 1 root root 191817140 Mar 24 22:27 jdk-8u201-linux-x64.tar.gz
drwxrwxr-x. 2 root root        76 Dec 21  2013 UnlimitedJCEPolicyJDK8
[[email protected] ~]#
[[email protected] ~]# ll UnlimitedJCEPolicyJDK8/
total 16
-rw-rw-r--. 1 root root 3035 Dec 21  2013 local_policy.jar
-rw-r--r--. 1 root root 7323 Dec 21  2013 README.txt
-rw-rw-r--. 1 root root 3023 Dec 21  2013 US_export_policy.jar
[[email protected] ~]#
[[email protected] ~]# ll /yinzhengjie/softwares/jdk1.8.0_201/jre/lib/security/        #查看为拷贝JCE文件之前目录结构
total 164
-rw-r--r-- 1 10 143 4054 Dec 15 14:45 blacklist
-rw-r--r-- 1 10 143 1273 Dec 15 14:45 blacklisted.certs
-rw-r--r-- 1 10 143 104430 Dec 15 14:45 cacerts
-rw-r--r-- 1 10 143 2466 Dec 15 14:45 java.policy
-rw-r--r-- 1 10 143 41528 Dec 15 14:45 java.security
-rw-r--r-- 1 10 143 98 Dec 15 14:45 javaws.policy
drwxr-xr-x 4 10 143 38 Dec 15 14:45 policy
-rw-r--r-- 1 10 143 0 Dec 15 14:45 trusted.libraries
[[email protected] ~]#
[[email protected] ~]# mv UnlimitedJCEPolicyJDK8/*.jar /yinzhengjie/softwares/jdk1.8.0_201/jre/lib/security/
[[email protected] ~]#
[[email protected] ~]# ll /yinzhengjie/softwares/jdk1.8.0_201/jre/lib/security/        #成功移动到该目录
total 172
-rw-r--r--. 1   10  143   4054 Dec 16 03:45 blacklist
-rw-r--r--. 1   10  143   1273 Dec 16 03:45 blacklisted.certs
-rw-r--r--. 1   10  143 104430 Dec 16 03:45 cacerts
-rw-r--r--. 1   10  143   2466 Dec 16 03:45 java.policy
-rw-r--r--. 1   10  143  41528 Dec 16 03:45 java.security
-rw-r--r--. 1   10  143     98 Dec 16 03:45 javaws.policy
-rw-rw-r--. 1 root root   3035 Dec 21  2013 local_policy.jar
drwxr-xr-x. 4   10  143     38 Dec 16 03:45 policy
-rw-r--r--. 1   10  143      0 Dec 16 03:45 trusted.libraries
-rw-rw-r--. 1 root root   3023 Dec 21  2013 US_export_policy.jar
[[email protected] ~]#
[[email protected] ~]#
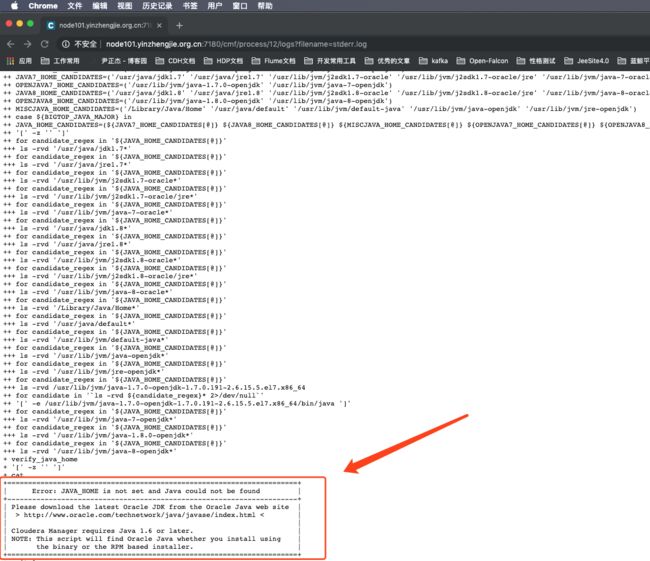
5>.如果没有安装JDK可能会报错如下
安装完JDK后我们需要做一些软连接,该链接为CM默认查找JDK环境的路径,如果你尽管安装JDK但没有做软连接可能会遇到下面的坑,这个问题是因为网友在我博客中留言我中看到的,我找到了解决方案,原链接为:https://www.cnblogs.com/yinzhengjie/p/9638360.html#4252486。
问题分析

  Inspector did not run successfully.一般是由于没有配置JDK环境。

  这种情况应该是你安装了Oracle版本的JDK且自定义了JDK HOME路径,尽管你将自己的JDK加入到“/etc/profile”中,CM Agent并不识别,它识别JDK的路径是通过读取自己的配置文件,即:“/opt/cloudera-manager/cm-5.15.1/lib64/cmf/service/common/cloudera-config.sh”。

解决方案有两种:
  (1)一种是将jdk环境加入“local JAVA8_HOME_CANDIDATES”属性中;
  (2)另一种就是配置软连接,将“/usr/java/jdk1.8”指向你服务的JDK PATH即可。
  我推荐大家使用第二种方法,做一个软连接即可也不需要去修改CM的配置文件,具体操作如下:
    [[email protected] ~]# mkdir /usr/java && cd /usr/java
    [[email protected] /usr/java]#
    [[email protected] /usr/java]# ln -s /yinzhengjie/softwares/jdk1.8.0_201/ /usr/java/jdk1.8
    [[email protected] /usr/java]#
    [[email protected] /usr/java]# ll
    total 0
    lrwxrwxrwx 1 root root 36 Jun 9 18:57 jdk1.8 -> /yinzhengjie/softwares/jdk1.8.0_201/
    [[email protected] /usr/java]#
十二.克隆虚拟机(经过上述修改后,接下来我们需要克隆出来8台虚拟机用于CDH大数据进群部署)
1>.进入克隆向导界面
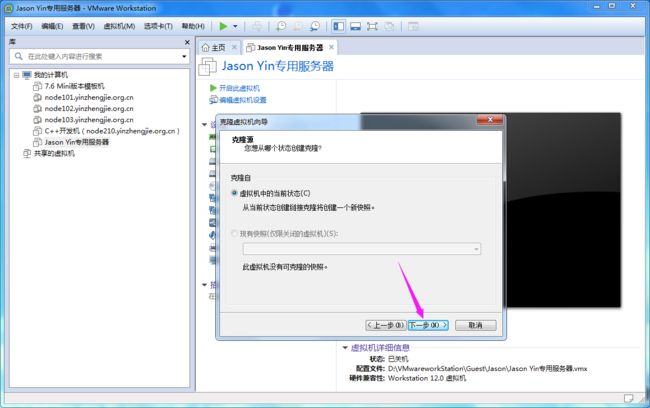
2>.选择克隆源
3>.选择"链接克隆"
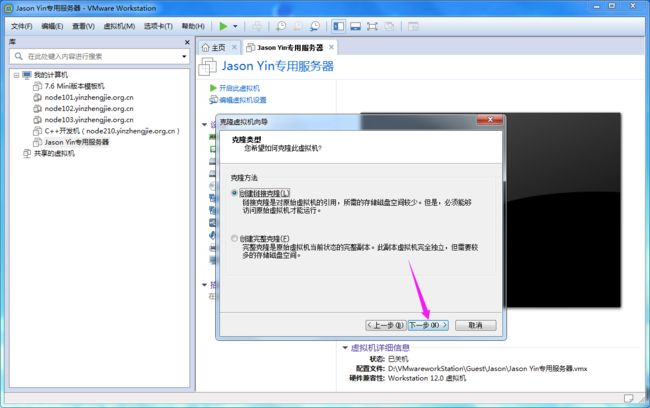
4>.自定义虚拟机名称和存储路径
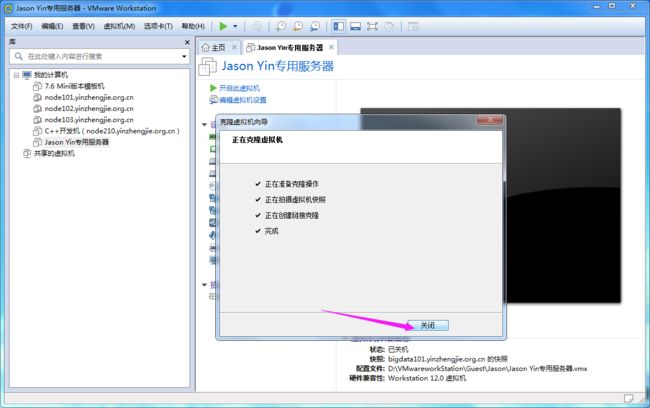
5>.克隆完成
6>.重复以上步骤,克隆其余7台虚拟机
7>.将虚拟机环境归类
8>.编辑克隆后的虚拟机硬件配置并开机
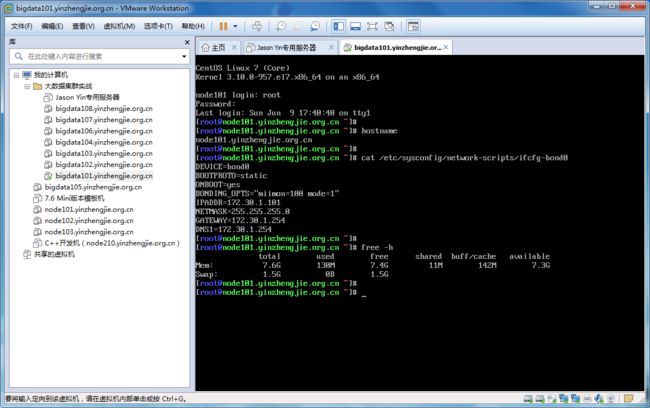
9>.修改IP地址和主机名称
10>.完成其它剩余7台虚拟机的IP地址修改,当然你可以随意修改虚拟机的硬件配置哟
