零、Mysql运维技术之主从、主主+keepalived
一、什么是主从复制?
主从复制,是用来建立一个和主数据库完全一样的数据库环境,称为从数据库;主数据库一般是准实时的业务数据库。
二、主从复制的作用
1、做数据的热备,作为后备数据库,主数据库服务器故障后,可切换到从数据库继续工作,避免数据丢失。
2、架构的扩展。业务量越来越大,I/O访问频率过高,单机无法满足,此时做多库的存储,降低磁盘I/O访问的频率,提高单个机器的I/O性能。
3、读写分离,使数据库能支撑更大的并发。
三、主从复制的原理
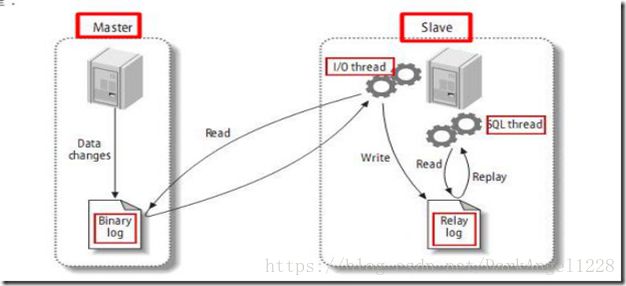
方式一说明、
1.数据库有个bin-log二进制文件,记录了所有sql语句。
2.我们的目标就是把主数据库的bin-log文件的sql语句复制过来。
3.让其在从数据的relay-log重做日志文件中再执行一次这些sql语句即可。
方式二说明、
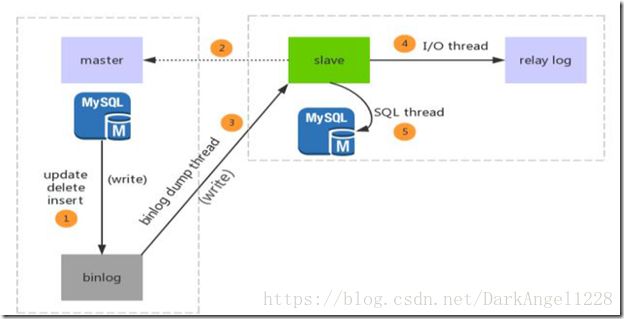
步骤一:主库db的更新事件(update、insert、delete)被写到binlog
步骤:从库发起连接,连接到主库
步骤三:此时主库创建一个binlog dump thread线程,把binlog的内容发送到从库
步骤四:从库启动之后,创建一个I/O线程,读取主库传过来的binlog内容并写入到relay log.
步骤五:还会创建一个SQL线程,从relay log里面读取内容,从Exec_Master_Log_Pos位置开始执行读取到的更新事件,将更新内容写入到slave的db.
四、主从搭建
主IP:192.168.43.223
从IP:192.168.43.224
1、主库配置
#vi /etc/my.cnf
[mysqld]
log-bin=mysql-bin   //[必须]启用二进制日志
server-id=223      //[必须]服务器唯一ID,默认是1,一般取IP最后一段

mysql> GRANT REPLICATION SLAVE ON *.* to 'mysync'@'%' identified by 'q123456';
Query OK, 0 rows affected, 1 warning (0.36 sec)

重启数据库
[root@localhost data]# service mysql restart
Shutting down MySQL.... SUCCESS!
Starting MySQL. SUCCESS!

查看Master状态
mysql> show master status;
+------------------+----------+--------------+------------------+-------------------+
| File             | Position | Binlog_Do_DB | Binlog_Ignore_DB | Executed_Gtid_Set |
+------------------+----------+--------------+------------------+-------------------+
| mysql-bin.000008 |      444 |              |                  |                   |
+------------------+----------+--------------+------------------+-------------------+
1 row in set (0.00 sec)
2、从库配置
#vi /etc/my.cnf
[mysqld]
log-bin=mysql-bin   //[不是必须]启用二进制日志
server-id=224      //[必须]服务器唯一ID,默认是1,一般取IP最后一段

mysql> change master to master_host='192.168.43.223',master_user='mysync',master_password='q123456',master_log_file='mysql-bin.000008',master_log_pos=444;
Query OK, 0 rows affected, 2 warnings (0.01 sec)

启动从服务
mysql> start slave;
Query OK, 0 rows affected (0.00 sec)

查看主从复制状态
mysql> show slave status \G
*************************** 1. row ***************************
               Slave_IO_State: Waiting for master to send event
                  Master_Host: 192.168.43.223
                  Master_User: mysync
                  Master_Port: 3306
                Connect_Retry: 60
              Master_Log_File: mysql-bin.000008
          Read_Master_Log_Pos: 1167
               Relay_Log_File: localhost-relay-bin.000002
                Relay_Log_Pos: 320
        Relay_Master_Log_File: mysql-bin.000008
             Slave_IO_Running: Yes
            Slave_SQL_Running: Yes
              Replicate_Do_DB:
          Replicate_Ignore_DB:
           Replicate_Do_Table:
       Replicate_Ignore_Table:
      Replicate_Wild_Do_Table:
  Replicate_Wild_Ignore_Table:
                   Last_Errno: 0
                   Last_Error:
                 Skip_Counter: 0
          Exec_Master_Log_Pos: 1167
              Relay_Log_Space: 531
              Until_Condition: None
               Until_Log_File:
                Until_Log_Pos: 0
           Master_SSL_Allowed: No
           Master_SSL_CA_File:
           Master_SSL_CA_Path:
              Master_SSL_Cert:
            Master_SSL_Cipher:
               Master_SSL_Key:
        Seconds_Behind_Master: 0
Master_SSL_Verify_Server_Cert: No
                Last_IO_Errno: 0
                Last_IO_Error:
               Last_SQL_Errno: 0
               Last_SQL_Error:
  Replicate_Ignore_Server_Ids:
             Master_Server_Id: 223
                  Master_UUID: 76130b97-849d-11ea-aa43-000c29b216d9
             Master_Info_File: /usr/local/mysql/data/master.info
                    SQL_Delay: 0
          SQL_Remaining_Delay: NULL
      Slave_SQL_Running_State: Slave has read all relay log; waiting for more updates
           Master_Retry_Count: 86400
                  Master_Bind:
      Last_IO_Error_Timestamp:
     Last_SQL_Error_Timestamp:
               Master_SSL_Crl:
           Master_SSL_Crlpath:
           Retrieved_Gtid_Set:
            Executed_Gtid_Set:
                Auto_Position: 0
         Replicate_Rewrite_DB:
                 Channel_Name:
           Master_TLS_Version:
1 row in set (0.00 sec)
3、测试
在主服务器的test库新建一张表,并插入数据,看从服务器是否自动复制即可。
五、主主搭建
主IP:192.168.43.223
主IP:192.168.43.224
安装主从方式反方向重新配置即可。
1、主库配置
mysql> GRANT REPLICATION SLAVE ON *.* to 'mysync'@'%' identified by 'q123456';
Query OK, 0 rows affected, 1 warning (0.02 sec)

mysql> Query OK, 0 rows affected, 1 warning (0.36 sec)


mysql> show master status;
+------------------+----------+--------------+------------------+-------------------+
| File             | Position | Binlog_Do_DB | Binlog_Ignore_DB | Executed_Gtid_Set |
+------------------+----------+--------------+------------------+-------------------+
| mysql-bin.000010 |      154 |              |                  |                   |
+------------------+----------+--------------+------------------+-------------------+
1 row in set (0.00 sec)
2、从库配置
mysql> change master to master_host='192.168.43.224',master_user='mysync',master_password='q123456',master_log_file='mysql-bin.000010',master_log_pos=154;
Query OK, 0 rows affected, 2 warnings (0.38 sec)

mysql> start slave;
Query OK, 0 rows affected (0.00 sec)

mysql> show slave status \G
*************************** 1. row ***************************
               Slave_IO_State: Waiting for master to send event
                  Master_Host: 192.168.43.224
                  Master_User: mysync
                  Master_Port: 3306
                Connect_Retry: 60
              Master_Log_File: mysql-bin.000010
          Read_Master_Log_Pos: 154
               Relay_Log_File: localhost-relay-bin.000002
                Relay_Log_Pos: 320
        Relay_Master_Log_File: mysql-bin.000010
             Slave_IO_Running: Yes
            Slave_SQL_Running: Yes
              Replicate_Do_DB:
          Replicate_Ignore_DB:
           Replicate_Do_Table:
       Replicate_Ignore_Table:
      Replicate_Wild_Do_Table:
  Replicate_Wild_Ignore_Table:
                   Last_Errno: 0
                   Last_Error:
                 Skip_Counter: 0
          Exec_Master_Log_Pos: 154
              Relay_Log_Space: 531
              Until_Condition: None
               Until_Log_File:
                Until_Log_Pos: 0
           Master_SSL_Allowed: No
           Master_SSL_CA_File:
           Master_SSL_CA_Path:
              Master_SSL_Cert:
            Master_SSL_Cipher:
               Master_SSL_Key:
        Seconds_Behind_Master: 0
Master_SSL_Verify_Server_Cert: No
                Last_IO_Errno: 0
                Last_IO_Error:
               Last_SQL_Errno: 0
               Last_SQL_Error:
  Replicate_Ignore_Server_Ids:
             Master_Server_Id: 224
                  Master_UUID: 26baa802-856e-11ea-a726-000c2927a330
             Master_Info_File: /usr/local/mysql/data/master.info
                    SQL_Delay: 0
          SQL_Remaining_Delay: NULL
      Slave_SQL_Running_State: Slave has read all relay log; waiting for more updates
           Master_Retry_Count: 86400
                  Master_Bind:
      Last_IO_Error_Timestamp:
     Last_SQL_Error_Timestamp:
               Master_SSL_Crl:
           Master_SSL_Crlpath:
           Retrieved_Gtid_Set:
            Executed_Gtid_Set:
                Auto_Position: 0
         Replicate_Rewrite_DB:
                 Channel_Name:
           Master_TLS_Version:
1 row in set (0.00 sec)
六、主主+keepalived搭建
环境IP说明
主IP:192.168.43.223
主IP:192.168.43.224
VIP:192.168.43.225
Keepalived版本:1.2.13
在两个主机器上安装keepalived如下:
安装Openssl(两台主机上均安装):
方式一、离线包安装
1、下载openssl
下载地址:https://www.openssl.org/source/openssl-1.1.0h.tar.gz
2、安装:
    [root@localhost openssl-1.1.0h]# ./config --prefix=/usr/local/openssl
    [root@localhost openssl-1.1.0h]# make
    [root@localhost openssl-1.1.0h]# make install
3、替换老版本的openssl
#mv /usr/bin/openssl /usr/bin/openssl.bak
#ln -sf /usr/local/openssl/bin/openssl /usr/bin/openssl
#echo "/usr/local/openssl/lib" >> /etc/ld.so.conf
#ldconfig -v                    --设置生效
[root@localhost bin]# openssl version
OpenSSL 1.1.0h  27 Mar 2018

方式二、在线安装
yum install -y openssl openssl-devel
如果安装过程出现Couldn't resolve host 情况,修改一下 /etc/resolv.conf 添加一个nameserver 8.8.8.8
安装keepalived(两台主机上均安装):
下载安装包
[root@localhost]#wget -q http://www.keepalived.org/software/keepalived-1.2.13.tar.gz
解压安装包
[root@localhost]#tar -zxvf keepalived-1.2.13.tar.gz
[root@localhost]#cd keepalived-1.2.13
编译安装
[root@localhost keepalived-1.2.13]# ./configure && make && make install
拷贝文件开机启动
[root@localhost keepalived-1.2.13]# cp /usr/local/etc/rc.d/init.d/keepalived /etc/rc.d/init.d/
拷贝配置文件
[root@localhost keepalived-1.2.13]# cp /usr/local/etc/sysconfig/keepalived /etc/sysconfig/
[root@localhost keepalived-1.2.13]# mkdir /etc/keepalived
[root@localhost keepalived-1.2.13]# cp /usr/local/etc/keepalived/keepalived.conf /etc/keepalived
增加命令到环境变量
[root@localhost keepalived-1.2.13]# cp /usr/local/sbin/keepalived /usr/sbin/
[root@localhost keepalived-1.2.13]# chkconfig --add keepalived
[root@localhost keepalived-1.2.13]# chkconfig --level 345 keepalived on
配置keepalived日志
设置keepalived输出日志

#1、修改配置文件
vi /etc/sysconfig/keepalived
将 KEEPALIVED_OPTIONS = “-D” 修改为 KEEPALIVED_OPTIONS=”-D -d -S 0”

#2、修改配置文件
vim /etc/rsyslog.conf

文件最后添加
local0.* /var/log/keepalived.log

重启服务
service rsyslog restart
service keepalived restart

cat /var/log/keepalived.log
keepalived.conf配置文件
! Configuration File for keepalived
global_defs {
   #运行Keepalived服务器的标识,发邮件时显示在邮件标题中的信息
   router_id mysql_ha
}
# 检测脚本
vrrp_script chk_mysql {
    script "/etc/keepalived/mysql_check.sh"
    interval 2
    weight 2
}
#定义VRRP实例,实例名自定义
vrrp_instance mysql-ha {
    #指定Keepalived的角色,MASTER主机 BACKUP备份
    state BACKUP #此处两个都设置为BACKUP
    #指定HA监测的接口
    interface ens33
    #虚拟路由标识,这个标识是一个数字(1-255),在一个VRRP实例中主备服务器ID必须一样
    #如果启动日志报错one or more vip associated with vrid mismatch actual master advert,修改该ID即可
    virtual_router_id 88
    #优先级,数字越大优先级越高,在一个实例中主服务器优先级要高于备服务器
    priority 100  #主服务器是100,从服务器是99
    #设置主备之间同步检查的时间间隔单位秒
    advert_int 1
    #设置不抢占模式(DB1设置即可)
    # nopreempt
    #设置验证类型和密码
    authentication {
        #验证类型有两种{PASS|HA}
        auth_type PASS
        #设置验证密码,在一个实例中主备密码保持一样
        auth_pass centos
    }
    track_script {
        chk_mysql  # 执行监控的服务
    }
    #定义虚拟IP地址,可以有多个,每行一个
    virtual_ipaddress {
        192.168.43.229
    }
}
mysql_check.sh配置文件
#!/bin/bash
MYSQL=/usr/local/mysql/bin/mysql
MYSQL_HOST=127.0.0.1
MYSQL_USER=root
MYSQL_PASSWORD=root
CHECK_TIME=3
#mysql  is working MYSQL_OK is 1 , mysql down MYSQL_OK is 0
MYSQL_OK=1
function check_mysql_helth (){
    $MYSQL -h $MYSQL_HOST -u $MYSQL_USER -p${MYSQL_PASSWORD} -e "show status;" >/dev/null 2>&1
    if [ $? = 0 ] ;then
    MYSQL_OK=1
    else
    MYSQL_OK=0
    fi
    return $MYSQL_OK
}
while [ $CHECK_TIME -ne 0 ]
do
    let "CHECK_TIME -= 1"
    check_mysql_helth
if [ $MYSQL_OK = 1 ] ; then
    CHECK_TIME=0
    exit 0
fi
if [ $MYSQL_OK -eq 0 ] &&  [ $CHECK_TIME -eq 0 ]
then
    /etc/init.d/keepalived stop
    exit 1
fi
sleep 1
done
修改检查脚本权限
[root@localhost keepalived]# chmod 777 mysql_check.sh启动查看VIP情况
[root@localhost keepalived]# service keepalived restart
Restarting keepalived (via systemctl):                     [  确定  ]

[root@localhost ~]# ip addr
1: lo:  mtu 65536 qdisc noqueue state UNKNOWN qlen 1
    link/loopback 00:00:00:00:00:00 brd 00:00:00:00:00:00
    inet 127.0.0.1/8 scope host lo
       valid_lft forever preferred_lft forever
    inet6 ::1/128 scope host
       valid_lft forever preferred_lft forever
2: ens33:  mtu 1500 qdisc pfifo_fast state UP qlen 1000
    link/ether 00:0c:29:27:a3:30 brd ff:ff:ff:ff:ff:ff
    inet 192.168.43.224/24 brd 192.168.43.255 scope global ens33
       valid_lft forever preferred_lft forever
    inet 192.168.43.229/32 scope global ens33
       valid_lft forever preferred_lft forever
    inet6 fe80::9cd7:7adb:8ba0:1941/64 scope link
       valid_lft forever preferred_lft forever
    inet6 fe80::9421:8a4b:5137:fdec/64 scope link tentative dadfailed
       valid_lft forever preferred_lft forever
3: virbr0:  mtu 1500 qdisc noqueue state DOWN qlen 1000
    link/ether 52:54:00:9b:6d:07 brd ff:ff:ff:ff:ff:ff
    inet 192.168.122.1/24 brd 192.168.122.255 scope global virbr0
       valid_lft forever preferred_lft forever
4: virbr0-nic:  mtu 1500 qdisc pfifo_fast master virbr0 state DOWN qlen 1000
    link/ether 52:54:00:9b:6d:07 brd ff:ff:ff:ff:ff:ff