版本记录
| 版本号 | 时间 |
|---|---|
| V1.0 | 2018.10.14 星期日 |
前言
MapKit框架直接从您的应用界面显示地图或卫星图像,调出兴趣点,并确定地图坐标的地标信息。接下来几篇我们就一起看一下这个框架。感兴趣的看下面几篇文章。
1. MapKit框架详细解析(一) —— 基本概览(一)
2. MapKit框架详细解析(二) —— 基本使用简单示例(一)
3. MapKit框架详细解析(三) —— 基本使用简单示例(二)
4. MapKit框架详细解析(四) —— 一个叠加视图相关的简单示例(一)
Annotations - 注释
如果您曾在地图应用中搜索过某个位置,那么您已经看到了地图上显示的那些彩色pins。 这些称为annotations,使用MKAnnotationView创建。 您可以在自己的应用程序中使用annotations - 您可以使用您想要的任何图像,而不仅仅是pins!
在您的应用中,annotations将非常有用,可以帮助指出公园游客的特定景点。 annotations对象与MKOverlay和MKOverlayRenderer的工作方式类似,但您将使用MKAnnotation和MKAnnotationView。
在Annotationations组中创建一个名为AttractionAnnotation.swift的新Swift文件。 用以下内容替换其内容:
import UIKit
import MapKit

enum AttractionType: Int {
  case misc = 0
  case ride
  case food
  case firstAid

  func image() -> UIImage {
    switch self {
    case .misc:
      return #imageLiteral(resourceName: "star")
    case .ride:
      return #imageLiteral(resourceName: "ride")
    case .food:
      return #imageLiteral(resourceName: "food")
    case .firstAid:
      return #imageLiteral(resourceName: "firstaid")
    }
  }
}

class AttractionAnnotation: NSObject, MKAnnotation {
  var coordinate: CLLocationCoordinate2D
  var title: String?
  var subtitle: String?
  var type: AttractionType

  init(coordinate: CLLocationCoordinate2D, title: String, subtitle: String, type: AttractionType) {
    self.coordinate = coordinate
    self.title = title
    self.subtitle = subtitle
    self.type = type
  }
}
在这里,您首先为AttractionType定义一个枚举,以帮助您将每个吸引力分类为一个类型。 这个枚举列出了四种类型的注释:misc, rides, foods and first aid。 另外还有一个方便的函数来获取正确的annotation图像。
接下来,您声明此类符合MKAnnotation Protocol。 与MKOverlay非常相似,MKAnnotation具有必需的coordinate属性。 您可以定义特定于此实现的少数属性。 最后,定义一个初始化程序,允许您为每个属性赋值。
现在,您需要创建一个特定的MKAnnotation实例以用于annotations。
在Annotations组下创建另一个名为AttractionAnnotationView.swift的Swift文件。 用以下内容替换其内容:
import UIKit
import MapKit

class AttractionAnnotationView: MKAnnotationView {
  // Required for MKAnnotationView
  required init?(coder aDecoder: NSCoder) {
    super.init(coder: aDecoder)
  }

  override init(annotation: MKAnnotation?, reuseIdentifier: String?) {
    super.init(annotation: annotation, reuseIdentifier: reuseIdentifier)
    guard let attractionAnnotation = self.annotation as? AttractionAnnotation else { return }

    image = attractionAnnotation.type.image()
  }
}
MKAnnotationView需要init(coder :)初始化程序。 如果没有它的定义,错误将阻止您构建和运行应用程序。 为了防止这种情况,只需定义它并调用其超类初始化程序。 在这里,您还可以根据annotation的type属性覆盖init(annotation:reuseIdentifier :),在annotation的image属性上设置不同的图像。
现在创建了annotation及其关联视图,您可以开始将它们添加到地图视图中!
要确定每个annotation的位置,您将使用MagicMountainAttractions.plist文件中的信息,您可以在Park Information组下找到该文件。 plist文件包含坐标信息和有关公园景点的其他详细信息。
返回ParkMapViewController.swift并插入以下方法:
func addAttractionPins() {
  guard let attractions = Park.plist("MagicMountainAttractions") as? [[String : String]] else { return }

  for attraction in attractions {
    let coordinate = Park.parseCoord(dict: attraction, fieldName: "location")
    let title = attraction["name"] ?? ""
    let typeRawValue = Int(attraction["type"] ?? "0") ?? 0
    let type = AttractionType(rawValue: typeRawValue) ?? .misc
    let subtitle = attraction["subtitle"] ?? ""
    let annotation = AttractionAnnotation(coordinate: coordinate, title: title, subtitle: subtitle, type: type)
    mapView.addAnnotation(annotation)
  }
}
此方法读取MagicMountainAttractions.plist并枚举字典数组。 对于每个条目,它使用attraction的信息创建AttractionAnnotation的实例,然后将每个annotation添加到地图视图中。
现在,您需要更新loadSelectedOptions()以适应此新选项,并在用户选择它时执行新方法。
更新loadSelectedOptions()中的switch语句以包含以下内容:
case .mapPins:
  addAttractionPins()
这会在需要时调用新的addAttractionPins()方法。 请注意,对removeOverlays的调用也会隐藏pins覆盖。
已经完成的差不多了! 最后但并非最不重要的是,您需要实现另一个代理方法,该方法将MKAnnotationView实例提供给地图视图,以便它可以自己呈现它们。
将以下方法添加到文件底部的MKMapViewDelegate类扩展中:
func mapView(_ mapView: MKMapView, viewFor annotation: MKAnnotation) -> MKAnnotationView? {
  let annotationView = AttractionAnnotationView(annotation: annotation, reuseIdentifier: "Attraction")
  annotationView.canShowCallout = true
  return annotationView
}
此方法接收选定的MKAnnotation并使用它来创建AttractionAnnotationView。 由于属性canShowCallout设置为true,因此当用户触摸annotation时将显示标注。 最后,该方法返回annotation view。
Build并运行以查看您的annotation!
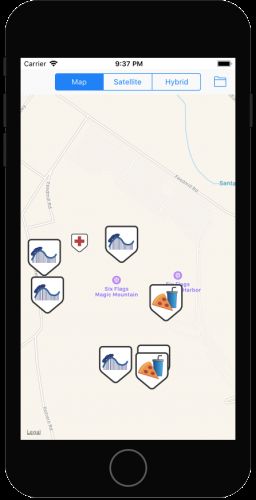
打开Attraction Pins以查看结果,如下面的屏幕截图所示:
此时吸引针看起来相当“尖锐”!
到目前为止,您已经介绍了很多复杂的MapKit,包括overlays and annotations。 但是如果你需要使用一些绘图基元,比如线条,形状和圆圈呢?
MapKit框架还使您能够直接在地图视图上绘制。 MapKit就是为此目的提供MKPolyline,MKPolygon和MKCircle。
I Walk The Line – MKPolyline - 我走线 - MKPolyline
如果你去过Magic Mountain,你就会知道Goliath过山车是一次令人难以置信的骑行,有些骑手喜欢在走进大门后直奔它!
为了帮助这些骑手,您将绘制从公园入口到Goliath的路径。
MKPolyline是绘制连接多个点的路径的绝佳解决方案,例如绘制从A点到B点的非线性路线。
要绘制折线,您需要按照代码绘制它们的顺序设置一系列经度和纬度坐标。
EntranceToGoliathRoute.plist(再次在Park Information文件夹中找到)包含路径信息。
您需要一种方法来读取该plist文件并为骑手创建路线。
打开ParkMapViewController.swift并将以下方法添加到类中:
func addRoute() {
  guard let points = Park.plist("EntranceToGoliathRoute") as? [String] else { return }

  let cgPoints = points.map { CGPointFromString($0) }
  let coords = cgPoints.map { CLLocationCoordinate2DMake(CLLocationDegrees($0.x), CLLocationDegrees($0.y)) }
  let myPolyline = MKPolyline(coordinates: coords, count: coords.count)

  mapView.add(myPolyline)
}
此方法读取EntranceToGoliathRoute.plist,并将各个坐标字符串转换为CLLocationCoordinate2D结构。
在您的应用中实现折线非常简单;你只需创建一个包含所有点的数组,并将其传递给MKPolyline! 不会比这更简单了吧。
现在,您需要添加一个选项,以允许用户打开或关闭折线路径。
更新loadSelectedOptions()以包含另一个case语句:
case .mapRoute:
  addRoute()
这在需要时调用addRoute()方法。
最后,要将它们组合在一起,您需要更新代理方法,以便它返回您要在地图视图上呈现的实际视图。
用这个替换mapView(_:rendererForOverlay):
func mapView(_ mapView: MKMapView, rendererFor overlay: MKOverlay) -> MKOverlayRenderer {
  if overlay is ParkMapOverlay {
    return ParkMapOverlayView(overlay: overlay, overlayImage: #imageLiteral(resourceName: "overlay_park"))
  } else if overlay is MKPolyline {
    let lineView = MKPolylineRenderer(overlay: overlay)
    lineView.strokeColor = UIColor.green
    return lineView
  }

  return MKOverlayRenderer()
}
这里的更改是查找MKPolyline对象的新增的else if分支。 显示折线视图的过程与先前的叠加视图非常相似。 但是,在这种情况下,您不需要创建任何自定义视图对象。 您只需使用提供的MKPolyLineRenderer框架,并使用叠加层初始化新实例。
MKPolyLineRenderer还使您能够更改折线的某些属性。 在这种情况下,您已修改笔画的颜色以显示为绿色。
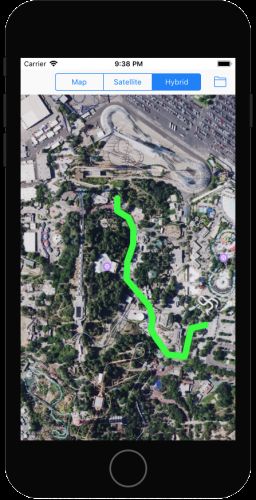
Build并运行您的应用程序,启用Route选项,它将显示在屏幕上:
Goliath狂热分子现在可以在快速的时间内登上过山车!
向公园顾客展示实际公园边界是很好的,因为公园实际上并没有占据屏幕上显示的整个空间。
虽然您可以使用MKPolyline在公园边界周围绘制形状,但MapKit提供了另一个专门用于绘制闭合多边形的类:MKPolygon。
Don’t Fence Me In – MKPolygon - 不要围困我 - MKPolygon
MKPolygon与MKPolyline非常相似,只是坐标集中的第一个和最后一个点相互连接以创建闭合形状。
您将创建一个MKPolygon作为显示公园边界的叠加层。 公园边界坐标已在MagicMountain.plist中定义;返回并查看init(filename :)以查看plist文件中读取边界点的位置。
将以下方法添加到ParkMapViewController.swift:
func addBoundary() {
  mapView.add(MKPolygon(coordinates: park.boundary, count: park.boundary.count))
}
上面的addBoundary()的实现非常简单。 给定park实例的边界数组和点数,您可以快速轻松地创建新的MKPolygon实例!
你能猜到下一步吗? 这与你上面为MKPolyline所做的非常相似。
是的,这是正确的 - 在loadSelectedOptions的switch中插入另一个case来处理显示或隐藏公园边界的新选项:
case .mapBoundary:
  addBoundary()
正如MKPolyline一样,MKPolygon符合MKOverlay,因此您需要再次更新委托方法。
更新ParkMapViewController.swift中的委托方法,如下所示:
func mapView(_ mapView: MKMapView, rendererFor overlay: MKOverlay) -> MKOverlayRenderer {
  if overlay is ParkMapOverlay {
    return ParkMapOverlayView(overlay: overlay, overlayImage: #imageLiteral(resourceName: "overlay_park"))
  } else if overlay is MKPolyline {
    let lineView = MKPolylineRenderer(overlay: overlay)
    lineView.strokeColor = UIColor.green
    return lineView
  } else if overlay is MKPolygon {
    let polygonView = MKPolygonRenderer(overlay: overlay)
    polygonView.strokeColor = UIColor.magenta
    return polygonView
  }

  return MKOverlayRenderer()
}
代理方法的更新与以前一样简单。 您将MKOverlayView创建为MKPolygonRenderer的实例,并将笔触颜色设置为洋红色。
运行应用程序以查看您的新边界:
这照顾了折线和多边形。 要讲述的最后一种绘图方法是绘制圆圈作为叠加层,由MKCircle巧妙地处理。
Circle In The Sand – MKCircle - 在沙子圈 - MKCircle
MKCircle也非常类似于MKPolyline和MKPolygon,除了它绘制一个圆,给定一个坐标点作为圆的中心,以及一个确定圆的大小的半径。
标记公园角色的一般位置会很棒。 在地图上绘制一些圆圈以模拟这些角色的位置!
MKCircle叠加层是实现此功能的一种非常简单的方法。
Park Information文件夹还包含字符位置文件。 每个文件都是用户角色的几个坐标的数组。
在名为Models组下创建一个新的Swift文件Character.swift。 用以下代码替换其内容:
import UIKit
import MapKit

class Character: MKCircle {

  var name: String?
  var color: UIColor?

  convenience init(filename: String, color: UIColor) {
    guard let points = Park.plist(filename) as? [String] else { self.init(); return }

    let cgPoints = points.map { CGPointFromString($0) }
    let coords = cgPoints.map { CLLocationCoordinate2DMake(CLLocationDegrees($0.x), CLLocationDegrees($0.y)) }

    let randomCenter = coords[Int(arc4random()%4)]
    let randomRadius = CLLocationDistance(max(5, Int(arc4random()%40)))

    self.init(center: randomCenter, radius: randomRadius)
    self.name = filename
    self.color = color
  }
}
您刚添加的新类符合MKCircle协议,并定义了两个可选属性:name和color。 便捷初始化程序接受plist文件名和颜色来绘制圆。 然后,它从plist文件中读取数据,并从文件中的四个位置中选择一个随机位置。 接下来,它选择一个随机半径来模拟时间方差。 返回的MKCircle已设置好并准备好放在地图上!
现在您需要一种方法来添加每个角色。 打开ParkMapViewController.swift并将以下方法添加到类中:
func addCharacterLocation() {
  mapView.add(Character(filename: "BatmanLocations", color: .blue))
  mapView.add(Character(filename: "TazLocations", color: .orange))
  mapView.add(Character(filename: "TweetyBirdLocations", color: .yellow))
}
上述方法几乎对每个角色执行相同的操作。 它会传递每个文件的plist文件名,决定颜色并将其作为叠加层添加到地图中。
你几乎完成! 你能回忆起最后几步应该是什么吗?
是的,你仍然需要提供一个MKOverlayView的地图视图,这是通过委托方法完成的。
更新ParkMapViewController.swift中的委托方法:
func mapView(_ mapView: MKMapView, rendererFor overlay: MKOverlay) -> MKOverlayRenderer {
  if overlay is ParkMapOverlay {
    return ParkMapOverlayView(overlay: overlay, overlayImage: #imageLiteral(resourceName: "overlay_park"))
  } else if overlay is MKPolyline {
    let lineView = MKPolylineRenderer(overlay: overlay)
    lineView.strokeColor = UIColor.green
    return lineView
  } else if overlay is MKPolygon {
    let polygonView = MKPolygonRenderer(overlay: overlay)
    polygonView.strokeColor = UIColor.magenta
    return polygonView
  } else if let character = overlay as? Character {
    let circleView = MKCircleRenderer(overlay: character)
    circleView.strokeColor = character.color
    return circleView
  }

  return MKOverlayRenderer()
}
最后,更新loadSelectedOptions()以向用户提供打开或关闭角色位置的选项:
case .mapCharacterLocation:
  addCharacterLocation()
您也可以删除default:和break语句,因为您已经涵盖了所有可能的情况。
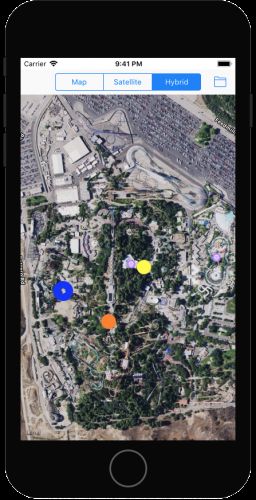
Build并运行应用程序,并打开角色覆盖图以查看每个人隐藏的位置!
有更先进的 - 也许更有效 - 的方法来创建叠加层。 一些替代方法是使用KML文件,MapBox tiles或其他第三方提供的资源。
源码
1. Swift
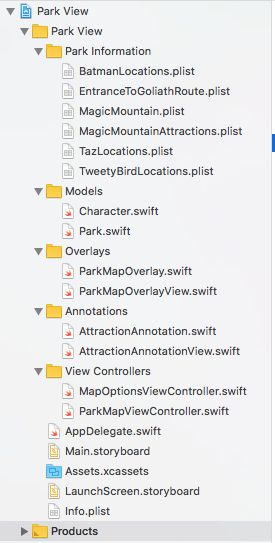
首先看一下工程文件
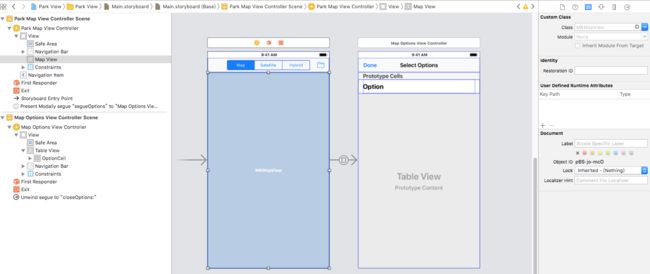
然后看一下sb中的内容
下面就是详细的代码了。
1. Character.swift
import UIKit
import MapKit

class Character: MKCircle {

  var name: String?
  var color: UIColor?

  convenience init(filename: String, color: UIColor) {
    guard let points = Park.plist(filename) as? [String] else { self.init(); return }

    let cgPoints = points.map { CGPointFromString($0) }
    let coords = cgPoints.map { CLLocationCoordinate2DMake(CLLocationDegrees($0.x), CLLocationDegrees($0.y)) }

    let randomCenter = coords[Int(arc4random()%4)]
    let randomRadius = CLLocationDistance(max(5, Int(arc4random()%40)))

    self.init(center: randomCenter, radius: randomRadius)
    self.name = filename
    self.color = color
  }
}
2. Park.swift
import UIKit
import MapKit

class Park {
  var name: String?
  var boundary: [CLLocationCoordinate2D] = []

  var midCoordinate = CLLocationCoordinate2D()
  var overlayTopLeftCoordinate = CLLocationCoordinate2D()
  var overlayTopRightCoordinate = CLLocationCoordinate2D()
  var overlayBottomLeftCoordinate = CLLocationCoordinate2D()
  var overlayBottomRightCoordinate: CLLocationCoordinate2D {
    get {
      return CLLocationCoordinate2DMake(overlayBottomLeftCoordinate.latitude,
                                        overlayTopRightCoordinate.longitude)
    }
  }

  var overlayBoundingMapRect: MKMapRect {
    get {
      let topLeft = MKMapPointForCoordinate(overlayTopLeftCoordinate);
      let topRight = MKMapPointForCoordinate(overlayTopRightCoordinate);
      let bottomLeft = MKMapPointForCoordinate(overlayBottomLeftCoordinate);

      return MKMapRectMake(
        topLeft.x,
        topLeft.y,
        fabs(topLeft.x - topRight.x),
        fabs(topLeft.y - bottomLeft.y))
    }
  }

  init(filename: String) {
    guard let properties = Park.plist(filename) as? [String : Any],
      let boundaryPoints = properties["boundary"] as? [String] else { return }

    midCoordinate = Park.parseCoord(dict: properties, fieldName: "midCoord")
    overlayTopLeftCoordinate = Park.parseCoord(dict: properties, fieldName: "overlayTopLeftCoord")
    overlayTopRightCoordinate = Park.parseCoord(dict: properties, fieldName: "overlayTopRightCoord")
    overlayBottomLeftCoordinate = Park.parseCoord(dict: properties, fieldName: "overlayBottomLeftCoord")

    let cgPoints = boundaryPoints.map { CGPointFromString($0) }
    boundary = cgPoints.map { CLLocationCoordinate2DMake(CLLocationDegrees($0.x), CLLocationDegrees($0.y)) }
  }

  static func plist(_ plist: String) -> Any? {
    guard let filePath = Bundle.main.path(forResource: plist, ofType: "plist"),
      let data = FileManager.default.contents(atPath: filePath) else { return nil }

    do {
      return try PropertyListSerialization.propertyList(from: data, options: [], format: nil)
    } catch {
      return nil
    }
  }

  static func parseCoord(dict: [String: Any], fieldName: String) -> CLLocationCoordinate2D{
    if let coord = dict[fieldName] as? String {
      let point = CGPointFromString(coord)
      return CLLocationCoordinate2DMake(CLLocationDegrees(point.x), CLLocationDegrees(point.y))
    }
    return CLLocationCoordinate2D()
  }
}
3. ParkMapOverlay.swift
import UIKit
import MapKit

class ParkMapOverlay: NSObject, MKOverlay {

  var coordinate: CLLocationCoordinate2D
  var boundingMapRect: MKMapRect

  init(park: Park) {
    boundingMapRect = park.overlayBoundingMapRect
    coordinate = park.midCoordinate
  }
}
4. ParkMapOverlayView.swift
import UIKit
import MapKit

class ParkMapOverlayView: MKOverlayRenderer {
  var overlayImage: UIImage

  init(overlay:MKOverlay, overlayImage:UIImage) {
    self.overlayImage = overlayImage
    super.init(overlay: overlay)
  }

  override func draw(_ mapRect: MKMapRect, zoomScale: MKZoomScale, in context: CGContext) {
    guard let imageReference = overlayImage.cgImage else { return }

    let rect = self.rect(for: overlay.boundingMapRect)
    context.scaleBy(x: 1.0, y: -1.0)
    context.translateBy(x: 0.0, y: -rect.size.height)
    context.draw(imageReference, in: rect)
  }
}
5. AttractionAnnotation.swift
import UIKit
import MapKit

enum AttractionType: Int {
  case misc = 0
  case ride
  case food
  case firstAid

  func image() -> UIImage {
    switch self {
    case .misc:
      return #imageLiteral(resourceName: "star")
    case .ride:
      return #imageLiteral(resourceName: "ride")
    case .food:
      return #imageLiteral(resourceName: "food")
    case .firstAid:
      return #imageLiteral(resourceName: "firstaid")
    }
  }
}

class AttractionAnnotation: NSObject, MKAnnotation {
  var coordinate: CLLocationCoordinate2D
  var title: String?
  var subtitle: String?
  var type: AttractionType

  init(coordinate: CLLocationCoordinate2D, title: String, subtitle: String, type: AttractionType) {
    self.coordinate = coordinate
    self.title = title
    self.subtitle = subtitle
    self.type = type
  }
}
6. AttractionAnnotationView.swift
import UIKit
import MapKit

class AttractionAnnotationView: MKAnnotationView {

  // Required for MKAnnotationView
  required init?(coder aDecoder: NSCoder) {
    super.init(coder: aDecoder)
  }

  override init(annotation: MKAnnotation?, reuseIdentifier: String?) {
    super.init(annotation: annotation, reuseIdentifier: reuseIdentifier)
    guard let attractionAnnotation = self.annotation as? AttractionAnnotation else { return }

    image = attractionAnnotation.type.image()
  }
}
7. MapOptionsViewController.swift
import UIKit

enum MapOptionsType: Int {
  case mapBoundary = 0
  case mapOverlay
  case mapPins
  case mapCharacterLocation
  case mapRoute

  func displayName() -> String {
    switch (self) {
    case .mapBoundary:
      return "Park Boundary"
    case .mapOverlay:
      return "Map Overlay"
    case .mapPins:
      return "Attraction Pins"
    case .mapCharacterLocation:
      return "Character Location"
    case .mapRoute:
      return "Route"
    }
  }
}

class MapOptionsViewController: UIViewController {

  var selectedOptions = [MapOptionsType]()
}

// MARK: - UITableViewDataSource
extension MapOptionsViewController: UITableViewDataSource {

  func numberOfSections(in tableView: UITableView) -> Int {
    return 1
  }

  func tableView(_ tableView: UITableView, numberOfRowsInSection section: Int) -> Int {
    return 5
  }

  func tableView(_ tableView: UITableView, cellForRowAt indexPath: IndexPath) -> UITableViewCell {
    let cell = tableView.dequeueReusableCell(withIdentifier: "OptionCell")!

    if let mapOptionsType = MapOptionsType(rawValue: indexPath.row) {
      cell.textLabel!.text = mapOptionsType.displayName()
      cell.accessoryType = selectedOptions.contains(mapOptionsType) ? .checkmark : .none
    }

    return cell
  }
}

// MARK: - UITableViewDelegate
extension MapOptionsViewController: UITableViewDelegate {

  func tableView(_ tableView: UITableView, didSelectRowAt indexPath: IndexPath) {
    guard let cell = tableView.cellForRow(at: indexPath) else { return }
    guard let mapOptionsType = MapOptionsType(rawValue: indexPath.row) else { return }

    if (cell.accessoryType == .checkmark) {
      // Remove option
      selectedOptions = selectedOptions.filter { $0 != mapOptionsType}
      cell.accessoryType = .none
    } else {
      // Add option
      selectedOptions += [mapOptionsType]
      cell.accessoryType = .checkmark
    }

    tableView.deselectRow(at: indexPath, animated: true)
  }
}
8. ParkMapViewController.swift
import UIKit
import MapKit

class ParkMapViewController: UIViewController {

  @IBOutlet weak var mapView: MKMapView!

  var park = Park(filename: "MagicMountain")
  var selectedOptions : [MapOptionsType] = []

  override func viewDidLoad() {
    super.viewDidLoad()

    let latDelta = park.overlayTopLeftCoordinate.latitude - park.overlayBottomRightCoordinate.latitude

    // Think of a span as a tv size, measure from one corner to another
    let span = MKCoordinateSpanMake(fabs(latDelta), 0.0)
    let region = MKCoordinateRegionMake(park.midCoordinate, span)

    mapView.region = region
  }

  // MARK: - Add methods
  func addOverlay() {
    let overlay = ParkMapOverlay(park: park)
    mapView.add(overlay)
  }

  func addAttractionPins() {
    guard let attractions = Park.plist("MagicMountainAttractions") as? [[String : String]] else { return }

    for attraction in attractions {
      let coordinate = Park.parseCoord(dict: attraction, fieldName: "location")
      let title = attraction["name"] ?? ""
      let typeRawValue = Int(attraction["type"] ?? "0") ?? 0
      let type = AttractionType(rawValue: typeRawValue) ?? .misc
      let subtitle = attraction["subtitle"] ?? ""
      let annotation = AttractionAnnotation(coordinate: coordinate, title: title, subtitle: subtitle, type: type)
      mapView.addAnnotation(annotation)
    }
  }

  func addRoute() {
    guard let points = Park.plist("EntranceToGoliathRoute") as? [String] else { return }

    let cgPoints = points.map { CGPointFromString($0) }
    let coords = cgPoints.map { CLLocationCoordinate2DMake(CLLocationDegrees($0.x), CLLocationDegrees($0.y)) }
    let myPolyline = MKPolyline(coordinates: coords, count: coords.count)

    mapView.add(myPolyline)
  }

  func addBoundary() {
    mapView.add(MKPolygon(coordinates: park.boundary, count: park.boundary.count))
  }

  func addCharacterLocation() {
    mapView.add(Character(filename: "BatmanLocations", color: .blue))
    mapView.add(Character(filename: "TazLocations", color: .orange))
    mapView.add(Character(filename: "TweetyBirdLocations", color: .yellow))
  }

  // MARK: Helper methods
  func loadSelectedOptions() {
    mapView.removeAnnotations(mapView.annotations)
    mapView.removeOverlays(mapView.overlays)

    for option in selectedOptions {
      switch (option) {
      case .mapOverlay:
        self.addOverlay()
      case .mapPins:
        self.addAttractionPins()
      case .mapRoute:
        self.addRoute()
      case .mapBoundary:
        self.addBoundary()
      case .mapCharacterLocation:
        self.addCharacterLocation()
      }
    }
  }

  override func prepare(for segue: UIStoryboardSegue, sender: Any?) {
    (segue.destination as? MapOptionsViewController)?.selectedOptions = selectedOptions
  }

  @IBAction func closeOptions(_ exitSegue: UIStoryboardSegue) {
    guard let vc = exitSegue.source as? MapOptionsViewController else { return }
    selectedOptions = vc.selectedOptions
    loadSelectedOptions()
  }

  @IBAction func mapTypeChanged(_ sender: UISegmentedControl) {
    mapView.mapType = MKMapType.init(rawValue: UInt(sender.selectedSegmentIndex)) ?? .standard
  }
}

// MARK: - MKMapViewDelegate
extension ParkMapViewController: MKMapViewDelegate {

  func mapView(_ mapView: MKMapView, rendererFor overlay: MKOverlay) -> MKOverlayRenderer {
    if overlay is ParkMapOverlay {
      return ParkMapOverlayView(overlay: overlay, overlayImage: #imageLiteral(resourceName: "overlay_park"))
    } else if overlay is MKPolyline {
      let lineView = MKPolylineRenderer(overlay: overlay)
      lineView.strokeColor = UIColor.green
      return lineView
    } else if overlay is MKPolygon {
      let polygonView = MKPolygonRenderer(overlay: overlay)
      polygonView.strokeColor = UIColor.magenta
      return polygonView
    } else if let character = overlay as? Character {
      let circleView = MKCircleRenderer(overlay: character)
      circleView.strokeColor = character.color
      return circleView
    }

    return MKOverlayRenderer()
  }

  func mapView(_ mapView: MKMapView, viewFor annotation: MKAnnotation) -> MKAnnotationView? {
    let annotationView = AttractionAnnotationView(annotation: annotation, reuseIdentifier: "Attraction")
    annotationView.canShowCallout = true
    return annotationView
  }
}
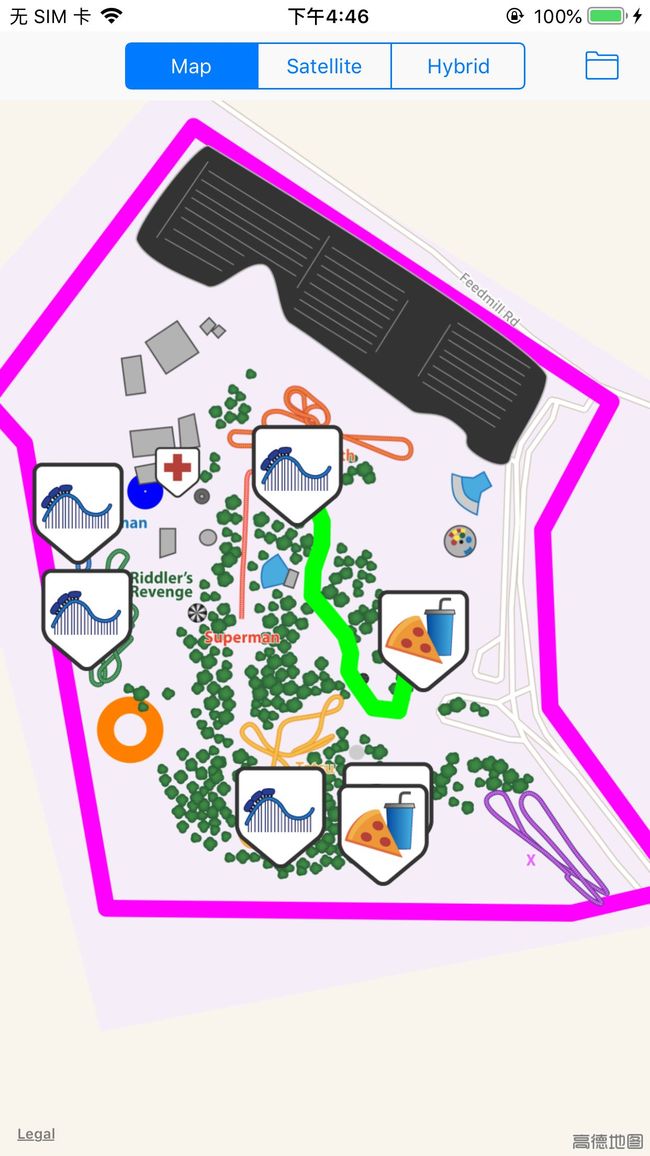
下面是最终的所有选项都勾选的效果图
下面是gif图
后记
本篇主要讲述了一个叠加视图相关的简单示例,感兴趣给个赞或者关注~~~
