vscode配置c++环境并解决中文乱码问题
总共四步:
- 安装vscodde,安装code runner 和C/C++ 插件
- 安装mingw64,并添加到环境变量
- 在vscode相关文件中添加配置
- 解决C++输出中文乱码的问题
第一步:
- 安装vscode,在vscode拓展商店安装 code runner 和 C/C++ 插件:
第二步:
- 下载mingw64,记得选择离线版下载。
- 离线下载地址:https://sourceforge.net/projects/mingw-w64/files/
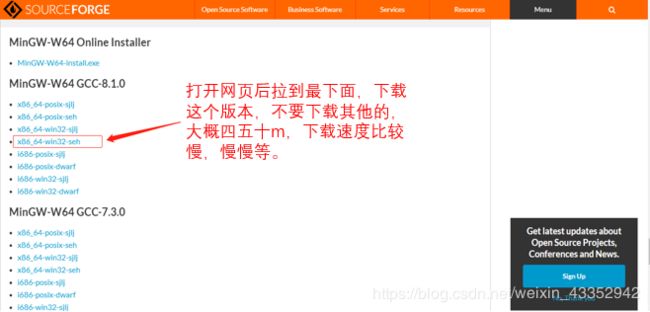
- 下载好后解压,把解压路径+\mingw64\bin添加到环境变量。例如我直接解压在D盘,所以我把 D:\mingw64\bin 添加到环境变量中,根据你的路径添加到环境变量中。添加到环境变量的方法我就不说了,如果实在不会的话可以在下面留言。

检查是否成功添加正确的路径到环境变量中,win+R 打开cmd窗口,输入g++ -v,回车若出现类似于以下的内容则成功了,继续下一步。若失败大概是没添加正确的路径或是安装错误的mingw64。

到这里已经可以运行cpp文件了,下面是有关调试的设置
第三步:
配置四个文件,看起来麻烦其实弄起来挺快的
- launch.json
- settings.json
- c_cpp_propertier.json
- tasks.json
1、launch.json
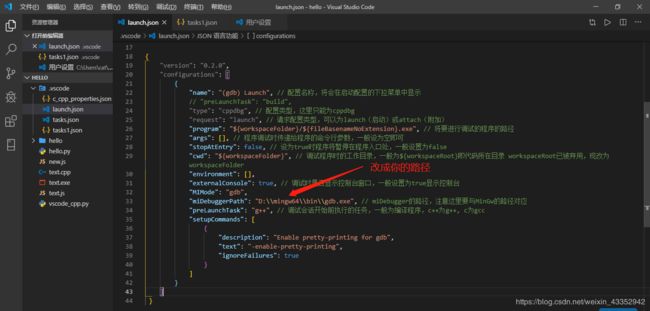
把以下配置添加到你的launch.json中,注意把你的路径覆盖我的。
{
    "version": "0.2.0",
    "configurations": [
        {
            "name": "(gdb) Launch", // 配置名称,将会在启动配置的下拉菜单中显示
            // "preLaunchTask": "build",
            "type": "cppdbg", // 配置类型,这里只能为cppdbg
            "request": "launch", // 请求配置类型,可以为launch(启动)或attach(附加)
            "program": "${workspaceFolder}/${fileBasenameNoExtension}.exe", // 将要进行调试的程序的路径
            "args": [], // 程序调试时传递给程序的命令行参数,一般设为空即可
            "stopAtEntry": false, // 设为true时程序将暂停在程序入口处,一般设置为false
            "cwd": "${workspaceFolder}", // 调试程序时的工作目录,一般为${workspaceRoot}即代码所在目录 workspaceRoot已被弃用,现改为workspaceFolder
            "environment": [],
            "externalConsole": true, // 调试时是否显示控制台窗口,一般设置为true显示控制台
            "MIMode": "gdb",
            "miDebuggerPath": "D:\\mingw64\\bin\\gdb.exe", // miDebugger的路径,注意这里要与MinGw的路径对应
            "preLaunchTask": "g++", // 调试会话开始前执行的任务,一般为编译程序,c++为g++, c为gcc
            "setupCommands": [
                {
                    "description": "Enable pretty-printing for gdb",
                    "text": "-enable-pretty-printing",
                    "ignoreFailures": true
                }
            ]
        }
    ]
 }
2、settings.json
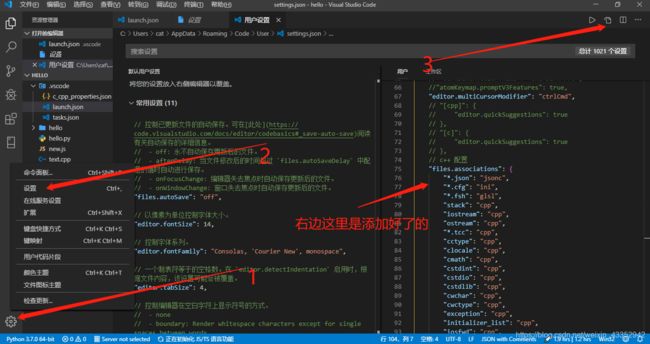
复制以下内容添加到你的settings.json中。
{
    //"atomKeymap.promptV3Features": true,
    "editor.multiCursorModifier": "ctrlCmd",
    // "[cpp]": {
    //     "editor.quickSuggestions": true
    // },
    // "[c]": {
    //     "editor.quickSuggestions": true
    // },
    // c++ 配置
    "files.associations": {
        "*.json": "jsonc",
        "*.cfg": "ini",
        "*.fsh": "glsl",
        "stack": "cpp",
        "iostream": "cpp",
        "ostream": "cpp",
        "*.tcc": "cpp",
        "cctype": "cpp",
        "clocale": "cpp",
        "cmath": "cpp",
        "cstdint": "cpp",
        "cstdio": "cpp",
        "cstdlib": "cpp",
        "cwchar": "cpp",
        "cwctype": "cpp",
        "exception": "cpp",
        "initializer_list": "cpp",
        "iosfwd": "cpp",
        "istream": "cpp",
        "limits": "cpp",
        "new": "cpp",
        "stdexcept": "cpp",
        "streambuf": "cpp",
        "system_error": "cpp",
        "type_traits": "cpp",
        "typeinfo": "cpp",
        "utility": "cpp",
        "iomanip": "cpp"
    },
    "editor.snippetSuggestions": "top",
    "C_Cpp.clang_format_sortIncludes": true,
    "editor.wordWrap": "on",
    "editor.formatOnPaste": true,
    "editor.formatOnType": true,
    "editor.codeActionsOnSaveTimeout": 500,
    "files.autoSaveDelay": 500,
    "editor.hover.delay": 1000,
    // "files.autoGuessEncoding": true,
    "editor.detectIndentation": false,
    // "files.encoding": "utf8",
    "editor.formatOnSaveTimeout": 20,
    // "editor.fontFamily": "Consolas",
    // "workbench.iconTheme": "vscode-icons",
    //下面这个设置为终端输出结果
    // "code-runner.runInTerminal": true,
    //下面这个解决终端输出c++中文乱码
    "terminal.integrated.shellArgs.windows": [
        "/K chcp 65001 >nul"
    ],
}
3、c_cpp_properties.json
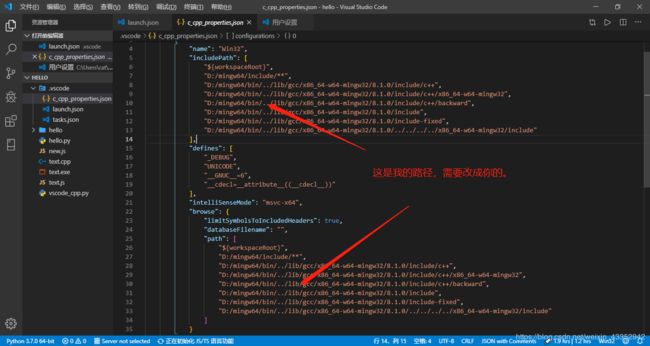
复制以下内容到你的c_cpp_properties.json文件中,记得将我的路径修改成你的路径。
{
    "configurations": [
        {
            "name": "Win32",
            "includePath": [
                "${workspaceRoot}",
                "D:/mingw64/include/**",
                "D:/mingw64/bin/../lib/gcc/x86_64-w64-mingw32/8.1.0/include/c++",
                "D:/mingw64/bin/../lib/gcc/x86_64-w64-mingw32/8.1.0/include/c++/x86_64-w64-mingw32",
                "D:/mingw64/bin/../lib/gcc/x86_64-w64-mingw32/8.1.0/include/c++/backward",
                "D:/mingw64/bin/../lib/gcc/x86_64-w64-mingw32/8.1.0/include",
                "D:/mingw64/bin/../lib/gcc/x86_64-w64-mingw32/8.1.0/include-fixed",
                "D:/mingw64/bin/../lib/gcc/x86_64-w64-mingw32/8.1.0/../../../../x86_64-w64-mingw32/include"
            ],
            "defines": [
                "_DEBUG",
                "UNICODE",
                "__GNUC__=6",
                "__cdecl=__attribute__((__cdecl__))"
            ],
            "intelliSenseMode": "msvc-x64",
            "browse": {
                "limitSymbolsToIncludedHeaders": true,
                "databaseFilename": "",
                "path": [
                    "${workspaceRoot}",
                    "D:/mingw64/include/**",
                    "D:/mingw64/bin/../lib/gcc/x86_64-w64-mingw32/8.1.0/include/c++",
                    "D:/mingw64/bin/../lib/gcc/x86_64-w64-mingw32/8.1.0/include/c++/x86_64-w64-mingw32",
                    "D:/mingw64/bin/../lib/gcc/x86_64-w64-mingw32/8.1.0/include/c++/backward",
                    "D:/mingw64/bin/../lib/gcc/x86_64-w64-mingw32/8.1.0/include",
                    "D:/mingw64/bin/../lib/gcc/x86_64-w64-mingw32/8.1.0/include-fixed",
                    "D:/mingw64/bin/../lib/gcc/x86_64-w64-mingw32/8.1.0/../../../../x86_64-w64-mingw32/include"
                ]
            }
        }
    ],
    "version": 4
}
4、tasks.json
Ctrl+shift+p 打开vscode查找功能,输入task
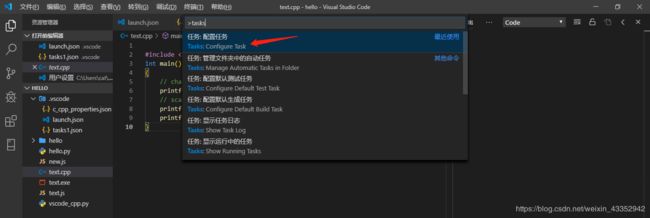


然后将下面内容添加到你的tasks.json中。
{
    "version": "2.0.0",
    "tasks": [{
        "label": "build",
        "type": "shell",
        "group": {
            "kind": "build",
            "isDefault": true
        },
        "presentation": {
            "echo": true,
            "reveal": "always",
            "focus": false,
            "panel": "shared"
        },
        "windows": {
            "command": "g++",
            "args": [
                "-ggdb",
                "\"${file}\"",
                "--std=c++11",
                "-o",
                "\"${fileDirname}\\${fileBasenameNoExtension}.exe\""
            ]
        }
    }]
}
到了这一步,就可以运行代码了,新建一个cpp文件,复制以下代码测试:
#include 点击鼠标右键再点击run code 或者使用运行代码快捷键 Ctrl+AIt+N ,即可查看输出

如果你是按照我的方法到这一步的话,那么输出中文就不会乱码。
如果你想在终端输出c++代码,那么就需要在settings.json中添加以下代码,我在上面的settings.json中已经把这两行代码添加上去了,所以你无须再添加。

中文的windows下的cmd默认使用GBK的编码,/K chcp 65001 >nul的含义是在运行cmd的时候将编码设置为65001;>nul是避免在控制台输出修改编码的信息,否则会输出active code page: 65001;
运行结果展示:

没有添加就会出现下面这种情况:

到这里我已经讲完了,昨天弄的时候踩了挺多坑,希望这篇文章能对你有所帮助。
相关推荐:
vscode配置python环境并解决输出中文乱码问题
vscode配置js环境