CentOS 系统自动化安装
概述:
系统安装过程
配置anaconda
自动化安装系统
CentOS 系统安装:
1.启动流程:
bootloader–>kernel(initrd)–>rootfs–>anaconda(启动安装程序)
2.anaconda:(系统安装程序)
tui:基于cureses的文本配置窗口;
gui:图形界面**
     Anaconda是RedHat、CentOS、Fedora等Linux的安装管理程序。它可以提供文本、图形等安装管理方式,
并支持Kickstart等脚本提供自动安装的功能。此外,其还支持许多启动参数,熟悉这些参数可为安装带来很多方便。
该程序的功能是把位于光盘或其他源上的数据包,根据设置安装到主机上。为实现该定制安装,它提供一个定制界面,
可以实现交互式界面供用户选择配置(如选择语言,键盘,时区等信息)。Anaconda的大部分模块用Python编写,
有少许的载入模块用C编写。
3.CentOS的安装过程启动流程:
MBR:boot.cat
Stage2:isolinux/isolinux.bin
                 配置文件:isolinux/isolinux.cfg
                 每个对应的菜单选项
                 加载内核:isolinux/vmlinuz
                 向内核传递参数:append initrd=initrd.img
                 其实整个光盘安装启动过程就是依赖于isolinux这个目录下的文件的
 装载根文件系统,并启动anaconda
                 默认界面是图形界面(GUI):512MB+内存空间
                 若需要显示指定启动TUI接口:向启动内核传递一个参数“text”即可;
         (1)按tab键,在后面增加text
         (2)按ESC键:boot(提示符下): linux text
注意:

   上述内容一般位于引导设备,例如可通过光盘、U盘、或网络等;后续的anaconda及其安装用到的程序包等可以来自于
程序包仓库。
     此仓库的位置可以为:
         本地光盘、本地硬盘、ftp server、http server、nfs server
         如果想手动指定安装仓库:按 ESC键:boot(提示符下):linux method
[root@centos6 /misc/cd/isolinux]#ls
boot.cat  grub.conf   isolinux.bin  memtest     TRANS.TBL     vmlinuz
boot.msg  initrd.img  isolinux.cfg  splash.jpg  vesamenu.c32
default vesamenu.c32 菜单风格
#prompt 1
timeout 600
display boot.msg
menu background splash.jpg 背景图
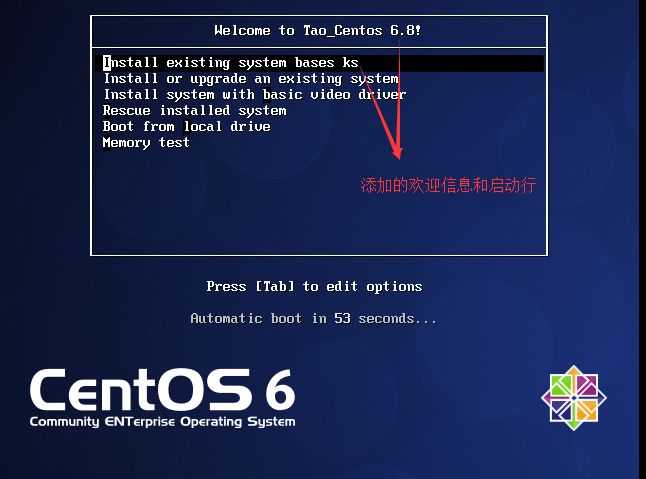
menu title Welcome to CentOS 6.9!
menu color border 0 #ffffffff #00000000
menu color sel 7 #ffffffff #ff000000
menu color title 0 #ffffffff #00000000
menu color tabmsg 0 #ffffffff #00000000
menu color unsel 0 #ffffffff #00000000
menu color hotsel 0 #ff000000 #ffffffff
menu color hotkey 7 #ffffffff #ff000000
menu color scrollbar 0 #ffffffff #00000000
label linux 选择1模式Tab后面补上rescue相当于救援模式
menu label ^Install or upgrade an existing system ^脱字符 高亮显示
menu default 60秒内选择默认菜单
kernel vmlinuz 安装内核文件
append initrd=initrd.img 读取 内核参数
label vesa
menu label Install system with ^basic video driver 驱动无法支持用基本图形显卡安装
kernel vmlinuz
append initrd=initrd.img nomodeset
label rescue
menu label ^Rescue installed system 救援模式
kernel vmlinuz
append initrd=initrd.img rescue
label local
menu label Boot from ^local drive
localboot 0xffff 由本地硬盘启动
label memtest86
menu label ^Memory test
kernel memtest
append -
anaconda 工作过程
安装前配置阶段,安装阶段,首次启动
1)安装前配置阶段:
安装过程使用的语言;
键盘类型;
安装目标存数设备;
       Basic Storage:本地磁盘
       Special Storage:ISCSI
设定主机名;
配置网络接口;
时区;
管理员密码;
设定分区方式及MBR的安装位置;
创建一个普通用户;
选定要安装的程序包;
2)安装阶段:
在目标磁盘创建分区并执行格式化;
将选定的程序包安装至目标位置;
安装bootloader
3)重启系统
iptables 防火墙
selinux
core dump 核心转储
anaconda 的配置方式:
交互式配置方式;
支持通过读取配置文件中事先定义好的配置项自动完成配置;遵循特定的语法格式,此文件即为kickstart文件;
安装引导选项:
boot:

 text:文本安装方式;
 method:手动指定使用安装方法;

 与网络相关的引导选项:

   ip=IPADDR
          netmask=MASK
          gateway=GW
          dns=DNS_SERVER_IP
          ifname=NAME:MAC_ADDR

 远程访问功能相关的引导选项:

     vnc
          vncpassword='PASSWORD'

指明kickstart文件的位置:ks=

  DVD drive:   ks=cdrom:/PATH/TO/KICKSTART_FILE
          Hard drive:  ks=hd:device:/directory/KICKSTART_FILE
          HTTP server: ks=http://host:port/path/to/KICKSTART_FILE
          FTP server:  ks=ftp://host:port/path/to/KICKSTART_FILE
          HTTPS server:ks=https://host:port/path/to/KICKSTART_FILE
          NFS server:  ks=nfs:host:/path/to/KICKSTART_FILE
 启动救援模式:

           rescue
 装载额外驱动:

            dd
www.redhat.com/docs 《installation guide》 官方文档
kickstart文件的格式
命令段:指定各种安装前的配置选项,如键盘类型等;
    必备命令
        可选命令

程序包段:指明要安装程序包,以及包组,也包括不安装的程序包;
    %packages :指明程序包段的开始;
        @group_name:安装一个包组;
        package:安装一个程序包;
        -package :指明不安装的程序包;
        %end :指明程序包段的结尾;

脚本段:
     %pre:安装前脚本
              运行环境:运行于安装介质上的微型Linux环境
        %post:安装后脚本
              运行环境:安装完成的系统;
1)命令段中的必备命令
authconfig: 认证方式配置:

       authconfig–useshadow–passalgo=sha512
bootloader:bootloader的安装位置及相关配置;

       bootloader –location=mbr –driveorder=sda –append="crashkernel=auto rhgb quiet"
keyboard: 设定键盘类型;

lang: 语言类型; lang zh_CN.UTF-8

part: 分区布局;
  part /boot –fstype=ext4 –size=200
  part pv.008002 –size=61440
  补充:分区相关的其他命令:
    clrarpart:清除分区
             clearpart –none –drives=sda:清空磁盘分区
    volgroup:创建卷组
             volgroup vg0 –pesize=8192 pv.008002
       logvol:创建逻辑卷
             logvol / –fstype=ext4 –name=root –vgname=vg0 –size=20480

rootpw: 指明root的密码;

timezone: 时区  timezone Asia/Shanghai
可选命令:
install OR upgrade;安装或升级
text: 安装界面类型,text为TUL,默认为GUI
network:配置网络接口:
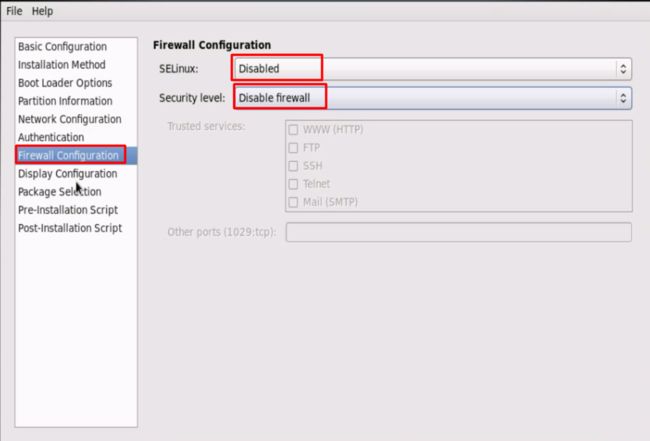
firewall:防火墙
系统安装完成之后禁用防火墙
CentOS 6:
# service iptables stop
# chkconfig iptables off
CentOS 7:
# systemctl stop firewalld.service
# systemctl disables firewalld.service
selinux:SElinux
系统安装完成后禁用SElinux:
编辑/etc/sysconfig/selinux或/etc/selinux/config文件,
修改SELINUX参数的值为下面其中参数之一:
permisslve,disabled
立即生效:
getenforce
setenforce 0
halt、poweroff、reboot:安装完成之后的行为;
repo:安装时使用的rpository
user:安装完成后为系统创建新用户
url: 指明安装时使用的repository,但是为url格式;
key –skip 跳过安装号码,适用于rhel版本
CentOS 6 中的 anaconda-ks.cfg
[root@CentOS6 ~]# cat anaconda-ks.cfg
# Kickstart file automatically generated by anaconda.

#version=DEVEL
install# 安装
url --url=    # 指明安装时使用的仓库
lang en_US.UTF-8 # 指明使用的语言
keyboard us    # 指明使用的键盘
network --onboot yes --device eth0 --bootproto dhcp --noipv6 # 配置网络接口
rootpw  --iscrypted $6$CGsqab6d$Cd.PnnWtlL5XZAyr9J2zoMqyJH1QodcDp1pQp0uZ1f0Cq4eq9.TMkSQU6IfpvYZEYc32.lmF0lKuQwavnC49a0
# 指明root密码
# Reboot after installation
reboot          # 安装完成之后的行为
firewall --disabled   # 防火墙
authconfig --useshadow  --passalgo=sha512 # 认证方式配置
selinux --disabled      # SElinux
timezone Asia/Shanghai    # 时区
bootloader --location=mbr --driveorder=sda --append=
"crashkernel=auto crashkernel=auto rhgb rhgb quiet quiet"# bootloader的安装位置及相关配置
# Clear the Master Boot Record
#zerombr
# The following is the partition information you requested
# Note that any partitions you deleted are not expressed
# here so unless you clear all partitions first, this is
# not guaranteed to work
#clearpart --all

#part /boot --fstype=ext4 --size=200
#part pv.008002 --size=61440

#volgroup vg0 --pesize=8192 pv.008002
#logvol / --fstype=ext4 --name=root --vgname=vg0 --size=20480
#logvol swap --name=swap --vgname=vg0 --size=2048
#logvol /usr --fstype=ext4 --name=usr --vgname=vg0 --size=10240
#logvol /var --fstype=ext4 --name=var --vgname=vg0 --size=20480

repo --name="CentOS"  --baseurl=[http://10.1.0.1/cobbler/ks_mirror/6/ --cost=100](http://10.1.0.1/cobbler/ks_mirror/6/%C2%A0--cost=100)
定制kickstart文件的方式:
(1)直接手动编辑;
      依据某模板修改
(2)可使用创建工具:
        # yum install system-config-kickstart
# system-config-kickstart
      依据某模板修改并生成新配置;
(3)检查ks文件的语法错误:ksvalidator
        # ksvalidator /PATH/TO/KICKSTART_FILE
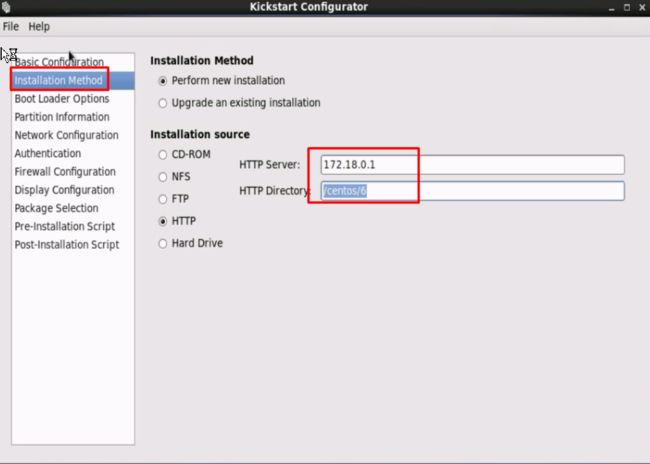
利用创建工具,操作如下:
[root@CentOS6 ~]# system-config-kickstart & # 运行命令,会出现如下编辑界
输入root账号密码,修改时区 设置自动启动,字符界面安装
安装方法 安装仓库路径
网卡设置ip
防火墙关闭
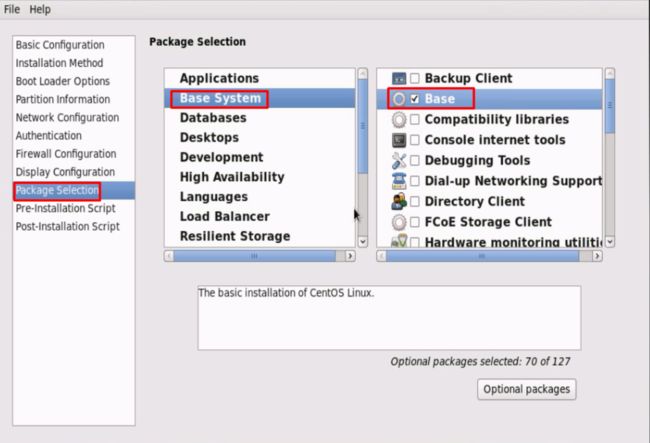
添加软件
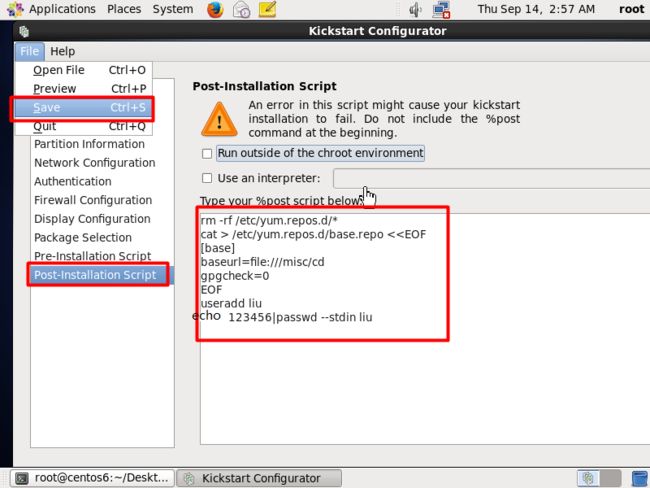
脚本
解释器
yum仓库
删除 ,路径  创建账号
系统光盘中isolinux目录列表
ctrl+s 保存
ctrl+q 退出
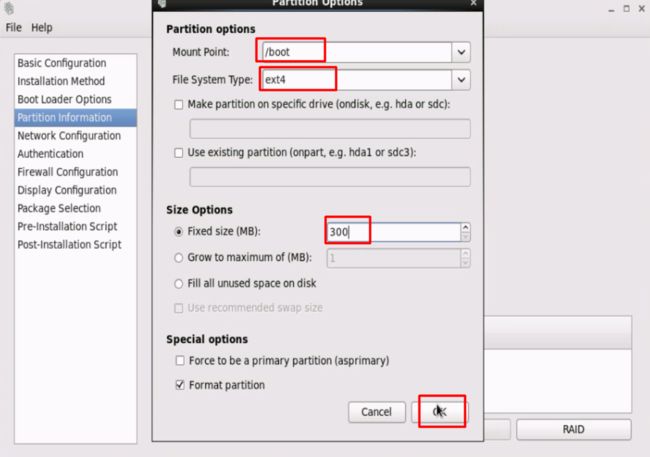
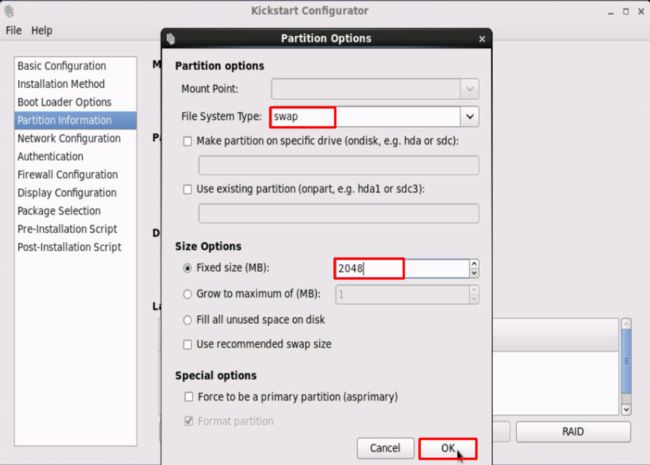
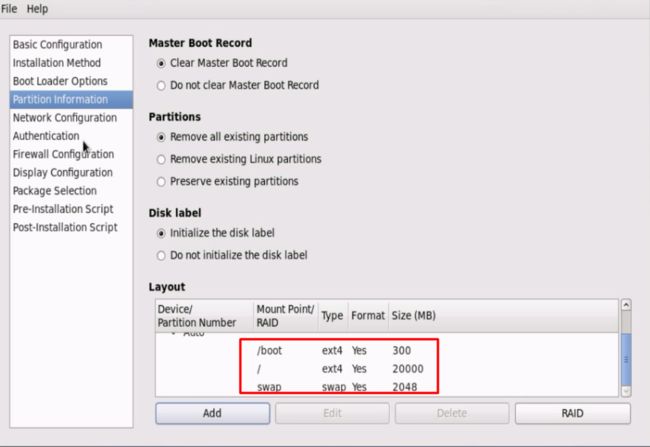
我们可以在编辑器上进行编辑,选择分区,网络,等配置,也可以导入模板文件(anaconda)在此基础上修改配置,并创建文件名,保存至root下退出;
需要注意这里在分区时一定选择清除主引导分区,删除所有分区和初始化磁盘卷标,要不然在自动化安装时会提醒你是否清除数据
3)查看root下生成的文件,并检查语法错误,如下:
[root@CentOS6 ~]#  ls
anaconda-ks.cfg  bin  Desktop  Documents  Downloads
 f1  ks.cfg # 生成的文件  Music  Pictures  Public  Templates  Videos
[root@CentOS6 ~]# ksvalidator ks.cfg  # 检查语法错误,有错误会报错
制作引导光盘
1)创建引导光盘
# cp/media/cdrom/isolinux/ /tmp/myiso/
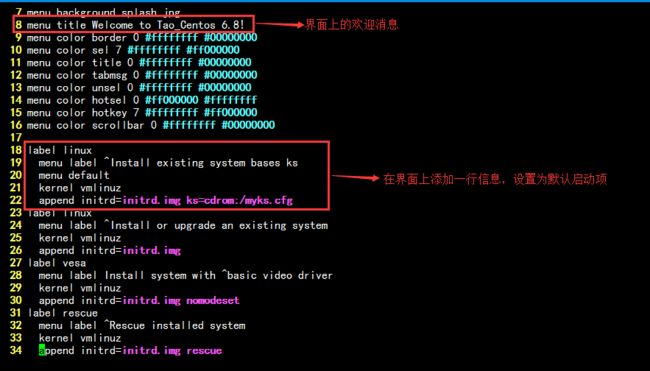
# vi /tmp/myiso/isolinux/isolinux.cfg
initrd=initrd.imgtext ks=cdrom:/myks.cfg
# cp/root/myks.cfg /tmp/myiso/
# cd /tmp
# mkisofs -R -J -T -v –no-emul-boot –boot-load-size 4 –boot-info-table -V "CentOS 6.6 x86_64 boot" -b isolinux/isolinux.bin-c isolinux/boot.cat -o /root/boot.iso myiso/
演示步骤如下:
[root@CentOS6 ~]# mkdir  /tmp/myiso/
[root@CentOS6 ~]# cp -a /misc/cd/isolinux/ /tmp/myiso/ # 复制光盘下的isolinux到/tmp下
[root@CentOS6 ~]# cd /tmp/myiso/isolinux/
[root@CentOS6 isolinux]# ll  # 可以看到,因为是光盘文件所以都是只读的
total 44436
-r--r--r-- 1 root root     2048 Sep 13 12:11 boot.cat
-r--r--r-- 1 root root       84 Sep 13 12:11 boot.msg
-r--r--r-- 1 root root      321 Sep 13 12:11 grub.conf
-r--r--r-- 1 root root 40688737 Sep 13 12:11 initrd.img  # 文件驱动
-r--r--r-- 1 root root    24576 Sep 13 12:11 isolinux.bin
-r--r--r-- 1 root root      923 Sep 13 12:11 isolinux.cfg  # 配置文件
-r--r--r-- 1 root root   183012 Sep 13 12:11 memtest
-r--r--r-- 1 root root   151230 Sep 13 12:11 splash.jpg  # 为背景图
-r--r--r-- 1 root root     2215 Sep 13 12:11 TRANS.TBL
-r--r--r-- 1 root root   163728 Sep 13 12:11 vesamenu.c32
-r-xr-xr-x 1 root root  4264528 Sep 13 12:11 vmlinuz  # 内核文件
[root@CentOS6 isolinux]# chmod u+w isolinux.cfg  # 添加写权限,进行修改
[root@CentOS6 isolinux]# vim isolinux.cfg
[root@CentOS6 tmp]# mkisofs -R -J -T -v --no-emul-boot --boot-load-size 4 --boot-info-table
 -V "CentOS 6.8 x86_64 boot" -b isolinux/isolinux.bin -c isolinux/boot.cat -o /root/boot.iso myiso/
 # 注意一定退出myiso目录,创建光盘镜像,指明路径等信息,并在/root下生成一个boot.iso镜像
[root@CentOS6 ~]# ls
anaconda-ks.cfg  bin  boot.iso # 生成的镜像文件
Desktop  Documents  Downloads  f1  Music  myks.cfg  Pictures  Public  Templates  Videos
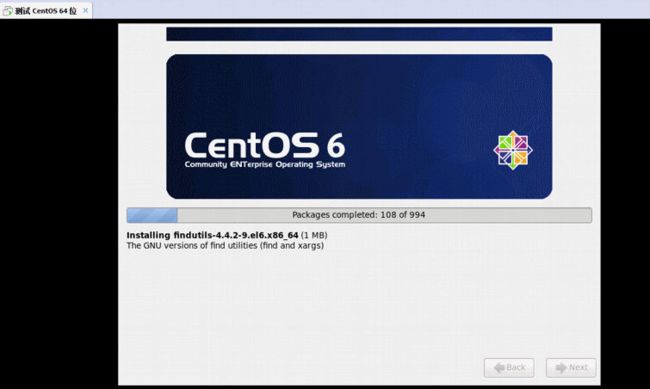
成功安装: