python opencv数字图像处理TASK2灰度变换和二值化
灰度变换和二值化
1、灰度化的常用方法
在数字图像处理中常用的灰度化方法主要包括:分量法、加权平均值和最大值法。一般认为三种方法并无优劣之分,在不同情况下增加一些尝试方法,兴许会有不用效果。
以下主要介绍灰度化和灰度变换:
灰度化
import cv2 as cv

img = cv.imread('peppers.png')
cv.imshow('input',img)
grayimg=cv.cvtColor(img,cv.COLOR_BGR2GRAY)
cv.imshow('gray',grayimg)
cv.waitKey(0)
cv.destroyAllWindows()
效果对比如下:
2、灰度变换:反转、对数变化、幂律变化、分段性变换
反转
import cv2 as cv

img = cv.imread('peppers.png')
#获取宽和高
rows=img.shape[0]
cols=img.shape[1]
cv.imshow('input',img)
grayimg=cv.cvtColor(img,cv.COLOR_BGR2GRAY)
cv.imshow('gray',grayimg)
#进行反转
gray1=grayimg.copy()
for i in range(rows):
    for j in range(cols):
        gray1[i][j]=255-gray1[i][j]
cv.imshow('fanzhuan',gray1)
cv.waitKey(0)
cv.destroyAllWindows()
效果对比如下:
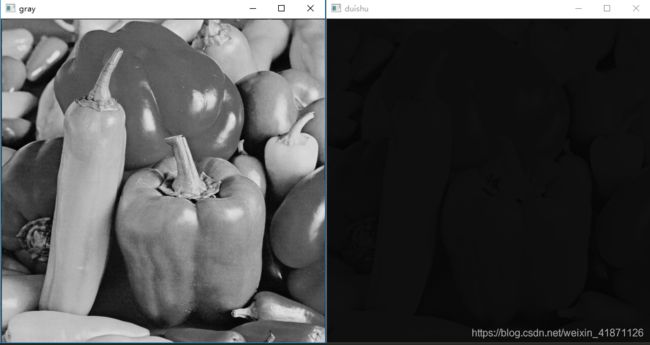
对数:主要用来增强较暗的 细节
#对数变换
gray2=grayimg.copy()
for i in range(rows):
    for j in range(cols):
        gray2[i][j] = 3 * math.log(1 + gray2[i][j])
cv.imshow('duishu',gray2)
效果对比如下

幂律变化又叫伽马变化:
伽马值小于1时,会拉伸图像中灰度级较低的区域,压缩灰度级较高的部分
伽马值大于1时,会拉伸图像中灰度级较高的区域,压缩灰度级较低的部
#幂律变化
gray3=grayimg.copy()
for i in range(rows):
    for j in range(cols):
        gray3[i][j]=0.5*pow(gray3[i][j],0.8)
效果如下

分段性变化:即在不同的区间采用不同变换,下面以125为分水岭,小于进行伽马变换,大于进行反转。
#分段变换
gray4=grayimg.copy()
for i in range(rows):
    for j in range(cols):
        if gray4[i][j]<125:
            gray4[i][j]=0.5*pow(gray4[i][j],0.8)
        else:
            gray4[i][j] = 255 - gray4[i][j]
cv.imshow('fenduan',gray4)
效果如下:图1为gray,图2为分段变换,图3为反转变换,图4为伽马变换。
3、图像直方图,直方图匹配
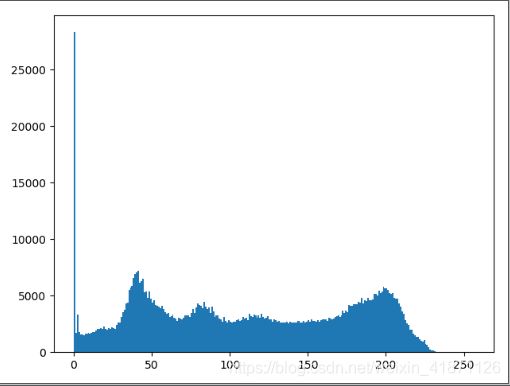
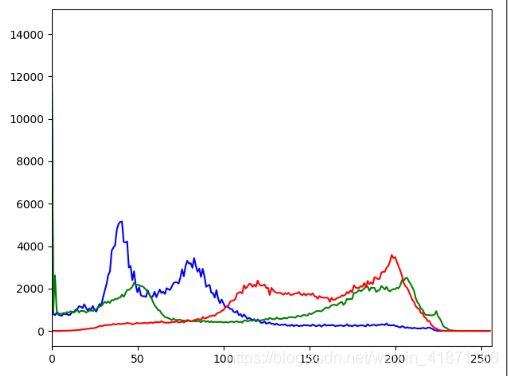
直方图像素值分布的统计信息
# 图像直方图
import cv2 as cv
import numpy as np
from matplotlib import pyplot as plt

#一维
def plot_demo(image):
    plt.hist(image.ravel(), 256, [0, 256])
    plt.show()
#三维
def image_hist(image):
    color = ('blue', 'green', 'red')
    for i, color in enumerate(color):
        hist = cv.calcHist([image], [i], None, [256], [0, 256])
        plt.plot(hist, color=color)
        plt.xlim([0, 256])
    plt.show()

src = cv.imread('peppers.png')
cv.imshow('input', src)
plot_demo(src)
image_hist(src)
cv.waitKey(0)
def template_demo():
    tpl = cv.imread('part.png')
    target = cv.imread('peppers.png')
    cv.imshow('sample', tpl)
    cv.imshow('target', target)
    methods = [cv.TM_SQDIFF_NORMED, cv.TM_CCORR_NORMED, cv.TM_CCOEFF_NORMED]
    th, tw = tpl.shape[:2]
    for md in methods:
        print(md)
        result = cv.matchTemplate(target, tpl, md)
        min_val, max_val, min_loc, max_loc = cv.minMaxLoc(result)
        if md == cv.TM_SQDIFF_NORMED:
            tl = min_loc

        else:
            tl = max_loc  # tl是矩形左上角位置
        br = (tl[0] + tw, tl[1] + th)  # 根据左上顶点,分别加上模板宽高,求出另外一个顶角坐标
        bt = (tl[0] + 0, tl[1] + th)

        print(tl, bt, br)
        cv.rectangle(target, tl, br, (0, 0, 255), 2)  # 两个坐标,颜色,线宽
        cv.imshow('match' + np.str(md), target)
template_demo()
效果如下:cv.TM_SQDIFF_NORMED, cv.TM_CCORR_NORMED, cv.TM_CCOEFF_NORMED对应三种不同的匹配方式。
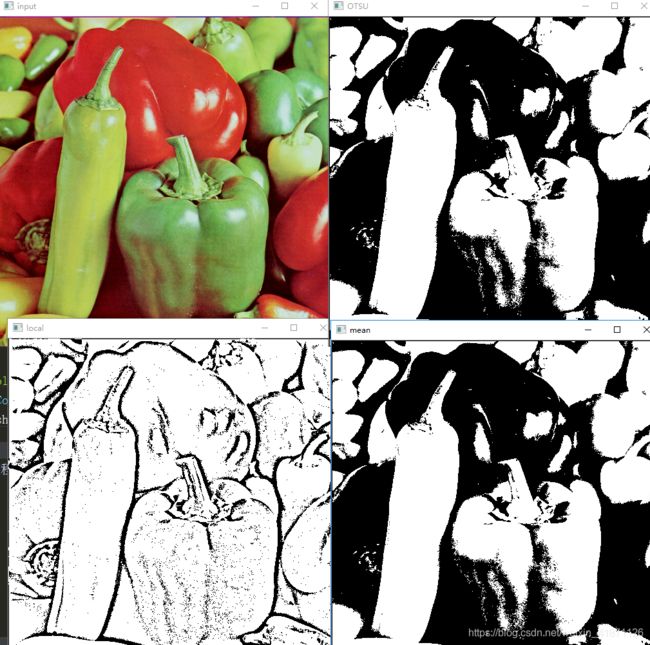
4、二值化
分别以OTSU阈值法,局部阈值和平均阈值进行二值化
import cv2 as cv
import numpy as np

def threshold_demo(image):
    gray = cv.cvtColor(image, cv.COLOR_BGR2GRAY)
    ret, binary = cv.threshold(gray, 0, 255, cv.THRESH_BINARY | cv.THRESH_OTSU)  # (原图,0,255,二值化|阈值计算方法)
    print('threshold value:%s' % ret)
    cv.imshow('binary', binary)
    cv.imwrite('binary2.jpg', binary)
# 局部阈值
def local_threshold(image):
    gray = cv.cvtColor(image, cv.COLOR_BGR2GRAY)
    binary = cv.adaptiveThreshold(gray, 255, cv.ADAPTIVE_THRESH_GAUSSIAN_C, cv.THRESH_BINARY, 25, 10)  # blocksize必须为奇数
    cv.imshow('local', binary)
    cv.imwrite('local.jpg', binary)

def custom_threshold(image):
    gray = cv.cvtColor(image, cv.COLOR_BGR2GRAY)
    h, w = image.shape[:2]
    m = np.reshape(gray, [1, w * h])  # 把gray变成一行n列的
    mean = m.sum() / (w * h)  # 计算像素均值
    ret, binary = cv.threshold(gray, mean, 255, cv.THRESH_BINARY)  # (原图,0,255,二值化|阈值计算方法)
    cv.imshow('mean', binary)
    cv.imwrite('mean.jpg', binary)

src = cv.imread('peppers.png')
cv.imshow('input', src)
threshold_demo(src)
local_threshold(src)
custom_threshold(src)
cv.waitKey(0)
cv.destroyAllWindows()


