pytest+allure环境搭建和使用
环境和执行:
python 3.6.5
allure 2.7.0
pytest 4.0.1 (第一次使用的是最新版本5.0.1,导致最后在生成测试报告的时候,html里没有数据,查了一下是因为高版本在python里不兼容的原因)
pytest安装
使用pip安装后,需要将pytest加到系统变量中,否则无法在cmd中使用pytest命令
pytest --version #显示pytest的import的路径
pytest --fixtures #显示内置的函数参数
pytest -h | --help #帮助信息
1.allure安装
下载allure,解压放到一个目录下,在变量PATH中添加bin目录的路径
下载地址:https://github.com/allure-framework/allure2/releases/tag/2.7.0

allure --version 查看安装版本
2. 安装allure-pytest
pip安装:pip install allure-pytest
pip install pyyaml,在python代码中,import allure会出错,需安装pyyaml
3. 安装pytest-html
pip install pytest-html
4.命令执行测试代码,并生成测试报告方式一:
在测试用例目录下执行命令
pytest 测试用例目录 –alluredir=./保存文件夹路径
如: pytest test_allure.py --alluredir=./allure-result/
pytest:pytest的命令 或者py.test命令
test_allure.py :需要执行的测试文件
–alluredir=./allure-result :alluredir 表示生成测试结果保存路径; ./allure-result 表示当前路径下的allure-result文件下。

allure serve 测试用例目录 #需要启动一个小服务器
如:allure serve ./allure-result

5.命令执行测试代码,并生成测试报告方式二
pytest命令基础上加–alluredir,生成xml报告
pytest -s -q --alluredir [xml_report_path]
//[xml_report_path]根据自己需要定义文件夹,可定义为:/report/xml
//如: pytest -s -q --alluredir=report/xml
用例执行完成之后会在[xml_report_path]目录下生成了一堆xml的report文件
allure generate [xml_report_path] -o [html_report_path]

//[html_report_path]根据自己需要定义文件夹,可定义为:/report/html
//如:allure generate report/xml -o report/html

重复执行的时候因为已经有report/html,需要加--clean参数
如:allure generate report/xml -o report/html --clean
第一次操作的时候生成的html里没有测试数据,查了一下我是用的pytest版本是5.0的,高版本在python3.6.5里不太兼容导致,最后将pytest版本改成4.0.1就可以了
6.allure的定制
Feature: 标注主要功能模块
Story: 标注Features功能模块下的分支功能
Severity: 标注测试用例的重要级别
Step: 标注测试用例的重要步骤
Issue和TestCase: 标注Issue、Case,可加入URL
Severity定制详解
Allure中对严重级别的定义:
1、 Blocker级别:中断缺陷(客户端程序无响应,无法执行下一步操作)
2、 Critical级别:临界缺陷( 功能点缺失)
3、 Normal级别:普通缺陷(数值计算错误)
4、 Minor级别:次要缺陷(界面错误与UI需求不符)
5、 Trivial级别:轻微缺陷(必输项无提示,或者提示不规范)
参考地址:https://testerhome.com/topics/15649?locale=zh-TW
# -*- coding: utf-8 -*-

import allure
import pytest

@allure.step("字符串相加:{0},{1}")  #测试步骤,可通过format机制自动获取函数参数
def add(x,y):
    return x+y

@allure.feature('测试模块1')     #主要功能模块
@allure.story('测试模块1下的场景1,add()的测试')    #模块下的场景
@allure.severity('blocker')
#test_case_01为用例title
def test_case_01():

    """
        用例描述:model1,Test case 01
    """
    assert add(1,5) == 6
@allure.feature('测试模块1')
@allure.story('测试模块1下的场景2')
@allure.severity('critical')
def test_case_02():
    """
        用例描述:model1,Test case 02
    """
    assert 1 == 1


@allure.feature('测试模板2')
@allure.story('测试模块2下的场景1')
@allure.severity('normal')
def test_case_03():
    """
        用例描述:model2,Test case 01
    """
    assert 0 == 1

@allure.feature('测试模板2')
@allure.story('测试模块2下的场景2')
def test_case_04():
    """
        用例描述:model2,Test case 02
    """
    assert 0 == 1

if __name__ == '__main__':
    pytest.main(['-s', '-q', '--alluredir', './report/xml'])
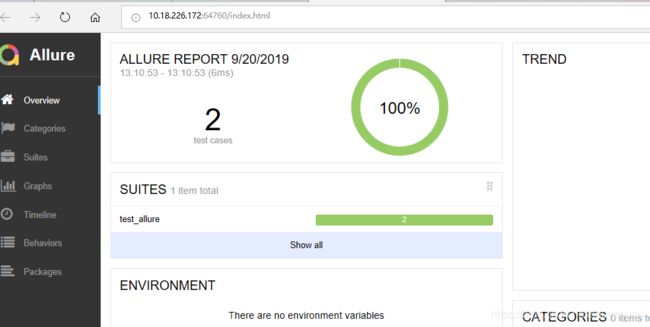
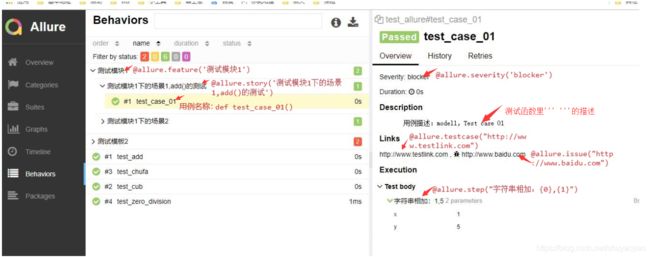
在allure测试报告中的情况如下:
翻译文档:https://blog.csdn.net/crazyskady?t=1