scrollTo与scrollBy用法以及TouchSlop与VelocityTracker解析
下一篇: scroller类的用法完全解析以及带源码分析
最近在工作中使用到了scrollTo与scrollBy,因此在这准备对它们的用法以及TouchSlop与VelocityTracker做一下整理与总结,以便加深理解,以下是本篇的主要内容,至于Scroller类的解析以及用法,我会放在下一篇文件记录。
直接开始吧。
1.view相关位置参数
1.1 Android坐标系
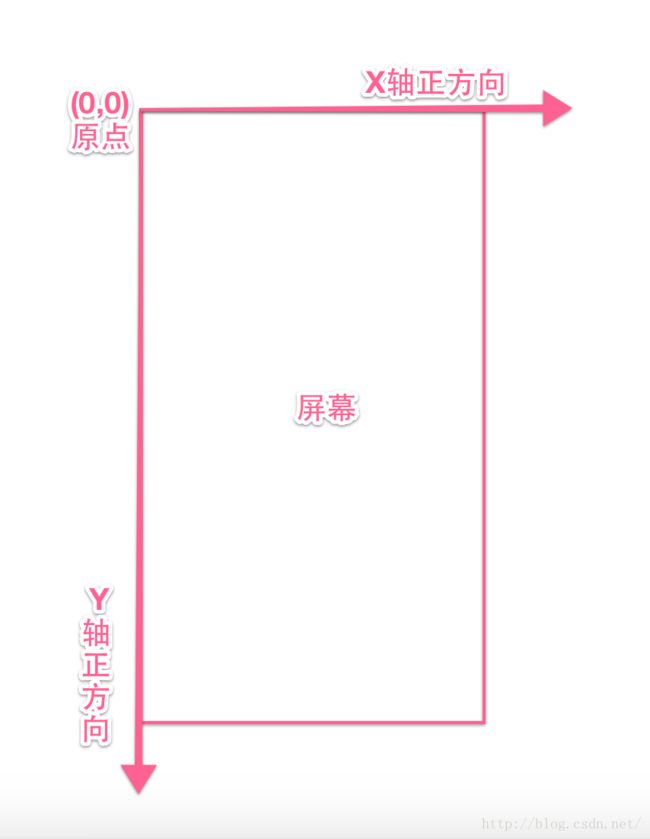
在物理学中,描述一个物体的运动通常都需要选定一个参考系,因此所谓的view的相关位置参数也就是这里要说明的Android设备屏幕的平面直角坐标参考系,在android中,将屏幕最左上角的顶点作为android坐标系的原点,从这个点向右是X轴正方向,从这个点向下是Y轴正方向,如下图所示:

当然android系统也提供getLocationOnScreen(int location[])函数来获取view在坐标系中点位置,这里要注意的是获取到到坐标是当前view的左上角在坐标系中的坐标。代码如下获取view在屏幕中的坐标:
    int[] location = new int[2];
    view.getLocationOnScreen(location);
    int x = location[0];
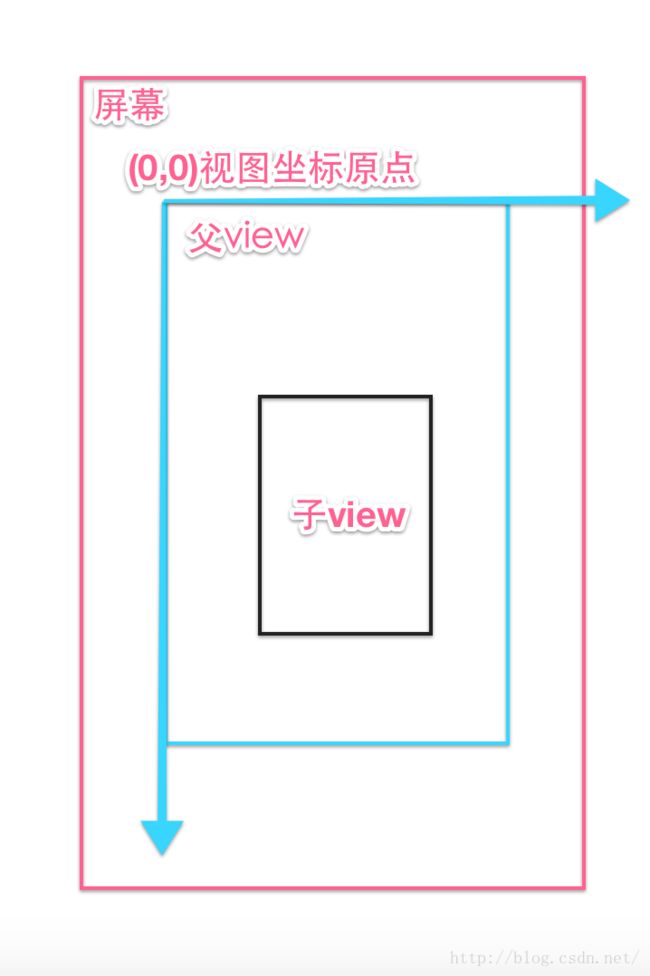
int y = location[1];由图我们可以发现原点不再是android坐标系中的屏幕最左上角,而是以父视图左上角为坐标系原点。其实我们在触控事件中,通过getX()与getY()所获取到到坐标就是视图坐标系中的坐标。
1.2 View中各类获取间距的参数值
View自身提供的获取坐标的方法:
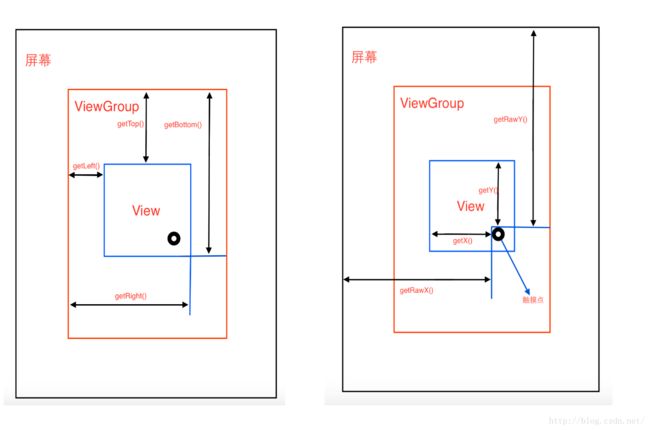
getTop():获取view自身的顶边到其父布局顶边的距离。
getLeft():获取view自身的左边到其父布局左边的距离。
getRight():获取view自身的右边到其父布局左边的距离。
getBottom():获取view自身的底边到其父布局顶边的距离。
MotionEvent提供的方法
getX() :获取点击事件距离控件左边的距离,即视图坐标。
getY() :获取点击事件距离控件顶边的距离,即视图坐标。
getRawX():获取点击事件距离整个屏幕左边的距离,即绝对坐标。
getRawY():获取点击事件距离整个屏幕顶边的距离,即绝对坐标。
不理解?怎么办?请看下图:

现在够清晰了吧
2.touchSlop与VelocityTracker
2.1 touchSlop
当时我在另一个类看到这么一个调用函数
ViewConfiguration.get(context).getScaledTouchSlop();
/**
 * Contains methods to standard constants used in the UI for timeouts, sizes, and distances.
 */
public class ViewConfiguration {
根据文档注释这个类是用来存放UI相关的标准常量,如超时时间,大小,距离.......由此也可知touchSlop只不过是其中的一个常量罢了。我大概扫了几眼这个类,定义的常量还不少,其实我是想说,我不打算分析这个类.....有兴趣的自己再去扫扫.......
2.2 VelocityTracker
/**
 * Helper for tracking the velocity of touch events, for implementing
 * flinging and other such gestures.
 *
 * Use {@link #obtain} to retrieve a new instance of the class when you are going
 * to begin tracking.  Put the motion events you receive into it with
 * {@link #addMovement(MotionEvent)}.  When you want to determine the velocity call
 * {@link #computeCurrentVelocity(int)} and then call {@link #getXVelocity(int)}
 * and {@link #getYVelocity(int)} to retrieve the velocity for each pointer id.
 */
public final class VelocityTracker {
这段话的大概意思是:辅助跟踪触摸事件的速率,如快速滑动或者其他手势操作。当我们准备开始跟踪滑动速率时可以使用obtain()方法来获取一个VelocityTracker的实例,然后在onTouchEvent回调函数中,使用addMovement(MotionEvent)函数将当前的移动事件传递给VelocityTracker对象。当我们决定计算当前触摸点的速率时可以调用computeCurrentVelocity(int units)函数来计算当前的速度,使用getXVelocity() 、getYVelocity()函数来获得当前X轴和Y轴的速度。
简单的说就是VelocityTracker是个速度跟踪类,用于跟踪手指滑动的速度,包括x轴方向和y轴方向的速度。如何使用?
如果我们决定跟踪View中onTouchEvent()方法中的手指滑动速度,可以在手指按下时(ACTION_DOWN)使用以下代码:
 VelocityTracker velocityTracker=VelocityTracker.obtain();
   velocityTracker.addMovement(event);
velocityTracker.addMovement(event)的作用可以理解为收集速率追踪点数据
velocityTracker.computeCurrentVelocity(1000);
 float velocityX = velocityTracker.getXVelocity();
 float velocityY = velocityTracker.getXVelocity();
参数:units 我们想要指定的得到的速度单位,如果值为1,代表1毫秒运动了多少像素。如果值为1000,代表1秒内运动了多少像素。如果值为100,代表100毫秒内运动了多少像素。(这个参数设置真有点.......什么鬼嘛!)这个方法还有一个重载函数 computeCurrentVelocity (int units, float maxVelocity), 跟上面一样也就是多了一个参数。
参数:maxVelocity 该方法所能得到的最大速度,这个速度必须和你指定的units使用同样的单位,而且必须是整数.也就是,你指定一个速度的最大值,如果计算超过这个最大值,就使用这个最大值,否则,使用计算的的结果,
这个最大速度可以通过ViewConfiguration.get(context).getScaledMaximumFlingVelocity()方式获取。
getXVelocity()和getYVelocity() ,这两个很简单,获得横向和竖向的速率。前提是一定要先调用computeCurrentVelocity (int units)函数计算当前速度!
最后,东西我们不要了,当然要回收啦!这时当然要调用clear()来重置并调用recycler()方法来回收内存啦,代码如下,请收下!
  /**
     * 使用完VelocityTracker,必须释放资源
     */
    private void releaseVelocityTracker() {
        if (mVelocityTracker != null) {
            mVelocityTracker.clear();
            mVelocityTracker.recycle();
            mVelocityTracker = null;
        }
    }
package com.zejian.scrollerapp;
import android.app.Activity;
import android.os.Bundle;
import android.util.Log;
import android.view.MotionEvent;
import android.view.VelocityTracker;
import android.view.ViewConfiguration;
import android.widget.TextView;
import com.zejian.scrollerapp.utils.LogUtils;
/**
 * Created by zejian
 * Time  16/1/20 上午11:45
 * Email [email protected]
 * Description: VelocityTracker速度测试类
 */
public class VelocityTrackerActicity extends Activity {
    private static final String TAG = "VelocityTrackerActicity";
    private TextView tv;
    private VelocityTracker mVelocityTracker;
    private int mPointerId;
    private int mMaxVelocity;
    @Override
    protected void onCreate(Bundle savedInstanceState) {
        super.onCreate(savedInstanceState);
        setContentView(R.layout.activity_velocity_tracker);
        tv= (TextView) findViewById(R.id.tv);
        tv.setText("VelocityTrackerActicity");
        mMaxVelocity = ViewConfiguration.get(this).getScaledMaximumFlingVelocity();
    }
    @Override
    public boolean dispatchTouchEvent(MotionEvent ev) {
        return super.dispatchTouchEvent(ev);
    }
    @Override
    public boolean onTouchEvent(MotionEvent event) {
        LogUtils.e("onTouchEvent start!!");
        Log.i(TAG, "ACTION_DOWN");
        if(null == mVelocityTracker) {
            mVelocityTracker = VelocityTracker.obtain();
        }
        mVelocityTracker.addMovement(event);
        final VelocityTracker verTracker = mVelocityTracker;
        switch (event.getAction()) {
            case MotionEvent.ACTION_DOWN:
                //获取第一个触点的id, 此时可能有多个触点,获取其中一个
                mPointerId = event.getPointerId(0);
                break;
            case MotionEvent.ACTION_MOVE:
                //计算瞬时速度
                verTracker.computeCurrentVelocity(1000, mMaxVelocity);
                float velocityX = verTracker.getXVelocity(mPointerId);
                float velocityY = verTracker.getYVelocity(mPointerId);
                LogUtils.e("velocityX-->" + velocityX);
                LogUtils.e("velocityY-->"+velocityY);
                break;
            case MotionEvent.ACTION_UP:
            case MotionEvent.ACTION_CANCEL:
                releaseVelocityTracker();//释放资源
                break;
            default:
                break;
        }
        return super.onTouchEvent(event);
    }
    /**
     * 使用完VelocityTracker,必须释放资源
     */
    private void releaseVelocityTracker() {
        if (mVelocityTracker != null) {
            mVelocityTracker.clear();
            mVelocityTracker.recycle();
            mVelocityTracker = null;
        }
    }
}
3.scrollTo()与scrollBy()
在android中为了实现view的滑动,android系统为此提供了scrollTo()和scrollBy()两个方法。老样子呗,看看源码再说话。
/**
     * Set the scrolled position of your view. This will cause a call to
     * {@link #onScrollChanged(int, int, int, int)} and the view will be
     * invalidated.
     * @param x the x position to scroll to
     * @param y the y position to scroll to
     */
    public void scrollTo(int x, int y) {
        if (mScrollX != x || mScrollY != y) {
            int oldX = mScrollX;
            int oldY = mScrollY;
            mScrollX = x;
            mScrollY = y;
            invalidateParentCaches();
            onScrollChanged(mScrollX, mScrollY, oldX, oldY);
            if (!awakenScrollBars()) {
                postInvalidateOnAnimation();
            }
        }
    }
    /**
     * Move the scrolled position of your view. This will cause a call to
     * {@link #onScrollChanged(int, int, int, int)} and the view will be
     * invalidated.
     * @param x the amount of pixels to scroll by horizontally
     * @param y the amount of pixels to scroll by vertically
     */
    public void scrollBy(int x, int y) {
        scrollTo(mScrollX + x, mScrollY + y);
    }
根据scrollTo(int x, int y)的文档说明,当我们调用scrollTo(int x, int y)方法时,该方法内部将会去调用onScrollChanged(int, int, int, int),这也将直接导致view重绘,也就实现了所谓的view滑动效果。而scrollBy(int x, int y),这哥们可真的够懒了,一点内涵都没有,居然直接跑去调用scrollTo(int x, int y),也罢。不过这么一看两者的区别也很明显,scrollTo(int x, int y)是基于所给参数的绝对滑动,而scrollBy(int x, int y)是基于所给参数的相对滑动,简单一句,scrollTo()是一步到位,而scrollBy()是逐步累加,这点很容易明白,从源码就能看出来了。但是scrollTo或者scrollBy到底是改变了啥啊?(柯南:真相只有一个那就是看源码呗)从scrollTo(int x, int y)源码中我们可以看到mScrollX 和mScrollY 的值将会被改变,这两值又是啥?
/**
     * The offset, in pixels, by which the content of this view is scrolled
     * horizontally.
     * {@hide}
     */
    @ViewDebug.ExportedProperty(category = "scrolling")
    protected int mScrollX;
    /**
     * The offset, in pixels, by which the content of this view is scrolled
     * vertically.
     * {@hide}
     */
    @ViewDebug.ExportedProperty(category = "scrolling")
protected int mScrollY;由此可知我们调用scrollTo(int x, int y)和scrollBy(int x, int y)时传递的参数并非是坐标而是偏移量。比如我们view是TextView,那么我们调用scrollTo或者scrollBy方法时,移动的其实就是TextView的内容,但如果我们的view是LinearLayout(ViewGroup),那么移动其实就是该布局内的子view了。到此也算明朗了。android的view内容也提供了获取这两个偏移量大小的方法,如下:
/**
     * Return the scrolled left position of this view. This is the left edge of
     * the displayed part of your view. You do not need to draw any pixels
     * farther left, since those are outside of the frame of your view on
     * screen.
     *
     * @return The left edge of the displayed part of your view, in pixels.
     */
    public final int getScrollX() {
        return mScrollX;
    }
    /**
     * Return the scrolled top position of this view. This is the top edge of
     * the displayed part of your view. You do not need to draw any pixels above
     * it, since those are outside of the frame of your view on screen.
     *
     * @return The top edge of the displayed part of your view, in pixels.
     */
    public final int getScrollY() {
        return mScrollY;
    }
来个小结:
1.scrollTo()的移动是一步到位,而scrollBy()逐步累加的
2.scrollTo()和scrollBy()传递的参数是偏移量而非坐标
3.scrollTo()和scrollBy()移动的都只是View的内容,View的背景本身是不移动的。
到了这里原本以为差不多了,但在实际操作中发现,传入的参数完全跟想执行的操作相反!!!
比如我们对于一个TextView调用scrollTo(0,20),那么该TextView中的content(比如显示的文字:波多),会怎么移动呢?按我们前面掌握的知识,应该是向下移动20个单位。但结果恰恰相反,向上移动了20个单位。如果我们想向下移动20个单位应该这样调用scrollTo(0,-20),这是为啥呢?
要解决这个问题,那么就得看看mScrollX和mScrollY是在哪里被使用的?
根据前面分析,调用scrollTo()方法将会导致view重绘,也就是会去调用public void invalidate(int l, int t, int r, int b)方法,我们先看看这个方法得源码:
/**
     * Mark the area defined by the rect (l,t,r,b) as needing to be drawn. The
     * coordinates of the dirty rect are relative to the view. If the view is
     * visible, {@link #onDraw(android.graphics.Canvas)} will be called at some
     * point in the future.
     *
     * This must be called from a UI thread. To call from a non-UI thread, call
     * {@link #postInvalidate()}.
     *
     * @param l the left position of the dirty region
     * @param t the top position of the dirty region
     * @param r the right position of the dirty region
     * @param b the bottom position of the dirty region
     */
    public void invalidate(int l, int t, int r, int b) {
        final int scrollX = mScrollX;
        final int scrollY = mScrollY;
        invalidateInternal(l - scrollX, t - scrollY, r - scrollX, b - scrollY, true, false);
    }
invalidateInternal(l - scrollX, t - scrollY, r - scrollX, b - scrollY, true, false)通过这个方法,我们大概也能猜到点猫腻了。如果我们传递的scrollerX值是正数的话,(l - scrollX) 计算后则左边距会变小,所以内容会往左移动(也就是x轴的负方向)。如果我们传递的scrollerX值是负数的话,(l - scrollX) 计算后则左边距会变大,因此内容会往右移动(也就是x轴的正方向),同理,y轴也一样。
所以有如下结论:如果我们想往x轴和y轴正方向移动时,mScrollY和mScrollX必须为负值,相反如果我们想往x轴和y轴负方向移动时,mScrollY和mScrollX就必须为正值啦。
脑海突然冒出lol送塔的画面,然后内心又闪过cf爆敌方头的刺激感,其实我想说来个实战案例吧。
在这里我们自定义一个可以自由滑动的view,通过scrollBy()实现,自定义view代码如下:
package view;
import android.content.Context;
import android.graphics.Color;
import android.util.AttributeSet;
import android.view.MotionEvent;
import android.view.View;
public class ScrollByDragView extends View{
	 private int lastX;
	    private int lastY;
	    public ScrollByDragView(Context context) {
	        super(context);
	        ininView();
	    }
	    public ScrollByDragView(Context context, AttributeSet attrs) {
	        super(context, attrs);
	        ininView();
	    }
	    public ScrollByDragView(Context context, AttributeSet attrs, int defStyleAttr) {
	        super(context, attrs, defStyleAttr);
	        ininView();
	    }
	    private void ininView() {
	        setBackgroundColor(Color.BLUE);
	    }
	    @Override
	    public boolean onTouchEvent(MotionEvent event) {
	        int x = (int) event.getX();
	        int y = (int) event.getY();
	        switch (event.getAction()) {
	            case MotionEvent.ACTION_DOWN:
	                lastX = (int) event.getX();
	                lastY = (int) event.getY();
	                break;
	            case MotionEvent.ACTION_MOVE:
	                int offsetX = x - lastX;
	                int offsetY = y - lastY;
	                ((View) getParent()).scrollBy(-offsetX, -offsetY);
	                break;
	        }
	        return true;
	    }
}
代码相对简单,但这里有点要注意的是,((View) getParent()).scrollBy(-offsetX, -offsetY),这个必须调用父类的scrollBy(),因为我们要滑动的我们自己的自定义view。
布局文件drag_view_scrollby.xml
package com.zejian.androidmotionevent;
import android.app.Activity;
import android.os.Bundle;
public class DragViewScrollBy extends Activity{

	 @Override
	    protected void onCreate(Bundle savedInstanceState) {
	        super.onCreate(savedInstanceState);
	        setContentView(R.layout.drag_view_scrollby);
	    }

}好了,到此本篇结束,下篇将分析一下Scroller类。


