(二)、一步一步教你搭建SpringBoot+Mybatis
SpringBoot+Mybatis
玩了一段时间了,上网转了转,发现网上有许多SpringBoot框架架构的相关教程,不过都比较简短,可能小萌新看懂需要花费很多脑力和时间,所以本人就决定写一篇所有人都能轻松看懂的教程,还望大家多多支持hhh~~~
如果你是以下两种人的其中一种
- 熟练爱好者:那么你如果忘记了有pom.xml和ymal文件、properties文件详细配置,你可以在本篇中直接找干货COPY.(o)/~
- 小萌新:那么建议你能够耐心坚持下去,祝你们学习愉快!
SpringBoot可以说是目前Java开发非常主流的框架了,可以很简单的创造出许多漂亮网站的功能。
总的一句话概括SpringBoot就是:Boot!快速启动!习惯优于配置!大道至简!
怎么理解这句话呢?其实就是说,相比于SSM定义很多复杂的Bean或者Config其他的配置。Springboot中,基本上它可以“读懂”你的意思,帮你把看似机械化的架构和配置工作。全部做完、十分简单、甚至Tomcat都不用。
然后Springboot真的可以很简单~,只要好好学习自己手动架构一个也就理解了,架构完以后就能无限的Copy啦,其中简单的说下Springboot的一些特点。
- 内置Tomcat
我觉得这个基本上颠覆了以前的传统。怎么理解?
你做完一个项目。直接打包成jar、然后找到一台有JDK环境的地方,运行指令就可以直接启动项目了~!
完全不需要去下载Tomcat、然后配置server.xml、然后放到webApp、然后用tomcat运行和启动。同时还不会影响到其他项目的运行~!
前台启动:
	java -jar XXX.jar
后台启动:
	java -jar xxx.jar &

假设你打开Linux终端、如果用前台运行的话、当你关闭终端时、也就停止了项目的运行。
所以、当你真正需要部署的时候,使用后台部署模式。部署后你可以直接关闭终端。
-
默认配置
大道至简。各种web支持。Mysql支持。Redis支持。都可以做到按照常用习惯自动配置 -
友好自定义配置
在resource目录下创建名为application.yaml的文件。可以在里面对项目进行任何配置。
server:
  port: 8080
  servlet-path: /
spring:
    http:
      encoding:
        charset: utf-8
        enabled: true
        force: true
    resources:
          static-locations: classpath:/static/,classpath:/public/
    mvc:
      view:
        prefix: /WEB-INF/jsp/
        suffix: .jsp
    mail:
      host: smtp.163.com
      username: [email protected]
      password: xxxxx
      properties:
              mail:
                  smtp:
                      auth: true
                      timeout: 25000
mybatis:
  mapper-locations: cn.lantian.springboot.mapper.*.xml
  type-aliases-package: cn.lantian.springboot.model

#pagehelper分页插件
pagehelper:
    helperDialect: mysql
    reasonable: true
    supportMethodsArguments: true
    params: count=countSql
logging:
  level: info
-
几乎全注解模式
controller、service、配置、应有尽有 -
对其他开源系列都基本很友好
比如分页插件、轻松一配、完成工作!
好、有一个小概念之后,我们正式来构建Springboot项目。因为笔者使用的是IDEA作为Java的IDE,那就以此为例(编译器大同小异,掌握了内部的来龙去脉用什么都一样)
- 创建一个maven项目
![]()
![]()
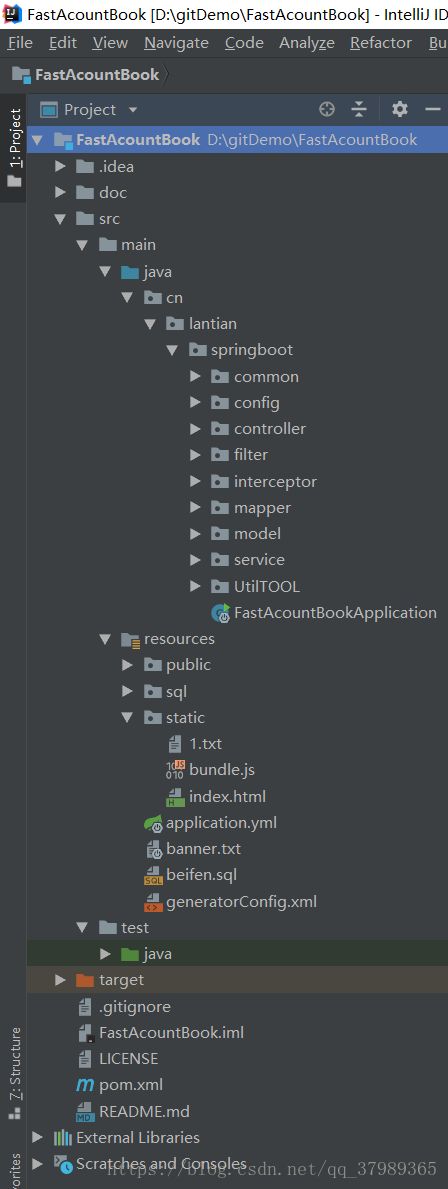
3.如果不出意外的话、你们的骨架就架构成功了。是不是层次看着特别舒服。
4.接下来我们导入Springboot框架中常用到的相关jar包。找到POM.XML文件
(o)/~是这样的。
O(∩_∩)O哈哈~然后看好了哦、放点东西进去
    4.0.0


        org.springframework.boot
        spring-boot-starter-parent
        1.5.6.RELEASE


    groupId
    FastAcountBook
    1.0-SNAPSHOT
    jar


            commons-net
            commons-net
            3.1


            com.google.guava
            guava
            20.0


            org.apache.commons
            commons-lang3
            3.5


            commons-collections
            commons-collections
            3.2.1


            joda-time
            joda-time
            2.3


            org.springframework.boot
            spring-boot-starter-jdbc


            org.mybatis.spring.boot
            mybatis-spring-boot-starter
            1.3.0


            org.springframework.boot
            spring-boot-starter-web


            org.springframework.boot
            spring-boot-starter-test
            test


            org.springframework.boot
            spring-boot-starter-data-redis


            mysql
            mysql-connector-java
            5.1.40


            com.alibaba
            druid
            1.0.11


            com.fasterxml.jackson.core
            jackson-core


            com.fasterxml.jackson.core
            jackson-databind


            com.fasterxml.jackson.datatype
            jackson-datatype-joda


            com.fasterxml.jackson.module
            jackson-module-parameter-names


            com.alibaba
            fastjson
            1.2.47


            com.github.pagehelper
            pagehelper-spring-boot-starter
            1.1.2


            com.alibaba
            druid-spring-boot-starter
            1.1.0


            junit
            junit
            test


            org.springframework.boot
            spring-boot-test


            org.springframework
            spring-test


            junit
            junit


            org.springframework.boot
            spring-boot-starter-mail


            org.springframework.boot
            spring-boot-starter-freemarker


            cn.afterturn
            easypoi-base
            3.1.0


            cn.afterturn
            easypoi-web
            3.1.0


            cn.afterturn
            easypoi-annotation
            3.1.0


            commons-io
            commons-io
            2.4


            com.google.code.gson
            gson
            2.8.5


            org.apache.httpcomponents
            httpclient
            4.5.5


            org.mybatis.generator
            mybatis-generator-core
            1.3.2


            org.springframework.boot
            spring-boot-devtools
            true


        ${project.artifactId}


                src/main/java

                    **/*.properties
                    **/*.xml
                    **/*.tld
                    **/*.jsp


                src/main/resources
                true

                    **/*


                org.springframework.boot
                spring-boot-maven-plugin


                org.mybatis.generator
                mybatis-generator-maven-plugin
                1.3.2

                    ${basedir}/src/main/resources/generatorConfig.xml
                    true
                    true


                org.apache.maven.plugins
                maven-resources-plugin

                    UTF-8


                org.apache.maven.plugins
                maven-compiler-plugin

                    1.8
                    1.8
                    UTF-8


                org.springframework.boot
                spring-boot-maven-plugin
好的哟!这样所需要的jar包就已经丢进去了。
接下来、很舒服、我们就开始做最后配置
在cn.lantian.springboot下新建一个Application的启动类、并标注上相关注解
package cn.lantian.springboot;

import cn.lantian.springboot.interceptor.FirstInterceptor;
import com.alibaba.druid.pool.DruidDataSource;
import com.alibaba.druid.support.http.StatViewServlet;
import com.alibaba.druid.support.http.WebStatFilter;
import org.mybatis.spring.annotation.MapperScan;
import org.springframework.boot.SpringApplication;
import org.springframework.boot.SpringBootConfiguration;
import org.springframework.boot.autoconfigure.SpringBootApplication;
import org.springframework.boot.builder.SpringApplicationBuilder;
import org.springframework.boot.web.servlet.FilterRegistrationBean;
import org.springframework.boot.web.servlet.ServletRegistrationBean;
import org.springframework.boot.web.support.SpringBootServletInitializer;
import org.springframework.cache.annotation.EnableCaching;
import org.springframework.context.annotation.Bean;
import org.springframework.context.annotation.Configuration;
import org.springframework.scheduling.annotation.EnableScheduling;
import org.springframework.stereotype.Controller;
import org.springframework.web.bind.annotation.RequestMapping;
import org.springframework.web.bind.annotation.ResponseBody;
import org.springframework.web.servlet.config.annotation.InterceptorRegistry;
import org.springframework.web.servlet.config.annotation.WebMvcConfigurerAdapter;

import javax.sql.DataSource;
import java.sql.SQLException;
import java.util.HashMap;
import java.util.Map;

/**
 * Created by Lzbin、lantian on 2018/3/10.
 *
 * @version 1.0
 * @PACKAGE_NAME cn.lantian.springboot.application
 * @Dercripton
 * @Time 下午11:03
 */
@Controller
@MapperScan("cn.lantian.springboot.mapper")
@SpringBootApplication
@SpringBootConfiguration
@EnableScheduling
@EnableCaching
public class FastAcountBookApplication extends SpringBootServletInitializer {

    @Override
    protected SpringApplicationBuilder configure(SpringApplicationBuilder builder) {
        return builder.sources(FastAcountBookApplication.class);
    }

    @RequestMapping("/hello")
    @ResponseBody
    public String hello() {
        return "hello";
    }


    //执行顺序:过滤前 – 拦截前 – Action处理 – 拦截后 – 过滤后
    //MVC控制-拦截器配置
    @Configuration
    static class WebMvcConfigurer extends WebMvcConfigurerAdapter {
        //增加拦截器
        @Override
        public void addInterceptors(InterceptorRegistry registry) {
            registry.addInterceptor(new FirstInterceptor()).//指定拦截器
                    addPathPatterns("/**").excludePathPatterns("/resources","/hello");//指定拦截路径
        }
    }


    /**
     * 注册DruidServlet
     *
     * @return
     */
    @Bean
    public ServletRegistrationBean druidServletRegistrationBean() {
        ServletRegistrationBean servletRegistrationBean = new ServletRegistrationBean();
        servletRegistrationBean.setServlet(new StatViewServlet());
        servletRegistrationBean.addUrlMappings("/druid/*");
        return servletRegistrationBean;
    }

    /**
     * 注册DruidFilter拦截
     *
     * @return
     */
    @Bean
    public FilterRegistrationBean duridFilterRegistrationBean() {
        FilterRegistrationBean filterRegistrationBean = new FilterRegistrationBean();
        filterRegistrationBean.setFilter(new WebStatFilter());
        Map initParams = new HashMap();
        //设置忽略请求
        initParams.put("exclusions", "*.js,*.gif,*.jpg,*.bmp,*.png,*.css,*.ico,/druid/*");
        filterRegistrationBean.setInitParameters(initParams);
        filterRegistrationBean.addUrlPatterns("/*");
        return filterRegistrationBean;
    }
    /* datasource:
    name: test
    url: jdbc:mysql://47.98.194.241:3306/officeauto1?useUnicode=true&characterEncoding=UTF-8&allowMultiQueries=true
    username: root
    password: sziit
        # 使用druid数据源
    type: com.alibaba.druid.pool.DruidDataSource
    driver-class-name: com.mysql.jdbc.Driver*/

    /**
     * 配置DataSource
     *
     * @return
     * @throws SQLException
     */
    @Bean
    public DataSource druidDataSource() throws SQLException {
        DruidDataSource druidDataSource = new DruidDataSource();
        druidDataSource.setUsername("xxx");
        druidDataSource.setPassword("xxx");

        druidDataSource.setUrl("jdbc:mysql://xxx:3306/fastacountbook?useUnicode=true&characterEncoding=UTF-8&allowMultiQueries=true");
        //   druidDataSource.setUrl("jdbc:mysql://xxx:3306/officeauto1?useUnicode=true&characterEncoding=UTF-8&allowMultiQueries=true");
        druidDataSource.setMaxActive(100);
        druidDataSource.setFilters("stat,wall");
        druidDataSource.setInitialSize(10);
        return druidDataSource;
    }


    public static void main(String[] args) {
        SpringApplication.run(FastAcountBookApplication.class, args);
    }

}
- 恭喜你、全部配置完成~!!!
最后、舒服一下吧。点击main方法、直接启动~
是不是突然觉得比SSM轻多了、快速启动就是这个意思。
以上就是Springboot搭建的全过程啦~
还有什么不明白疑问的地方、可以通过评论进行交流~
如果觉得不错的小伙伴可以转发哦让更多同学看到、一起学习一起进步!!!

